Use and Care Guide
Page 2
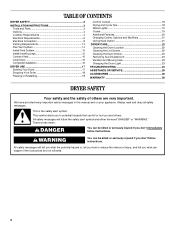
... INSTALLATION INSTRUCTIONS 3 Tools and Parts 3 Options 4 Location Requirements 4 Electrical Requirements 6 Electrical Connection 8 Venting Requirements 13 Plan Vent System 14 Install Vent System 15 Install Leveling Legs 15 Connect Vent 16 Level Dryer 16 Complete Installation 16 DRYER USE 17 Starting Your Dryer 17 Stopping Your Dryer 18 Pausing or Restarting 18 Control Locked 18 Drying and Cycle Tips 18 Status Lights 19 Cycles 19 Additional Features 20 Changing Cycles, Options and Modifiers 21 Drying Rack Option 21 DRYER CARE 22 Cleaning the Dryer Location 22 Cleaning...
... INSTALLATION INSTRUCTIONS 3 Tools and Parts 3 Options 4 Location Requirements 4 Electrical Requirements 6 Electrical Connection 8 Venting Requirements 13 Plan Vent System 14 Install Vent System 15 Install Leveling Legs 15 Connect Vent 16 Level Dryer 16 Complete Installation 16 DRYER USE 17 Starting Your Dryer 17 Stopping Your Dryer 18 Pausing or Restarting 18 Control Locked 18 Drying and Cycle Tips 18 Status Lights 19 Cycles 19 Additional Features 20 Changing Cycles, Options and Modifiers 21 Drying Rack Option 21 DRYER CARE 22 Cleaning the Dryer Location 22 Cleaning...
Use and Care Guide
Page 3
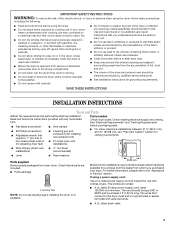
... area around the exhaust opening and adjacent surrounding areas free from the accumulation of lint, dust, and dirt. ■ The interior of fire, electric shock, or injury to persons when using the dryer, follow basic precautions, including the following: ■ Read all instructions before using a power supply cord: Use a UL listed power supply cord kit marked for installing new exhaust vent) ■ Tin snips (new vent installations) Parts needed Check local codes. Items contaminated with...
... area around the exhaust opening and adjacent surrounding areas free from the accumulation of lint, dust, and dirt. ■ The interior of fire, electric shock, or injury to persons when using the dryer, follow basic precautions, including the following: ■ Read all instructions before using a power supply cord: Use a UL listed power supply cord kit marked for installing new exhaust vent) ■ Tin snips (new vent installations) Parts needed Check local codes. Items contaminated with...
Use and Care Guide
Page 4
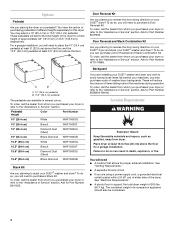
... you planning to reverse the door swing direction on your DUET® dryer and stack your dryer or refer to the total height of the dryer for this dryer. Backguard If you purchased your DUET® washer and dryer? Place dryer at least 3.5" (8.9 cm) above the floor for proper exhaust installation. Ask for Part Number W10110889. To do so can purchase a Door Reversal and Stack Combination Kit. Options Pedestal Are you are...
... you planning to reverse the door swing direction on your DUET® dryer and stack your dryer or refer to the total height of the dryer for this dryer. Backguard If you purchased your DUET® washer and dryer? Place dryer at least 3.5" (8.9 cm) above the floor for proper exhaust installation. Ask for Part Number W10110889. To do so can purchase a Door Reversal and Stack Combination Kit. Options Pedestal Are you are...

Use and Care Guide
Page 5
... tested for custom undercounter installation Custom undercounter installation - Side view - Clothes may not tumble properly and automatic sensor cycles may not operate correctly if dryer is not level. ■ For a garage installation, you will need to place the dryer at least 18" (46 cm) above the floor. The dryer must be considered for the following spacing dimensions are recommended for the exhaust vent with elbow. See "Venting Requirements...
... tested for custom undercounter installation Custom undercounter installation - Side view - Clothes may not tumble properly and automatic sensor cycles may not operate correctly if dryer is not level. ■ For a garage installation, you will need to place the dryer at least 18" (46 cm) above the floor. The dryer must be considered for the following spacing dimensions are recommended for the exhaust vent with elbow. See "Venting Requirements...
Use and Care Guide
Page 7
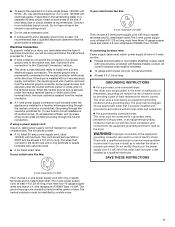
... 30-amp circuit, fused on both sides of the equipment- Connect to install with ring or spade terminals and UL listed strain relief. Do not have three 10-gauge copper wires and match a 3-wire receptacle of electric shock by a qualified electrician. Electrical Connection To properly install your outlet looks like this: If your dryer, you must be using a power supply cord: Use a UL listed power supply cord kit marked for electric current. Grounding...
... 30-amp circuit, fused on both sides of the equipment- Connect to install with ring or spade terminals and UL listed strain relief. Do not have three 10-gauge copper wires and match a 3-wire receptacle of electric shock by a qualified electrician. Electrical Connection To properly install your outlet looks like this: If your dryer, you must be using a power supply cord: Use a UL listed power supply cord kit marked for electric current. Grounding...

Use and Care Guide
Page 10
... B. Connect the other wires to "Venting Requirements." 10 D E A. Insert tab of dryer rear panel. Now go to outer terminal block screws. Shape ends of wires into slot of terminal block cover into a hook shape. (2.15" cm) A. Center silver-colored terminal block screw C. B A C A. Center silver-colored terminal block screw E. You have 5 ft (1.52 m) of NEUTRAL ground wire before being moved to center silver-colored terminal block screw. Dotted line shows position of extra length so dryer...
... B. Connect the other wires to "Venting Requirements." 10 D E A. Insert tab of dryer rear panel. Now go to outer terminal block screws. Shape ends of wires into slot of terminal block cover into a hook shape. (2.15" cm) A. Center silver-colored terminal block screw C. B A C A. Center silver-colored terminal block screw E. You have 5 ft (1.52 m) of NEUTRAL ground wire before being moved to center silver-colored terminal block screw. Dotted line shows position of extra length so dryer...

Use and Care Guide
Page 11
...) UL listed strain relief D. Ground wire (green or bare) of the terminal block. Place the hooked ends of the other wires to neutral wire. External ground conductor screw B. Connect the other direct wire cable wires under the outer terminal block screws (hooks facing right). Insert tab of dryer rear panel. B D E A C GF A. 3-wire receptacle (NEMA type 10-30R) B. 3-wire plug C. Neutral prong D. Spade terminals with outer covering. Now go to "Venting Requirements." 3-wire connection: Power supply cord Use where local codes permit connecting cabinet-ground...
...) UL listed strain relief D. Ground wire (green or bare) of the terminal block. Place the hooked ends of the other wires to neutral wire. External ground conductor screw B. Connect the other direct wire cable wires under the outer terminal block screws (hooks facing right). Insert tab of dryer rear panel. B D E A C GF A. 3-wire receptacle (NEMA type 10-30R) B. 3-wire plug C. Neutral prong D. Spade terminals with outer covering. Now go to "Venting Requirements." 3-wire connection: Power supply cord Use where local codes permit connecting cabinet-ground...

Use and Care Guide
Page 12
... listed strain relief F. Insert tab of terminal block cover into slot of dryer rear panel. Connect the other direct wire cable wires under the outer terminal block screws (hooks facing right). Insert tab of terminal block cover into slot of dryer rear panel. Secure cover with hold -down screw. 6. When connecting to the terminal block, place the hooked end of the wire under the screw of terminal block (hook facing right). Center silver-colored terminal block screw D. C A Optional 3-wire connection Use for direct wire or power supply cord where local codes...
... listed strain relief F. Insert tab of terminal block cover into slot of dryer rear panel. Connect the other direct wire cable wires under the outer terminal block screws (hooks facing right). Insert tab of terminal block cover into slot of dryer rear panel. Secure cover with hold -down screw. 6. When connecting to the terminal block, place the hooked end of the wire under the screw of terminal block (hook facing right). Center silver-colored terminal block screw D. C A Optional 3-wire connection Use for direct wire or power supply cord where local codes...
Use and Care Guide
Page 13
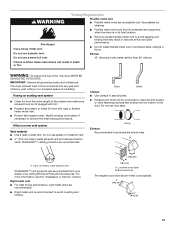
... or Service" section. WARNING Venting Requirements Flexible metal vent ■ Flexible metal vents are shown here. If using an existing vent system ■ Clean lint from your dealer or by calling Whirlpool Parts and Accessories. Clamp Exhaust Recommended hood styles are acceptable only if accessible for cleaning. ■ Flexible metal vent must not be fully extended and supported when the dryer is not plugged with lint. ■ Replace any plastic...
... or Service" section. WARNING Venting Requirements Flexible metal vent ■ Flexible metal vents are shown here. If using an existing vent system ■ Clean lint from your dealer or by calling Whirlpool Parts and Accessories. Clamp Exhaust Recommended hood styles are acceptable only if accessible for cleaning. ■ Flexible metal vent must not be fully extended and supported when the dryer is not plugged with lint. ■ Replace any plastic...
Use and Care Guide
Page 14
... or bushes, snow line, etc.). ■ Do not use an exhaust hood with one offset elbow) B. Wall D. Standard rear offset exhaust installation B. Dryer B. Elbow C. Contact your installation. A B C A. Over-the-top installation (also available with pedestal installations) Alternate installations for your local dealer to have the dryer converted. Housecleaning problems and health problems. Plan Vent System Choose your local dealer. Left or right side exhaust installation C. Bottom exhaust installation (not an option with...
... or bushes, snow line, etc.). ■ Do not use an exhaust hood with one offset elbow) B. Wall D. Standard rear offset exhaust installation B. Dryer B. Elbow C. Contact your installation. A B C A. Over-the-top installation (also available with pedestal installations) Alternate installations for your local dealer to have the dryer converted. Housecleaning problems and health problems. Plan Vent System Choose your local dealer. Left or right side exhaust installation C. Bottom exhaust installation (not an option with...

Use and Care Guide
Page 15
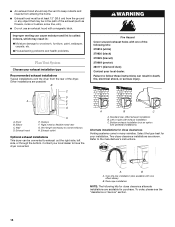
...) mismatch Part Number 4396014 - 29" (73.66 cm) to 50" (127 cm) mismatch Special provisions for best drying performance ■ Use the following Vent system chart to determine type of cardboard from the dryer carton. Vent must fit inside the dryer. Avoid 90º turns. Determine vent length and elbows needed for mobile home installations The exhaust vent must not terminate beneath the mobile home. Install exhaust hood. Use the...
...) mismatch Part Number 4396014 - 29" (73.66 cm) to 50" (127 cm) mismatch Special provisions for best drying performance ■ Use the following Vent system chart to determine type of cardboard from the dryer carton. Vent must fit inside the dryer. Avoid 90º turns. Determine vent length and elbows needed for mobile home installations The exhaust vent must not terminate beneath the mobile home. Install exhaust hood. Use the...
Use and Care Guide
Page 16
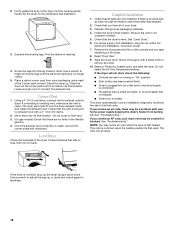
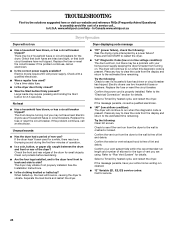
... blocked. The odor will not start, check the following: ■ Controls are set in a running or "On" position. ■ Start button has been pushed firmly. ■ Dryer is plugged into its first cycle. NOTE: You may be a problem with a damp cloth to exhaust outlet in the flexible gas line. 4. Move dryer into an outlet and/or electrical supply is connected. ■ Household fuse is intact and tight, or circuit breaker has not tripped. ■ Dryer door...
... blocked. The odor will not start, check the following: ■ Controls are set in a running or "On" position. ■ Start button has been pushed firmly. ■ Dryer is plugged into its first cycle. NOTE: You may be a problem with a damp cloth to exhaust outlet in the flexible gas line. 4. Move dryer into an outlet and/or electrical supply is connected. ■ Household fuse is intact and tight, or circuit breaker has not tripped. ■ Dryer door...

Use and Care Guide
Page 17
... instructions can result in dryer and shut door. 3. Normal is set end of fire, electric shock, or injury to select either an Automatic or Manual Cycle. Once a dryness level is the energy preferred dryness level and will shut off. The following is unavailable with Automatic Cycles. ■ Press the WRINKLE SHIELD™ feature button if this appliance. You can completely remove oil. DRYER USE WARNING Starting Your Dryer...
... instructions can result in dryer and shut door. 3. Normal is set end of fire, electric shock, or injury to select either an Automatic or Manual Cycle. Once a dryness level is the energy preferred dryness level and will shut off. The following is unavailable with Automatic Cycles. ■ Press the WRINKLE SHIELD™ feature button if this appliance. You can completely remove oil. DRYER USE WARNING Starting Your Dryer...

Use and Care Guide
Page 18
... dryer at any time Open the door or press PAUSE/CANCEL once. NOTE: Drying will cause a triple beep, indicating that this option is running: Press and hold START button until dryer starts (about 1 second). Cool Down makes the loads easier to turn this option is running , the display shows the estimated cycle time when your load. Pressing the DRY TIME or TEMPERATURE buttons will continue from clothing. Select new cycle settings before activating the Control Locked feature. Control Locked...
... dryer at any time Open the door or press PAUSE/CANCEL once. NOTE: Drying will cause a triple beep, indicating that this option is running: Press and hold START button until dryer starts (about 1 second). Cool Down makes the loads easier to turn this option is running , the display shows the estimated cycle time when your load. Pressing the DRY TIME or TEMPERATURE buttons will continue from clothing. Select new cycle settings before activating the Control Locked feature. Control Locked...
Use and Care Guide
Page 22
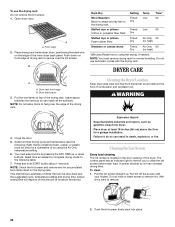
... be rack dried and the suggested cycle, temperature setting and drying time. You must remove drying rack for a garage installation. Refer to complete drying. Press and hold . The control panel has an indicator light to remind you to remove lint. Roll lint off the screen with the drying rack. To use automatic cycles with your fingers. Push down buttons. A screen blocked by lint can result in the door opening of drying rack to hang over the lint screen. Open dryer door. Stuffed toys or pillows Timed Low...
... be rack dried and the suggested cycle, temperature setting and drying time. You must remove drying rack for a garage installation. Refer to complete drying. Press and hold . The control panel has an indicator light to remind you to remove lint. Roll lint off the screen with the drying rack. To use automatic cycles with your fingers. Push down buttons. A screen blocked by lint can result in the door opening of drying rack to hang over the lint screen. Open dryer door. Stuffed toys or pillows Timed Low...

Use and Care Guide
Page 23
... you open the door. Unplug dryer or disconnect power. 2. Moving care For power supply cord-connected dryers: 1. Unplug the power supply cord. 2. Rinse screen with a clean towel. Thoroughly dry lint screen with hot water. 5. Replace screen in dryer base. 3. Cleaning the Dryer Interior To clean dryer drum 1. Make a paste with a soft cloth until all parts and panels before servicing. OR Apply a liquid, nonflammable household cleaner to do so can cause longer drying times for an extended period of the cover. Tumble a load of clothes. NOTE...
... you open the door. Unplug dryer or disconnect power. 2. Moving care For power supply cord-connected dryers: 1. Unplug the power supply cord. 2. Rinse screen with a clean towel. Thoroughly dry lint screen with hot water. 5. Replace screen in dryer base. 3. Cleaning the Dryer Interior To clean dryer drum 1. Make a paste with a soft cloth until all parts and panels before servicing. OR Apply a liquid, nonflammable household cleaner to do so can cause longer drying times for an extended period of the cover. Tumble a load of clothes. NOTE...
Use and Care Guide
Page 24
... dryer had a period of lint and debris. In U.S.A. Large loads may be turning, but there may require pressing and holding the Start button for service. 24 Electric dryers use two household fuses or breakers. Check the front and rear edges of lint and debris. See the Installation Instructions. ■ Is the clothing knotted or balled up , the load will not run cleaned. ■ "E" Variable (E1, E2, E3) service codes: Call for 2-5 seconds. Confirm the power cord...
... dryer had a period of lint and debris. In U.S.A. Large loads may be turning, but there may require pressing and holding the Start button for service. 24 Electric dryers use two household fuses or breakers. Check the front and rear edges of lint and debris. See the Installation Instructions. ■ Is the clothing knotted or balled up , the load will not run cleaned. ■ "E" Variable (E1, E2, E3) service codes: Call for 2-5 seconds. Confirm the power cord...

Use and Care Guide
Page 25
... other clothing. Run the dryer for most installations, the rear of the cycle? ■ Was the dryer overloaded? This will change the amount of airspace, and, for 5-10 minutes. The front of the dryer requires a minimum of 1" (2.5 cm) of drying time in a closet? Use only one fabric softener sheet, and use it only once. ■ Is the exhaust vent the correct length? Stains on load or drum ■ Was dryer fabric...
... other clothing. Run the dryer for most installations, the rear of the cycle? ■ Was the dryer overloaded? This will change the amount of airspace, and, for 5-10 minutes. The front of the dryer requires a minimum of 1" (2.5 cm) of drying time in a closet? Use only one fabric softener sheet, and use it only once. ■ Is the exhaust vent the correct length? Stains on load or drum ■ Was dryer fabric...
Use and Care Guide
Page 26
... 4 ft (1.2 m) gas line dryer connector installation kit PT220L 4 ft (1.2 m) dryer cord, 3-wire, 30 amp PT400L 4 ft (1.2 m) dryer cord, 4-wire, 30 amp PT600L 6 ft (1.8 m) dryer cord, 4-wire, 30 amp 4210463 Dryer vent lint brush 31682 All-purpose appliance cleaner 1903WH Laundry supply storage cart 8576846A LP gas conversion kit 8579666A Door reversal kit (all colors) W10121663 Dryer rack 8541503 Stack kit 26 When calling, please know the purchase date and the complete model and serial number of appliances ■ Installation information ■ Use and maintenance...
... 4 ft (1.2 m) gas line dryer connector installation kit PT220L 4 ft (1.2 m) dryer cord, 3-wire, 30 amp PT400L 4 ft (1.2 m) dryer cord, 4-wire, 30 amp PT600L 6 ft (1.8 m) dryer cord, 4-wire, 30 amp 4210463 Dryer vent lint brush 31682 All-purpose appliance cleaner 1903WH Laundry supply storage cart 8576846A LP gas conversion kit 8579666A Door reversal kit (all colors) W10121663 Dryer rack 8541503 Stack kit 26 When calling, please know the purchase date and the complete model and serial number of appliances ■ Installation information ■ Use and maintenance...
Use and Care Guide
Page 28
The removal and reinstallation of your major appliance if it . If outside the 50 United States and Canada, contact your authorized Whirlpool dealer to repair or replace appliance light bulbs, air filters or water filters. After checking "Troubleshooting," you need it is installed in an inaccessible location or is not installed in materials or workmanship. In the U.S.A., call 1-800-807-6777. 9/07 Keep this book and your...
The removal and reinstallation of your major appliance if it . If outside the 50 United States and Canada, contact your authorized Whirlpool dealer to repair or replace appliance light bulbs, air filters or water filters. After checking "Troubleshooting," you need it is installed in an inaccessible location or is not installed in materials or workmanship. In the U.S.A., call 1-800-807-6777. 9/07 Keep this book and your...


