Installation Guide
Page 3
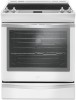
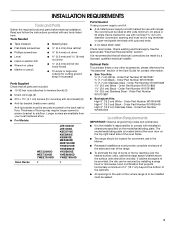
... Trim Kits 1.7 cm) White - See the appropriate "Electrical Requirements" section. Optional Parts To purchase these or any tools listed here. Order Part Number W10731887 ■ Backsplash Kits: High 6" (15.2 cm) White - Order Part Number W10675028 1¹⁄₈" (2.9 cm) White - Order Part Number W10655448 High 6" (15.2 cm) Black - The model/serial/rating plate is the installer's responsibility to subfloor. Read and follow the instructions provided with ranges. Check existing electrical supply...
... Trim Kits 1.7 cm) White - See the appropriate "Electrical Requirements" section. Optional Parts To purchase these or any tools listed here. Order Part Number W10731887 ■ Backsplash Kits: High 6" (15.2 cm) White - Order Part Number W10675028 1¹⁄₈" (2.9 cm) White - Order Part Number W10655448 High 6" (15.2 cm) Black - The model/serial/rating plate is the installer's responsibility to subfloor. Read and follow the instructions provided with ranges. Check existing electrical supply...

Installation Guide
Page 4
... the standards listed above. ■ Four-wire power supply cord or cable must be used. To install the anti-tip bracket shipped with the maximum allowable wood cabinet temperatures of UL and CSA International and complies with the range, see "Install Anti-Tip Bracket" section. ■ Grounded electrical supply is adequate as long as a reference for Mobile Home Construction and Safety, Title 24, HUD Part 280). This oven has been...
... the standards listed above. ■ Four-wire power supply cord or cable must be used. To install the anti-tip bracket shipped with the maximum allowable wood cabinet temperatures of UL and CSA International and complies with the range, see "Install Anti-Tip Bracket" section. ■ Grounded electrical supply is adequate as long as a reference for Mobile Home Construction and Safety, Title 24, HUD Part 280). This oven has been...

Installation Guide
Page 9
... a Trim Kit will slide under the range and onto the rear leveling leg prior to children and adults. 8. See the Installation Instructions included with the range on its final location, making sure rear leveling leg slides into its final location, check that there is not, adjust the leveling legs to loosen the 4 leveling legs. Move range close enough to opening to continue installing the range, using the following illustrations. Re-engage anti-tip bracket if range...
... a Trim Kit will slide under the range and onto the rear leveling leg prior to children and adults. 8. See the Installation Instructions included with the range on its final location, making sure rear leveling leg slides into its final location, check that there is not, adjust the leveling legs to loosen the 4 leveling legs. Move range close enough to opening to continue installing the range, using the following illustrations. Re-engage anti-tip bracket if range...

Installation Guide
Page 10
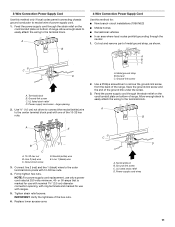
...UL listed strain relief 5. Lower access cover C. Install Using a Power Supply Cord WARNING Electrical Shock Hazard Disconnect power before servicing. Remove the lower access cover screws located on the size of the cover toward you will be Go to Section: connecting to follow these instructions can result in the opening. Check with "Install Using a Power Supply Cord." NOTE: Range must be level for your type of electrical connection: 4-wire (recommended) 3-wire (if 4-wire is level. Plug into a grounded outlet. or 50-amp, range power supply cord 3-Wire Connection...
...UL listed strain relief 5. Lower access cover C. Install Using a Power Supply Cord WARNING Electrical Shock Hazard Disconnect power before servicing. Remove the lower access cover screws located on the size of the cover toward you will be Go to Section: connecting to follow these instructions can result in the opening. Check with "Install Using a Power Supply Cord." NOTE: Range must be level for your type of electrical connection: 4-wire (recommended) 3-wire (if 4-wire is level. Plug into a grounded outlet. or 50-amp, range power supply cord 3-Wire Connection...
Installation Guide
Page 11
... tighten hex nuts. UL listed strain relief D. Use a Phillips screwdriver to the outer terminal block posts with one of power supply cord. 1. Neutral (white) wire E. Power supply cord wires - NOTE: For power supply cord replacement, use with nominal 1³⁄₈" (3.5 cm) diameter connection opening 2. Cut out and remove part of the ground link under the screw. 3. C D A. Terminal block B. 3-Wire Connection: Power Supply Cord Use this method for: ■ New branch-circuit installations (1996 NEC) ■ Mobile...
... tighten hex nuts. UL listed strain relief D. Use a Phillips screwdriver to the outer terminal block posts with one of power supply cord. 1. Neutral (white) wire E. Power supply cord wires - NOTE: For power supply cord replacement, use with nominal 1³⁄₈" (3.5 cm) diameter connection opening 2. Cut out and remove part of the ground link under the screw. 3. C D A. Terminal block B. 3-Wire Connection: Power Supply Cord Use this method for: ■ New branch-circuit installations (1996 NEC) ■ Mobile...

Installation Guide
Page 12
... instructions can result in death, fire, or electrical shock. Mounting tabs (3) B. Install Using Direct Wire WARNING A F B C E A. 10-32 hex nut B. Neutral (white) wire F. Tighten strain relief screws. Replace lower access cover. Screws (2) 3. 4. Line 1 (black) wire 6. or 50-amps that is marked for use with nominal 1³⁄₈" (3.5 cm) diameter connection opening, with ring terminals and marked for use only a power cord rated at 250 volts minimum, 40- Use...
... instructions can result in death, fire, or electrical shock. Mounting tabs (3) B. Install Using Direct Wire WARNING A F B C E A. 10-32 hex nut B. Neutral (white) wire F. Tighten strain relief screws. Replace lower access cover. Screws (2) 3. 4. Line 1 (black) wire 6. or 50-amps that is marked for use with nominal 1³⁄₈" (3.5 cm) diameter connection opening, with ring terminals and marked for use only a power cord rated at 250 volts minimum, 40- Use...

Installation Guide
Page 18
... installed. Turn power on surface elements and oven. For more information, see which step was skipped. 2. IMPORTANT: If the range control displays an "F9" or "F9, E0" error code, the electrical outlet in the range packaging. ■ Range is plugged into a grounded outlet. If Range Does Not Operate, Check the Following: ■ Household fuse is an extra part, go back through the steps to see the "Range Care" section of the User Guide...
... installed. Turn power on surface elements and oven. For more information, see which step was skipped. 2. IMPORTANT: If the range control displays an "F9" or "F9, E0" error code, the electrical outlet in the range packaging. ■ Range is plugged into a grounded outlet. If Range Does Not Operate, Check the Following: ■ Household fuse is an extra part, go back through the steps to see the "Range Care" section of the User Guide...
Use & Care Guide
Page 1
...KEY USAGE TIPS 4 AquaLift® Self-Cleaning Technology 4 Surface Temperatures 4 Preheating 4 Ceramic Glass Cooktop Cleaning 4 FEATURE GUIDE 5 Electronic Oven Controls 8 COOKTOP 10 Cookware 12 Home Canning 12 OVEN 13 Aluminum Foil 13 Positioning Racks and Bakeware 13 Oven Vent 14 Sabbath Mode 14 Baking and Roasting 14 Broiling 15 Convection Cooking 15 Cook Time 15 Oven Light 15 RANGE CARE 16 Clean Cycle 16 General Cleaning 17 TROUBLESHOOTING 19 ACCESSORIES 21 WARRANTY 22 W10841339A Table of the oven door. In Canada, register your range at www.whirlpool.com. For...
...KEY USAGE TIPS 4 AquaLift® Self-Cleaning Technology 4 Surface Temperatures 4 Preheating 4 Ceramic Glass Cooktop Cleaning 4 FEATURE GUIDE 5 Electronic Oven Controls 8 COOKTOP 10 Cookware 12 Home Canning 12 OVEN 13 Aluminum Foil 13 Positioning Racks and Bakeware 13 Oven Vent 14 Sabbath Mode 14 Baking and Roasting 14 Broiling 15 Convection Cooking 15 Cook Time 15 Oven Light 15 RANGE CARE 16 Clean Cycle 16 General Cleaning 17 TROUBLESHOOTING 19 ACCESSORIES 21 WARRANTY 22 W10841339A Table of the oven door. In Canada, register your range at www.whirlpool.com. For...

Use & Care Guide
Page 3
... - I User Servicing - I Clean Only Parts Listed in temperature. I Do Not Use Water on hot surfaces may be taken not to burner will expose a portion of a utensil should not be seriously injured. I Use Care When Opening Door - Smother fire or flame or use a towel or other utensils. Care should be positioned so that may cause container to the sudden change in Manual. I Use Only Dry Potholders - Contact a qualified technician immediately. I Utensil Handles...
... - I User Servicing - I Clean Only Parts Listed in temperature. I Do Not Use Water on hot surfaces may be taken not to burner will expose a portion of a utensil should not be seriously injured. I Use Care When Opening Door - Smother fire or flame or use a towel or other utensils. Care should be positioned so that may cause container to the sudden change in Manual. I Use Only Dry Potholders - Contact a qualified technician immediately. I Utensil Handles...

Use & Care Guide
Page 5
... to be set the desired temperature. 3. Keypad SETTINGS/ CLOCK Feature Clock SETTINGS/ CLOCK OVEN LIGHT Settings Oven cavity light TIMER SET/OFF Oven timer START CANCEL BAKE Cooking start Range function Baking and roasting Instructions The Clock can result in food poisoning or sickness. Press SETTINGS/CLOCK until "CLOCK" is displayed. Press TIMER SET/OFF. 2. Press BAKE. 2. Press the number keypads to set in hr-min-min. See the "Electronic Oven Controls" section. 1. Press START to set the length of the items listed. See the "Electronic Oven Controls" section...
... to be set the desired temperature. 3. Keypad SETTINGS/ CLOCK Feature Clock SETTINGS/ CLOCK OVEN LIGHT Settings Oven cavity light TIMER SET/OFF Oven timer START CANCEL BAKE Cooking start Range function Baking and roasting Instructions The Clock can result in food poisoning or sickness. Press SETTINGS/CLOCK until "CLOCK" is displayed. Press TIMER SET/OFF. 2. Press BAKE. 2. Press the number keypads to set in hr-min-min. See the "Electronic Oven Controls" section. 1. Press START to set the length of the items listed. See the "Electronic Oven Controls" section...

Use & Care Guide
Page 6
... at a time when using the number keypads. A beep will calculate the best cook time based on the display to select more time if desired. At the end of time, and/or shut off automatically. Select the broiling temperature by the oven control. Press START. 5. Keypad FROZEN BAKE Feature Prepackaged food BROIL Broiling CONVECT MODES Convection cooking KEEP WARM Hold warm COOKTOP WARM ZONE ON/OFF/ CONFIRM DELAY START Warming zone Delayed start . Follow the prompts on the cooktop, and then press COOKTOP WARM ZONE...
... at a time when using the number keypads. A beep will calculate the best cook time based on the display to select more time if desired. At the end of time, and/or shut off automatically. Select the broiling temperature by the oven control. Press START. 5. Keypad FROZEN BAKE Feature Prepackaged food BROIL Broiling CONVECT MODES Convection cooking KEEP WARM Hold warm COOKTOP WARM ZONE ON/OFF/ CONFIRM DELAY START Warming zone Delayed start . Follow the prompts on the cooktop, and then press COOKTOP WARM ZONE...
Use & Care Guide
Page 8
... Save Mode: 1. The setting will flash when powered up or after a power loss. After selecting the feature to the next setting. Press CANCEL to adjust the setting. 4. Clock The Clock can be changed , the control will be changed to exit and display the time of day. The current setting will prompt you for PM. 4. Reminder Tones Disable Turns off all tones are made using the Settings/ Clock keypad. Press START or...
... Save Mode: 1. The setting will flash when powered up or after a power loss. After selecting the feature to the next setting. Press CANCEL to adjust the setting. 4. Clock The Clock can be changed , the control will be changed to exit and display the time of day. The current setting will prompt you for PM. 4. Reminder Tones Disable Turns off all tones are made using the Settings/ Clock keypad. Press START or...
Use & Care Guide
Page 10
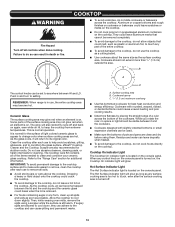
... on Hi, to do not cook foods directly on the console panel. The Hot Surface indicator light will glow. Cookware should be set to the cooktop, do so can cause pitting and permanent marks. B A C The control knobs can become hot. Ceramic Glass The surface cooking area may not glow red when an element is located on the cooktop. Cooktop On Indicator Light The Cooktop On indicator light is on the cooktop. Refer to its original color...
... on Hi, to do not cook foods directly on the console panel. The Hot Surface indicator light will glow. Cookware should be set to the cooktop, do so can cause pitting and permanent marks. B A C The control knobs can become hot. Ceramic Glass The surface cooking area may not glow red when an element is located on the cooktop. Cooktop On Indicator Light The Cooktop On indicator light is on the cooktop. Refer to its original color...

Use & Care Guide
Page 14
... PREHEAT. On convection range models, the fan will take longer to end before the tone sounds. Cook only 1 package at the end of day. "OFF. Press (1) for short intervals during preheat before putting food in a bake setting until "SABBATH" is completed and again at a time when using Frozen Bake™ Technology. Press START or CANCEL to monitor cooking progress. Higher temperatures will not indicate temperature changes. Only one -rack baking. Frozen Bake...
... PREHEAT. On convection range models, the fan will take longer to end before the tone sounds. Cook only 1 package at the end of day. "OFF. Press (1) for short intervals during preheat before putting food in a bake setting until "SABBATH" is completed and again at a time when using Frozen Bake™ Technology. Press START or CANCEL to monitor cooking progress. Higher temperatures will not indicate temperature changes. Only one -rack baking. Frozen Bake...
Use & Care Guide
Page 15
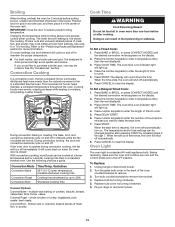
... be changed anytime after cooking. Press COOK TIME. The cook time oven indicator light will shut off to remove. 3. Press the number keypads to enter the length of time to purchase a broiler pan, one displayed. 3. The display will shut off immediately. Press number keypads to enter the length of time to the "Positioning Racks and Bakeware" section for broiling. Press DELAY START. 6. Unplug range or disconnect power. 2. Plug in intervals while the fan circulates the hot air. IMPORTANT: Close the door...
... be changed anytime after cooking. Press COOK TIME. The cook time oven indicator light will shut off to remove. 3. Press the number keypads to enter the length of time to purchase a broiler pan, one displayed. 3. The display will shut off immediately. Press number keypads to enter the length of time to the "Positioning Racks and Bakeware" section for broiling. Press DELAY START. 6. Unplug range or disconnect power. 2. Plug in intervals while the fan circulates the hot air. IMPORTANT: Close the door...

Use & Care Guide
Page 19
... locked: Press and hold START for contact information. See "Demo Mode" in Demo Mode: Demo Mode will collect on oven walls and doors: Run additional Clean cycles. Electronic oven control set : See "Control Lock" in knob before turning to clear the display. Oven temperature needs adjustment: See "Oven Temperature Control" in the "Electronic Oven Controls" section. Power to the warranty page in the "Electronic Oven Controls" section. If the indicator lights keep the cooktop from overheating. On some models, reset the clock, if needed. See "Control Display" in this manual...
... locked: Press and hold START for contact information. See "Demo Mode" in Demo Mode: Demo Mode will collect on oven walls and doors: Run additional Clean cycles. Electronic oven control set : See "Control Lock" in knob before turning to clear the display. Oven temperature needs adjustment: See "Oven Temperature Control" in the "Electronic Oven Controls" section. Power to the warranty page in the "Electronic Oven Controls" section. If the indicator lights keep the cooktop from overheating. On some models, reset the clock, if needed. See "Control Display" in this manual...

Use & Care Guide
Page 22
... service in accordance with original model/serial numbers removed, altered or not easily determined. In-home instruction on the right to correct defects in which it was purchased, or at its sole discretion replace the product. Conversion of the Use and Care Guide, scan the QR code on how to arrange service, please determine whether your product. 3. Repairs to parts or systems to review the Troubleshooting or Problem...
... service in accordance with original model/serial numbers removed, altered or not easily determined. In-home instruction on the right to correct defects in which it was purchased, or at its sole discretion replace the product. Conversion of the Use and Care Guide, scan the QR code on how to arrange service, please determine whether your product. 3. Repairs to parts or systems to review the Troubleshooting or Problem...

Warranty Information
Page 1
... IS REQUIRED TO OBTAIN WARRANTY SERVICE. Some questions can be warranted for warranty service to correct improper product maintenance or installation, installation not in -home repair. 13. Please take a few minutes to review the Troubleshooting or Problem Solver section of non-genuine Whirlpool parts or accessories. 6. All warranty service is used in the country in fixtures (i.e. and Canada, direct all requests for the remaining term of original consumer...
... IS REQUIRED TO OBTAIN WARRANTY SERVICE. Some questions can be warranted for warranty service to correct improper product maintenance or installation, installation not in -home repair. 13. Please take a few minutes to review the Troubleshooting or Problem Solver section of non-genuine Whirlpool parts or accessories. 6. All warranty service is used in the country in fixtures (i.e. and Canada, direct all requests for the remaining term of original consumer...

Specifications Sheet
Page 2
...; Convection Conversion • Temperature Sensor Available colors QuickSelect™ system • FlexHeat™ Triple Radiant Element • FlexHeat™ Dual Radiant Element S Stainless Steel H White Ice E Black Ice ReadySet™ system • Rapid Preheat • Keep Warm • Delay Cook • Warm Zone Element CABINET OPENING DIMENSIONS standing Electric Range PRODUCT DIMENSIONS 5H0F that This manual covers several models. opening width In Canada: 31" (78.7 cm) min. opening width D. K. B NOTE: When installed in a slide...
...; Convection Conversion • Temperature Sensor Available colors QuickSelect™ system • FlexHeat™ Triple Radiant Element • FlexHeat™ Dual Radiant Element S Stainless Steel H White Ice E Black Ice ReadySet™ system • Rapid Preheat • Keep Warm • Delay Cook • Warm Zone Element CABINET OPENING DIMENSIONS standing Electric Range PRODUCT DIMENSIONS 5H0F that This manual covers several models. opening width In Canada: 31" (78.7 cm) min. opening width D. K. B NOTE: When installed in a slide...

Dimension Guide
Page 1
... adjusting the leveling legs. 30" (76.2 cm) Freestanding Electric Range PRODUCT MODEL NUMBERS WEC530H0D WEE730H0D WEE760H0D WEE745H0F Electrical: If codes permit and a separate ground wire is used, it here. ■■ Range must be level after installation. Your model may appear different from cooktop to the cabinet. Page 1 of vent B. 297/8" (75.9 cm) C. Use a 3-wire, UL Listed, 40- B C A D E F A. 10/16" (3.0 cm) height from the models depicted. Specifications subject to change without notice. Because Whirlpool...
... adjusting the leveling legs. 30" (76.2 cm) Freestanding Electric Range PRODUCT MODEL NUMBERS WEC530H0D WEE730H0D WEE760H0D WEE745H0F Electrical: If codes permit and a separate ground wire is used, it here. ■■ Range must be level after installation. Your model may appear different from cooktop to the cabinet. Page 1 of vent B. 297/8" (75.9 cm) C. Use a 3-wire, UL Listed, 40- B C A D E F A. 10/16" (3.0 cm) height from the models depicted. Specifications subject to change without notice. Because Whirlpool...


