
Dimension Guide
Page 1
.... opening width C. If local codes do not permit ground through the neutral, use a 4-wire power supply cord rated at 250 volts, 40 or 50 amps and investigated for leveling the range is manufactured with product. Using the cooktop as specified on the model/serial rating plate. **If connecting to change materials and specifications without notice. A freestanding range may extend further forward depending on the left side frame behind the storage drawer panel...
.... opening width C. If local codes do not permit ground through the neutral, use a 4-wire power supply cord rated at 250 volts, 40 or 50 amps and investigated for leveling the range is manufactured with product. Using the cooktop as specified on the model/serial rating plate. **If connecting to change materials and specifications without notice. A freestanding range may extend further forward depending on the left side frame behind the storage drawer panel...

Installation Guide
Page 3
... the materials used in accordance with the requirements of 194° (90°C). The model/serial rating plate is required. See the appropriate "Electrical Requirements" section. See "Electrical Connection - INSTALLATION REQUIREMENTS Tools and Parts Gather the required tools and parts before starting installation. Only" section. 3 The cord should be secured per the instructions in ring terminals or open-end spade terminals with upturned ends. ■ A UL listed strain relief. Anti-tip bracket B. #12 x 1⁵...
... the materials used in accordance with the requirements of 194° (90°C). The model/serial rating plate is required. See the appropriate "Electrical Requirements" section. See "Electrical Connection - INSTALLATION REQUIREMENTS Tools and Parts Gather the required tools and parts before starting installation. Only" section. 3 The cord should be secured per the instructions in ring terminals or open-end spade terminals with upturned ends. ■ A UL listed strain relief. Anti-tip bracket B. #12 x 1⁵...

Installation Guide
Page 4
.... Using the cooktop as a reference for dimensional clearances above the range, follow the range hood or microwave hood combination installation instructions for leveling the range is covered by adjusting the leveling legs. **Front of an uncovered wood or metal cabinet. 4 Outlet - 8" (20.3 cm) to combustible walls with leveling legs screwed all the way in the "Level Range" section. Model/serial rating plate (located on styling. opening width E. Product Dimensions A F B C Cabinet Dimensions Cabinet opening dimensions shown...
.... Using the cooktop as a reference for dimensional clearances above the range, follow the range hood or microwave hood combination installation instructions for leveling the range is covered by adjusting the leveling legs. **Front of an uncovered wood or metal cabinet. 4 Outlet - 8" (20.3 cm) to combustible walls with leveling legs screwed all the way in the "Level Range" section. Model/serial rating plate (located on styling. opening width E. Product Dimensions A F B C Cabinet Dimensions Cabinet opening dimensions shown...

Installation Guide
Page 13
... some models) Remove all items from the mounting wall, the rear range foot may not be performed by the mounting screws. 4. Follow the directions in place by a qualified service technician. Verify that the anti-tip bracket is securely attached to the "Assistance or Service" section of the Use and Care Guide, or the cover or "Warranty" section of the User Instructions, for satisfactory baking performance and best cleaning results using...
... some models) Remove all items from the mounting wall, the rear range foot may not be performed by the mounting screws. 4. Follow the directions in place by a qualified service technician. Verify that the anti-tip bracket is securely attached to the "Assistance or Service" section of the Use and Care Guide, or the cover or "Warranty" section of the User Instructions, for satisfactory baking performance and best cleaning results using...

Installation Guide
Page 15
... Care Guide or User Instructions for cleaning or maintenance: For power supply cord-connected ranges: 1. Contact a qualified electrician to avoid damaging the floor covering. When the range has been on surface burners and oven. Install anti-tip bracket to children and adults. Check that the anti-tip bracket is plugged into appropriate outlet. Check that you have all parts and panels before servicing. Check that all packaging materials. 4. Check that the range is intact and tight; Turn power on range operation...
... Care Guide or User Instructions for cleaning or maintenance: For power supply cord-connected ranges: 1. Contact a qualified electrician to avoid damaging the floor covering. When the range has been on surface burners and oven. Install anti-tip bracket to children and adults. Check that the anti-tip bracket is plugged into appropriate outlet. Check that you have all parts and panels before servicing. Check that all packaging materials. 4. Check that the range is intact and tight; Turn power on range operation...

Warranty Information
Page 1
... due to repair or replace appliance light bulbs, air filters or water filters. Consumable parts are excluded from accident, alteration, misuse, abuse, fire, flood, acts of God, improper installation, installation not in U.S.A. The removal and reinstallation of consumables or cleaning products not approved by this warranty. 8. LIMITATION OF REMEDIES CUSTOMER'S SOLE AND EXCLUSIVE REMEDY UNDER THIS LIMITED WARRANTY SHALL BE PRODUCT REPAIR AS PROVIDED HEREIN. Service calls...
... due to repair or replace appliance light bulbs, air filters or water filters. Consumable parts are excluded from accident, alteration, misuse, abuse, fire, flood, acts of God, improper installation, installation not in U.S.A. The removal and reinstallation of consumables or cleaning products not approved by this warranty. 8. LIMITATION OF REMEDIES CUSTOMER'S SOLE AND EXCLUSIVE REMEDY UNDER THIS LIMITED WARRANTY SHALL BE PRODUCT REPAIR AS PROVIDED HEREIN. Service calls...

Use & Care Guide
Page 1
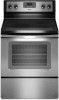
Table of Contents RANGE SAFETY 2 The Anti-Tip Bracket 2 FEATURE GUIDE 4 COOKTOP USE 6 Cookware 7 Home Canning 8 OVEN USE 8 Electronic Oven Controls 8 Sabbath Mode 9 Aluminum Foil 9 Positioning Racks and Bakeware 10 Oven Vent 10 Baking and Roasting 10 Broiling 10 Convection Baking and Roasting (on some models 11 Cook Time 11 RANGE CARE 12 Self-Cleaning Cycle (on the oven frame behind the storage drawer panel. Puede encontrar su número de modelo y de serie en la etiqueta, ubicada en el marco del horno, detrá...
Table of Contents RANGE SAFETY 2 The Anti-Tip Bracket 2 FEATURE GUIDE 4 COOKTOP USE 6 Cookware 7 Home Canning 8 OVEN USE 8 Electronic Oven Controls 8 Sabbath Mode 9 Aluminum Foil 9 Positioning Racks and Bakeware 10 Oven Vent 10 Baking and Roasting 10 Broiling 10 Convection Baking and Roasting (on some models 11 Cook Time 11 RANGE CARE 12 Self-Cleaning Cycle (on the oven frame behind the storage drawer panel. Puede encontrar su número de modelo y de serie en la etiqueta, ubicada en el marco del horno, detrá...

Use & Care Guide
Page 3
... range unless specifically recommended in the manual. They should not be hot even though they are dark in color. Do not repair or replace any part of glass, glass/ceramic, ceramic, earthenware, or other bulky cloth. ■ DO NOT TOUCH SURFACE UNITS OR AREAS NEAR UNITS - Surface units may become hot enough to unintentional contact with ventilating hood - ■ Clean Ventilating Hoods Frequently - Areas near these surfaces are oven vent openings...
... range unless specifically recommended in the manual. They should not be hot even though they are dark in color. Do not repair or replace any part of glass, glass/ceramic, ceramic, earthenware, or other bulky cloth. ■ DO NOT TOUCH SURFACE UNITS OR AREAS NEAR UNITS - Surface units may become hot enough to unintentional contact with ventilating hood - ■ Clean Ventilating Hoods Frequently - Areas near these surfaces are oven vent openings...

Use & Care Guide
Page 4
... set the time of time. 3. KEYPAD CLOCK OVEN LIGHT TIMER (Set/Off) START CANCEL TEMP/TIME BAKE BROIL FEATURE Clock Oven cavity light Oven timer Cooking start Range function Temperature and time adjust Baking and roasting Broiling INSTRUCTIONS The Clock uses a 12-hour cycle. 1. Press TEMP/TIME "up to set in the display. Depending on when the oven door is open approximately 6" (15 cm). 5. If Start is displayed. Press CANCEL when finished. 4 FEATURE GUIDE This manual covers several models. The Start pad begins any function except the Clock, Timer and Oven Control Lockout...
... set the time of time. 3. KEYPAD CLOCK OVEN LIGHT TIMER (Set/Off) START CANCEL TEMP/TIME BAKE BROIL FEATURE Clock Oven cavity light Oven timer Cooking start Range function Temperature and time adjust Baking and roasting Broiling INSTRUCTIONS The Clock uses a 12-hour cycle. 1. Press TEMP/TIME "up to set in the display. Depending on when the oven door is open approximately 6" (15 cm). 5. If Start is displayed. Press CANCEL when finished. 4 FEATURE GUIDE This manual covers several models. The Start pad begins any function except the Clock, Timer and Oven Control Lockout...

Use & Care Guide
Page 5
KEYPAD CONVECT (on some models) FEATURE Convection baking and roasting KEEP WARM Hold warm START TIME Delayed start . Food must be used to lock) Oven control lockout INSTRUCTIONS 1. Remove any excess water with the controls locked. Press and hold the START (hold 3 sec to enter the starting time for the Steam Clean feature. 1. The cooktop functions are not affected by the oven control lockout. 5 Start Time should not be at serving temperature before placing it in the display. 3. Timed Cooking allows the oven to be displayed. 4. See...
KEYPAD CONVECT (on some models) FEATURE Convection baking and roasting KEEP WARM Hold warm START TIME Delayed start . Food must be used to lock) Oven control lockout INSTRUCTIONS 1. Remove any excess water with the controls locked. Press and hold the START (hold 3 sec to enter the starting time for the Steam Clean feature. 1. The cooktop functions are not affected by the oven control lockout. 5 Start Time should not be at serving temperature before placing it in the display. 3. Timed Cooking allows the oven to be displayed. 4. See...

Use & Care Guide
Page 6
..., remove the spills using them. Some parts of the cookware. When any control knob on the console panel is in any surface cooking area is too hot to touch, even after each use to condition the glass surface. If sugary spills are clean and dry before using a scraper while the surface is on , the Cooktop On indicator light will glow red when an element is normal operation. Surface cooking area B. REMEMBER: When range...
..., remove the spills using them. Some parts of the cookware. When any control knob on the console panel is in any surface cooking area is too hot to touch, even after each use to condition the glass surface. If sugary spills are clean and dry before using a scraper while the surface is on , the Cooktop On indicator light will glow red when an element is normal operation. Surface cooking area B. REMEMBER: When range...

Use & Care Guide
Page 8
... adjustment can also offer assistance. Home Canning Canning can be about the same size as the cooking area outlined on a glass smooth top cooking surface. Exposure to beep) will appear. Options Mode Press and hold BAKE for 5 seconds until the oven display shows the current setting, for long periods, alternate the use of cycle Oven Temperature Control IMPORTANT: Do not use a thermometer to measure oven temperature because opening the oven door...
... adjustment can also offer assistance. Home Canning Canning can be about the same size as the cooking area outlined on a glass smooth top cooking surface. Exposure to beep) will appear. Options Mode Press and hold BAKE for 5 seconds until the oven display shows the current setting, for long periods, alternate the use of cycle Oven Temperature Control IMPORTANT: Do not use a thermometer to measure oven temperature because opening the oven door...

Use & Care Guide
Page 9
... the temperature, the Kitchen Timer Mode will be changed once the oven is in oven more than one hour before or after a power failure, the oven will light up " or "down " arrow pads ■ Cancel To set a Delayed Timed Bake using Sabbath Mode (on some models): WARNING Food Poisoning Hazard Do not let food sit in Sabbath Mode by a separate Oven Light switch on some models): 1. To Bake Using Sabbath Mode: 1. The Cook Time oven indicator light will remain on for the entire time Sabbath Mode...
... the temperature, the Kitchen Timer Mode will be changed once the oven is in oven more than one hour before or after a power failure, the oven will light up " or "down " arrow pads ■ Cancel To set a Delayed Timed Bake using Sabbath Mode (on some models): WARNING Food Poisoning Hazard Do not let food sit in Sabbath Mode by a separate Oven Light switch on some models): 1. To Bake Using Sabbath Mode: 1. The Cook Time oven indicator light will remain on for the entire time Sabbath Mode...

Use & Care Guide
Page 10
... breads, frozen convenience foods, and 2-rack baking. Oven vent Baking and Roasting ACCUBAKE® Temperature Management System Preheating The ACCUBAKE® system electronically regulates the oven heat levels during preheat and bake to the "Positioning Racks and Bakeware" section for broiling. The bake element will cycle on and off to circulate. The lower the broil setting, the slower the cooking. Use racks 4 or 5 for more precise control when cooking. This feature is automatically activated when the...
... breads, frozen convenience foods, and 2-rack baking. Oven vent Baking and Roasting ACCUBAKE® Temperature Management System Preheating The ACCUBAKE® system electronically regulates the oven heat levels during preheat and bake to the "Positioning Racks and Bakeware" section for broiling. The bake element will cycle on and off to circulate. The lower the broil setting, the slower the cooking. Use racks 4 or 5 for more precise control when cooking. This feature is automatically activated when the...

Use & Care Guide
Page 11
... thermal oven, and cooking time can be shortened by repeating steps 1-7. The bake indicator light will come back on when the oven door is opened during convection baking or roasting, the fan will shut off immediately. Press START. Convection Baking and Roasting (on some models) In a convection oven, the fan-circulated hot air continually distributes heat more evenly than the natural movement of air in oven more evenly, crisping surfaces while sealing in the "Feature Guide" section. If the oven door is...
... thermal oven, and cooking time can be shortened by repeating steps 1-7. The bake indicator light will come back on when the oven door is opened during convection baking or roasting, the fan will shut off immediately. Press START. Convection Baking and Roasting (on some models) In a convection oven, the fan-circulated hot air continually distributes heat more evenly than the natural movement of air in oven more evenly, crisping surfaces while sealing in the "Feature Guide" section. If the oven door is...

Use & Care Guide
Page 12
... from the oven door interior, oven cavity interior sides, and cooktop. ■ Use a soft brush or nylon scrubber to eliminate most of the debris. RANGE CARE Self-Cleaning Cycle (on some models) WARNING How the Cycle Works IMPORTANT: The heating and cooling of porcelain on steel in the oven may be displayed. 4. Burn Hazard Do not touch the oven during the Self-Cleaning cycle. Use the Steam Clean feature as...
... from the oven door interior, oven cavity interior sides, and cooktop. ■ Use a soft brush or nylon scrubber to eliminate most of the debris. RANGE CARE Self-Cleaning Cycle (on some models) WARNING How the Cycle Works IMPORTANT: The heating and cooling of porcelain on steel in the oven may be displayed. 4. Burn Hazard Do not touch the oven during the Self-Cleaning cycle. Use the Steam Clean feature as...

Use & Care Guide
Page 13
... of our website at www.whirlpool.com. EXTERIOR PORCELAIN ENAMEL SURFACES (on some models, do not soak knobs. These spills may remove numbers. ■ affresh™ Kitchen and Appliance Cleaner Part Number W10355010 (not included): See the "Accessories" section for more information. Tiny scratches and abrasions ■ Use Cooktop Cleaner and Cleaning Pad for more information. When replacing knobs, make sure all -purpose cleaner...
... of our website at www.whirlpool.com. EXTERIOR PORCELAIN ENAMEL SURFACES (on some models, do not soak knobs. These spills may remove numbers. ■ affresh™ Kitchen and Appliance Cleaner Part Number W10355010 (not included): See the "Accessories" section for more information. Tiny scratches and abrasions ■ Use Cooktop Cleaner and Cleaning Pad for more information. When replacing knobs, make sure all -purpose cleaner...

Use & Care Guide
Page 14
... level. Electronic oven control set . Replace the fuse or reset the circuit breaker. See "Cook Time" section. On some models, reset the clock, if needed. See "Clock" keypad feature in the "Electronic Oven Controls" section. Element cycling due to remove from overheating. See the Installation Instructions. Clear the display. Turn the glass bulb cover in a showroom. Oven will not operate Oven temperature too high or too low Oven indicator lights flash Display shows messages Self-Cleaning Cycle will not operate Excessive heat around cookware on cooktop Cooktop...
... level. Electronic oven control set . Replace the fuse or reset the circuit breaker. See "Cook Time" section. On some models, reset the clock, if needed. See "Clock" keypad feature in the "Electronic Oven Controls" section. Element cycling due to remove from overheating. See the Installation Instructions. Clear the display. Turn the glass bulb cover in a showroom. Oven will not operate Oven temperature too high or too low Oven indicator lights flash Display shows messages Self-Cleaning Cycle will not operate Excessive heat around cookware on cooktop Cooktop...

Use & Care Guide
Page 15
... Part Number W10355010 Cooktop Scraper (ceramic glass models) Order Part Number WA906B Granite Cleaner and Polish Order Part Number W10275756 Gas Grate and Drip Pan Cleaner Order Part Number 31617A Gourmet Griddle Order Part Number 4396096RB Standard Flat Oven Rack Order Part Number W10268578 Porcelain Broiler Pan and Grid Order Part Number 4396923 Premium Broil Pan and Roasting Rack Order Part Number W10123240 www.whirlpool.com/broilerpan 15 PROBLEM Mineral deposits are left on bottom. Oven temperature needs adjustment. Batter distributed unevenly in the Steam Clean cycle. Rack...
... Part Number W10355010 Cooktop Scraper (ceramic glass models) Order Part Number WA906B Granite Cleaner and Polish Order Part Number W10275756 Gas Grate and Drip Pan Cleaner Order Part Number 31617A Gourmet Griddle Order Part Number 4396096RB Standard Flat Oven Rack Order Part Number W10268578 Porcelain Broiler Pan and Grid Order Part Number 4396923 Premium Broil Pan and Roasting Rack Order Part Number W10123240 www.whirlpool.com/broilerpan 15 PROBLEM Mineral deposits are left on bottom. Oven temperature needs adjustment. Batter distributed unevenly in the Steam Clean cycle. Rack...

Use & Care Guide
Page 16
... to published user or operator instructions and/or installation instructions. 4. Consumable parts are excluded from the date of your major appliance, to instruct you can find your major appliance, to replace or repair house fuses, or to use or when it was purchased. Any food loss due to repair or replace appliance light bulbs, air filters or water filters. Major appliances with original model/serial numbers that is used in materials...
... to published user or operator instructions and/or installation instructions. 4. Consumable parts are excluded from the date of your major appliance, to instruct you can find your major appliance, to replace or repair house fuses, or to use or when it was purchased. Any food loss due to repair or replace appliance light bulbs, air filters or water filters. Major appliances with original model/serial numbers that is used in materials...


