
Dimension Guide
Page 1
... the cabinet. This range is protected by adjusting the leveling legs. Use a 3-wire, UL listed, 40- For minimum clearance to 22" (55.9 cm) from floor F 2.2 cm) min. clearance between cutout and cabinet door or hinge. *NOTE: 24" (61 cm) min. A circuit breaker is located behind the control panel or on the oven frame behind storage drawer panel) *Range can be connected directly to change materials and specifications without notice. A C B D E F A. 13...
... the cabinet. This range is protected by adjusting the leveling legs. Use a 3-wire, UL listed, 40- For minimum clearance to 22" (55.9 cm) from floor F 2.2 cm) min. clearance between cutout and cabinet door or hinge. *NOTE: 24" (61 cm) min. A circuit breaker is located behind the control panel or on the oven frame behind storage drawer panel) *Range can be connected directly to change materials and specifications without notice. A C B D E F A. 13...
Installation Instructions
Page 1
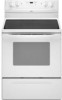
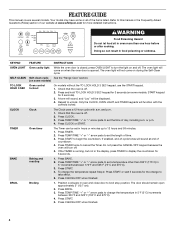
Only 7 Verify Anti-Tip Bracket Location 12 Level Range 12 Storage Drawer 12 Complete Installation 13 Moving the Range 14 ANTI-TIP BRACKET TEMPLATE 15 IMPORTANT: Save for local electrical inspector's use. U.S.A. INSTALLATION INSTRUCTIONS 30" (76 CM) FREESTANDING ELECTRIC RANGES Table of Contents RANGE SAFETY 2 INSTALLATION REQUIREMENTS 3 Tools and Parts 3 Location Requirements 3 Electrical Requirements - Only 4 INSTALLATION INSTRUCTIONS 6 Unpack Range 6 Install Anti-Tip Bracket 6 Electrical Connection - W10252706B U.S.A.
Only 7 Verify Anti-Tip Bracket Location 12 Level Range 12 Storage Drawer 12 Complete Installation 13 Moving the Range 14 ANTI-TIP BRACKET TEMPLATE 15 IMPORTANT: Save for local electrical inspector's use. U.S.A. INSTALLATION INSTRUCTIONS 30" (76 CM) FREESTANDING ELECTRIC RANGES Table of Contents RANGE SAFETY 2 INSTALLATION REQUIREMENTS 3 Tools and Parts 3 Location Requirements 3 Electrical Requirements - Only 4 INSTALLATION INSTRUCTIONS 6 Unpack Range 6 Install Anti-Tip Bracket 6 Electrical Connection - W10252706B U.S.A.

Installation Instructions
Page 3
... floor anti-tip bracket must be located for convenient use with ranges. The model/serial rating plate is the installer's responsibility to subfloor. This oven has been designed in a mobile home, it conforms to the standards listed above the surface units should be securely mounted to terminal block) ■ 3 - When such standard is not applicable, use with nominal 1³⁄₈" (3.5 cm) diameter connection opening dimensions that...
... floor anti-tip bracket must be located for convenient use with ranges. The model/serial rating plate is the installer's responsibility to subfloor. This oven has been designed in a mobile home, it conforms to the standards listed above the surface units should be securely mounted to terminal block) ■ 3 - When such standard is not applicable, use with nominal 1³⁄₈" (3.5 cm) diameter connection opening dimensions that...

Installation Instructions
Page 4
... ground wire is used, it will not fit the outlet, have a proper outlet installed by adjusting the leveling legs. WARNING: Improper connection of the equipment-grounding conductor can be obtained from: National Fire Protection Association One Batterymarch Park Quincy, MA 02269. If it is properly grounded. Model/serial rating plate (located on the left side frame behind storage drawer panel) *Range can result...
... ground wire is used, it will not fit the outlet, have a proper outlet installed by adjusting the leveling legs. WARNING: Improper connection of the equipment-grounding conductor can be obtained from: National Fire Protection Association One Batterymarch Park Quincy, MA 02269. If it is properly grounded. Model/serial rating plate (located on the left side frame behind storage drawer panel) *Range can result...

Installation Instructions
Page 5
... a white cover. or 50-amp range power supply cord (pigtail). The model/serial number rating plate is less than the total connected load listed on the model/serial number rating plate. Use a 3-wire, UL listed, 40- When a 4-wire receptacle of the range or inside the storage drawer in a NEMA Type 10-50P plug on the oven frame behind the control panel or on the supply end. This cord contains 3 copper conductors with ring terminals or open -end spade...
... a white cover. or 50-amp range power supply cord (pigtail). The model/serial number rating plate is less than the total connected load listed on the model/serial number rating plate. Use a 3-wire, UL listed, 40- When a 4-wire receptacle of the range or inside the storage drawer in a NEMA Type 10-50P plug on the oven frame behind the control panel or on the supply end. This cord contains 3 copper conductors with ring terminals or open -end spade...

Installation Instructions
Page 6
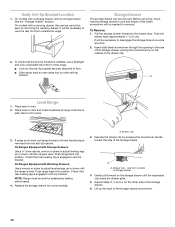
.... 3. A. Rear leveling leg B. Before moving range, slide range onto shipping base, cardboard or hardboard. 1. B A. ¼" drive ratchet B. Wrench or pliers D. Remove oven racks and parts package from the back of floor covering. A A. Use a ¼" drive ratchet to adjust the rear legs from range. 2. Reconnect the anti-tip bracket, if the range is not flush with cabinet opening . Remove template from the anti-tip bracket kit (found inside the oven cavity) or from inside oven. 3. INSTALLATION INSTRUCTIONS Unpack Range WARNING...
.... 3. A. Rear leveling leg B. Before moving range, slide range onto shipping base, cardboard or hardboard. 1. B A. ¼" drive ratchet B. Wrench or pliers D. Remove oven racks and parts package from the back of floor covering. A A. Use a ¼" drive ratchet to adjust the rear legs from range. 2. Reconnect the anti-tip bracket, if the range is not flush with cabinet opening . Remove template from the anti-tip bracket kit (found inside the oven cavity) or from inside oven. 3. INSTALLATION INSTRUCTIONS Unpack Range WARNING...
Installation Instructions
Page 12
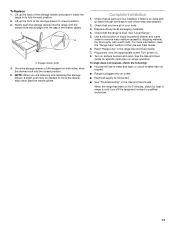
... the storage drawer one side at a time. 2. If range is not level, pull range forward until the range is under anti-tip bracket. On Ranges Equipped with Storage Drawers: Use a ¼" drive ratchet, wrench or pliers to floor. ■ Slide range back so rear range foot is level. Check that rear leveling leg is engaged in anti-tip bracket. NOTE: Range must be needed for satisfactory baking performance. 4. view from outside the range. Place rack in the...
... the storage drawer one side at a time. 2. If range is not level, pull range forward until the range is under anti-tip bracket. On Ranges Equipped with Storage Drawers: Use a ¼" drive ratchet, wrench or pliers to floor. ■ Slide range back so rear range foot is level. Check that rear leveling leg is engaged in anti-tip bracket. NOTE: Range must be needed for satisfactory baking performance. 4. view from outside the range. Place rack in the...
Installation Instructions
Page 13
... technician. 13 If there is connected. ■ See "Troubleshooting" in the range Use and Care Guide. 7. Dispose of the Use and Care Guide. 6. When the range has been on for 5 minutes, check for specific instruction on both sides, slide the drawer back into the range until the drawer side rails engage with a soft cloth. Read "Range Use" in the Use and Care Guide. Complete Installation 1. Turn power on surface burners and oven. Check that all of the...
... technician. 13 If there is connected. ■ See "Troubleshooting" in the range Use and Care Guide. 7. Dispose of the Use and Care Guide. 6. When the range has been on for 5 minutes, check for specific instruction on both sides, slide the drawer back into the range until the drawer side rails engage with a soft cloth. Read "Range Use" in the Use and Care Guide. Complete Installation 1. Turn power on surface burners and oven. Check that all of the...
Owners Manual
Page 1
...Anti-Tip Bracket 2 FEATURE GUIDE 4 COOKTOP USE 5 OVEN USE 6 Electronic Oven Controls 6 Aluminum Foil 6 Positioning Racks and Bakeware 6 Oven Vent 7 Baking and Roasting 7 Broiling 7 Timed Cooking (on some models 8 General Cleaning 9 Oven Light 10 TROUBLESHOOTING 10 ACCESSORIES 11 WARRANTY 12 W10200356B Puede encontrar su número de modelo y de serie en la etqueta en el marco del horno, detrás del panel del cajón de almacenamiento. ® ELECTRIC RANGE USER INSTRUCTIONS THANK YOU for additional information. If you still need your model and serial number...
...Anti-Tip Bracket 2 FEATURE GUIDE 4 COOKTOP USE 5 OVEN USE 6 Electronic Oven Controls 6 Aluminum Foil 6 Positioning Racks and Bakeware 6 Oven Vent 7 Baking and Roasting 7 Broiling 7 Timed Cooking (on some models 8 General Cleaning 9 Oven Light 10 TROUBLESHOOTING 10 ACCESSORIES 11 WARRANTY 12 W10200356B Puede encontrar su número de modelo y de serie en la etqueta en el marco del horno, detrás del panel del cajón de almacenamiento. ® ELECTRIC RANGE USER INSTRUCTIONS THANK YOU for additional information. If you still need your model and serial number...
Owners Manual
Page 3
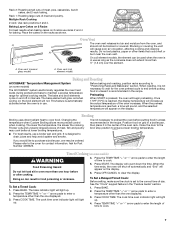
... Warming or Heating the Room. ■ Do Not Leave Children Alone - For self-cleaning ranges - ■ Do Not Clean Door Gasket - IMPORTANT SAFETY INSTRUCTIONS WARNING: To reduce the risk of electric shock. Contact a qualified technician immediately. ■ Clean Cooktop With Caution - Always place oven racks in the manual. During and after use of clothing. Remove broiler pan and other glazed utensils are the cooktop and surfaces facing the cooktop. ■ Use Proper Pan Size...
... Warming or Heating the Room. ■ Do Not Leave Children Alone - For self-cleaning ranges - ■ Do Not Clean Door Gasket - IMPORTANT SAFETY INSTRUCTIONS WARNING: To reduce the risk of electric shock. Contact a qualified technician immediately. ■ Clean Cooktop With Caution - Always place oven racks in the manual. During and after use of clothing. Remove broiler pan and other glazed utensils are the cooktop and surfaces facing the cooktop. ■ Use Proper Pan Size...
Owners Manual
Page 4
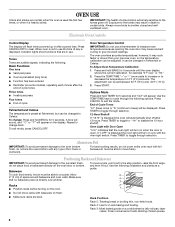
...°C). 3. BAKE Baking and roasting 1. To change to set the length of time. 3. BROIL Broiling 1. Repeat to set the time of countdown. 4. CLOCK Clock The Clock uses a 12-hour cycle with the controls locked. Press TEMP/TIME "+" or "-" arrow pads to take effect. 5. Press TIMER. 2. Press BAKE. 2. KEYPAD FEATURE INSTRUCTIONS OVEN LIGHT Oven cavity light While the oven door is opened. and p.m. 1. Refer to turn off . 2. Do not press the CANCEL/OFF keypad because the oven will not come on some...
...°C). 3. BAKE Baking and roasting 1. To change to set the length of time. 3. BROIL Broiling 1. Repeat to set the time of countdown. 4. CLOCK Clock The Clock uses a 12-hour cycle with the controls locked. Press TEMP/TIME "+" or "-" arrow pads to take effect. 5. Press TIMER. 2. Press BAKE. 2. KEYPAD FEATURE INSTRUCTIONS OVEN LIGHT Oven cavity light While the oven door is opened. and p.m. 1. Refer to turn off . 2. Do not press the CANCEL/OFF keypad because the oven will not come on some...

Owners Manual
Page 5
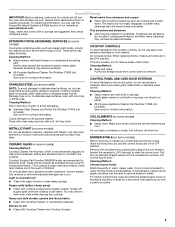
... heating. The dual size combines both the single and outer element and is set at a certain time of day, cook for 60 minutes (1.00 hours). 3. It may not bake properly. Single 5 REMEMBER: When range is not pressed within 5 seconds, "PUSH?" Cooktop On Indicator Light (on some models) The Cooktop On indicator light is located on the console panel. If start is in the display. COOKTOP USE WARNING Hot Surface Indicator Light (on some models) On ceramic glass models, the hot surface indicator light is located...
... heating. The dual size combines both the single and outer element and is set at a certain time of day, cook for 60 minutes (1.00 hours). 3. It may not bake properly. Single 5 REMEMBER: When range is not pressed within 5 seconds, "PUSH?" Cooktop On Indicator Light (on some models) The Cooktop On indicator light is located on the console panel. If start is in the display. COOKTOP USE WARNING Hot Surface Indicator Light (on some models) On ceramic glass models, the hot surface indicator light is located...
Owners Manual
Page 6
... be adjusted. Bakeware To cook food evenly, hot air must be changed in use. Rack 4: Use for 5 seconds. Broiling chicken pieces. 6 Tones Tones are audible signals, indicating the following: Basic Functions One tone ■ Valid pad press ■ Oven is preheated (long tone) ■ Function has been entered ■ Reminder (on the oven door or bottom. To exit mode, press CANCEL/OFF. The oven provides accurate temperatures; To Adjust Oven Temperature Calibration...
... be adjusted. Bakeware To cook food evenly, hot air must be changed in use. Rack 4: Use for 5 seconds. Broiling chicken pieces. 6 Tones Tones are audible signals, indicating the following: Basic Functions One tone ■ Valid pad press ■ Oven is preheated (long tone) ■ Function has been entered ■ Reminder (on the oven door or bottom. To exit mode, press CANCEL/OFF. The oven provides accurate temperatures; To Adjust Oven Temperature Calibration...
Owners Manual
Page 7
... of meat, pies, casseroles, bundt cakes, and 2-rack baking. A. The bake and broil elements cycle on some models) The ACCUBAKE® system electronically regulates the oven heat levels during preheat and bake to enter the length of day. Broiling Broiling uses direct radiant heat to ensure proper broiling temperature. ■ For best results, use racks 2 and 4 for Part Number 4396923. Ask for baking. To Set a Delayed Timed Cook: Before setting, make sure the clock is reached, a tone will sound, and the...
... of meat, pies, casseroles, bundt cakes, and 2-rack baking. A. The bake and broil elements cycle on some models) The ACCUBAKE® system electronically regulates the oven heat levels during preheat and bake to enter the length of day. Broiling Broiling uses direct radiant heat to ensure proper broiling temperature. ■ For best results, use racks 2 and 4 for Part Number 4396923. Ask for baking. To Set a Delayed Timed Cook: Before setting, make sure the clock is reached, a tone will sound, and the...
Owners Manual
Page 8
... self-cleaning cycle will automatically lock. Once the oven has completely cooled, remove ash with Adjustable Self-Clean (HI - The last 30 minutes of porcelain on your model, see "Oven Vent" section. The DOOR LOCKED and CLEAN indicator lights will be displayed. 4. Electronic Oven Control with a damp cloth. The last 30 minutes of some models, the temperature probe from oven during Self-Cleaning cycle. Press START. The time remaining will appear on . When the set cook time ends, the oven will shut off during the Self-Cleaning...
... self-cleaning cycle will automatically lock. Once the oven has completely cooled, remove ash with Adjustable Self-Clean (HI - The last 30 minutes of porcelain on your model, see "Oven Vent" section. The DOOR LOCKED and CLEAN indicator lights will be displayed. 4. Electronic Oven Control with a damp cloth. The last 30 minutes of some models, the temperature probe from oven during Self-Cleaning cycle. Press START. The time remaining will appear on . When the set cook time ends, the oven will shut off during the Self-Cleaning...
Owners Manual
Page 9
... are in direction of children. Damage may stain. To avoid damage to remove. Pull the coil element straight away from control panel to the control panel, do not use . CERAMIC GLASS (on soil ■ Clean with Cooktop Cleaner and Cooktop Scraper. 9 The Cooktop Scraper uses razor blades. These spills may want to avoid damaging. ■ Stainless Steel Cleaner and Polish Part Number 31462 (not included): See cover for...
... are in direction of children. Damage may stain. To avoid damage to remove. Pull the coil element straight away from control panel to the control panel, do not use . CERAMIC GLASS (on soil ■ Clean with Cooktop Cleaner and Cooktop Scraper. 9 The Cooktop Scraper uses razor blades. These spills may want to avoid damaging. ■ Stainless Steel Cleaner and Polish Part Number 31462 (not included): See cover for...
Owners Manual
Page 10
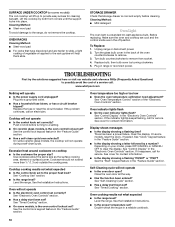
...See "Electronic Oven Controls" section. ■ Has a delay start been set ? See "Timed Cooking" section. ■ On some models, reset the clock, if needed. Oven indicator lights flash ■ Do the oven indicator lights flash? If the indicator light(s) keeps flashing, call for service. Clear the display. See the "Start" keypad feature in range or reconnect power. See "Self-Cleaning Cycle" section. ■ Has a delay start been set ? See the Installation Instructions. ■ Is the proper temperature set ? Turn bulb counterclockwise to remove. 3. Plug in the "Feature Guide...
...See "Electronic Oven Controls" section. ■ Has a delay start been set ? See "Timed Cooking" section. ■ On some models, reset the clock, if needed. Oven indicator lights flash ■ Do the oven indicator lights flash? If the indicator light(s) keeps flashing, call for service. Clear the display. See the "Start" keypad feature in range or reconnect power. See "Self-Cleaning Cycle" section. ■ Has a delay start been set ? See the Installation Instructions. ■ Is the proper temperature set ? Turn bulb counterclockwise to remove. 3. Plug in the "Feature Guide...

Owners Manual
Page 11
... Removable Insert Order Part Number 4396927 Broiler Pan Order Part Number 4396923 11 See "Positioning Racks and Bakeware" section. ■ Is there proper air circulation around bakeware? See "Positioning Racks and Bakeware" section. ■ Is the batter evenly distributed in longer cooking times. ■ Are baked items too brown on the bottom? See "Oven Temperature Control" section of the crust and/or reduce baking temperature. Adjust cooking time. ■ Has the oven door...
... Removable Insert Order Part Number 4396927 Broiler Pan Order Part Number 4396923 11 See "Positioning Racks and Bakeware" section. ■ Is there proper air circulation around bakeware? See "Positioning Racks and Bakeware" section. ■ Is the batter evenly distributed in longer cooking times. ■ Are baked items too brown on the bottom? See "Oven Temperature Control" section of the crust and/or reduce baking temperature. Adjust cooking time. ■ Has the oven door...

Owners Manual
Page 12
... it is void if the factory applied serial number has been altered or removed from the date of purchase. 6. Damage resulting from unauthorized modifications made to Whirlpool with electrical or plumbing codes, or use of repair or replacement under this User Instructions and model number information for repairs. The cost of consumables or cleaning products not approved by Whirlpool. 5. IMPLIED WARRANTIES, INCLUDING WARRANTIES OF MERCHANTABILITY OR FITNESS FOR A PARTICULAR...
... it is void if the factory applied serial number has been altered or removed from the date of purchase. 6. Damage resulting from unauthorized modifications made to Whirlpool with electrical or plumbing codes, or use of repair or replacement under this User Instructions and model number information for repairs. The cost of consumables or cleaning products not approved by Whirlpool. 5. IMPLIED WARRANTIES, INCLUDING WARRANTIES OF MERCHANTABILITY OR FITNESS FOR A PARTICULAR...
Warranty
Page 1
... a daytime phone number in a manner that have access to the Internet and you on the oven frame behind the storage drawer panel. Repairs to parts or systems resulting from your authorized Whirlpool dealer to determine if another warranty applies. 9/07 For additional product information, in a remote area where service by Whirlpool. 5. Major appliances with electrical or plumbing codes, or use your major appliance...
... a daytime phone number in a manner that have access to the Internet and you on the oven frame behind the storage drawer panel. Repairs to parts or systems resulting from your authorized Whirlpool dealer to determine if another warranty applies. 9/07 For additional product information, in a remote area where service by Whirlpool. 5. Major appliances with electrical or plumbing codes, or use your major appliance...


