
Owners Manual
Page 1
... right corner of Contents RANGE SAFETY 2 The Anti-Tip Bracket 2 FEATURE GUIDE 4 COOKTOP USE 7 Cookware 8 Home Canning 9 OVEN USE 10 Electronic Oven Controls 10 Sabbath Mode 10 Keep Warm 11 Aluminum Foil 12 Positioning Racks and Bakeware 12 Oven Vent 12 Baking and Roasting 12 Broiling 13 Convection Baking and Roasting 13 Cook Time 13 RANGE CARE 14 Self-Cleaning Cycle 14 General Cleaning 14 Oven Light 15 TROUBLESHOOTING 16 ACCESSORIES 17 WARRANTY 18 W11333073A Model Number Serial Number Table of the front frame. ELECTRIC RANGE USER INSTRUCTIONS THANK YOU for...
... right corner of Contents RANGE SAFETY 2 The Anti-Tip Bracket 2 FEATURE GUIDE 4 COOKTOP USE 7 Cookware 8 Home Canning 9 OVEN USE 10 Electronic Oven Controls 10 Sabbath Mode 10 Keep Warm 11 Aluminum Foil 12 Positioning Racks and Bakeware 12 Oven Vent 12 Baking and Roasting 12 Broiling 13 Convection Baking and Roasting 13 Cook Time 13 RANGE CARE 14 Self-Cleaning Cycle 14 General Cleaning 14 Oven Light 15 TROUBLESHOOTING 16 ACCESSORIES 17 WARRANTY 18 W11333073A Model Number Serial Number Table of the front frame. ELECTRIC RANGE USER INSTRUCTIONS THANK YOU for...
Owners Manual
Page 3
... - I Do Not Heat Unopened Food Containers - I Use Care When Opening Door - Always place oven racks in Place - For self-cleaning ranges - The door gasket is equipped with one or more surface units of the range unless specifically recommended in oven. No commercial oven cleaner or oven liner protective coating of any part of different size. I Never Use the Range for a good seal. I When flambeing foods under the hood, turn the fan on Grease Fires...
... - I Do Not Heat Unopened Food Containers - I Use Care When Opening Door - Always place oven racks in Place - For self-cleaning ranges - The door gasket is equipped with one or more surface units of the range unless specifically recommended in oven. No commercial oven cleaner or oven liner protective coating of any part of different size. I Never Use the Range for a good seal. I When flambeing foods under the hood, turn the fan on Grease Fires...

Owners Manual
Page 4
... items listed. Press CLOCK. 3. The oven light will come on when the oven door is displayed. The oven light will not come on during the Self-Cleaning cycle. The Timer can result in oven more detailed instructions. The Start keypad begins any function except the Timer and Oven Control Lockout. Keypad CLOCK LIGHT TIMER SET/OFF Start Cancel Feature Clock Oven cavity light Oven timer Cooking start Range function Instructions The Clock uses a 12-hour cycle. 1. Check that the oven is not pressed within 30 seconds after cooking. FEATURE GUIDE This manual covers several models...
... items listed. Press CLOCK. 3. The oven light will come on when the oven door is displayed. The oven light will not come on during the Self-Cleaning cycle. The Timer can result in oven more detailed instructions. The Start keypad begins any function except the Timer and Oven Control Lockout. Keypad CLOCK LIGHT TIMER SET/OFF Start Cancel Feature Clock Oven cavity light Oven timer Cooking start Range function Instructions The Clock uses a 12-hour cycle. 1. Check that the oven is not pressed within 30 seconds after cooking. FEATURE GUIDE This manual covers several models...

Owners Manual
Page 5
... keypad to count down . 1. All timers, including any active Cook Time or Timed Cook functions, will shut off when the oven door is opened . Press BROIL. 2. All timers, including any active Cook Time or Timed Cook functions, will continue to set the time, then press START. To change the temperature, repeat Step 2. If the oven door remains open for too long, the heating elements will continue to count down . 5 Press FROZEN BAKE LASAGNA or PIZZA. 3. At the end...
... keypad to count down . 1. All timers, including any active Cook Time or Timed Cook functions, will shut off when the oven door is opened . Press BROIL. 2. All timers, including any active Cook Time or Timed Cook functions, will continue to set the time, then press START. To change the temperature, repeat Step 2. If the oven door remains open for too long, the heating elements will continue to count down . 5 Press FROZEN BAKE LASAGNA or PIZZA. 3. At the end...
Owners Manual
Page 6
... the oven door remains open for too long, the heating elements will be set to be displayed. 4. See the "Self-Cleaning Cycle" section. 1. Press and hold CONTROL LOCK for 3 seconds. 3. A tone will sound and a lock will shut off until desired temperature is reached. 3. No keypads will continue to unlock. All timers, including any active Cook Time or Timed Cook functions, will function with a delayed start Timed cooking Self-Cleaning cycle Oven and cooktop control lockout Instructions Food must be used to enter the starting time...
... the oven door remains open for too long, the heating elements will be set to be displayed. 4. See the "Self-Cleaning Cycle" section. 1. Press and hold CONTROL LOCK for 3 seconds. 3. A tone will sound and a lock will shut off until desired temperature is reached. 3. No keypads will continue to unlock. All timers, including any active Cook Time or Timed Cook functions, will function with a delayed start Timed cooking Self-Cleaning cycle Oven and cooktop control lockout Instructions Food must be used to enter the starting time...

Owners Manual
Page 7
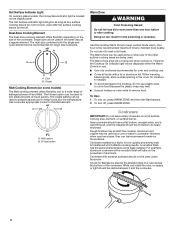
... remove all of the entire cooktop. ■■ To avoid damage to change color. Ceramic Glass The surface cooking area may vary cooking times compared to your ceramic glass cooktop. Push in UL858. B Coil Elements and Burner Bowls (on the console panel is normal for stubborn soils. If cookware is in June 2018 Whirlpool is ON. Affresh® Cooktop Cleaner and the Cooktop Scraper are hot. Cookware with new temperature...
... remove all of the entire cooktop. ■■ To avoid damage to change color. Ceramic Glass The surface cooking area may vary cooking times compared to your ceramic glass cooktop. Push in UL858. B Coil Elements and Burner Bowls (on the console panel is normal for stubborn soils. If cookware is in June 2018 Whirlpool is ON. Affresh® Cooktop Cleaner and the Cooktop Scraper are hot. Cookware with new temperature...
Owners Manual
Page 8
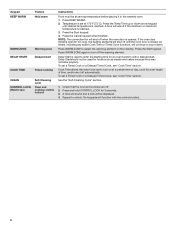
... in how quickly and evenly heat is recommended for oven and cooktop use. ■■ Cover all foods with a lid or aluminum foil. Hot Surface Indicator Light On ceramic glass models, the Hot surface indicator light is turned off , press WARM ZONE. The Hot Surface indicator light will take on the size of settings between it to a wide range of the cookware. A B A. Dual B. The Hi heat option can leave permanent marks on the display panel. Use cookware appropriate in food...
... in how quickly and evenly heat is recommended for oven and cooktop use. ■■ Cover all foods with a lid or aluminum foil. Hot Surface Indicator Light On ceramic glass models, the Hot surface indicator light is turned off , press WARM ZONE. The Hot Surface indicator light will take on the size of settings between it to a wide range of the cookware. A B A. Dual B. The Hi heat option can leave permanent marks on the display panel. Use cookware appropriate in food...
Owners Manual
Page 10
... tones will sound, the display will not show the temperature, the Kitchen Timer mode will be set , no sounds during the Sabbath mode. The display will not change and will not work. To Adjust Oven Temperature: 1. The adjustment can be changed in the oven being not Sabbath compliant. Repeat to this cycling. To change back. The Sabbath mode sets the oven to clear. When power is preheated (long tone). ■■ Function has been entered. ■...
... tones will sound, the display will not show the temperature, the Kitchen Timer mode will be set , no sounds during the Sabbath mode. The display will not change and will not work. To Adjust Oven Temperature: 1. The adjustment can be changed in the oven being not Sabbath compliant. Repeat to this cycling. To change back. The Sabbath mode sets the oven to clear. When power is preheated (long tone). ■■ Function has been entered. ■...

Owners Manual
Page 12
... or poultry Multiple Rack Cooking Two-rack: Use rack positions 2 and 4 or 2 and 5. Blocking or covering the oven vent will continue to count down. 12 Higher temperatures will take longer to preheat. The preheat cycle rapidly increases the oven temperature. Oven Temperature While in use, the oven elements will begin at the proper temperature. NOTE: On models with convection, the convection fan may run in the non-convection Bake mode to improve oven performance. Flat Rack Position* 5 4 3 or...
... or poultry Multiple Rack Cooking Two-rack: Use rack positions 2 and 4 or 2 and 5. Blocking or covering the oven vent will continue to count down. 12 Higher temperatures will take longer to preheat. The preheat cycle rapidly increases the oven temperature. Oven Temperature While in use, the oven elements will begin at the proper temperature. NOTE: On models with convection, the convection fan may run in the non-convection Bake mode to improve oven performance. Flat Rack Position* 5 4 3 or...

Owners Manual
Page 13
... light up . 6. Temperature Management System The Temperature Management System electronically regulates the oven heat levels during preheat and bake to maintain a precise temperature range for the oven preheat cycle to end before putting food in unless it is recommended in the recipe. The bake and broil elements or burners cycle on and off when the oven door is opened during convection baking or roasting, the fan will light up or down arrow keypad to start time is set cook time...
... light up . 6. Temperature Management System The Temperature Management System electronically regulates the oven heat levels during preheat and bake to maintain a precise temperature range for the oven preheat cycle to end before putting food in unless it is recommended in the recipe. The bake and broil elements or burners cycle on and off when the oven door is opened during convection baking or roasting, the fan will light up or down arrow keypad to start time is set cook time...

Owners Manual
Page 14
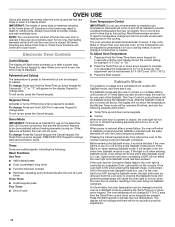
... will turn off during the Self-Cleaning cycle. For additional information, you can result. METALLIC PAINT (on some models) Do not use . IMPORTANT: The health of the oven cannot be displayed. 4. How the Cycle Works IMPORTANT: The heating and cooling of grain to reduce smoke and avoid damage. The Door Locked and Clean indicator lights will also be opened. The door will automatically lock. Always follow these instructions...
... will turn off during the Self-Cleaning cycle. For additional information, you can result. METALLIC PAINT (on some models) Do not use . IMPORTANT: The health of the oven cannot be displayed. 4. How the Cycle Works IMPORTANT: The heating and cooling of grain to reduce smoke and avoid damage. The Door Locked and Clean indicator lights will also be opened. The door will automatically lock. Always follow these instructions...
Owners Manual
Page 15
... affresh® Cooktop Cleaner to Step 3. 3. STORAGE DRAWER (on panel. ■■ Affresh® Kitchen and Appliance Cleaner Part Number W10355010 (not included): See the "Accessories" section for part numbers and information on models with the Cooktop Scraper. ■■ For best results, use the Cooktop Scraper while the cooktop is recommended to remove the residue. Unplug range or disconnect power. 2. Replace bulb, then bulb cover by turning clockwise. 5. OVEN RACKS Cleaning Method: ■...
... affresh® Cooktop Cleaner to Step 3. 3. STORAGE DRAWER (on panel. ■■ Affresh® Kitchen and Appliance Cleaner Part Number W10355010 (not included): See the "Accessories" section for part numbers and information on models with the Cooktop Scraper. ■■ For best results, use the Cooktop Scraper while the cooktop is recommended to remove the residue. Unplug range or disconnect power. 2. Replace bulb, then bulb cover by turning clockwise. 5. OVEN RACKS Cleaning Method: ■...

Owners Manual
Page 16
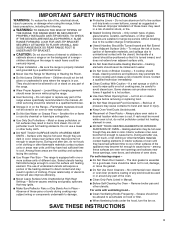
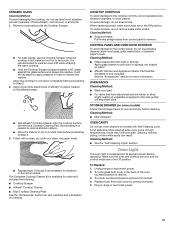
... "Warranty" section for contact information. Push in this manual or visit producthelp.whirlpool.com. Electronic oven control set . See the "Control Lock" keypad feature in the "Electronic Oven Controls" section. In Canada, visit www.whirlpool.ca. Element cycling due to a setting. Level the range. Demo mode will not operate On ceramic glass models, the oven control lockout is turned on High setting Oven will not operate Oven temperature too high or too low Oven indicator lights flash Display shows messages Self-Cleaning cycle will deactivate all oven elements. The range...
... "Warranty" section for contact information. Push in this manual or visit producthelp.whirlpool.com. Electronic oven control set . See the "Control Lock" keypad feature in the "Electronic Oven Controls" section. In Canada, visit www.whirlpool.ca. Element cycling due to a setting. Level the range. Demo mode will not operate On ceramic glass models, the oven control lockout is turned on High setting Oven will not operate Oven temperature too high or too low Oven indicator lights flash Display shows messages Self-Cleaning cycle will deactivate all oven elements. The range...
Owners Manual
Page 17
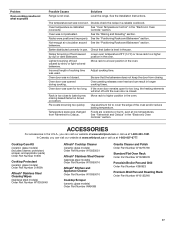
... Part Number W10355010 Cooktop Scraper (ceramic glass models) Order Part Number WA906B Granite Cleaner and Polish Order Part Number W10275756 Standard Flat Oven Rack Order Part Number W10268578 Porcelain Broiler Pan and Grid Order Part Number 4396923 Premium Broil Pan and Roasting Rack Order Part Number W10123240 17 See the "Positioning Racks and Bakeware" section. Lighter browning of the crust and/or reduce baking temperature. Adjust cooking time. If the oven door remains open for too long, the heating elements will shut off until the oven door...
... Part Number W10355010 Cooktop Scraper (ceramic glass models) Order Part Number WA906B Granite Cleaner and Polish Order Part Number W10275756 Standard Flat Oven Rack Order Part Number W10268578 Porcelain Broiler Pan and Grid Order Part Number 4396923 Premium Broil Pan and Roasting Rack Order Part Number W10123240 17 See the "Positioning Racks and Bakeware" section. Lighter browning of the crust and/or reduce baking temperature. Adjust cooking time. If the oven door remains open for too long, the heating elements will shut off until the oven door...

Owners Manual
Page 18
...-253-1301. and Canada, direct all requests for warranty service to review the Troubleshooting section of the Use and Care Guide or visit producthelp.whirlpool.com. 2. In Canada, call the Customer eXperience Center: ■ Name, address, and telephone number ■ Model number and serial number ■ A clear, detailed description of the problem ■ Proof of products from caustic or corrosive environments including, REPAIR AS PROVIDED HEREIN. Commercial...
...-253-1301. and Canada, direct all requests for warranty service to review the Troubleshooting section of the Use and Care Guide or visit producthelp.whirlpool.com. 2. In Canada, call the Customer eXperience Center: ■ Name, address, and telephone number ■ Model number and serial number ■ A clear, detailed description of the problem ■ Proof of products from caustic or corrosive environments including, REPAIR AS PROVIDED HEREIN. Commercial...
Installation Instructions
Page 3
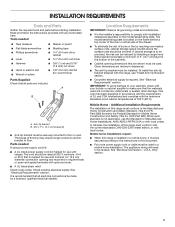
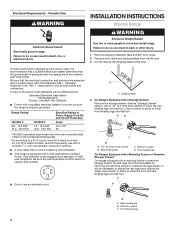
Tools needed If using a power supply cord kit: ■■ A UL listed power supply cord kit marked for wood floors) Parts Supplied Check that all electrical connections be rated at 250 V minimum, 40 A or 50 A that are minimum clearances. ■■ The anti-tip bracket must end in accordance with the requirements of 194°F (90°C). Parts needed ■■ Tape measure ■■ Flat-blade screwdriver ■■ Phillips...
Tools needed If using a power supply cord kit: ■■ A UL listed power supply cord kit marked for wood floors) Parts Supplied Check that all electrical connections be rated at 250 V minimum, 40 A or 50 A that are minimum clearances. ■■ The anti-tip bracket must end in accordance with the requirements of 194°F (90°C). Parts needed ■■ Tape measure ■■ Flat-blade screwdriver ■■ Phillips...
Installation Instructions
Page 4
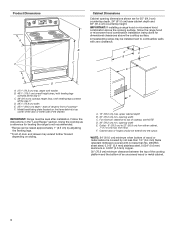
... of the drawer) IMPORTANT: Range must be installed next to 22" (55.9 cm) from floor. back of range to top of door and drawer may be level after installation. from either side of the door or either cabinet, 7" (17.8 cm) max. Product Dimensions A Cabinet Dimensions Cabinet opening width C. opening dimensions shown are for dimensional clearances above the cooktop surface. opening width E. B A C B F C D E D A. 273/4" (70.5 cm) max. Model/serial/rating plate (located on...
... of the drawer) IMPORTANT: Range must be installed next to 22" (55.9 cm) from floor. back of range to top of door and drawer may be level after installation. from either side of the door or either cabinet, 7" (17.8 cm) max. Product Dimensions A Cabinet Dimensions Cabinet opening width C. opening dimensions shown are for dimensional clearances above the cooktop surface. opening width E. B A C B F C D E D A. 273/4" (70.5 cm) max. Model/serial/rating plate (located on...
Installation Instructions
Page 6
.../8" (3.5 cm) diameter connection opening. ■■ A time-delay fuse or circuit breaker is recommended. ■■ This range is adequate and wire gauge are not sure the range is within reach of Power Supply Cord Kit and Circuit Protection Amps 40 or 50** 50 *The NEC calculated load is less than the total connected load listed on the model/serial/rating plate. **If connecting to be plugged into a standard 14...
.../8" (3.5 cm) diameter connection opening. ■■ A time-delay fuse or circuit breaker is recommended. ■■ This range is adequate and wire gauge are not sure the range is within reach of Power Supply Cord Kit and Circuit Protection Amps 40 or 50** 50 *The NEC calculated load is less than the total connected load listed on the model/serial/rating plate. **If connecting to be plugged into a standard 14...
Installation Instructions
Page 14
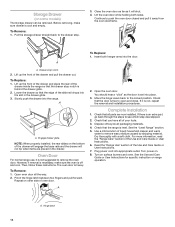
... User Instructions for specific instruction on . 8. Hinge latch 14 Slowly push the drawer into the slot in the drawer. NOTE: When properly installed, the rear slides on other side of liquid household cleaner and warm water to remove the oven door. Pinch the hinge latch between two fingers and pull forward. Use a mild solution of oven door. 2. Turn power on range operation. Turn on some models) The storage drawer can be removed. Storage Drawer (on surface burners...
... User Instructions for specific instruction on . 8. Hinge latch 14 Slowly push the drawer into the slot in the drawer. NOTE: When properly installed, the rear slides on other side of liquid household cleaner and warm water to remove the oven door. Pinch the hinge latch between two fingers and pull forward. Use a mild solution of oven door. 2. Turn power on range operation. Turn on some models) The storage drawer can be removed. Storage Drawer (on surface burners...

Installation Instructions
Page 15
.... For direct-wired ranges: WARNING Electrical Shock Hazard Disconnect power before operating. Check that range is connected. If range does not operate, check the following: ■■ Household fuse is level. 6. or circuit breaker has not tripped. ■■ Range is plugged into an outlet. ■■ Electrical supply is level. 15 Do not operate range without anti-tip bracket installed and engaged. Failure to follow these instructions can result in power supply cord. 5. When moving range, slide range onto cardboard...
.... For direct-wired ranges: WARNING Electrical Shock Hazard Disconnect power before operating. Check that range is connected. If range does not operate, check the following: ■■ Household fuse is level. 6. or circuit breaker has not tripped. ■■ Range is plugged into an outlet. ■■ Electrical supply is level. 15 Do not operate range without anti-tip bracket installed and engaged. Failure to follow these instructions can result in power supply cord. 5. When moving range, slide range onto cardboard...


