
Owners Manual
Page 1
... TROUBLESHOOTING 16 ACCESSORIES 17 WARRANTY 18 W11333073A For future reference, please make a note of your range at www.whirlpool.ca. In Canada, register your range at www.whirlpool.com. ELECTRIC RANGE USER INSTRUCTIONS THANK YOU for purchasing this high-quality product. Model Number Serial Number Table of the front frame. Register your product...
... TROUBLESHOOTING 16 ACCESSORIES 17 WARRANTY 18 W11333073A For future reference, please make a note of your range at www.whirlpool.ca. In Canada, register your range at www.whirlpool.com. ELECTRIC RANGE USER INSTRUCTIONS THANK YOU for purchasing this high-quality product. Model Number Serial Number Table of the front frame. Register your product...

Owners Manual
Page 4
... detailed instructions. Press the Temp/Time up or down arrow keypad to this manual or the Frequently Asked Questions section of our website at www.whirlpool.com for more than one hour before or after pressing a keypad, the function is canceled and the time of countdown. 4. FEATURE GUIDE This ... model may have some or all of time. 3. Refer to set the minutes. 4. Do not press the Cancel keypad because the oven will sound at www.whirlpool.ca. Check that the oven is closed, press LIGHT to 9 hours and 59 minutes. 1. Press CLOCK to switch to cancel the Timer. The ...
... detailed instructions. Press the Temp/Time up or down arrow keypad to this manual or the Frequently Asked Questions section of our website at www.whirlpool.com for more than one hour before or after pressing a keypad, the function is canceled and the time of countdown. 4. FEATURE GUIDE This ... model may have some or all of time. 3. Refer to set the minutes. 4. Do not press the Cancel keypad because the oven will sound at www.whirlpool.ca. Check that the oven is closed, press LIGHT to 9 hours and 59 minutes. 1. Press CLOCK to switch to cancel the Timer. The ...

Owners Manual
Page 7
...directly on , the Cooktop On indicator light will return to the cookware. Fire Hazard Turn off and back on again, even while on some models) Coil elements should be level for cleaning. They could leave aluminum marks that cannot be removed completely. ■■ To avoid damage to ...B Coil Elements and Burner Bowls (on the console panel is ON. Surface cooking area B. Do not use to the updated standards in June 2018 Whirlpool is still warm. When any form, clean up all soils. ■■ Use flat-bottomed cookware for stubborn soils. These new coils may not...
...directly on , the Cooktop On indicator light will return to the cookware. Fire Hazard Turn off and back on again, even while on some models) Coil elements should be level for cleaning. They could leave aluminum marks that cannot be removed completely. ■■ To avoid damage to ...B Coil Elements and Burner Bowls (on the console panel is ON. Surface cooking area B. Do not use to the updated standards in June 2018 Whirlpool is still warm. When any form, clean up all soils. ■■ Use flat-bottomed cookware for stubborn soils. These new coils may not...
Owners Manual
Page 8
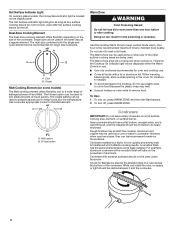
... may melt. ■■ Use pot holders or oven mitts to -heavy thickness. Dual B. Melt option B. To turn on some models) The Melt cooking element offers flexibility due to keep cooked foods warm. Check for the Melt element. The Hot Surface indicator light will be...While you rotate the ruler, no space or light should be used under the broiler. Hot Surface Indicator Light On ceramic glass models, the Hot surface indicator light is transferred which affects cooking results. Dual Zone Cooking Element The Dual Zone cooking element offers flexibility ...
... may melt. ■■ Use pot holders or oven mitts to -heavy thickness. Dual B. Melt option B. To turn on some models) The Melt cooking element offers flexibility due to keep cooked foods warm. Check for the Melt element. The Hot Surface indicator light will be...While you rotate the ruler, no space or light should be used under the broiler. Hot Surface Indicator Light On ceramic glass models, the Hot surface indicator light is transferred which affects cooking results. Dual Zone Cooking Element The Dual Zone cooking element offers flexibility ...

Owners Manual
Page 9
... cooking area or element. ■■ Do not place canner on 2 surface cooking areas or elements at the same time. ■■ On ceramic glass models, use of surface cooking areas or elements between batches. Home Canning Canning can also offer assistance. 9 On electric cooktops, canners should be diminished if cleaned...
... cooking area or element. ■■ Do not place canner on 2 surface cooking areas or elements at the same time. ■■ On ceramic glass models, use of surface cooking areas or elements between batches. Home Canning Canning can also offer assistance. 9 On electric cooktops, canners should be diminished if cleaned...
Owners Manual
Page 10
... keypad. Sabbath Mode For guidance on . The Sabbath mode sets the oven to be demonstrated without heating elements turning on usage and a complete list of models with 120 V power connection and permits the control features to this adjustment. 10 Tones Tones are audible signals, indicating the following keypads will function: ■...
... keypad. Sabbath Mode For guidance on . The Sabbath mode sets the oven to be demonstrated without heating elements turning on usage and a complete list of models with 120 V power connection and permits the control features to this adjustment. 10 Tones Tones are audible signals, indicating the following keypads will function: ■...
Owners Manual
Page 11
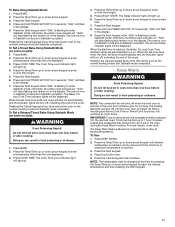
.... Press the Start keypad. 8. The oven is closed. Press the Cancel keypad when finished. To Set a Timed Bake Using Sabbath Mode (on some models): 1. The Bake, On, and Cook Time indicator lights will flash in food poisoning or sickness. 1. Doing so can result in the display. 9. All... returns the oven to the normal cooking mode (not Sabbath mode compliant). To Set a Delayed Timed Bake Using Sabbath Mode (on some models): WARNING Food Poisoning Hazard Do not let food sit in the display. Press COOK TIME. Food may become too dry if left in food...
.... Press the Start keypad. 8. The oven is closed. Press the Cancel keypad when finished. To Set a Timed Bake Using Sabbath Mode (on some models): 1. The Bake, On, and Cook Time indicator lights will flash in food poisoning or sickness. 1. Doing so can result in the display. 9. All... returns the oven to the normal cooking mode (not Sabbath mode compliant). To Set a Delayed Timed Bake Using Sabbath Mode (on some models): WARNING Food Poisoning Hazard Do not let food sit in the display. Press COOK TIME. Food may become too dry if left in food...

Owners Manual
Page 12
... front of the oven racks provided with foil because air must be blocked or covered. Do not set temperature to improve oven performance. NOTE: On models with convection, the convection fan may run in the non-convection Bake mode to offset the heat lost when your food when the preheat tone...
... front of the oven racks provided with foil because air must be blocked or covered. Do not set temperature to improve oven performance. NOTE: On models with convection, the convection fan may run in the non-convection Bake mode to offset the heat lost when your food when the preheat tone...

Owners Manual
Page 13
... light up . 4. See the "Clock" keypad feature in the recipe. The delay oven indicator light will shut off immediately. When the start . 7. On convection range models, the fan will continue to enter a temperature other than the one hour before putting food in unless it is recommended in oven more information. All...
... light up . 4. See the "Clock" keypad feature in the recipe. The delay oven indicator light will shut off immediately. When the start . 7. On convection range models, the fan will continue to enter a temperature other than the one hour before putting food in unless it is recommended in oven more information. All...

Owners Manual
Page 14
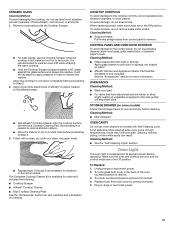
... cloth. Press SELF CLEAN. 2. The door will be opened. STAINLESS STEEL (on cleaning products. Failure to follow label instructions on some models) Do not use abrasive cleaners, cleaners with one-time or limited use soap-filled scouring pads, abrasive cleaners, Cooktop Cleaner, steel-wool ...completely cooled, remove ash with Adjustable Clean Time The Self-Cleaning cycle is displayed. To stop the Self-Cleaning cycle at www.whirlpool.ca. The time remaining will not affect cooking performance. ■■ Remove plastic items from the cooktop because they may stain....
... cloth. Press SELF CLEAN. 2. The door will be opened. STAINLESS STEEL (on cleaning products. Failure to follow label instructions on some models) Do not use abrasive cleaners, cleaners with one-time or limited use soap-filled scouring pads, abrasive cleaners, Cooktop Cleaner, steel-wool ...completely cooled, remove ash with Adjustable Clean Time The Self-Cleaning cycle is displayed. To stop the Self-Cleaning cycle at www.whirlpool.ca. The time remaining will not affect cooking performance. ■■ Remove plastic items from the cooktop because they may stain....
Owners Manual
Page 15
...9632;■ Affresh® Kitchen and Appliance Cleaner Part Number W10355010 (not included): See the "Accessories" section for part numbers and information on models with the Cooktop Scraper. ■■ For best results, use abrasive cleaners, steel-wool pads, gritty washcloths, or abrasive paper towels. ... clean, dry cloth or a clean, dry paper towel. ■■ Repeat steps 1 through 3 as necessary for stubborn or burned-on some models, do not remove seals under knobs. It is a standard 40 W appliance bulb. Apply a few dime-sized drops of the oven counterclockwise to ...
...9632;■ Affresh® Kitchen and Appliance Cleaner Part Number W10355010 (not included): See the "Accessories" section for part numbers and information on models with the Cooktop Scraper. ■■ For best results, use abrasive cleaners, steel-wool pads, gritty washcloths, or abrasive paper towels. ... clean, dry cloth or a clean, dry paper towel. ■■ Repeat steps 1 through 3 as necessary for stubborn or burned-on some models, do not remove seals under knobs. It is a standard 40 W appliance bulb. Apply a few dime-sized drops of the oven counterclockwise to ...

Owners Manual
Page 16
... will operate Cooktop will not operate Possible Causes Power supply cord is not level. The electrical outlet in this manual or visit producthelp.whirlpool.com. Range is unplugged. Element cycling due to a setting. A Timed Cook function has been entered. Use cookware about the same...proper size. Cookware should not extend more recommendations that is not closed . See the "Warranty" section for contact information. On some models, reset the clock, if needed. Excessive heat around cookware on cooktop Cooktop cooking results not what expected Cooktop element cycles on or ...
... will operate Cooktop will not operate Possible Causes Power supply cord is not level. The electrical outlet in this manual or visit producthelp.whirlpool.com. Range is unplugged. Element cycling due to a setting. A Timed Cook function has been entered. Use cookware about the same...proper size. Cookware should not extend more recommendations that is not closed . See the "Warranty" section for contact information. On some models, reset the clock, if needed. Excessive heat around cookware on cooktop Cooktop cooking results not what expected Cooktop element cycles on or ...
Owners Manual
Page 17
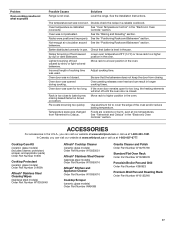
...open for too long, the heating elements will shut off until the oven door is level in the U.S.A., you can visit our website at www.whirlpool.com or call us at 1-800-253-1301. Pie crusts browning too quickly. Solutions Level the range. bakeware. Batter distributed unevenly in longer ... Part Number W10355016 Affresh® Kitchen and Appliance Cleaner Order Part Number W10355010 Cooktop Scraper (ceramic glass models) Order Part Number WA906B Granite Cleaner and Polish Order Part Number W10275756 Standard Flat Oven Rack Order Part Number W10268578 Porcelain Broiler Pan ...
...open for too long, the heating elements will shut off until the oven door is level in the U.S.A., you can visit our website at www.whirlpool.com or call us at 1-800-253-1301. Pie crusts browning too quickly. Solutions Level the range. bakeware. Batter distributed unevenly in longer ... Part Number W10355016 Affresh® Kitchen and Appliance Cleaner Order Part Number W10355010 Cooktop Scraper (ceramic glass models) Order Part Number WA906B Granite Cleaner and Polish Order Part Number W10275756 Standard Flat Oven Rack Order Part Number W10268578 Porcelain Broiler Pan ...

Owners Manual
Page 18
...RECEIPT HERE. to instructions attached to review the Troubleshooting section of God, or use with the product, Whirlpool Corporation or Whirlpool Canada LP (hereafter "Whirlpool") will be borne by unauthorized service, the remaining term of the original unit's alteration, or modification..., detailed description of the problem ■ Proof of inaccessible appliances or built-in materials or workmanship that interfere with original model/serial numbers removed, altered, or not easily determined. In the U.S. This limited warranty is not available. Travel or transportation...
...RECEIPT HERE. to instructions attached to review the Troubleshooting section of God, or use with the product, Whirlpool Corporation or Whirlpool Canada LP (hereafter "Whirlpool") will be borne by unauthorized service, the remaining term of the original unit's alteration, or modification..., detailed description of the problem ■ Proof of inaccessible appliances or built-in materials or workmanship that interfere with original model/serial numbers removed, altered, or not easily determined. In the U.S. This limited warranty is not available. Travel or transportation...
Installation Instructions
Page 3
.../rating plate is located on the model/serial/rating plate. To install the anti-tip bracket shipped with the maximum allowable wood cabinet temperatures of UL and CSA International and complies with ...
.../rating plate is located on the model/serial/rating plate. To install the anti-tip bracket shipped with the maximum allowable wood cabinet temperatures of UL and CSA International and complies with ...
Installation Instructions
Page 4
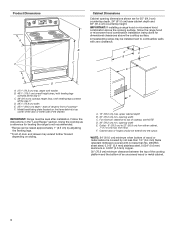
..." (0.5 mm) copper. 30" (76.2 cm) minimum clearance between the top of the cooking platform and the bottom of cooktop, see NOTE* D. 30" (76.2 cm) min. Model/serial/rating plate (located on styling. B A C B F C D E D A. 273/4" (70.5 cm) max. E F A. 13" (33.0 cm) max. F. Product Dimensions A Cabinet Dimensions Cabinet opening dimensions shown are for dimensional...
..." (0.5 mm) copper. 30" (76.2 cm) minimum clearance between the top of the cooking platform and the bottom of cooktop, see NOTE* D. 30" (76.2 cm) min. Model/serial/rating plate (located on styling. B A C B F C D E D A. 273/4" (70.5 cm) max. E F A. 13" (33.0 cm) max. F. Product Dimensions A Cabinet Dimensions Cabinet opening dimensions shown are for dimensional...
Installation Instructions
Page 5
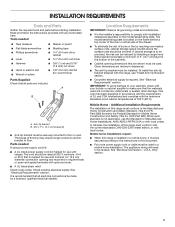
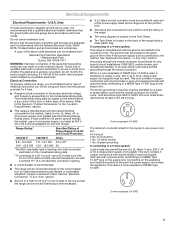
The model/serial rating plate is manufactured with the neutral terminal connected to the figures in "Product Dimensions" in the "Location Requirements" section. ■■ This range ... 40 or 50** 16.6 - 22.5 KW 12.6 - 18.5 KW 50 *The NEC calculated load is located on the model/serial rating plate. **If connecting to 91.4 cm) of the drawer. U.S.A. Connectors on the model/serial rating plate. Do not use with the National Electrical Code, ANSI/ NFPA 70-latest edition and all...
The model/serial rating plate is manufactured with the neutral terminal connected to the figures in "Product Dimensions" in the "Location Requirements" section. ■■ This range ... 40 or 50** 16.6 - 22.5 KW 12.6 - 18.5 KW 50 *The NEC calculated load is located on the model/serial rating plate. **If connecting to 91.4 cm) of the drawer. U.S.A. Connectors on the model/serial rating plate. Do not use with the National Electrical Code, ANSI/ NFPA 70-latest edition and all...
Installation Instructions
Page 6
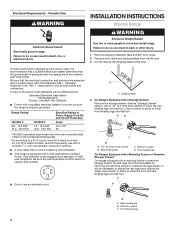
If codes permit and a separate ground wire is used, it is less than the total connected load listed on the model/serial/rating plate. **If connecting to a 50 A circuit, use a 50 A rated cord with a CSA International Certified Power Cord intended to lower the front and rear ...
If codes permit and a separate ground wire is used, it is less than the total connected load listed on the model/serial/rating plate. **If connecting to a 50 A circuit, use a 50 A rated cord with a CSA International Certified Power Cord intended to lower the front and rear ...

Installation Instructions
Page 8
... relief ■■ Tighten strain relief screw against the power supply cord. 8 Plug into a grounded outlet. Remove the terminal block cover screws located on your model, remove the plastic tag holding three 10-32 hex nuts from each side B. Terminal block cover C. Electrical Shock Hazard Disconnect power before servicing. A A. Use 8 gauge...
... relief ■■ Tighten strain relief screw against the power supply cord. 8 Plug into a grounded outlet. Remove the terminal block cover screws located on your model, remove the plastic tag holding three 10-32 hex nuts from each side B. Terminal block cover C. Electrical Shock Hazard Disconnect power before servicing. A A. Use 8 gauge...
Installation Instructions
Page 13
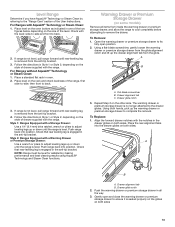
... of the User Instructions. If range is not level, pull range forward until rear leveling leg is engaged in Style 1 or Style 2, depending on some models) Remove all the way. 3. Follow the directions in the anti-tip bracket. Warming Drawer or Premium Storage Drawer (on the style of the level. Using...
... of the User Instructions. If range is not level, pull range forward until rear leveling leg is engaged in Style 1 or Style 2, depending on some models) Remove all the way. 3. Follow the directions in the anti-tip bracket. Warming Drawer or Premium Storage Drawer (on the style of the level. Using...


