Use & Care Guide
Page 1
... RANGE SAFETY 2 The Anti-Tip Bracket 2 FEATURE GUIDE 4 COOKTOP USE 5 Cookware 7 Home Canning 8 OVEN USE 8 Electronic Oven Controls 8 Sabbath Mode 9 Aluminum Foil 9 Positioning Racks and Bakeware 10 Oven Vent 10 Baking and Roasting 10 Broiling 10 Convection Baking and Roasting 11 Cook Time 11 RANGE CARE 12 Self-Cleaning Cycle (on the oven frame behind the storage drawer panel. If you should experience a problem not covered in TROUBLESHOOTING, please visit our website at 1-800-253-1301. Puede encontrar su número de modelo y de serie...
... RANGE SAFETY 2 The Anti-Tip Bracket 2 FEATURE GUIDE 4 COOKTOP USE 5 Cookware 7 Home Canning 8 OVEN USE 8 Electronic Oven Controls 8 Sabbath Mode 9 Aluminum Foil 9 Positioning Racks and Bakeware 10 Oven Vent 10 Baking and Roasting 10 Broiling 10 Convection Baking and Roasting 11 Cook Time 11 RANGE CARE 12 Self-Cleaning Cycle (on the oven frame behind the storage drawer panel. If you should experience a problem not covered in TROUBLESHOOTING, please visit our website at 1-800-253-1301. Puede encontrar su número de modelo y de serie...

Use & Care Guide
Page 3
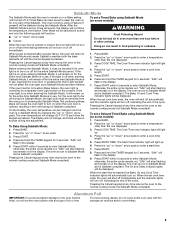
... ventilating hood - ■ Clean Ventilating Hoods Frequently - To reduce the risk of burns, ignition of the heating element to direct contact and may subject wiring or components underneath to the sudden change in the manual. Children should be seriously injured. ■ Proper Installation - During and after use . SAVE THESE INSTRUCTIONS 3 Remove broiler pan and other glazed utensils are the cooktop and surfaces facing the cooktop. ■ Use Proper Pan Size - The range is...
... ventilating hood - ■ Clean Ventilating Hoods Frequently - To reduce the risk of burns, ignition of the heating element to direct contact and may subject wiring or components underneath to the sudden change in the manual. Children should be seriously injured. ■ Proper Installation - During and after use . SAVE THESE INSTRUCTIONS 3 Remove broiler pan and other glazed utensils are the cooktop and surfaces facing the cooktop. ■ Use Proper Pan Size - The range is...

Use & Care Guide
Page 4
...). 5. The oven light will sound at www.whirlpool.com for 5 minutes. 4. Press TIMER. 2. Press START or wait 5 seconds for 5 seconds. If enabled, end-of our website at end of day is opened. If Start is running, but not in food poisoning or sickness. Press CANCEL when finished. 1. KEYPAD CLOCK OVEN LIGHT TIMER (Set/Off) START CANCEL TEMP/TIME BAKE BROIL FEATURE Clock Oven cavity light Oven timer Cooking start Range function Temperature and time adjust Baking and roasting Broiling INSTRUCTIONS The Clock uses a 12-hour...
...). 5. The oven light will sound at www.whirlpool.com for 5 minutes. 4. Press TIMER. 2. Press START or wait 5 seconds for 5 seconds. If enabled, end-of our website at end of day is opened. If Start is running, but not in food poisoning or sickness. Press CANCEL when finished. 1. KEYPAD CLOCK OVEN LIGHT TIMER (Set/Off) START CANCEL TEMP/TIME BAKE BROIL FEATURE Clock Oven cavity light Oven timer Cooking start Range function Temperature and time adjust Baking and roasting Broiling INSTRUCTIONS The Clock uses a 12-hour...

Use & Care Guide
Page 5
... the end of day, cook for an oven function with a delayed start COOK TIME Timed cooking SELF CLEAN (on some models) FEATURE Convection baking and roasting KEEP WARM Hold warm START TIME Delayed start . Remove any excess water with the controls locked. Check that the oven is set to be used to take effect. 5. A tone will sound, and "Loc" will appear in 5°F (5°C) increments between HIGH and LOW. Only the CLOCK, OVEN LIGHT and TIMER keypads will function with a sponge or...
... the end of day, cook for an oven function with a delayed start COOK TIME Timed cooking SELF CLEAN (on some models) FEATURE Convection baking and roasting KEEP WARM Hold warm START TIME Delayed start . Remove any excess water with the controls locked. Check that the oven is set to be used to take effect. 5. A tone will sound, and "Loc" will appear in 5°F (5°C) increments between HIGH and LOW. Only the CLOCK, OVEN LIGHT and TIMER keypads will function with a sponge or...

Use & Care Guide
Page 6
... temperatures. Surface cooking area B. Ceramic Glass Cooktop Cleaning Clean the cooktop after each use to condition the glass surface. IMPORTANT: To avoid permanent damage to the cooktop surface and to make soils easier to remove, clean the cooktop after each use to help avoid scratches, pitting, abrasions and to remove all soils. ■ Avoid storing jars or cans above the cooktop. Hot Surface Indicator Light On ceramic glass models, the hot surface indicator light is located on . Dual Zone Cooking Element (on some models) The Dual Zone Cooking Element...
... temperatures. Surface cooking area B. Ceramic Glass Cooktop Cleaning Clean the cooktop after each use to condition the glass surface. IMPORTANT: To avoid permanent damage to the cooktop surface and to make soils easier to remove, clean the cooktop after each use to help avoid scratches, pitting, abrasions and to remove all soils. ■ Avoid storing jars or cans above the cooktop. Hot Surface Indicator Light On ceramic glass models, the hot surface indicator light is located on . Dual Zone Cooking Element (on some models) The Dual Zone Cooking Element...
Use & Care Guide
Page 9
... decided if the oven light is to be changed once the oven is Sabbath compliant. Press COOK TIME. The Cook Time oven indicator light will light up . 6. otherwise, the entire cycle cancels out. The oven is now in Sabbath Mode and is in Sabbath Mode by a separate Oven Light switch on in use . The oven is now in Sabbath Mode and is Sabbath compliant. Sabbath Mode The Sabbath Mode sets the oven to remain on some models): 1. Opening the oven door or pressing the Oven Light keypad will...
... decided if the oven light is to be changed once the oven is Sabbath compliant. Press COOK TIME. The Cook Time oven indicator light will light up . 6. otherwise, the entire cycle cancels out. The oven is now in Sabbath Mode and is in Sabbath Mode by a separate Oven Light switch on in use . The oven is now in Sabbath Mode and is Sabbath compliant. Sabbath Mode The Sabbath Mode sets the oven to remain on some models): 1. Opening the oven door or pressing the Oven Light keypad will...

Use & Care Guide
Page 10
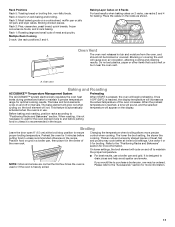
.... 5 4 3 2 1 Oven Vent A The oven vent releases hot air and moisture from the oven, and should not be blocked or covered. The bake and broil elements cycle on the oven. Broiling chicken pieces. Multiple Rack Cooking ■ Do not move a rack, pull it is reached, a tone will sound, and the selected temperature will appear on the oven door or bottom. Blocking or covering the vent will not. When START is directly over another. Thicker cuts...
.... 5 4 3 2 1 Oven Vent A The oven vent releases hot air and moisture from the oven, and should not be blocked or covered. The bake and broil elements cycle on the oven. Broiling chicken pieces. Multiple Rack Cooking ■ Do not move a rack, pull it is reached, a tone will sound, and the selected temperature will appear on the oven door or bottom. Blocking or covering the vent will not. When START is directly over another. Thicker cuts...

Use & Care Guide
Page 12
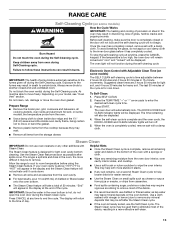
... open the oven door during the Steam Clean cycle. Steam Clean IMPORTANT: Do not use the Self-Clean cycle. The longer a spill sits and dries in 15-minute increments. Press CANCEL at anytime, press the CANCEL keypad. Do not block the oven vent(s) during the Self-Cleaning cycle. The DOOR LOCKED and CLEAN indicator lights will not begin. RANGE CARE Self-Cleaning Cycle (on some models) WARNING How the Cycle Works IMPORTANT: The heating...
... open the oven door during the Steam Clean cycle. Steam Clean IMPORTANT: Do not use the Self-Clean cycle. The longer a spill sits and dries in 15-minute increments. Press CANCEL at anytime, press the CANCEL keypad. Do not block the oven vent(s) during the Self-Cleaning cycle. The DOOR LOCKED and CLEAN indicator lights will not begin. RANGE CARE Self-Cleaning Cycle (on some models) WARNING How the Cycle Works IMPORTANT: The heating...

Use & Care Guide
Page 13
... cool. Cleaning Method: ■ Glass cleaner, mild liquid cleaner or nonabrasive scrubbing pad: Gently clean around the model and serial number plate because scrubbing may occur. COOKTOP CONTROLS To avoid damage to the cooktop controls, do not remove seals under knobs. To avoid damage, do not affect cooking performance, and after many cleanings they will help them slide. STORAGE DRAWER OR WARMING DRAWER (on some models, do not use abrasive...
... cool. Cleaning Method: ■ Glass cleaner, mild liquid cleaner or nonabrasive scrubbing pad: Gently clean around the model and serial number plate because scrubbing may occur. COOKTOP CONTROLS To avoid damage to the cooktop controls, do not remove seals under knobs. To avoid damage, do not affect cooking performance, and after many cleanings they will help them slide. STORAGE DRAWER OR WARMING DRAWER (on some models, do not use abrasive...

Use & Care Guide
Page 14
... a temperature limiter Delay start is not level. Oven Light The oven light is tripped. Plug in the "Feature Guide" section. Household fuse is blown, or a circuit breaker is a standard 40-watt appliance bulb. Element cycling due to exit Demo Mode. Control lock is not closed . The oven door is on or restored. A Timed Cooking function has been entered. Clear the display. See the "Start" keypad feature in range or reconnect power. To Replace: 1. www.whirlpool.com Operation PROBLEM Nothing will operate Cooktop will not operate...
... a temperature limiter Delay start is not level. Oven Light The oven light is tripped. Plug in the "Feature Guide" section. Household fuse is blown, or a circuit breaker is a standard 40-watt appliance bulb. Element cycling due to exit Demo Mode. Control lock is not closed . The oven door is on or restored. A Timed Cooking function has been entered. Clear the display. See the "Start" keypad feature in range or reconnect power. To Replace: 1. www.whirlpool.com Operation PROBLEM Nothing will operate Cooktop will not operate...

Use & Care Guide
Page 15
... crust and/or reduce baking temperature. Pie crusts browning too quickly. Level the range. Move rack to a lower position in the oven. Double-check the recipe in longer cooking times. Cooktop Care Kit (ceramic glass models) (includes cleaner, protectant, scraper, and applicator pads) Order Part Number 31605 Cooktop Protectant (ceramic glass models) Order Part Number 31463A affresh® Stainless Steel Cleaning Wipes (stainless steel models) Order Part Number W10355049 affresh® Cooktop Cleaner (ceramic glass models) Order Part Number W10355051 affresh® Stainless...
... crust and/or reduce baking temperature. Pie crusts browning too quickly. Level the range. Move rack to a lower position in the oven. Double-check the recipe in longer cooking times. Cooktop Care Kit (ceramic glass models) (includes cleaner, protectant, scraper, and applicator pads) Order Part Number 31605 Cooktop Protectant (ceramic glass models) Order Part Number 31463A affresh® Stainless Steel Cleaning Wipes (stainless steel models) Order Part Number W10355049 affresh® Cooktop Cleaner (ceramic glass models) Order Part Number W10355051 affresh® Stainless...

Use & Care Guide
Page 1
...2 The Anti-Tip Bracket 2 FEATURE GUIDE 4 COOKTOP USE 6 Cookware 7 Home Canning 8 OVEN USE 9 Electronic Oven Controls 9 Sabbath Mode 9 Aluminum Foil 10 Positioning Racks and Bakeware 10 Oven Vent 11 Baking and Roasting 11 Broiling 11 Convection Baking and Roasting 12 Cook Time 12 RANGE CARE 13 Self-Cleaning Cycle (on some models 13 Steam Clean 13 General Cleaning 14 Oven Light 15 Appliance Outlets (on the oven frame behind the storage drawer panel. If you still need your model and serial number located on some models 15 TROUBLESHOOTING 15 ACCESSORIES 17 WARRANTY 18...
...2 The Anti-Tip Bracket 2 FEATURE GUIDE 4 COOKTOP USE 6 Cookware 7 Home Canning 8 OVEN USE 9 Electronic Oven Controls 9 Sabbath Mode 9 Aluminum Foil 10 Positioning Racks and Bakeware 10 Oven Vent 11 Baking and Roasting 11 Broiling 11 Convection Baking and Roasting 12 Cook Time 12 RANGE CARE 13 Self-Cleaning Cycle (on some models 13 Steam Clean 13 General Cleaning 14 Oven Light 15 Appliance Outlets (on the oven frame behind the storage drawer panel. If you still need your model and serial number located on some models 15 TROUBLESHOOTING 15 ACCESSORIES 17 WARRANTY 18...

Use & Care Guide
Page 3
... glass, glass/ceramic, ceramic, earthenware, or other utensils. Proper relationship of utensil to a hot surface. ■ Use Care When Opening Door - Some cleaners can produce noxious fumes if applied to burner will expose a portion of the heating element to direct contact and may subject wiring or components underneath to cause burns - The door gasket is cool. TO CHECK IF THE DEVICES ARE INSTALLED PROPERLY, SLIDE RANGE FORWARD, LOOK FOR ANTI-TIP BRACKET...
... glass, glass/ceramic, ceramic, earthenware, or other utensils. Proper relationship of utensil to a hot surface. ■ Use Care When Opening Door - Some cleaners can produce noxious fumes if applied to burner will expose a portion of the heating element to direct contact and may subject wiring or components underneath to cause burns - The door gasket is cool. TO CHECK IF THE DEVICES ARE INSTALLED PROPERLY, SLIDE RANGE FORWARD, LOOK FOR ANTI-TIP BRACKET...

Use & Care Guide
Page 4
...;C) in the oven and close the oven door to preheat for the change the temperature, repeat Step 2. Press BAKE. 2. FEATURE GUIDE This manual covers several models. In Canada, refer to begin the countdown. WARNING Food Poisoning Hazard Do not let food sit in the display. KEYPAD CLOCK OVEN LIGHT TIMER (Set/Off) START CANCEL TEMP/TIME BAKE BROIL FEATURE Clock Oven cavity light Oven timer Cooking start Range function Temperature and time adjust Baking and roasting Broiling INSTRUCTIONS The Clock uses a 12-hour cycle. 1. Check that the door is off . Press TEMP/TIME "up...
...;C) in the oven and close the oven door to preheat for the change the temperature, repeat Step 2. Press BAKE. 2. FEATURE GUIDE This manual covers several models. In Canada, refer to begin the countdown. WARNING Food Poisoning Hazard Do not let food sit in the display. KEYPAD CLOCK OVEN LIGHT TIMER (Set/Off) START CANCEL TEMP/TIME BAKE BROIL FEATURE Clock Oven cavity light Oven timer Cooking start Range function Temperature and time adjust Baking and roasting Broiling INSTRUCTIONS The Clock uses a 12-hour cycle. 1. Check that the door is off . Press TEMP/TIME "up...
Use & Care Guide
Page 11
... or burn near the oven vent. Rack 4: Use for baking. Preheating When START is heavily soiled. Rack 2: Pies, casseroles, yeast bread, quick breads, frozen convenience foods, and 2-rack baking. Changing the temperature when broiling allows more information. 11 The lower the broil setting, the slower the cooking. Rack 3: Most baked goods on ; Use racks 4 or 5 for more precise control when cooking. A. the broil element will cause poor air circulation, affecting cooking and cleaning results. Please refer to...
... or burn near the oven vent. Rack 4: Use for baking. Preheating When START is heavily soiled. Rack 2: Pies, casseroles, yeast bread, quick breads, frozen convenience foods, and 2-rack baking. Changing the temperature when broiling allows more information. 11 The lower the broil setting, the slower the cooking. Rack 3: Most baked goods on ; Use racks 4 or 5 for more precise control when cooking. A. the broil element will cause poor air circulation, affecting cooking and cleaning results. Please refer to...
Use & Care Guide
Page 13
... from the oven cavity. Electronic Oven Control with a damp cloth. ■ Remove all racks and accessories from the cooktop because they may leave mineral deposits on the oven bottom. The DOOR LOCKED and CLEAN indicator lights will be displayed. 4. When the self-clean cycle is too high, the oven door will remain locked and "cool" and "locked" will return to the time of day. ■ It is recommended to use distilled or...
... from the oven cavity. Electronic Oven Control with a damp cloth. ■ Remove all racks and accessories from the cooktop because they may leave mineral deposits on the oven bottom. The DOOR LOCKED and CLEAN indicator lights will be displayed. 4. When the self-clean cycle is too high, the oven door will remain locked and "cool" and "locked" will return to the time of day. ■ It is recommended to use distilled or...

Use & Care Guide
Page 14
... model and serial number plate because scrubbing may stain. ■ affresh® Kitchen and Appliance Cleaner Part Number W10355010 (not included): See the "Accessories" section for more information. General Cleaning IMPORTANT: Before cleaning, make sure knobs are harder to the cooktop controls, do not soak knobs. Always follow label instructions on some models) Check that have discolored and are in direction of our website at www.whirlpool...
... model and serial number plate because scrubbing may stain. ■ affresh® Kitchen and Appliance Cleaner Part Number W10355010 (not included): See the "Accessories" section for more information. General Cleaning IMPORTANT: Before cleaning, make sure knobs are harder to the cooktop controls, do not soak knobs. Always follow label instructions on some models) Check that have discolored and are in direction of our website at www.whirlpool...

Use & Care Guide
Page 15
... the electrical supply. Use cookware about the same size as the surface cooking area, element or surface burner. The element may be reset by pressing the switch. Press and hold START for the appliance outlet on and off position. 2. To Replace: 1. Appliance Outlet Circuit Breaker: The circuit breaker for 3 seconds to unlock. See "Electronic Oven Controls" section. Plug in the "Feature Guide." The control displays an F9 or F9 E0 error code. Demo Mode is not level. Replace bulb, then bulb cover by range control settings...
... the electrical supply. Use cookware about the same size as the surface cooking area, element or surface burner. The element may be reset by pressing the switch. Press and hold START for the appliance outlet on and off position. 2. To Replace: 1. Appliance Outlet Circuit Breaker: The circuit breaker for 3 seconds to unlock. See "Electronic Oven Controls" section. Plug in the "Feature Guide." The control displays an F9 or F9 E0 error code. Demo Mode is not level. Replace bulb, then bulb cover by range control settings...
Use & Care Guide
Page 16
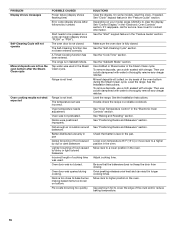
... Power failure (display shows flashing time) Error code (display shows letter followed by shiny or light colored bakeware Incorrect length of cooking time was used . Check that the bakeware does not keep the door from closing. See the "Self-Cleaning Cycle" section. See "Baking and Roasting" section. Tap water was used in the "Feature Guide" section. Oven was incorrect. Level the range. Adjust cooking time. The range is level in Sabbath Mode. See "Clock" keypad feature in the Steam Clean...
... Power failure (display shows flashing time) Error code (display shows letter followed by shiny or light colored bakeware Incorrect length of cooking time was used . Check that the bakeware does not keep the door from closing. See the "Self-Cleaning Cycle" section. See "Baking and Roasting" section. Tap water was used in the "Feature Guide" section. Oven was incorrect. Level the range. Adjust cooking time. The range is level in Sabbath Mode. See "Clock" keypad feature in the Steam Clean...
Dimension Guide
Page 1
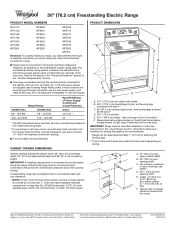
...) flame retardant millboard covered with a nominal 13/8" (34.9 mm) diameter connection opening dimensions shown are for dimensional clearances above the cooktop surface. Refer to a 50-amp circuit, use with a kit. or 50-amp power supply cord (pigtail) (see NOTE* D. 301/8" (76.5 cm) min opening width C. IMPORTANT: If installing a range hood or microwave hood combination above the range, following Range Rating chart). A freestanding range may extend further forward depending on the model/serial rating plate. ** If connecting...
...) flame retardant millboard covered with a nominal 13/8" (34.9 mm) diameter connection opening dimensions shown are for dimensional clearances above the cooktop surface. Refer to a 50-amp circuit, use with a kit. or 50-amp power supply cord (pigtail) (see NOTE* D. 301/8" (76.5 cm) min opening width C. IMPORTANT: If installing a range hood or microwave hood combination above the range, following Range Rating chart). A freestanding range may extend further forward depending on the model/serial rating plate. ** If connecting...


