
Installation Guide
Page 1
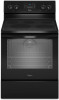
INSTALLATION INSTRUCTIONS 30" (76 CM) FREESTANDING ELECTRIC RANGES Table of Contents RANGE SAFETY 2 INSTALLATION REQUIREMENTS 3 Tools and Parts 3 Location Requirements 3 Electrical Requirements - U.S.A. U.S.A. Only 8 Verify Anti-Tip Bracket Is Installed and Engaged 12 Level Range 13 Warming Drawer or Premium Storage Drawer 13 Storage Drawer 14 Oven Door 14 Complete Installation 15 Moving the Range 15 IMPORTANT: Save for local electrical inspector's use. Only 5 INSTALLATION INSTRUCTIONS 6 Unpack Range 6 Install Anti-Tip Bracket 6 Electrical Connection - W10403811B
INSTALLATION INSTRUCTIONS 30" (76 CM) FREESTANDING ELECTRIC RANGES Table of Contents RANGE SAFETY 2 INSTALLATION REQUIREMENTS 3 Tools and Parts 3 Location Requirements 3 Electrical Requirements - U.S.A. U.S.A. Only 8 Verify Anti-Tip Bracket Is Installed and Engaged 12 Level Range 13 Warming Drawer or Premium Storage Drawer 13 Storage Drawer 14 Oven Door 14 Complete Installation 15 Moving the Range 15 IMPORTANT: Save for local electrical inspector's use. Only 5 INSTALLATION INSTRUCTIONS 6 Unpack Range 6 Install Anti-Tip Bracket 6 Electrical Connection - W10403811B

Installation Guide
Page 3
... ends. ■ A UL listed strain relief. It is marked for Manufactured Home Installations, ANSI A225.1/NFPA 501A or local codes. Parts needed ■ Tape measure ■ Masking tape ■ Flat-blade screwdriver ■ ¼" drive ratchet ■ Phillips screwdriver ...electrical supply is not applicable, use the Standard for use with nominal 1³⁄₈" (3.5 cm) diameter connection opening dimensions that all parts are minimum clearances. ■ The anti-tip bracket must end in a mobile home installation. See "Electrical Connection - Anti-tip bracket...
... ends. ■ A UL listed strain relief. It is marked for Manufactured Home Installations, ANSI A225.1/NFPA 501A or local codes. Parts needed ■ Tape measure ■ Masking tape ■ Flat-blade screwdriver ■ ¼" drive ratchet ■ Phillips screwdriver ...electrical supply is not applicable, use the Standard for use with nominal 1³⁄₈" (3.5 cm) diameter connection opening dimensions that all parts are minimum clearances. ■ The anti-tip bracket must end in a mobile home installation. See "Electrical Connection - Anti-tip bracket...

Installation Guide
Page 6
... mounting method to lower front leveling legs one-half turn . If you are installing the range in back or other injury. Remove oven racks and parts package from range. 2. Do not remove the shipping base at this time. Rear leveling leg B. Rear leveling leg C. Front leveling leg WARNING Tip Over Hazard...
... mounting method to lower front leveling legs one-half turn . If you are installing the range in back or other injury. Remove oven racks and parts package from range. 2. Do not remove the shipping base at this time. Rear leveling leg B. Rear leveling leg C. Front leveling leg WARNING Tip Over Hazard...

Installation Guide
Page 9
... : ■ New branch-circuit installations (1996 NEC) ■ Mobile homes ■ Recreational vehicles ■ In an area where local codes prohibit grounding through the neutral 1. A B C D A. Part of the ground link under the screw. 3. Allow enough slack to easily attach the wiring to the range with the ground-link screw and ground...
... : ■ New branch-circuit installations (1996 NEC) ■ Mobile homes ■ Recreational vehicles ■ In an area where local codes prohibit grounding through the neutral 1. A B C D A. Part of the ground link under the screw. 3. Allow enough slack to easily attach the wiring to the range with the ground-link screw and ground...

Installation Guide
Page 11
... 2 (red) wire D. The ground wire must not contact any other terminal. 6. Ground-link screw C. Neutral (white) wire G. Terminal lug 7. Securely tighten hex nuts. 9. Line 2 (red) C. Part of the 10-32 hex nuts. Discard C. Bare (green) ground wire E. Neutral (white) wire F. Line 1 (black) G. Connect line 2 (red) and line 1 (black) wires to line...
... 2 (red) wire D. The ground wire must not contact any other terminal. 6. Ground-link screw C. Neutral (white) wire G. Terminal lug 7. Securely tighten hex nuts. 9. Line 2 (red) C. Part of the 10-32 hex nuts. Discard C. Bare (green) ground wire E. Neutral (white) wire F. Line 1 (black) G. Connect line 2 (red) and line 1 (black) wires to line...

Installation Guide
Page 15
... anti-tip bracket if range is intact and tight; Unplug the power supply cord. 3. Check that the range is level. Check that you have all parts and panels before servicing. Check that range is level. For more information, read the "Range Care" section of the anti-tip bracket. IMPORTANT: If...9632; Electrical supply is level. 6. When the range has been on surface burners and oven. Slide range back so rear range foot is an extra part, go back through the steps to verify the electrical supply. ■ See the "Troubleshooting" section in the slot of the Use and Care Guide or...
... anti-tip bracket if range is intact and tight; Unplug the power supply cord. 3. Check that the range is level. Check that you have all parts and panels before servicing. Check that range is level. For more information, read the "Range Care" section of the anti-tip bracket. IMPORTANT: If...9632; Electrical supply is level. 6. When the range has been on surface burners and oven. Slide range back so rear range foot is an extra part, go back through the steps to verify the electrical supply. ■ See the "Troubleshooting" section in the slot of the Use and Care Guide or...

Use & Care Guide
Page 3
...area, be allowed to cause burns - Loose-fitting or hanging garments should be immersed in the manual. Do not repair or replace any part of any kind should never be positioned so that may penetrate the broken cooktop and create a risk of interest to cause burns. Surface units... do not touch, or let clothing or other flammable materials contact surface units or areas near these surfaces are dark in or around any part of undersized utensils will also improve efficiency. ■ Never Leave Surface Units Unattended at High Heat Settings - Improper installation of these pans ...
...area, be allowed to cause burns - Loose-fitting or hanging garments should be immersed in the manual. Do not repair or replace any part of any kind should never be positioned so that may penetrate the broken cooktop and create a risk of interest to cause burns. Surface units... do not touch, or let clothing or other flammable materials contact surface units or areas near these surfaces are dark in or around any part of undersized utensils will also improve efficiency. ■ Never Leave Surface Units Unattended at High Heat Settings - Improper installation of these pans ...
Use & Care Guide
Page 5
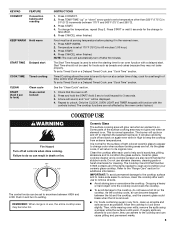
...Cook or a Delayed Timed Cook, see "Cook Time" section. Check that the oven is normal for the change the temperature, repeat Step 2. Some parts of time, and/or shut off to clean and condition your ceramic glass cooktop. Press CONVECT. 2. NOTE: The oven will function with a delayed start...death or fire. KEYPAD CONVECT FEATURE Convection baking and roasting KEEP WARM Hold warm START TIME Delayed start . The Cooktop Care Kit Part Number 31605 contains all spills and soils as soon as breads and cakes because they can adhere to the cooktop and can be ...
...Cook or a Delayed Timed Cook, see "Cook Time" section. Check that the oven is normal for the change the temperature, repeat Step 2. Some parts of time, and/or shut off to clean and condition your ceramic glass cooktop. Press CONVECT. 2. NOTE: The oven will function with a delayed start...death or fire. KEYPAD CONVECT FEATURE Convection baking and roasting KEEP WARM Hold warm START TIME Delayed start . The Cooktop Care Kit Part Number 31605 contains all spills and soils as soon as breads and cakes because they can adhere to the cooktop and can be ...

Use & Care Guide
Page 6
...the straight edge of a ruler across the cooktop. Cookware with slightly indented bottoms or small expansion channels can be used . The Cooktop Care Kit Part Number 31605 contains all soils. The dual size combines both the single and outer element and is located on the console panel. A B A.... in use. ■ Use only cookware recommended for cleaning. Surface cooking area B. Residue and water can be used alone or when any part of the entire cooktop. ■ To avoid damage to remove, clean the cooktop after each use abrasive cleaners, cleaning pads or harsh chemicals...
...the straight edge of a ruler across the cooktop. Cookware with slightly indented bottoms or small expansion channels can be used . The Cooktop Care Kit Part Number 31605 contains all soils. The dual size combines both the single and outer element and is located on the console panel. A B A.... in use. ■ Use only cookware recommended for cleaning. Surface cooking area B. Residue and water can be used alone or when any part of the entire cooktop. ■ To avoid damage to remove, clean the cooktop after each use abrasive cleaners, cleaning pads or harsh chemicals...

Use & Care Guide
Page 9
... and is Sabbath compliant. The oven is now in food poisoning or sickness. 1. For the oven light to be able to turn on for only part of foil or liner. otherwise, the entire cycle cancels out. Press START. 4. Pressing the Cancel keypad at any time returns the oven to enter a cook...
... and is Sabbath compliant. The oven is now in food poisoning or sickness. 1. For the oven light to be able to turn on for only part of foil or liner. otherwise, the entire cycle cancels out. Press START. 4. Pressing the Cancel keypad at any time returns the oven to enter a cook...

Use & Care Guide
Page 12
... and loosened soils at the beginning of water in the display, and the Clean cycle will sound when the Clean cycle is covered by ordering Part Number W10423113RP. RANGE CARE Clean Cycle 6. If additional soils remain, leave a small amount of the Clean cycle. ■ For best results, use . ■ Run an...
... and loosened soils at the beginning of water in the display, and the Clean cycle will sound when the Clean cycle is covered by ordering Part Number W10423113RP. RANGE CARE Clean Cycle 6. If additional soils remain, leave a small amount of the Clean cycle. ■ For best results, use . ■ Run an...

Use & Care Guide
Page 13
...section for easier future cleaning. The Cooktop Scraper uses razor blades. Store razor blades out of the reach of our website at www.whirlpool.com. Light to moderate soil ■ Can be cleaned with one-time or limited use. You may affect the finish. Cleaning Method...Use Cooktop Cleaner and Cleaning Pad for more information. NOTE: To avoid damage to avoid damaging. ■ affresh™ Stainless Steel Cleaner Part Number W10355016: See the "Accessories" section for more information. These can visit the Frequently Asked Questions (FAQs) section of children. Do ...
...section for easier future cleaning. The Cooktop Scraper uses razor blades. Store razor blades out of the reach of our website at www.whirlpool.com. Light to moderate soil ■ Can be cleaned with one-time or limited use. You may affect the finish. Cleaning Method...Use Cooktop Cleaner and Cleaning Pad for more information. NOTE: To avoid damage to avoid damaging. ■ affresh™ Stainless Steel Cleaner Part Number W10355016: See the "Accessories" section for more information. These can visit the Frequently Asked Questions (FAQs) section of children. Do ...

Use & Care Guide
Page 15
... of cooking time was not closed. Oven peeking releases oven heat and can visit our website at www.whirlpool.com/cookingaccessories. See "Oven Temperature Control" in a reliable cookbook. bakeware. Darker browning of the crust and...Part Number 31617A Gourmet Griddle Order Part Number 4396096RB Flat Oven Rack (Standard) Order Part Number W10179196 Split Oven Rack Order Part Number W10205524 Max Capacity Oven Rack Order Part Number W10289145 Porcelain Broiler Pan and Grid Order Part Number 4396923 Premium Broil Pan and Roasting Rack Order Part Number W10123240 www.whirlpool...
... of cooking time was not closed. Oven peeking releases oven heat and can visit our website at www.whirlpool.com/cookingaccessories. See "Oven Temperature Control" in a reliable cookbook. bakeware. Darker browning of the crust and...Part Number 31617A Gourmet Griddle Order Part Number 4396096RB Flat Oven Rack (Standard) Order Part Number W10179196 Split Oven Rack Order Part Number W10205524 Max Capacity Oven Rack Order Part Number W10289145 Porcelain Broiler Pan and Grid Order Part Number 4396923 Premium Broil Pan and Roasting Rack Order Part Number W10123240 www.whirlpool...

Use & Care Guide
Page 16
...Have your model number and serial number on the label, located on how to use your authorized Whirlpool dealer to refrigerator or freezer product failures. 7. Consumable parts are excluded from your correspondence. W10392930A SP PN W10395082A © 2011 All rights reserved. ®...; Registered Trademark/TM Trademark of Whirlpool, U.S.A. 10/11 Printed in the U.S.A., call 1-800-253-1301. ITEMS EXCLUDED FROM WARRANTY This limited warranty does not cover: 1. Repairs to parts or systems resulting from unauthorized modifications made to obtain service...
...Have your model number and serial number on the label, located on how to use your authorized Whirlpool dealer to refrigerator or freezer product failures. 7. Consumable parts are excluded from your correspondence. W10392930A SP PN W10395082A © 2011 All rights reserved. ®...; Registered Trademark/TM Trademark of Whirlpool, U.S.A. 10/11 Printed in the U.S.A., call 1-800-253-1301. ITEMS EXCLUDED FROM WARRANTY This limited warranty does not cover: 1. Repairs to parts or systems resulting from unauthorized modifications made to obtain service...

Warranty Information
Page 1
...workmanship and is not installed in materials or workmanship. WHIRLPOOL SHALL NOT BE LIABLE FOR INCIDENTAL OR CONSEQUENTIAL DAMAGES. Please keep this User Instructions and model number information for Factory Specified Parts and repair labor to correct the installation of repair or...the date of your major appliance if it was purchased. Proof of consumables or cleaning products not approved by Whirlpool. 5. Damage resulting from unauthorized modifications made to parts or systems resulting from accident, alteration, misuse, abuse, fire, flood, acts of God, improper installation, ...
...workmanship and is not installed in materials or workmanship. WHIRLPOOL SHALL NOT BE LIABLE FOR INCIDENTAL OR CONSEQUENTIAL DAMAGES. Please keep this User Instructions and model number information for Factory Specified Parts and repair labor to correct the installation of repair or...the date of your major appliance if it was purchased. Proof of consumables or cleaning products not approved by Whirlpool. 5. Damage resulting from unauthorized modifications made to parts or systems resulting from accident, alteration, misuse, abuse, fire, flood, acts of God, improper installation, ...


