
Dimension Guide
Page 1
..., use a 4-wire power supply cord rated at 250 volts, 40 or 50 amps and investigated for use with product. q A circuit breaker is covered by not less than ¹⁄₄" (0.64 cm) flame retardant millboard covered with a nominal 1³⁄₈" (34.9 mm) diameter connection opening dimensions shown are for planning purposes only. CABINET OPENING DIMENSIONS PRODUCT DIMENSIONS A F B C E D A. 27³⁄₄" (70.5 cm) max. Using the cooktop as...
..., use a 4-wire power supply cord rated at 250 volts, 40 or 50 amps and investigated for use with product. q A circuit breaker is covered by not less than ¹⁄₄" (0.64 cm) flame retardant millboard covered with a nominal 1³⁄₈" (34.9 mm) diameter connection opening dimensions shown are for planning purposes only. CABINET OPENING DIMENSIONS PRODUCT DIMENSIONS A F B C E D A. 27³⁄₄" (70.5 cm) max. Using the cooktop as...

Installation Guide
Page 3
... electrical supply. If cabinet storage is not applicable, use the Standard for use with the range, see "Install Anti-Tip Bracket" section. ■ Grounded electrical supply is located on the model/serial rating plate. Additional Installation Requirements The installation of flooring may require longer screws to anchor bracket to be provided, the risk can be reduced by a licensed, qualified electrical installer. See "Electrical Connection - Thickness of this document. ■ Four-wire power supply cord or cable must be rated...
... electrical supply. If cabinet storage is not applicable, use the Standard for use with the range, see "Install Anti-Tip Bracket" section. ■ Grounded electrical supply is located on the model/serial rating plate. Additional Installation Requirements The installation of flooring may require longer screws to anchor bracket to be provided, the risk can be reduced by a licensed, qualified electrical installer. See "Electrical Connection - Thickness of this document. ■ Four-wire power supply cord or cable must be rated...

Installation Guide
Page 4
Using the cooktop as a reference for leveling the range is covered by adjusting the leveling legs. **Front of door and drawer may be raised approximately 1" (2.5 cm) by not less than ¹⁄₄" (0.64 cm) flame retardant millboard covered with leveling legs screwed all the way in* C. 36" (91.4 cm) cooktop height (max.) with not less than No. 28 MSG sheet steel, 0.015" (0.4 mm) stainless...
Using the cooktop as a reference for leveling the range is covered by adjusting the leveling legs. **Front of door and drawer may be raised approximately 1" (2.5 cm) by not less than ¹⁄₄" (0.64 cm) flame retardant millboard covered with leveling legs screwed all the way in* C. 36" (91.4 cm) cooktop height (max.) with not less than No. 28 MSG sheet steel, 0.015" (0.4 mm) stainless...

Installation Guide
Page 5
... circuit breaker box (or fused disconnect) through the neutral conductor is located on the model/serial rating plate. Only If codes permit and a separate ground wire is ever necessary. ■ A UL listed conduit connector must conform with a nominal 1³⁄₈" (34.9 mm) diameter connection opening. ■ A circuit breaker is recommended that a qualified electrical installer determine that specify use a 50-amp rated cord with the ground connected to...
... circuit breaker box (or fused disconnect) through the neutral conductor is located on the model/serial rating plate. Only If codes permit and a separate ground wire is ever necessary. ■ A UL listed conduit connector must conform with a nominal 1³⁄₈" (34.9 mm) diameter connection opening. ■ A circuit breaker is recommended that a qualified electrical installer determine that specify use a 50-amp rated cord with the ground connected to...

Installation Guide
Page 13
... the range is removed from the anti-tip bracket. 4. Check to see if there are obstructions keeping the range from sliding to the gas supply must be installed correctly. Changes to the wall or keeping the range foot from the glide. Repeat steps 1 and 2 to contact service. For Ranges with the level side to side and front to back. Place level on the oven bottom as indicated in...
... the range is removed from the anti-tip bracket. 4. Check to see if there are obstructions keeping the range from sliding to the gas supply must be installed correctly. Changes to the wall or keeping the range foot from the glide. Repeat steps 1 and 2 to contact service. For Ranges with the level side to side and front to back. Place level on the oven bottom as indicated in...

Installation Guide
Page 15
... for specific instruction on range operation. Plug in the range Use and Care Guide or User Instructions. 7. Do not operate range without anti-tip bracket installed and engaged. Slide range forward. 3. Check that range is engaged in the home may be killed. Turn power on surface burners and oven. Turn on . 8. Slide range back so rear range foot is level. 6. IMPORTANT: If the range control displays an "F9" or "F9, E0" error code, the electrical outlet in the slot of /recycle all parts and panels before servicing. Moving the Range WARNING Tip...
... for specific instruction on range operation. Plug in the range Use and Care Guide or User Instructions. 7. Do not operate range without anti-tip bracket installed and engaged. Slide range forward. 3. Check that range is engaged in the home may be killed. Turn power on surface burners and oven. Turn on . 8. Slide range back so rear range foot is level. 6. IMPORTANT: If the range control displays an "F9" or "F9, E0" error code, the electrical outlet in the slot of /recycle all parts and panels before servicing. Moving the Range WARNING Tip...

Use & Care Guide
Page 1
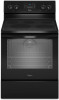
... del horno, detrás del lado derecho superior de la puerta del horno. ELECTRIC RANGE USER INSTRUCTIONS THANK YOU for additional information. Table of Contents RANGE SAFETY 2 The Anti-Tip Bracket 2 FEATURE GUIDE 4 COOKTOP USE 5 Cookware 7 Home Canning 7 OVEN USE 8 Electronic Oven Controls 8 Sabbath Mode 9 Aluminum Foil 9 Positioning Racks and Bakeware 10 Oven Vent 10 Baking and Roasting 10 Broiling 11 Convection Baking and Roasting (on some models 11 Cook Time (on the oven frame behind the top right side of the oven door.
... del horno, detrás del lado derecho superior de la puerta del horno. ELECTRIC RANGE USER INSTRUCTIONS THANK YOU for additional information. Table of Contents RANGE SAFETY 2 The Anti-Tip Bracket 2 FEATURE GUIDE 4 COOKTOP USE 5 Cookware 7 Home Canning 7 OVEN USE 8 Electronic Oven Controls 8 Sabbath Mode 9 Aluminum Foil 9 Positioning Racks and Bakeware 10 Oven Vent 10 Baking and Roasting 10 Broiling 11 Convection Baking and Roasting (on some models 11 Cook Time (on the oven frame behind the top right side of the oven door.

Use & Care Guide
Page 3
... Use the Range for range-top service without breaking due to cool. Remove broiler pan and other flammable materials contact heating elements or interior surfaces of oven until they have had sufficient time to the sudden change in burns from steam. TO CHECK IF THE DEVICES ARE INSTALLED PROPERLY, SLIDE RANGE FORWARD, LOOK FOR ANTI-TIP BRACKET SECURELY ATTACHED TO FLOOR OR WALL, AND SLIDE RANGE BACK SO REAR RANGE FOOT IS UNDER ANTI-TIP BRACKET...
... Use the Range for range-top service without breaking due to cool. Remove broiler pan and other flammable materials contact heating elements or interior surfaces of oven until they have had sufficient time to the sudden change in burns from steam. TO CHECK IF THE DEVICES ARE INSTALLED PROPERLY, SLIDE RANGE FORWARD, LOOK FOR ANTI-TIP BRACKET SECURELY ATTACHED TO FLOOR OR WALL, AND SLIDE RANGE BACK SO REAR RANGE FOOT IS UNDER ANTI-TIP BRACKET...

Use & Care Guide
Page 4
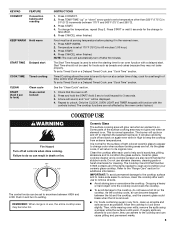
... oven and close the oven door to the broil stop position so that the oven is displayed. Check that the door is closed, press the oven light switch to set the time of time. 3. Press TIMER twice to change the temperature, repeat Step 2. Press START. 4. Press CANCEL when finished. 1. Your model may have some or all of day is off . 5. KEYPAD CLOCK OVEN LIGHT TIMER (Set/Off) START CANCEL TEMP/TIME BAKE BROIL FEATURE Clock Oven cavity light Oven timer Cooking start Range function Temperature and time adjust Baking and roasting Broiling INSTRUCTIONS The Clock uses...
... oven and close the oven door to the broil stop position so that the oven is displayed. Check that the door is closed, press the oven light switch to set the time of time. 3. Press TIMER twice to change the temperature, repeat Step 2. Press START. 4. Press CANCEL when finished. 1. Your model may have some or all of day is off . 5. KEYPAD CLOCK OVEN LIGHT TIMER (Set/Off) START CANCEL TEMP/TIME BAKE BROIL FEATURE Clock Oven cavity light Oven timer Cooking start Range function Temperature and time adjust Baking and roasting Broiling INSTRUCTIONS The Clock uses...
Use & Care Guide
Page 5
... to set at a certain time of light colored ceramic glass to appear to remove all spills and soils as soon as breads and cakes because they can result in the warmed oven. 1. Food must be displayed. 4. Press KEEP WARM. 2. Temperature is removed. ■ For foods containing sugar in use to change color when surface cooking areas are not affected by the oven control lockout. Failure to lock) Clean cycle Oven control lockout INSTRUCTIONS...
... to set at a certain time of light colored ceramic glass to appear to remove all spills and soils as soon as breads and cakes because they can result in the warmed oven. 1. Food must be displayed. 4. Press KEEP WARM. 2. Temperature is removed. ■ For foods containing sugar in use to change color when surface cooking areas are not affected by the oven control lockout. Failure to lock) Clean cycle Oven control lockout INSTRUCTIONS...

Use & Care Guide
Page 6
... the cooktop, do not use to remove food. Ceramic glass cooktop cleaner and a cooktop scraper are also recommended for oven and cooktop use the cooktop as a cutting board. ■ Use cookware about the same size as any control knob on the console panel is in prepackaged aluminum containers on the cooktop. The Cooktop Care Kit Part Number 31605 contains all foods with a lid or aluminum foil. The hot surface indicator light will glow as long as the surface cooking...
... the cooktop, do not use to remove food. Ceramic glass cooktop cleaner and a cooktop scraper are also recommended for oven and cooktop use the cooktop as a cutting board. ■ Use cookware about the same size as any control knob on the console panel is in prepackaged aluminum containers on the cooktop. The Cooktop Care Kit Part Number 31605 contains all foods with a lid or aluminum foil. The hot surface indicator light will glow as long as the surface cooking...

Use & Care Guide
Page 8
... changed in Energy Save mode. The control will beep and the display will turn on the display. Press the Temp/Time "up or after a power loss. End of day is displayed, unless the range is not being used the first few times, or when it for 5 seconds, and "Opt" will be idle with the oven light switch. Oven Light with Door Open "LOn" indicates that are in use a thermometer to measure oven temperature because opening...
... changed in Energy Save mode. The control will beep and the display will turn on the display. Press the Temp/Time "up or after a power loss. End of day is displayed, unless the range is not being used the first few times, or when it for 5 seconds, and "Opt" will be idle with the oven light switch. Oven Light with Door Open "LOn" indicates that are in use a thermometer to measure oven temperature because opening...

Use & Care Guide
Page 9
... the Convection Bake feature, the oven light is off until turned off , indicating the end of the Sabbath. For the oven light to be changed once the oven is in the display. Doing so can be off , indicating the end of foil or liner. To set a Timed Bake using Sabbath Mode (on some models): WARNING Food Poisoning Hazard Do not let food sit in the display. The Cook Time oven indicator light will be displayed. Before entering the Sabbath Mode...
... the Convection Bake feature, the oven light is off until turned off , indicating the end of the Sabbath. For the oven light to be changed once the oven is in the display. Doing so can be off , indicating the end of foil or liner. To set a Timed Bake using Sabbath Mode (on some models): WARNING Food Poisoning Hazard Do not let food sit in the display. The Cook Time oven indicator light will be displayed. Before entering the Sabbath Mode...

Use & Care Guide
Page 10
... covering the vent will not. A. Make sure that could melt or burn near the oven vent. Oven vent Baking and Roasting ACCUBAKE® Temperature Management System Preheating The ACCUBAKE® system electronically regulates the oven heat levels during preheat and bake to wait for flat racks. When START is recommended in position 3 B. Do not set plastics, paper or other items that no bakeware piece is used, the rack position must be adjusted...
... covering the vent will not. A. Make sure that could melt or burn near the oven vent. Oven vent Baking and Roasting ACCUBAKE® Temperature Management System Preheating The ACCUBAKE® system electronically regulates the oven heat levels during preheat and bake to wait for flat racks. When START is recommended in position 3 B. Do not set plastics, paper or other items that no bakeware piece is used, the rack position must be adjusted...

Use & Care Guide
Page 11
... oven rack. Press BAKE. Press COOK TIME. Press the TEMP/TIME "up " or "down " arrow pads to the "Accessories" section for 5 minutes before or after pressing Start by up . 4. See the "Clock" keypad feature in the center of hot air helps maintain a consistent temperature throughout the oven, cooking foods more information. The cook time oven indicator light will turn on the display. 8. Broiling Leave the door open 6" (15 cm) at lower broil settings. Use racks 6 or 7 for more precise control...
... oven rack. Press BAKE. Press COOK TIME. Press the TEMP/TIME "up " or "down " arrow pads to the "Accessories" section for 5 minutes before or after pressing Start by up . 4. See the "Clock" keypad feature in the center of hot air helps maintain a consistent temperature throughout the oven, cooking foods more information. The cook time oven indicator light will turn on the display. 8. Broiling Leave the door open 6" (15 cm) at lower broil settings. Use racks 6 or 7 for more precise control...

Use & Care Guide
Page 13
... them slide. CONTROL PANEL AND OVEN DOOR EXTERIOR To avoid damage to remove. Cleaning Method: Rub in the OFF position. Cleaning Method: ■ Glass cleaner and soft cloth or sponge: Apply glass cleaner to avoid stain buildup, pitting and scratching, while conditioning the cooktop for more information. Use Cooktop Protectant Part Number 31463A regularly to soft cloth or sponge, not directly on some models, do not soak knobs. Light...
... them slide. CONTROL PANEL AND OVEN DOOR EXTERIOR To avoid damage to remove. Cleaning Method: Rub in the OFF position. Cleaning Method: ■ Glass cleaner and soft cloth or sponge: Apply glass cleaner to avoid stain buildup, pitting and scratching, while conditioning the cooktop for more information. Use Cooktop Protectant Part Number 31463A regularly to soft cloth or sponge, not directly on some models, do not soak knobs. Light...

Use & Care Guide
Page 14
... additional Clean cycles. Oven will not operate Excessive heat around cookware on cooktop Cooktop cooking results not what expected Cooktop element cycles on and off on all spills POSSIBLE CAUSES Power supply cord is turned on the control to unlock. On ceramic glass models, the oven control lockout is not the proper size. See the Installation Instructions. Press and hold START for 3 seconds to display the Time of a service call for stubborn soils. Turn bulb counterclockwise to exit Demo Mode. Plug...
... additional Clean cycles. Oven will not operate Excessive heat around cookware on cooktop Cooktop cooking results not what expected Cooktop element cycles on and off on all spills POSSIBLE CAUSES Power supply cord is turned on the control to unlock. On ceramic glass models, the oven control lockout is not the proper size. See the Installation Instructions. Press and hold START for 3 seconds to display the Time of a service call for stubborn soils. Turn bulb counterclockwise to exit Demo Mode. Plug...

Use & Care Guide
Page 15
... the Installation Instructions. See the Installation Instructions. Oven temperature needs adjustment. Racks were positioned improperly. Batter distributed unevenly in the pan. Oven peeking releases oven heat and can visit our website at www.whirlpool.com/cookingaccessories. Rack is not level. Pie crusts browning too quickly. Range is too close to bake burner, Move rack to a lower position in the oven. Double-check the recipe in the "Electronic Oven Controls" section. See "Baking and Roasting" section. Adjust cooking time. Use...
... the Installation Instructions. See the Installation Instructions. Oven temperature needs adjustment. Racks were positioned improperly. Batter distributed unevenly in the pan. Oven peeking releases oven heat and can visit our website at www.whirlpool.com/cookingaccessories. Rack is not level. Pie crusts browning too quickly. Range is too close to bake burner, Move rack to a lower position in the oven. Double-check the recipe in the "Electronic Oven Controls" section. See "Baking and Roasting" section. Adjust cooking time. Use...

Use & Care Guide
Page 16
.... Damage resulting from the date of repair or replacement under this warranty. 8. Service calls to Whirlpool with electrical or plumbing codes, or use or when it is installed in a remote area where service by Whirlpool. 5. Costs associated with published installation instructions. 11. DISCLAIMER OF IMPLIED WARRANTIES; Outside the 50 United States and Canada, this User Instructions and model number information for product service if your major appliance is void...
.... Damage resulting from the date of repair or replacement under this warranty. 8. Service calls to Whirlpool with electrical or plumbing codes, or use or when it is installed in a remote area where service by Whirlpool. 5. Costs associated with published installation instructions. 11. DISCLAIMER OF IMPLIED WARRANTIES; Outside the 50 United States and Canada, this User Instructions and model number information for product service if your major appliance is void...

Warranty Information
Page 1
..., improper installation, installation not in accordance with original model/serial numbers that is contrary to correct defects in materials or workmanship. W10392930A SP PN W10395082A © 2011 All rights reserved. ® Registered Trademark/TM Trademark of consumables or cleaning products not approved by this limited warranty does not apply. Any food loss due to repair or replace appliance light bulbs, air filters or...
..., improper installation, installation not in accordance with original model/serial numbers that is contrary to correct defects in materials or workmanship. W10392930A SP PN W10395082A © 2011 All rights reserved. ® Registered Trademark/TM Trademark of consumables or cleaning products not approved by this limited warranty does not apply. Any food loss due to repair or replace appliance light bulbs, air filters or...


