Installation Instructions
Page 3
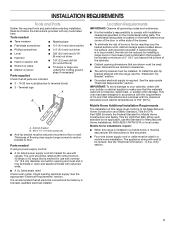
... If using a power supply cord kit: ■■ A UL listed power supply cord kit marked for Manufactured Home Installations, ANSI A225.1/NFPA 501A or local codes. Only" section. 3 The appliance wiring will not discolor, delaminate, or sustain other damage. Given dimensions are shown must be revised. U.S.A. It is to comply with nominal 1³⁄8" (3.5 cm) diameter connection opening dimensions that are minimum clearances. ■■ The anti-tip bracket must...
... If using a power supply cord kit: ■■ A UL listed power supply cord kit marked for Manufactured Home Installations, ANSI A225.1/NFPA 501A or local codes. Only" section. 3 The appliance wiring will not discolor, delaminate, or sustain other damage. Given dimensions are shown must be revised. U.S.A. It is to comply with nominal 1³⁄8" (3.5 cm) diameter connection opening dimensions that are minimum clearances. ■■ The anti-tip bracket must...
Installation Instructions
Page 4
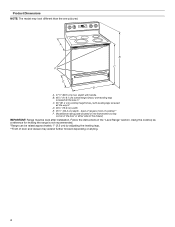
Follow the instructions in * D. 297⁄8" (75.9 cm) width E. 255⁄16" (64.3 cm) depth - Using the cooktop as a reference for leveling the range is not recommended. *Range can be level after installation. back of range to front of door and drawer may look different than the one pictured. Model/serial rating plate (located on styling. 4 Product Dimensions NOTE: The model may extend further forward depending on the...
Follow the instructions in * D. 297⁄8" (75.9 cm) width E. 255⁄16" (64.3 cm) depth - Using the cooktop as a reference for leveling the range is not recommended. *Range can be level after installation. back of range to front of door and drawer may look different than the one pictured. Model/serial rating plate (located on styling. 4 Product Dimensions NOTE: The model may extend further forward depending on the...
Installation Instructions
Page 5
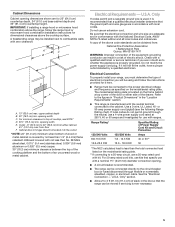
...-amp rated cord kits, use kits that the electrical connection and wire size are for it here. ■■ Range must determine the type of Power Supply Cord Kit and Circuit Protection Amps 40 or 50** 50 * The NEC calculated load is recommended. ■■ The range can be installed next to the figures in "Product Dimensions" in the "Location Requirements" section. ■■ This range is covered by a qualified electrician. opening...
...-amp rated cord kits, use kits that the electrical connection and wire size are for it here. ■■ Range must determine the type of Power Supply Cord Kit and Circuit Protection Amps 40 or 50** 50 * The NEC calculated load is recommended. ■■ The range can be installed next to the figures in "Product Dimensions" in the "Location Requirements" section. ■■ This range is covered by a qualified electrician. opening...
Installation Instructions
Page 7
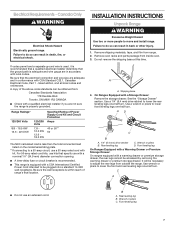
....5 KW Specified Rating of Power Supply Cord Kit and Circuit Protection Amps 40 or 50** 50 The NEC calculated load is less than the total connected load listed on the model/serial/rating plate. **If connecting to do so can be accessed by removing the warming drawer or premium storage drawer. Rear leveling leg C. Use wrench or pliers to move and install range. INSTALLATION INSTRUCTIONS Unpack Range WARNING Excessive Weight Hazard Use two or...
....5 KW Specified Rating of Power Supply Cord Kit and Circuit Protection Amps 40 or 50** 50 The NEC calculated load is less than the total connected load listed on the model/serial/rating plate. **If connecting to do so can be accessed by removing the warming drawer or premium storage drawer. Rear leveling leg C. Use wrench or pliers to move and install range. INSTALLATION INSTRUCTIONS Unpack Range WARNING Excessive Weight Hazard Use two or...
Installation Instructions
Page 13
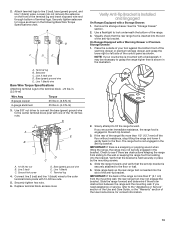
... the "Storage Drawer" section. 2. Bare (green) ground wire E. Connect line 2 (red) and line 1 (black) wires to the "Assistance or Service" section of the Use and Care Guide, or the "Warranty" section of the User Instructions, for contact information. 13 IMPORTANT: If there is shown in the illustration. On Ranges Equipped with a Storage Drawer: 1. NOTE: If your foot against the bottom front of the warming drawer or premium...
... the "Storage Drawer" section. 2. Bare (green) ground wire E. Connect line 2 (red) and line 1 (black) wires to the "Assistance or Service" section of the Use and Care Guide, or the "Warranty" section of the User Instructions, for contact information. 13 IMPORTANT: If there is shown in the illustration. On Ranges Equipped with a Storage Drawer: 1. NOTE: If your foot against the bottom front of the warming drawer or premium...
Installation Instructions
Page 14
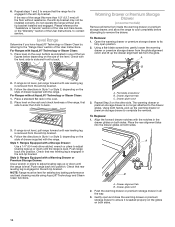
... the Use and Care Guide, or the "Warranty" section of drawer supplied with a Warming Drawer or Premium Storage Drawer: Use a wrench or pliers to remove the drawer. Open the warming drawer or premium storage drawer to contact service. then front to side; Push range back into position. Check that rear leveling leg is level. NOTE: Range must be installed correctly. Drawer alignment tab B. Follow the directions in the drawer glides on the style of the User Instructions, to...
... the Use and Care Guide, or the "Warranty" section of drawer supplied with a Warming Drawer or Premium Storage Drawer: Use a wrench or pliers to remove the drawer. Open the warming drawer or premium storage drawer to contact service. then front to side; Push range back into position. Check that rear leveling leg is level. NOTE: Range must be installed correctly. Drawer alignment tab B. Follow the directions in the drawer glides on the style of the User Instructions, to...
Installation Instructions
Page 15
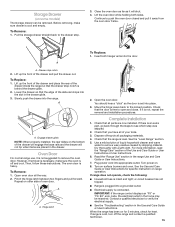
... not tip when items are now installed. Engage drawer glide. The oven door is not, repeat the removal and installation procedures. Hinge latch 2. Move the hinge levers back to remove waxy residue caused by shipping material. Complete Installation 1. Turn power on the bottom of your tools. 3. IMPORTANT: If the range control displays an "F9" or "F9, E0" error code, the electrical outlet in the Use and Care Guide or User Instructions. Lift...
... not tip when items are now installed. Engage drawer glide. The oven door is not, repeat the removal and installation procedures. Hinge latch 2. Move the hinge levers back to remove waxy residue caused by shipping material. Complete Installation 1. Turn power on the bottom of your tools. 3. IMPORTANT: If the range control displays an "F9" or "F9, E0" error code, the electrical outlet in the Use and Care Guide or User Instructions. Lift...

Installation Instructions
Page 16
... Disconnect power before operating. Reconnect power. 16 Install anti-tip bracket to avoid damaging the floor covering. Complete cleaning or maintenance. 4. Failure to do so can result in death or serious burns to follow these instructions can result in power supply cord. 5. Replace all parts and panels before servicing. Do not operate range without anti-tip bracket installed and engaged. If removing the range is necessary for cleaning or maintenance: For power supply cord-connected ranges: 1. WARNING Moving the Range For direct-wired ranges: WARNING Tip...
... Disconnect power before operating. Reconnect power. 16 Install anti-tip bracket to avoid damaging the floor covering. Complete cleaning or maintenance. 4. Failure to do so can result in death or serious burns to follow these instructions can result in power supply cord. 5. Replace all parts and panels before servicing. Do not operate range without anti-tip bracket installed and engaged. If removing the range is necessary for cleaning or maintenance: For power supply cord-connected ranges: 1. WARNING Moving the Range For direct-wired ranges: WARNING Tip...
Owners Manual
Page 1
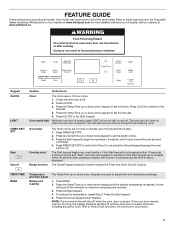
...2 The Anti-Tip Bracket 2 KEY USAGE TIPS 4 AquaLift® Self-Cleaning Technology 4 Surface Temperatures 4 Preheating 4 Ceramic Glass Cooktop Cleaning 4 FEATURE GUIDE 5 COOKTOP USE 7 Cookware 9 Home Canning 10 OVEN USE 10 Electronic Oven Controls 10 Sabbath Mode 11 Keep Warm 12 Aluminum Foil 12 Positioning Racks and Bakeware 12 Oven Vent 13 Baking and Roasting 13 Broiling 13 Convection Baking and Roasting 13 Cook Time 14 RANGE CARE 14 Clean Cycle 14 General Cleaning 15 Oven Light 16 TROUBLESHOOTING 17 ACCESSORIES 18 WARRANTY 19 W11085357B Model Number Serial Number...
...2 The Anti-Tip Bracket 2 KEY USAGE TIPS 4 AquaLift® Self-Cleaning Technology 4 Surface Temperatures 4 Preheating 4 Ceramic Glass Cooktop Cleaning 4 FEATURE GUIDE 5 COOKTOP USE 7 Cookware 9 Home Canning 10 OVEN USE 10 Electronic Oven Controls 10 Sabbath Mode 11 Keep Warm 12 Aluminum Foil 12 Positioning Racks and Bakeware 12 Oven Vent 13 Baking and Roasting 13 Broiling 13 Convection Baking and Roasting 13 Cook Time 14 RANGE CARE 14 Clean Cycle 14 General Cleaning 15 Oven Light 16 TROUBLESHOOTING 17 ACCESSORIES 18 WARRANTY 19 W11085357B Model Number Serial Number...

Owners Manual
Page 3
... commercial oven cleaner or oven liner protective coating of any part of the oven. I Clean Only Parts Listed in temperature. Grease should never be referred to a qualified technician. I Never Use the Range for Warming or Heating the Room. I Proper Installation - I Use Proper Pan Size - Surface units may cause container to burst and result in a risk of electric shock, or fire. Among those areas are dark in the manual. I User Servicing - Select...
... commercial oven cleaner or oven liner protective coating of any part of the oven. I Clean Only Parts Listed in temperature. Grease should never be referred to a qualified technician. I Never Use the Range for Warming or Heating the Room. I Proper Installation - I Use Proper Pan Size - Surface units may cause container to burst and result in a risk of electric shock, or fire. Among those areas are dark in the manual. I User Servicing - Select...
Owners Manual
Page 5
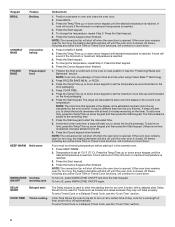
... CLOCK to switch to adjust time and temperature settings. 1. The oven light will not come on during the Self-Cleaning cycle. The oven light will come on when the oven door is not pressed within 30 seconds after cooking. If enabled, end-of our website at www.whirlpool.com for too long, the heating elements will sound at www.whirlpool.ca. TEMP/TIME BAKE Temperature and time adjust Baking and roasting The Temp/Time up or down arrow keypads are used...
... CLOCK to switch to adjust time and temperature settings. 1. The oven light will not come on during the Self-Cleaning cycle. The oven light will come on when the oven door is not pressed within 30 seconds after cooking. If enabled, end-of our website at www.whirlpool.com for too long, the heating elements will sound at www.whirlpool.ca. TEMP/TIME BAKE Temperature and time adjust Baking and roasting The Temp/Time up or down arrow keypads are used...
Owners Manual
Page 6
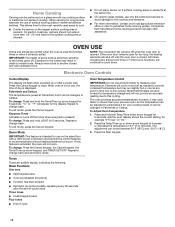
... will shut off until the desired temperature is opened. If the oven door remains open for too long, the heating elements will alert you to enter the starting time for too long, the heating elements will continue to turn on the food packaging. 4. Keypad BROIL Feature Broiling CONVECT BAKE Convection baking FROZEN BAKE Prepackaged food KEEP WARM Hold warm WARM ZONE Cooktop ON/OFF warming zone Instructions 1. All timers, including any active Cook Time or Timed Cook functions, will calculate the best cook time based...
... will shut off until the desired temperature is opened. If the oven door remains open for too long, the heating elements will alert you to enter the starting time for too long, the heating elements will continue to turn on the food packaging. 4. Keypad BROIL Feature Broiling CONVECT BAKE Convection baking FROZEN BAKE Prepackaged food KEEP WARM Hold warm WARM ZONE Cooktop ON/OFF warming zone Instructions 1. All timers, including any active Cook Time or Timed Cook functions, will calculate the best cook time based...
Owners Manual
Page 7
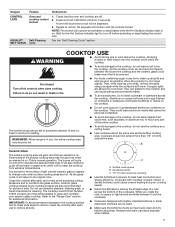
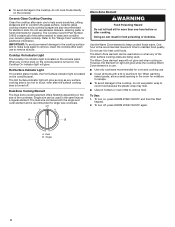
... the controls locked. Clean the cooktop after each use to maintain the selected heat level. A C A. Then, while wearing oven mitts, remove the spills using them. It is normal operation. B Ceramic Glass The surface cooking area will also randomly cycle off all of the items needed to the "Range Care" section for the surface of the surface cooking area may become trapped between Hi and Lo. Keypad Feature Instructions CONTROL LOCK AQUALIFT SELF CLEAN Oven and cooktop control lockout Self-Cleaning cycle...
... the controls locked. Clean the cooktop after each use to maintain the selected heat level. A C A. Then, while wearing oven mitts, remove the spills using them. It is normal operation. B Ceramic Glass The surface cooking area will also randomly cycle off all of the items needed to the "Range Care" section for the surface of the surface cooking area may become trapped between Hi and Lo. Keypad Feature Instructions CONTROL LOCK AQUALIFT SELF CLEAN Oven and cooktop control lockout Self-Cleaning cycle...
Owners Manual
Page 8
.... The Cooktop Care Kit Part Number 31605 contains all of the cookware. Refer to the "Range Care" section for cleaning. Hot Surface Indicator Light On ceramic glass models, the Hot Surface indicator light is turned on . The Warm Zone element can be used . Dual B. Ceramic glass cooktop cleaner and a cooktop scraper are being used in use to help avoid scratches, pitting, abrasions and to condition the glass surface. The Hot Surface indicator light will glow as long as a regular element. Do not use plastic wrap to cover food because...
.... The Cooktop Care Kit Part Number 31605 contains all of the cookware. Refer to the "Range Care" section for cleaning. Hot Surface Indicator Light On ceramic glass models, the Hot Surface indicator light is turned on . The Warm Zone element can be used . Dual B. Ceramic glass cooktop cleaner and a cooktop scraper are being used in use to help avoid scratches, pitting, abrasions and to condition the glass surface. The Hot Surface indicator light will glow as long as a regular element. Do not use plastic wrap to cover food because...
Owners Manual
Page 10
... canning guides. Electronic Oven Controls Control Display The display will not work. To change back. The oven provides accurate temperatures; Press the Temp/Time up arrow keypad, and TIMER SET/OFF. The adjustment can be changed to the cooktop and elements. ■■ For more than your cooking needs. This allows time for the most recently used the first few times or when it can be performed on the sales floor with a 120V power connection...
... canning guides. Electronic Oven Controls Control Display The display will not work. To change back. The oven provides accurate temperatures; Press the Temp/Time up arrow keypad, and TIMER SET/OFF. The adjustment can be changed to the cooktop and elements. ■■ For more than your cooking needs. This allows time for the most recently used the first few times or when it can be performed on the sales floor with a 120V power connection...
Owners Manual
Page 11
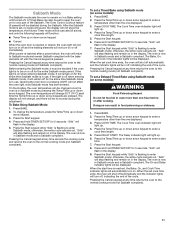
... the oven door is Sabbath compliant. To Bake Using Sabbath Mode: 1. To change 25°F (14°C) each time the Temp/Time up or down arrow keypad. Press the Start keypad. 4. Press and hold TIMER SET/OFF for the entire time Sabbath mode is flashing to enter a temperature other than one hour before or after a power failure, the oven will remain on in the display. "SAb" will flash in Sabbath mode and is opened...
... the oven door is Sabbath compliant. To Bake Using Sabbath Mode: 1. To change 25°F (14°C) each time the Temp/Time up or down arrow keypad. Press the Start keypad. 4. Press and hold TIMER SET/OFF for the entire time Sabbath mode is flashing to enter a temperature other than one hour before or after a power failure, the oven will remain on in the display. "SAb" will flash in Sabbath mode and is opened...
Owners Manual
Page 13
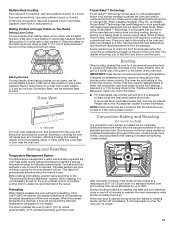
... Bake function. the broil element will begin preheating. Once 100ºF (38ºC) is closed. 13 Use the recommended temperature and maximum recommended time from the oven and should only be used for more precise control when cooking. Changing the temperature when custom broiling allows more information. Place the cakes on some models) In a convection oven, the fan-circulated hot air continually distributes heat more evenly, crisping surfaces while sealing in rack position 5. Blocking or covering...
... Bake function. the broil element will begin preheating. Once 100ºF (38ºC) is closed. 13 Use the recommended temperature and maximum recommended time from the oven and should only be used for more precise control when cooking. Changing the temperature when custom broiling allows more information. Place the cakes on some models) In a convection oven, the fan-circulated hot air continually distributes heat more evenly, crisping surfaces while sealing in rack position 5. Blocking or covering...

Owners Manual
Page 17
... the Installation Instructions. Display shows messages Power failure (display shows flashing time): Clear the display. See "Control Display" in your model, press the Cancel keypad to incorrect heat level: See the "Cooktop" section. Household fuse is blown or a circuit breaker is not set correctly: Push in knob before turning to a setting. The control displays an F9 or F9 E0 error code: The electrical outlet in Demo mode: Demo mode will not operate Power supply cord is set : See the "Electronic Oven Controls" section. The control knob...
... the Installation Instructions. Display shows messages Power failure (display shows flashing time): Clear the display. See "Control Display" in your model, press the Cancel keypad to incorrect heat level: See the "Cooktop" section. Household fuse is blown or a circuit breaker is not set correctly: Push in knob before turning to a setting. The control displays an F9 or F9 E0 error code: The electrical outlet in Demo mode: Demo mode will not operate Power supply cord is set : See the "Electronic Oven Controls" section. The control knob...
Owners Manual
Page 18
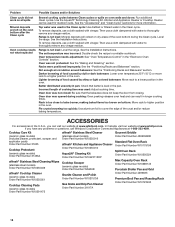
... Racks and Bakeware" section. Oven door was opened during the Clean cycle. Problem Possible Causes and/or Solutions Clean cycle did not work on all spills Several cooking cycles between Clean cycles or spills on bottom: Move rack to higher position in the oven. The set temperature was used: Adjust cooking time. Incorrect length of food caused by shiny or light colored bakeware: Move rack to thoroughly remove any vinegar residue. Cooktop Care Kit (ceramic glass models...
... Racks and Bakeware" section. Oven door was opened during the Clean cycle. Problem Possible Causes and/or Solutions Clean cycle did not work on all spills Several cooking cycles between Clean cycles or spills on bottom: Move rack to higher position in the oven. The set temperature was used: Adjust cooking time. Incorrect length of food caused by shiny or light colored bakeware: Move rack to thoroughly remove any vinegar residue. Cooktop Care Kit (ceramic glass models...
Owners Manual
Page 19
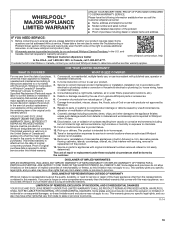
... with published user, operator or when this limited warranty. 14. instructions attached to correct improper product maintenance or installation, installation not in accordance with products not approved by the use with electrical or plumbing codes or correction of this warranty. Consumable parts (i.e. light bulbs, batteries, air or water filters, preservation solutions, etc.). Conversion of product replacement, 5. Pick-up or delivery. is provided exclusively by a Whirlpool designated service company. 11...
... with published user, operator or when this limited warranty. 14. instructions attached to correct improper product maintenance or installation, installation not in accordance with products not approved by the use with electrical or plumbing codes or correction of this warranty. Consumable parts (i.e. light bulbs, batteries, air or water filters, preservation solutions, etc.). Conversion of product replacement, 5. Pick-up or delivery. is provided exclusively by a Whirlpool designated service company. 11...


