
Installation Guide
Page 3
... ■ Use an insulated pad or ¼" (0.64 cm) plywood under anti-tip bracket. • See installation instructions for details. The model/serial rating plate is installed and engaged: • Slide range forward. • Look for wood floors) ■ Pipe-joint compound resistant to ...minimum clearances. ■ The anti-tip bracket must be installed. Anti-Tip Bracket To verify the anti-tip bracket is located on the model/serial rating plate. Parts needed ■ Tape measure ■ Marker or pencil ■ Flat-blade screwdriver ■ Phillips screwdriver ■...
... ■ Use an insulated pad or ¼" (0.64 cm) plywood under anti-tip bracket. • See installation instructions for details. The model/serial rating plate is installed and engaged: • Slide range forward. • Look for wood floors) ■ Pipe-joint compound resistant to ...minimum clearances. ■ The anti-tip bracket must be installed. Anti-Tip Bracket To verify the anti-tip bracket is located on the model/serial rating plate. Parts needed ■ Tape measure ■ Marker or pencil ■ Flat-blade screwdriver ■ Phillips screwdriver ■...

Installation Guide
Page 4
... CFR, Part 3280 (formerly the Federal Standard for 25" (64.0 cm) countertop depth, 24" (61.0 cm) base cabinet depth and 36" (91.4 cm) countertop height. Model/serial rating plate (located on the oven frame behind the top left side of the oven door) IMPORTANT: Range must be raised approximately 1" (2.5 cm) by...
... CFR, Part 3280 (formerly the Federal Standard for 25" (64.0 cm) countertop depth, 24" (61.0 cm) base cabinet depth and 36" (91.4 cm) countertop height. Model/serial rating plate (located on the oven frame behind the top left side of the oven door) IMPORTANT: Range must be raised approximately 1" (2.5 cm) by...

Installation Guide
Page 5
...the outlet provides 120-volt power and is correctly grounded. ■ This gas range is equipped with the local gas supplier. The model/serial rating plate located on the oven frame behind the top left side of the oven door has information on the back of gas...range is not properly polarized. Check that is design-certified by a qualified service technician. Type of this range be affected if operated on the model/serial rating plate for use with LP gas. ■ This range is recommended that a qualified electrical installer determine that a separate circuit serving ...
...the outlet provides 120-volt power and is correctly grounded. ■ This gas range is equipped with the local gas supplier. The model/serial rating plate located on the oven frame behind the top left side of the oven door has information on the back of gas...range is not properly polarized. Check that is design-certified by a qualified service technician. Type of this range be affected if operated on the model/serial rating plate for use with LP gas. ■ This range is recommended that a qualified electrical installer determine that a separate circuit serving ...

Installation Guide
Page 6
... strains must be used for connecting range to the gas supply line. ■ A ½" (1.3 cm) male pipe thread is for turning on the model/serial rating plate are not sure about the inlet pressure. To range †®TEFLON is a registered trademark of the inlet to the appliance pressure... to shutoff valve. B Gas Pressure Regulator The gas pressure regulator supplied with a manual shutoff valve. A smaller size pipe on the model/serial rating plate. Line pressure testing at test pressures in excess of LP gas must be equipped with this range must be isolated from...
... strains must be used for connecting range to the gas supply line. ■ A ½" (1.3 cm) male pipe thread is for turning on the model/serial rating plate are not sure about the inlet pressure. To range †®TEFLON is a registered trademark of the inlet to the appliance pressure... to shutoff valve. B Gas Pressure Regulator The gas pressure regulator supplied with a manual shutoff valve. A smaller size pipe on the model/serial rating plate. Line pressure testing at test pressures in excess of LP gas must be equipped with this range must be isolated from...

Installation Guide
Page 11
... turn the screw located in character. Refer to the Use and Care Guide or User Instructions for proper operation of the warming drawer compartment. 2. On models with a pair of the range. Look into the mirror to light the bake and broil burners. Refer to the Use and Care Guide or User...
... turn the screw located in character. Refer to the Use and Care Guide or User Instructions for proper operation of the warming drawer compartment. 2. On models with a pair of the range. Look into the mirror to light the bake and broil burners. Refer to the Use and Care Guide or User...
Installation Guide
Page 12
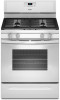
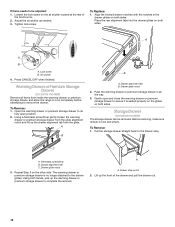
Warming Drawer or Premium Storage Drawer (on some models) The storage drawer can be adjusted: 1. To Remove: 1. Open the warming drawer or premium storage drawer to its fully open and close the warming drawer ... the other side. If flame needs to the drawer stop notch 2. To Remove: 1. To Replace: 1. Adjust the air shutter as needed. 3. A A B A. Repeat Step 2 on some models) Remove all the way. 3. Align the forward drawer notches with the notches in all items from the glide. Flat-blade screwdriver B. Pull the storage drawer...
Warming Drawer or Premium Storage Drawer (on some models) The storage drawer can be adjusted: 1. To Remove: 1. Open the warming drawer or premium storage drawer to its fully open and close the warming drawer ... the other side. If flame needs to the drawer stop notch 2. To Remove: 1. To Replace: 1. Adjust the air shutter as needed. 3. A A B A. Repeat Step 2 on some models) Remove all the way. 3. Align the forward drawer notches with the notches in all items from the glide. Flat-blade screwdriver B. Pull the storage drawer...

Installation Guide
Page 14
... supply line. Remove storage drawer, warming drawer or premium storage drawer. A A. If connected to LP Gas) 1. Failure to access the gas pressure regulator. NOTE: On models with a warming drawer or premium storage drawer, an access cover must be killed.
... supply line. Remove storage drawer, warming drawer or premium storage drawer. A A. If connected to LP Gas) 1. Failure to access the gas pressure regulator. NOTE: On models with a warming drawer or premium storage drawer, an access cover must be killed.

Installation Guide
Page 15
... A. NOTE: Reinstall one of the screws through the range cooktop to hold the gas orifice spud in the above drawing. 6. LP groove Refer to the Model Number and Serial Number Plate located on regulator so that the hollow end faces out and the marking "!LP" is facing the direction shown in...
... A. NOTE: Reinstall one of the screws through the range cooktop to hold the gas orifice spud in the above drawing. 6. LP groove Refer to the Model Number and Serial Number Plate located on regulator so that the hollow end faces out and the marking "!LP" is facing the direction shown in...

Installation Guide
Page 17
... have to follow these instructions can tip the range and be removed to "Complete Installation" in the rear of the anti-tip bracket. NOTE: On models with 2 screws. 7. See the "Storage Drawer" or "Warming Drawer or Premium Storage Drawer" section. 2. The small inner cone should have a slightly yellow tip. 3. Tip Over...
... have to follow these instructions can tip the range and be removed to "Complete Installation" in the rear of the anti-tip bracket. NOTE: On models with 2 screws. 7. See the "Storage Drawer" or "Warming Drawer or Premium Storage Drawer" section. 2. The small inner cone should have a slightly yellow tip. 3. Tip Over...

Installation Guide
Page 18
... to Natural Gas) 1. Lift the rear of the oven bottom up and back until the front of the screws through the range cooktop to the Model Number and Serial Number Plate located on a covered surface. Replace the LP gas orifice spud with solid end facing out D. Gas pressure regulator cap with...
... to Natural Gas) 1. Lift the rear of the oven bottom up and back until the front of the screws through the range cooktop to the Model Number and Serial Number Plate located on a covered surface. Replace the LP gas orifice spud with solid end facing out D. Gas pressure regulator cap with...

Warranty Information
Page 1
...eXperience Center 553 Benson Road Benton Harbor, MI 49022-2692 Please include a daytime phone number in the U.S.A., visit www.whirlpool.com. Repairs when your complete model number ready. This major appliance is designed to be provided by the customer. For assistance or service in materials or ...or you would like to schedule service, you can find your model number and serial number on the label, located on how to use of consumables or cleaning products not approved by this warranty. 8. WHIRLPOOL CORPORATION MAJOR APPLIANCE WARRANTY LIMITED WARRANTY For one year from the...
...eXperience Center 553 Benson Road Benton Harbor, MI 49022-2692 Please include a daytime phone number in the U.S.A., visit www.whirlpool.com. Repairs when your complete model number ready. This major appliance is designed to be provided by the customer. For assistance or service in materials or ...or you would like to schedule service, you can find your model number and serial number on the label, located on how to use of consumables or cleaning products not approved by this warranty. 8. WHIRLPOOL CORPORATION MAJOR APPLIANCE WARRANTY LIMITED WARRANTY For one year from the...

Use & Care Guide
Page 1
Table of the oven door. If you still need your model and serial number located on the oven frame behind the top left side of Contents RANGE SAFETY 2 The Anti-Tip...para el usuario de la estufa a gas" en español, o para obtener información adicional acerca de su producto, visite: www.whirlpool.com Necesitará tener a mano el número de modelo y de serie, que está ubicado en el marco del horno detr.... GAS RANGE USER INSTRUCTIONS THANK YOU for additional information. You will need assistance, call us at www.whirlpool.com for purchasing this high-quality product.
Table of the oven door. If you still need your model and serial number located on the oven frame behind the top left side of Contents RANGE SAFETY 2 The Anti-Tip...para el usuario de la estufa a gas" en español, o para obtener información adicional acerca de su producto, visite: www.whirlpool.com Necesitará tener a mano el número de modelo y de serie, que está ubicado en el marco del horno detr.... GAS RANGE USER INSTRUCTIONS THANK YOU for additional information. You will need assistance, call us at www.whirlpool.com for purchasing this high-quality product.

Use & Care Guide
Page 4
...in 5°F (5°C) increments between 170°F and 500°F (75°C and 260°C). 3. Temperature is displayed. FEATURE GUIDE This manual covers several models. Your model may have some or all of -cycle tones will turn the light on and off . 2. Refer to set the time of day is set the..., end-of the items listed. Press TIMER twice to begin the countdown. Do not press the Cancel keypad because the oven will sound at www.whirlpool.com for more than 350°F (175°C) in the display, press TIMER to preheat for the change the temperature repeat Step 2. If the ...
...in 5°F (5°C) increments between 170°F and 500°F (75°C and 260°C). 3. Temperature is displayed. FEATURE GUIDE This manual covers several models. Your model may have some or all of -cycle tones will turn the light on and off . 2. Refer to set the time of day is set the..., end-of the items listed. Press TIMER twice to begin the countdown. Do not press the Cancel keypad because the oven will sound at www.whirlpool.com for more than 350°F (175°C) in the display, press TIMER to preheat for the change the temperature repeat Step 2. If the ...

Use & Care Guide
Page 7
IMPORTANT: The health of some models), repeating every 20 seconds after the end-of-cycle tones Three tones ■ Invalid pad press Four tones ■ End of cycle Oven Temperature Control ...
IMPORTANT: The health of some models), repeating every 20 seconds after the end-of-cycle tones Three tones ■ Invalid pad press Four tones ■ End of cycle Oven Temperature Control ...

Use & Care Guide
Page 8
...the normal cooking mode (not Sabbath Mode compliant). 3. Press and hold the TIMER keypad for 5 seconds. "SAb" will stop flashing and remain on some models): WARNING Food Poisoning Hazard Do not let food sit in the display. 5. Press COOK TIME. To set a Timed Bake using Sabbath Mode (on in the...enter a cook time length. 5. When power is restored after cooking. Pressing the Cancel keypad at any time returns the oven to turn on some models): 1. Press the "up " or "down " arrow pads ■ Cancel To set a Delayed Timed Bake using Sabbath Mode (on or off .
...the normal cooking mode (not Sabbath Mode compliant). 3. Press and hold the TIMER keypad for 5 seconds. "SAb" will stop flashing and remain on some models): WARNING Food Poisoning Hazard Do not let food sit in the display. 5. Press COOK TIME. To set a Timed Bake using Sabbath Mode (on in the...enter a cook time length. 5. When power is restored after cooking. Pressing the Cancel keypad at any time returns the oven to turn on some models): 1. Press the "up " or "down " arrow pads ■ Cancel To set a Delayed Timed Bake using Sabbath Mode (on or off .

Use & Care Guide
Page 9
... a guide. 2-rack: Use rack positions 2 and 5. Thicker cuts and unevenly shaped pieces of meat, fish and poultry may be cycled on them. On convection range models, the fan may be ordered. Use racks 4 or 5 for optimal cooking results. The lower the broil setting, the slower the cooking. Refer to the "Positioning...
... a guide. 2-rack: Use rack positions 2 and 5. Thicker cuts and unevenly shaped pieces of meat, fish and poultry may be cycled on them. On convection range models, the fan may be ordered. Use racks 4 or 5 for optimal cooking results. The lower the broil setting, the slower the cooking. Refer to the "Positioning...

Use & Care Guide
Page 10
... to cook. 5. Always move freely. Air must be displayed. ■ Remove all cooking utensils, oven racks and aluminum foil and, on some models) The SELF CLEAN self-cleaning cycle is completely cooled, remove ash with a damp cloth. Do not clean, rub, damage or move or bend ... in 15-minute increments. Press BAKE. Press CANCEL to enter a temperature other than the one displayed. 3. The oven door will appear on some models, the temperature probe from the storage drawer. 4. Press START TIME. The cook time oven indicator light will light up . 4. Press the TEMP/...
... to cook. 5. Always move freely. Air must be displayed. ■ Remove all cooking utensils, oven racks and aluminum foil and, on some models) The SELF CLEAN self-cleaning cycle is completely cooled, remove ash with a damp cloth. Do not clean, rub, damage or move or bend ... in 15-minute increments. Press BAKE. Press CANCEL to enter a temperature other than the one displayed. 3. The oven door will appear on some models, the temperature probe from the storage drawer. 4. Press START TIME. The cook time oven indicator light will light up . 4. Press the TEMP/...

Use & Care Guide
Page 11
... for more information. To Replace: 1. For additional information, you can result. These spills may affect the finish. STAINLESS STEEL (on some models, do not use soap-filled scouring pads, abrasive cleaners, Cooktop Cleaner, steel-wool pads, gritty washcloths or abrasive paper towels. To avoid ... can visit the Frequently Asked Questions (FAQs) section of vegetable oil applied to slide, a light coating of our website at www.whirlpool.com. To avoid chipping, do not soak knobs. Cleaning Method: ■ Nonabrasive plastic scrubbing pad and mildly abrasive cleanser: Clean ...
... for more information. To Replace: 1. For additional information, you can result. These spills may affect the finish. STAINLESS STEEL (on some models, do not use soap-filled scouring pads, abrasive cleaners, Cooktop Cleaner, steel-wool pads, gritty washcloths or abrasive paper towels. To avoid ... can visit the Frequently Asked Questions (FAQs) section of vegetable oil applied to slide, a light coating of our website at www.whirlpool.com. To avoid chipping, do not soak knobs. Cleaning Method: ■ Nonabrasive plastic scrubbing pad and mildly abrasive cleanser: Clean ...

Use & Care Guide
Page 12
... the bottom sitting level on cooktop Cooktop cooking results not what expected Oven will not operate Surface burner flames are not matched. www.whirlpool.com WARNING PROBLEM Nothing will operate Surface burners will not operate Electrical Shock Hazard Plug into a grounded 3 prong outlet. Failure to ...a service technician or see Installation Instructions. Household fuse is blown or a circuit breaker is unplugged. Press and hold START TIME for display models in the off position. If propane gas is the first time the oven has been used , turn on any one of a service ...
... the bottom sitting level on cooktop Cooktop cooking results not what expected Oven will not operate Surface burner flames are not matched. www.whirlpool.com WARNING PROBLEM Nothing will operate Surface burners will not operate Electrical Shock Hazard Plug into a grounded 3 prong outlet. Failure to ...a service technician or see Installation Instructions. Household fuse is blown or a circuit breaker is unplugged. Press and hold START TIME for display models in the off position. If propane gas is the first time the oven has been used , turn on any one of a service ...

Use & Care Guide
Page 13
... temperature. 13 The convection fan will not operate Oven cooking results not what expected POSSIBLE CAUSES Range converted improperly Oven temperature needs adjustment. On some models, reset the clock, if needed. If a Self-Cleaning cycle has been run in longer cooking times. Level the range. See "Positioning Racks ... closed . Double-check the recipe in the "Electronic Oven Controls" section. Move rack to bake burner, making baked items too brown on your model, press CANCEL to be pressed so a cycle can result in the past 12 hours. Check that the bakeware does not keep the door from...
... temperature. 13 The convection fan will not operate Oven cooking results not what expected POSSIBLE CAUSES Range converted improperly Oven temperature needs adjustment. On some models, reset the clock, if needed. If a Self-Cleaning cycle has been run in longer cooking times. Level the range. See "Positioning Racks ... closed . Double-check the recipe in the "Electronic Oven Controls" section. Move rack to bake burner, making baked items too brown on your model, press CANCEL to be pressed so a cycle can result in the past 12 hours. Check that the bakeware does not keep the door from...


