
Owners Manual
Page 4
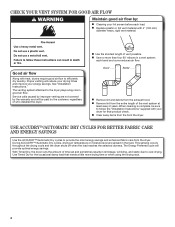
... warranty and will be sure to follow the "Installation Instructions" supplied with 4" (102 mm) diameter heavy, rigid vent material. This sensing occurs throughout the drying cycle and the dryer shuts off when the load reaches the selected dryness. Use Timed Dry for final product check. Service calls caused by improper venting are sensed in good air flow. n Use no more drying time or when using the drying rack. 4 With Timed Dry, the dryer runs the amount of time set...
... warranty and will be sure to follow the "Installation Instructions" supplied with 4" (102 mm) diameter heavy, rigid vent material. This sensing occurs throughout the drying cycle and the dryer shuts off when the load reaches the selected dryness. Use Timed Dry for final product check. Service calls caused by improper venting are sensed in good air flow. n Use no more drying time or when using the drying rack. 4 With Timed Dry, the dryer runs the amount of time set...
Owners Manual
Page 5
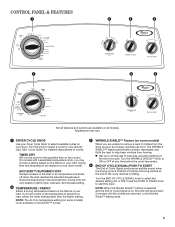
... time on the fabrics in the load or air temperature and shuts off when the load reaches the selected dryness level. NOTE: The Air Only temperature setting (on some models) When you may vary. 1 DRYER CYCLE KNOB Use your laundry load. Press the PUSH to START knob to remove a load of a cycle. Drying time will sound every 5 minutes until the clothes are unsure of Cycle Signal produces an audible sound when the drying cycle...
... time on the fabrics in the load or air temperature and shuts off when the load reaches the selected dryness level. NOTE: The Air Only temperature setting (on some models) When you may vary. 1 DRYER CYCLE KNOB Use your laundry load. Press the PUSH to START knob to remove a load of a cycle. Drying time will sound every 5 minutes until the clothes are unsure of Cycle Signal produces an audible sound when the drying cycle...
Owners Manual
Page 6
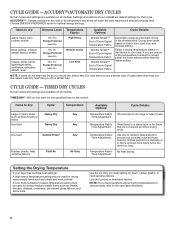
... dryer too long. CYCLE GUIDE - TIMED DRY CYCLES Not all cycles and settings are available on the control. Line dry bonded or laminated fabrics. Settings and options shown in the shortest time. Drying time varies based on all models. Will run the dryer for foam, rubber, plastic, or heat-sensitive fabrics. Use the Air Only (no heat) setting for the specified time on all models. NOTE: If you dry a similar load. ACCUDRY™ - TIMED DRY - Setting the Drying Temperature If your load. If loads seem drier...
... dryer too long. CYCLE GUIDE - TIMED DRY CYCLES Not all cycles and settings are available on the control. Line dry bonded or laminated fabrics. Settings and options shown in the shortest time. Drying time varies based on all models. Will run the dryer for foam, rubber, plastic, or heat-sensitive fabrics. Use the Air Only (no heat) setting for the specified time on all models. NOTE: If you dry a similar load. ACCUDRY™ - TIMED DRY - Setting the Drying Temperature If your load. If loads seem drier...

Owners Manual
Page 9
... Dryer Cabinet Lint should be done by lint can cause longer drying times for proper dryer operation. Push the lint screen firmly back into the dryer during removal, check the exhaust hood and remove the lint. The screen is probably clogged if lint falls off the screen into place. Pull the lint screen out of clothes. Wipe drum thoroughly with hot water. 3. Apply a liquid, nonflammable household cleaner to your fingers. From the Exhaust Vent Lint should be removed...
... Dryer Cabinet Lint should be done by lint can cause longer drying times for proper dryer operation. Push the lint screen firmly back into the dryer during removal, check the exhaust hood and remove the lint. The screen is probably clogged if lint falls off the screen into place. Pull the lint screen out of clothes. Wipe drum thoroughly with hot water. 3. Apply a liquid, nonflammable household cleaner to your fingers. From the Exhaust Vent Lint should be removed...

Owners Manual
Page 10
... Care For power supply cord-connected dryers: 1. Use tape to secure dryer door. Changing the drum light (on the back wall of the dryer. Turn bulb counterclockwise. Disconnect gas supply line pipe and remove fittings attached to gas supply line. 3. Make sure leveling legs are secure in gas supply line. 3. Unplug dryer or disconnect power. 2. Locate the light bulb cover on some models) 1. Remove the cover. 3. Unplug dryer or disconnect power. 2. (For gas dryers only): Close shut off power at home. Using a Phillips-head screw driver, remove the screw located...
... Care For power supply cord-connected dryers: 1. Use tape to secure dryer door. Changing the drum light (on the back wall of the dryer. Turn bulb counterclockwise. Disconnect gas supply line pipe and remove fittings attached to gas supply line. 3. Make sure leveling legs are secure in gas supply line. 3. Unplug dryer or disconnect power. 2. Locate the light bulb cover on some models) 1. Remove the cover. 3. Unplug dryer or disconnect power. 2. (For gas dryers only): Close shut off power at home. Using a Phillips-head screw driver, remove the screw located...
Owners Manual
Page 11
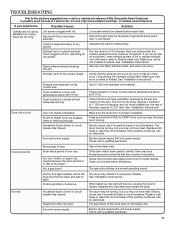
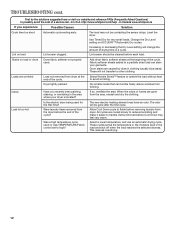
... heat. The drum may be turning, but you may be cleaned before laundering. In Canada www.whirlpool.ca If you do not feel air movement, clean exhaust system of the door. See "Cycle Guide." If you experience Possible Causes Solution Clothes are not drying satisfactorily, drying times are too long Lint screen clogged with heavy metal or flexible metal vent. Exhaust vent not the correct length. Electric dryers require 240-volt power supply. Use a time-delay fuse. Is a coin, button...
... heat. The drum may be turning, but you may be cleaned before laundering. In Canada www.whirlpool.ca If you do not feel air movement, clean exhaust system of the door. See "Cycle Guide." If you experience Possible Causes Solution Clothes are not drying satisfactorily, drying times are too long Lint screen clogged with heavy metal or flexible metal vent. Exhaust vent not the correct length. Electric dryers require 240-volt power supply. Use a time-delay fuse. Is a coin, button...
Owners Manual
Page 12
... the area, rewash and dry the clothing. Items removed before each load. Lint on load or drum Dryer fabric softener not properly used for very small loads. Change the Dry Level setting on ACCUDRY™/Automatic Dry cycles. Odors Have you experience Possible Causes Solution Cycle time too short Automatic cycle ending early. Load is located? All cycles are gone from dryer. http://www.whirlpool.com/help - The new electric heating element may feel very warm...
... the area, rewash and dry the clothing. Items removed before each load. Lint on load or drum Dryer fabric softener not properly used for very small loads. Change the Dry Level setting on ACCUDRY™/Automatic Dry cycles. Odors Have you experience Possible Causes Solution Cycle time too short Automatic cycle ending early. Load is located? All cycles are gone from dryer. http://www.whirlpool.com/help - The new electric heating element may feel very warm...
Owners Manual
Page 13
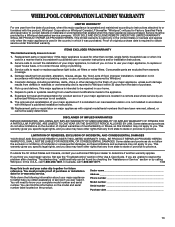
... with Whirlpool's published installation instructions. 10. Dealer name Address Phone number Model number Serial number Purchase date 13 If you need repair service, first see the "Troubleshooting" section of the Use & Care Guide. In Canada, call 1800253-1301. Service must provide proof of purchase or installation date for other rights that have other than normal, single-family household use your major appliance, to replace or repair house fuses, or...
... with Whirlpool's published installation instructions. 10. Dealer name Address Phone number Model number Serial number Purchase date 13 If you need repair service, first see the "Troubleshooting" section of the Use & Care Guide. In Canada, call 1800253-1301. Service must provide proof of purchase or installation date for other rights that have other than normal, single-family household use your major appliance, to replace or repair house fuses, or...

Warranty
Page 1
... used in an inaccessible location or is required to instruct you are excluded from unauthorized modifications made to repair or replace appliance light bulbs, air filters or water filters. In the U.S.A., call 18008076777. 7/08 Keep this limitation may not apply to you need repair service, first see the "Troubleshooting" section of original purchase date is not installed in accordance with Whirlpool's published installation instructions. 10. Service...
... used in an inaccessible location or is required to instruct you are excluded from unauthorized modifications made to repair or replace appliance light bulbs, air filters or water filters. In the U.S.A., call 18008076777. 7/08 Keep this limitation may not apply to you need repair service, first see the "Troubleshooting" section of original purchase date is not installed in accordance with Whirlpool's published installation instructions. 10. Service...

Dimension Guide
Page 1
... the exhaust. Water (Steam models only): The dryer must be used for 27" have a 90° turn to the cold water faucet using new inlet hoses. Side view - Recessed area B. Because Whirlpool Corporation policy includes a continuous commitment to improve our products, we reserve the right to the coupling can be used . gas. Damage to change without notice. Large opening hamper door 3"* (76 mm) Vent System Chart (29" Wide Long Vent Models Only) Number...
... the exhaust. Water (Steam models only): The dryer must be used for 27" have a 90° turn to the cold water faucet using new inlet hoses. Side view - Recessed area B. Because Whirlpool Corporation policy includes a continuous commitment to improve our products, we reserve the right to the coupling can be used . gas. Damage to change without notice. Large opening hamper door 3"* (76 mm) Vent System Chart (29" Wide Long Vent Models Only) Number...

Installation Instructions
Page 2
... dryer must conform with local codes, or in the absence of local codes, with the National Electrical Code, ANSI/NFPA 70 or Canadian Electrical Code, CSA C22.1. 2 IMPORTANT: The gas installation must be electrically grounded in accordance with local codes, or in this manual and on your appliance. This is , tell you how to potential hazards that can happen if the instructions are...
... dryer must conform with local codes, or in the absence of local codes, with the National Electrical Code, ANSI/NFPA 70 or Canadian Electrical Code, CSA C22.1. 2 IMPORTANT: The gas installation must be electrically grounded in accordance with local codes, or in this manual and on your appliance. This is , tell you how to potential hazards that can happen if the instructions are...

Installation Instructions
Page 4
... old clothes dryer, remove the door. SAVE THESE INSTRUCTIONS INSTALLATION REQUIREMENTS Tools and Parts Gather the required tools and parts before starting installation. In the State of Massachusetts, the following installation instructions apply: � Installations and repairs must be performed by a qualified or licensed contractor, plumber, or gasfitter qualified or licensed by the State of Massachusetts. � If using a ball valve, it shall be a T-handle type. � A flexible gas connector, when used...
... old clothes dryer, remove the door. SAVE THESE INSTRUCTIONS INSTALLATION REQUIREMENTS Tools and Parts Gather the required tools and parts before starting installation. In the State of Massachusetts, the following installation instructions apply: � Installations and repairs must be performed by a qualified or licensed contractor, plumber, or gasfitter qualified or licensed by the State of Massachusetts. � If using a ball valve, it shall be a T-handle type. � A flexible gas connector, when used...

Installation Instructions
Page 5
... 1" (25 mm), install Extended Dryer Feet Kit, Part Number 279810. Check existing electrical supply and venting. If slope is located in the same closet as a dryer. Do not operate your dryer. ■■ If you are included. Drying times can be extended. NOTE: No other fuel-burning appliance can be installed in dryer drum. Check code requirements. If not level, clothes may not tumble properly and automatic sensor cycles may not operate correctly. Contact...
... 1" (25 mm), install Extended Dryer Feet Kit, Part Number 279810. Check existing electrical supply and venting. If slope is located in the same closet as a dryer. Do not operate your dryer. ■■ If you are included. Drying times can be extended. NOTE: No other fuel-burning appliance can be installed in dryer drum. Check code requirements. If not level, clothes may not tumble properly and automatic sensor cycles may not operate correctly. Contact...

Installation Instructions
Page 7
... outlet, have a proper outlet installed by providing a path of electric shock. A time-delay fuse or circuit breaker is your responsibility: ■■ To contact a qualified electrical installer. ■■ To be obtained from dryer carton; GROUNDING INSTRUCTIONS � For a grounded, cord-connected dryer: This dryer must be plugged into a grounded 4 prong outlet. In the event of the line. This dryer is equipped with a qualified electrician or service representative or personnel if you use...
... outlet, have a proper outlet installed by providing a path of electric shock. A time-delay fuse or circuit breaker is your responsibility: ■■ To contact a qualified electrical installer. ■■ To be obtained from dryer carton; GROUNDING INSTRUCTIONS � For a grounded, cord-connected dryer: This dryer must be plugged into a grounded 4 prong outlet. In the event of the line. This dryer is equipped with a qualified electrician or service representative or personnel if you use...

Installation Instructions
Page 8
... Service" section of the gas connection to the gas supply. GAS DRYER POWER HOOKUP Gas Supply Requirements WARNING Explosion Hazard Use a new CSA International approved gas supply line. If connected to connect the exhaust vent. Examples of connection. 8 Gas type Natural gas: This dryer is acceptable for lengths under 20 ft. (6.1 m) if local codes and gas supplier permit. ■■ Must include 1/8" NPT minimum plugged tapping accessible for opening and closing. If this information does not agree with Natural Gas. Gas supply line...
... Service" section of the gas connection to the gas supply. GAS DRYER POWER HOOKUP Gas Supply Requirements WARNING Explosion Hazard Use a new CSA International approved gas supply line. If connected to connect the exhaust vent. Examples of connection. 8 Gas type Natural gas: This dryer is acceptable for lengths under 20 ft. (6.1 m) if local codes and gas supplier permit. ■■ Must include 1/8" NPT minimum plugged tapping accessible for opening and closing. If this information does not agree with Natural Gas. Gas supply line...

Installation Instructions
Page 9
... electrical shock. 1¼" (32 mm) ■■ 120 Volt, 60 Hz., AC only, 15- grounding conductor can result in elevation. rating shown on the model/serial number plate. A time-delay fuse or circuit breaker is required. Do not use an extension cord. WARNING: Improper connection of this dryer be used . Option 1 (Recommended Method) Flexible stainless steel gas connector: ■■ If local codes permit, use a new flexible stainless steel gas connector...
... electrical shock. 1¼" (32 mm) ■■ 120 Volt, 60 Hz., AC only, 15- grounding conductor can result in elevation. rating shown on the model/serial number plate. A time-delay fuse or circuit breaker is required. Do not use an extension cord. WARNING: Improper connection of this dryer be used . Option 1 (Recommended Method) Flexible stainless steel gas connector: ■■ If local codes permit, use a new flexible stainless steel gas connector...

Installation Instructions
Page 10
... may result in final dryer location. ■■ Remove excess to woodwork, furniture, paint, wallpaper, carpets, etc. Do not use a plastic vent. IMPORTANT: Observe all joints. ■■ Exhaust vent must not be connected into interior of duct and catch lint. Louvered hood B. Flexible metal vent: (Acceptable only if accessible to clean) ■■ Must be fully extended and supported in : Moisture damage to...
... may result in final dryer location. ■■ Remove excess to woodwork, furniture, paint, wallpaper, carpets, etc. Do not use a plastic vent. IMPORTANT: Observe all joints. ■■ Exhaust vent must not be connected into interior of duct and catch lint. Louvered hood B. Flexible metal vent: (Acceptable only if accessible to clean) ■■ Must be fully extended and supported in : Moisture damage to...

Installation Instructions
Page 11
... 4396008RP 4" steel dryer venting clamps - 2 pack 8212662 Flush mounting louvered vent hood 4" 11 Refer to connect elbows H. Wall D. Rigid metal or flexible metal vent G. In Canada, call 1-800-901-2042, or visit us at www.applianceaccessories.com. Vent length necessary to the manufacturer's instructions. Periscope installation NOTE: The following kits for purchase. Left or right side exhaust installation (27" wide models only) C. Part Number Descriptions 8171587RP...
... 4396008RP 4" steel dryer venting clamps - 2 pack 8212662 Flush mounting louvered vent hood 4" 11 Refer to connect elbows H. Wall D. Rigid metal or flexible metal vent G. In Canada, call 1-800-901-2042, or visit us at www.applianceaccessories.com. Vent length necessary to the manufacturer's instructions. Periscope installation NOTE: The following kits for purchase. Left or right side exhaust installation (27" wide models only) C. Part Number Descriptions 8171587RP...

Installation Instructions
Page 13
... gas connections, you must be used , be different, according to supply line type, size, and location. †®TEFLON is secured to secure vent, because they can catch lint. Dryer vent must fit over dryer exhaust outlet and inside exhaust hood. Move dryer to dryer location using straightest path possible. 2. Open shut-off valve in dryer. Make Gas Connection 1. Bubbles will show a leak. A recommended connection is clean. Run vent to final location. Then, test all connections by brushing on threads of vent to exhaust...
... gas connections, you must be used , be different, according to supply line type, size, and location. †®TEFLON is secured to secure vent, because they can catch lint. Dryer vent must fit over dryer exhaust outlet and inside exhaust hood. Move dryer to dryer location using straightest path possible. 2. Open shut-off valve in dryer. Make Gas Connection 1. Bubbles will show a leak. A recommended connection is clean. Run vent to final location. Then, test all connections by brushing on threads of vent to exhaust...

Installation Instructions
Page 14
... minutes and start , check the following: ■■ Dryer is plugged into a grounded 3 prong outlet. ■■ Electrical supply is connected. ■■ Household fuse is intact and tight, or circuit breaker has not tripped. ■■ Dryer door is closed , open it, then repeat the 5-minute test as outlined above. ■■ If the gas supply line shutoff valve is closed . If you have all parts are snug...
... minutes and start , check the following: ■■ Dryer is plugged into a grounded 3 prong outlet. ■■ Electrical supply is connected. ■■ Household fuse is intact and tight, or circuit breaker has not tripped. ■■ Dryer door is closed , open it, then repeat the 5-minute test as outlined above. ■■ If the gas supply line shutoff valve is closed . If you have all parts are snug...


