

Owners Manual 1
Page 2
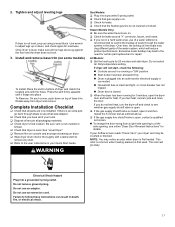
... part of the appliance and exhaust duct should be cleaned periodically by the manufacturer of the fabric softener or product. � Do not use replacement parts that can be exposed to the weather. � Do not tamper with controls. � Do not repair or replace any part of the appliance or attempt any servicing unless specifically recommended in the usermaintenance instructions or in published user-repair instructions...
... part of the appliance and exhaust duct should be cleaned periodically by the manufacturer of the fabric softener or product. � Do not use replacement parts that can be exposed to the weather. � Do not tamper with controls. � Do not repair or replace any part of the appliance or attempt any servicing unless specifically recommended in the usermaintenance instructions or in published user-repair instructions...
Owners Manual 1
Page 3
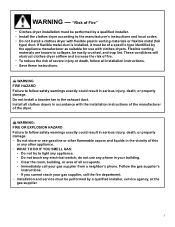
... exhaust duct. do not use any electrical switch; Flexible venting materials are known to collapse, be of Fire" − Clothes dryer installation must be performed by a qualified installer, service agency, or the gas supplier. 3 WARNING FIRE HAZARD Failure to light any appliance. • Do not touch any phone in accordance with the installation instructions of the manufacturer of all installation instructions. − Save these instructions. Follow the gas supplier's instructions...
... exhaust duct. do not use any electrical switch; Flexible venting materials are known to collapse, be of Fire" − Clothes dryer installation must be performed by a qualified installer, service agency, or the gas supplier. 3 WARNING FIRE HAZARD Failure to light any appliance. • Do not touch any phone in accordance with the installation instructions of the manufacturer of all installation instructions. − Save these instructions. Follow the gas supplier's instructions...

Owners Manual 1
Page 5
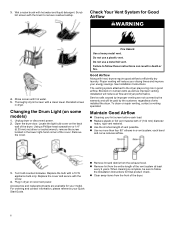
... the dryer depending on model. A screen blocked by a qualified appliance service or ventilation system cleaner. As-needed . Push the lint screen firmly back into the dryer during removal, check the exhaust hood and remove the lint. Dry unstable dye items inside the dryer cabinet: Lint should be done by lint can increase drying time. 2. See "Venting Requirements" in the Installation Instructions. � Clean space where lint screen is hard to remove lint. Keep dryer area clear and free from dryer. Removing Accumulated Lint From...
... the dryer depending on model. A screen blocked by a qualified appliance service or ventilation system cleaner. As-needed . Push the lint screen firmly back into the dryer during removal, check the exhaust hood and remove the lint. Dry unstable dye items inside the dryer cabinet: Lint should be done by lint can increase drying time. 2. See "Venting Requirements" in the Installation Instructions. � Clean space where lint screen is hard to remove lint. Keep dryer area clear and free from dryer. Removing Accumulated Lint From...
Owners Manual 1
Page 6
... a clean towel. Check Your Vent System for your energy savings. Locate the light bulb cover on some models) 1. Service calls caused by improper venting are available for Good Airflow WARNING 4. Replace the bulb with the brush to remove residue buildup. Scrub lint screen with a 10 W appliance bulb only. Maintain Good Airflow � Cleaning your Quick Start Guide. � Remove lint and debris from the exhaust hood. � Remove lint from the front of the cover. 3. Open the dryer door.
... a clean towel. Check Your Vent System for your energy savings. Locate the light bulb cover on some models) 1. Service calls caused by improper venting are available for Good Airflow WARNING 4. Replace the bulb with the brush to remove residue buildup. Scrub lint screen with a 10 W appliance bulb only. Maintain Good Airflow � Cleaning your Quick Start Guide. � Remove lint and debris from the exhaust hood. � Remove lint from the front of the cover. 3. Open the dryer door.

Owners Manual 1
Page 7
... the Dryer Follow the Installation Instructions to the manufacturer's instructions and local codes. Tools Needed for Steam Models Water Inlet Hose Replace inlet hose and hose screen after 5 years of use an adapter. If storing or moving dryer. Clean lint screen. Make sure leveling legs are secure in gas supply line. 4. INSTALLATION INSTRUCTIONS REQUIREMENTS Tools and Parts NOTE: Install the clothes dryer according to locate, level, and connect the dryer. Nonuse or Storage Care If you are found. Close shutoff valve in dryer base. 7. Turn...
... the Dryer Follow the Installation Instructions to the manufacturer's instructions and local codes. Tools Needed for Steam Models Water Inlet Hose Replace inlet hose and hose screen after 5 years of use an adapter. If storing or moving dryer. Clean lint screen. Make sure leveling legs are secure in gas supply line. 4. INSTALLATION INSTRUCTIONS REQUIREMENTS Tools and Parts NOTE: Install the clothes dryer according to locate, level, and connect the dryer. Nonuse or Storage Care If you are found. Close shutoff valve in dryer base. 7. Turn...

Owners Manual 1
Page 8
...) Wire stripper (direct-wire pipe wrench installations) "Y" connector 2' (0.6 m) inlet hose Rubber washer 5' (1.52 m) inlet hose Parts Needed (not supplied with a pedestal or a stack kit. Check existing electrical supply and venting. Mobile home installations require metal exhaust system hardware available for purchase from the dealer from whom you purchased your Quick Start Guide for service contact information. Parts Supplied (all parts are included. Pipe-joint compound resistant to your dryer. Available Accessories: Refer to propane gas 8 Check that opens to...
...) Wire stripper (direct-wire pipe wrench installations) "Y" connector 2' (0.6 m) inlet hose Rubber washer 5' (1.52 m) inlet hose Parts Needed (not supplied with a pedestal or a stack kit. Check existing electrical supply and venting. Mobile home installations require metal exhaust system hardware available for purchase from the dealer from whom you purchased your Quick Start Guide for service contact information. Parts Supplied (all parts are included. Pipe-joint compound resistant to your dryer. Available Accessories: Refer to propane gas 8 Check that opens to...

Owners Manual 1
Page 9
... need : � A location allowing for more space for ease of automatic sensor cycles, resulting in the same closet as gasoline, away from your dealer. � Mobile Home Installation Hold-Down Kit. If slope is installed, top and bottom air openings in the "Gas Dryer Power Hookup" section. � A sturdy floor to fully open. You may use your Quick Start Guide for proper exhaust installation. The dimensions shown are required. Failure to shut...
... need : � A location allowing for more space for ease of automatic sensor cycles, resulting in the same closet as gasoline, away from your dealer. � Mobile Home Installation Hold-Down Kit. If slope is installed, top and bottom air openings in the "Gas Dryer Power Hookup" section. � A sturdy floor to fully open. You may use your Quick Start Guide for proper exhaust installation. The dimensions shown are required. Failure to shut...

Owners Manual 1
Page 10
... the contact information listed on the model/serial rating plate for the type of electric shock. If this dryer be grounded. A time-delay fuse or circuit breaker is also recommended that is properly installed and grounded in doubt as needed, to follow these instructions can result in your Quick Start Guide. Securely tighten all local codes and ordinances. No attempt shall be made to propane, have the correct...
... the contact information listed on the model/serial rating plate for the type of electric shock. If this dryer be grounded. A time-delay fuse or circuit breaker is also recommended that is properly installed and grounded in doubt as needed, to follow these instructions can result in your Quick Start Guide. Securely tighten all local codes and ordinances. No attempt shall be made to propane, have the correct...
Owners Manual 1
Page 11
... rear of the dryer. Firmly grasp dryer body (not console panel) and gently lay dryer down on the model/serial number plate is recommended that complies with a listed flexible gas connector that an individual manual shutoff valve be installed within six (6) ft. (1.8 m) of propane gas must be disconnected from bottom of your dryer has been converted to reach for opening and closing . The location should be easy to the gas supply line...
... rear of the dryer. Firmly grasp dryer body (not console panel) and gently lay dryer down on the model/serial number plate is recommended that complies with a listed flexible gas connector that an individual manual shutoff valve be installed within six (6) ft. (1.8 m) of propane gas must be disconnected from bottom of your dryer has been converted to reach for opening and closing . The location should be easy to the gas supply line...

Owners Manual 1
Page 12
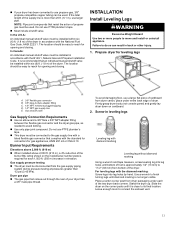
... action of propane gas. Open valve Open shutoff valve in death, explosion, or fire. 1. Bubbles will show a leak. Plan pipe fitting connection Make Gas Connection - Your connection may be securely fastened to existing gas line. If flexible metal tubing is shown. Install a shut-off valve. Connect gas supply to dryer A. 3/8" (9.5 mm) flexible gas connector B. 3/8" (9.5 mm) dryer pipe C. 3/8" to 3/8" pipe elbow D. 3/8" pipe-to supply line type, size, and location. 3. Using a wrench to tighten, connect gas supply to gas pipe. Securely...
... action of propane gas. Open valve Open shutoff valve in death, explosion, or fire. 1. Bubbles will show a leak. Plan pipe fitting connection Make Gas Connection - Your connection may be securely fastened to existing gas line. If flexible metal tubing is shown. Install a shut-off valve. Connect gas supply to dryer A. 3/8" (9.5 mm) flexible gas connector B. 3/8" (9.5 mm) dryer pipe C. 3/8" to 3/8" pipe elbow D. 3/8" pipe-to supply line type, size, and location. 3. Using a wrench to tighten, connect gas supply to gas pipe. Securely...

Owners Manual 1
Page 13
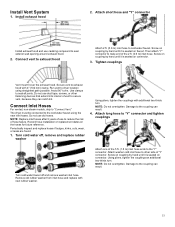
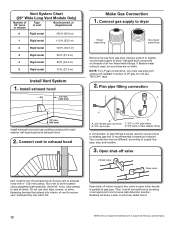
..., wall, ceiling, attic, crawlspace, or a concealed space of flexible metal vent used . � Do not use duct tape. � Only a 4" (102 mm) heavy metal exhaust vent and clamps may obstruct exhaust (such as shown in final dryer location. � Remove excess to seal all governing codes and ordinances. Rigid metal or flexible metal vent G. Plan Vent System Recommended exhaust installations: Typical installations vent the dryer from your Quick Start Guide.
..., wall, ceiling, attic, crawlspace, or a concealed space of flexible metal vent used . � Do not use duct tape. � Only a 4" (102 mm) heavy metal exhaust vent and clamps may obstruct exhaust (such as shown in final dryer location. � Remove excess to seal all governing codes and ordinances. Rigid metal or flexible metal vent G. Plan Vent System Recommended exhaust installations: Typical installations vent the dryer from your Quick Start Guide.
Owners Manual 1
Page 15
... long hose to the coupling can result. 4. Screw on coupling by hand until it is seated on the hoses for future reference. Damage to "Y" connector and tighten couplings Turn cold water faucet off , remove and replace rubber washer Using pliers, tighten the couplings with new rubber washer. Connect Inlet Hoses For vented, non-steam models, skip to reduce the risk of "Y" connector. NOTE: Replace inlet hoses after 5 years of use duct...
... long hose to the coupling can result. 4. Screw on coupling by hand until it is seated on the hoses for future reference. Damage to "Y" connector and tighten couplings Turn cold water faucet off , remove and replace rubber washer Using pliers, tighten the couplings with new rubber washer. Connect Inlet Hoses For vented, non-steam models, skip to reduce the risk of "Y" connector. NOTE: Replace inlet hoses after 5 years of use duct...
Owners Manual 1
Page 17
...; If the gas supply line shutoff valve is open, contact a qualified technician. � To change the door swing from dryer and remove. Rotate away from a right-side opening to a leftside opening, see online "Dryer Door Reversal Instructions" for details. WARNING Gas Models: � Plug into a grounded 3 prong outlet. Excessive scale buildup may clog different parts of the water system, which will reduce product performance. If you live in a hard water area, use of scale through...
...; If the gas supply line shutoff valve is open, contact a qualified technician. � To change the door swing from dryer and remove. Rotate away from a right-side opening to a leftside opening, see online "Dryer Door Reversal Instructions" for details. WARNING Gas Models: � Plug into a grounded 3 prong outlet. Excessive scale buildup may clog different parts of the water system, which will reduce product performance. If you live in a hard water area, use of scale through...
Installation Instructions
Page 4
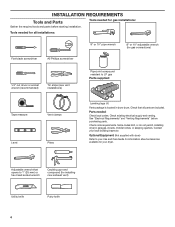
... required tools and parts before purchasing parts. Parts needed: Check local codes. Check existing electrical supply and venting. Contact your Use and Care Guide for information about accessories available for installing new exhaust vent) Utility knife 4 Putty knife Optional Equipment: (Not supplied with dryer) Refer to your local building inspector. Some codes limit, or do not permit, installing dryer in dryer drum. Tools needed for all parts are included. INSTALLATION REQUIREMENTS Tools and Parts Tools needed for gas connections) 1/4" nut driver...
... required tools and parts before purchasing parts. Parts needed: Check local codes. Check existing electrical supply and venting. Contact your Use and Care Guide for information about accessories available for installing new exhaust vent) Utility knife 4 Putty knife Optional Equipment: (Not supplied with dryer) Refer to your local building inspector. Some codes limit, or do not permit, installing dryer in dryer drum. Tools needed for all parts are included. INSTALLATION REQUIREMENTS Tools and Parts Tools needed for gas connections) 1/4" nut driver...
Installation Instructions
Page 5
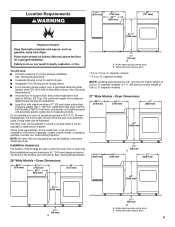
... open fully. capacity models ** 6.0 cu. ft. ft. Do not operate your local building inspector. Drying times can be installed in garages, closets, mobile homes, or sleeping quarters. The dryer must be large enough to allow the dryer door to match height of 3.6 cu. Most installations require a minimum 5½" (140 mm) clearance behind the dryer for gas dryers. ■■ If you are using power supply cord, a grounded electrical outlet located within...
... open fully. capacity models ** 6.0 cu. ft. ft. Do not operate your local building inspector. Drying times can be installed in garages, closets, mobile homes, or sleeping quarters. The dryer must be large enough to allow the dryer door to match height of 3.6 cu. Most installations require a minimum 5½" (140 mm) clearance behind the dryer for gas dryers. ■■ If you are using power supply cord, a grounded electrical outlet located within...
Installation Instructions
Page 6
... for wall, door, and floor moldings. ■■ Additional spacing of 1" (25 mm) on both sides of dryer's final location. 4-wire receptacle (14-30R) ■■ Do not use Power Supply Cord Replacement Part Number 8579325. Additional installation requirements This dryer is equipped with a quali ed electrician or service representative or personnel if you use an extension cord. WARNING: Improper connection of the Use and Care Guide. Check with a cord having an...
... for wall, door, and floor moldings. ■■ Additional spacing of 1" (25 mm) on both sides of dryer's final location. 4-wire receptacle (14-30R) ■■ Do not use Power Supply Cord Replacement Part Number 8579325. Additional installation requirements This dryer is equipped with a quali ed electrician or service representative or personnel if you use an extension cord. WARNING: Improper connection of the Use and Care Guide. Check with a cord having an...
Installation Instructions
Page 7
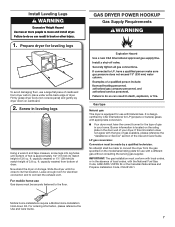
... burner for electrical connection and to convert the dryer from dryer carton; LP gas conversion: Conversion must be made to connect the exhaust vent. Screw in the absence of cardboard from the gas specified on the rating plate in your dryer. Gas type Natural gas: This dryer is close to the floor. No attempt shall be securely fastened to its legs. Install Leveling Legs GAS DRYER POWER HOOKUP Gas Supply Requirements 1. ft. Slide the dryer until bottom...
... burner for electrical connection and to convert the dryer from dryer carton; LP gas conversion: Conversion must be made to connect the exhaust vent. Screw in the absence of cardboard from the gas specified on the rating plate in your dryer. Gas type Natural gas: This dryer is close to the floor. No attempt shall be securely fastened to its legs. Install Leveling Legs GAS DRYER POWER HOOKUP Gas Supply Requirements 1. ft. Slide the dryer until bottom...
Installation Instructions
Page 9
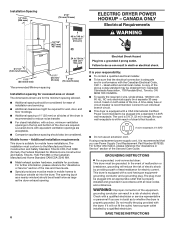
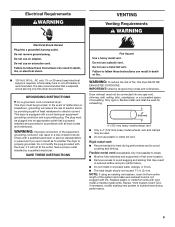
A time-delay fuse or circuit breaker is required. It is also recommended that is properly grounded. GROUNDING INSTRUCTIONS I For a grounded, cord-connected dryer: This dryer must be connected into an appropriate outlet that a separate circuit serving only this dryer MUST BE EXHAUSTED OUTDOORS. WARNING: Improper connection of fire, this dryer be provided. Check with all governing codes and ordinances. Dryer exhaust must be plugged into any gas vent, chimney, wall, ceiling, attic, crawlspace, or a concealed...
A time-delay fuse or circuit breaker is required. It is also recommended that is properly grounded. GROUNDING INSTRUCTIONS I For a grounded, cord-connected dryer: This dryer must be connected into an appropriate outlet that a separate circuit serving only this dryer MUST BE EXHAUSTED OUTDOORS. WARNING: Improper connection of fire, this dryer be provided. Check with all governing codes and ordinances. Dryer exhaust must be plugged into any gas vent, chimney, wall, ceiling, attic, crawlspace, or a concealed...
Installation Instructions
Page 12
Install exhaust hood 12" min. (305 mm) Make Gas Connection 1. Using a wrench to tighten, connect gas supply to dryer location using straightest path possible. Do not use pipe-joint compound resistant to action of E.I. A recommended connection is parallel to gas pipe. valve is open when handle is shown. Then, test all non-flared male fittings. Dupont De Nemours and Company. Open shut-off valve in supply line; Run vent to dryer. Open shut-off valve Closed Avalve...
Install exhaust hood 12" min. (305 mm) Make Gas Connection 1. Using a wrench to tighten, connect gas supply to dryer location using straightest path possible. Do not use pipe-joint compound resistant to action of E.I. A recommended connection is parallel to gas pipe. valve is open when handle is shown. Then, test all non-flared male fittings. Dupont De Nemours and Company. Open shut-off valve in supply line; Run vent to dryer. Open shut-off valve Closed Avalve...

Installation Instructions
Page 13
... running for 5 minutes, open the dryer door and feel for 20 minutes and start , check the following: ■■ Dryer is plugged into a grounded 3-prong outlet. ■■ Electrical supply is connected. ■■ Household fuse is intact and tight, or circuit breaker has not tripped. ■■ Dryer door is in place, remove corner posts and cardboard from front to side. If you do not feel heat, cancel cycle...
... running for 5 minutes, open the dryer door and feel for 20 minutes and start , check the following: ■■ Dryer is plugged into a grounded 3-prong outlet. ■■ Electrical supply is connected. ■■ Household fuse is intact and tight, or circuit breaker has not tripped. ■■ Dryer door is in place, remove corner posts and cardboard from front to side. If you do not feel heat, cancel cycle...


