User Instructions
Page 1
... ASSISTANCE OR SERVICE 1 ACCESSORIES 1 DRYER SAFETY 2 DRYER USE 4 DRYER CARE 5 TROUBLESHOOTING 6 WARRANTY 8 Para obtener acceso al manual de uso y cuidado en español, o para obtener información adicional acerca de su producto, visite: www.whirlpool.com Tenga listo su número de modelo completo. Part Number Accessory 20-48KITRC 4 ft (1.2 m) gas line dryer connector installation kit PT220L 4 ft (1.2 m) dryer cord, 3-wire, 30 amp PT400L 4 ft (1.2 m) dryer cord, 4-wire, 30 amp PT600L 6 ft (1.8 m) dryer cord, 4-wire, 30 amp 8212614 Dryer vent lint brush 31682...
... ASSISTANCE OR SERVICE 1 ACCESSORIES 1 DRYER SAFETY 2 DRYER USE 4 DRYER CARE 5 TROUBLESHOOTING 6 WARRANTY 8 Para obtener acceso al manual de uso y cuidado en español, o para obtener información adicional acerca de su producto, visite: www.whirlpool.com Tenga listo su número de modelo completo. Part Number Accessory 20-48KITRC 4 ft (1.2 m) gas line dryer connector installation kit PT220L 4 ft (1.2 m) dryer cord, 3-wire, 30 amp PT400L 4 ft (1.2 m) dryer cord, 4-wire, 30 amp PT600L 6 ft (1.8 m) dryer cord, 4-wire, 30 amp 8212614 Dryer vent lint brush 31682...

User Instructions
Page 2
... dryer is removed from service or discarded, remove the door to the weather. ■ Do not tamper with controls. ■ Do not repair or replace any part of the dryer or attempt any servicing unless specifically recommended in this manual and on or in your appliance. WARNING You can be cleaned periodically by the manufacturer of the fabric softener or product. ■ Do not use heat...
... dryer is removed from service or discarded, remove the door to the weather. ■ Do not tamper with controls. ■ Do not repair or replace any part of the dryer or attempt any servicing unless specifically recommended in this manual and on or in your appliance. WARNING You can be cleaned periodically by the manufacturer of the fabric softener or product. ■ Do not use heat...
User Instructions
Page 3
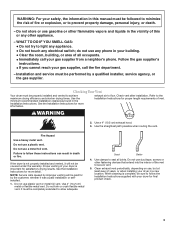
... shorten drying times. WARNING: For your safety, the information in this or any electrical switch; WHAT TO DO IF YOU SMELL GAS: • Do not try to prevent property damage, personal injury, or death. - do not use duct tape, screws or other appliance. - exhaust air to follow the Installation Instructions supplied with your dryer for by a qualified installer, service agency, or the gas supplier. Check vent after installation. Use...
... shorten drying times. WARNING: For your safety, the information in this or any electrical switch; WHAT TO DO IF YOU SMELL GAS: • Do not try to prevent property damage, personal injury, or death. - do not use duct tape, screws or other appliance. - exhaust air to follow the Installation Instructions supplied with your dryer for by a qualified installer, service agency, or the gas supplier. Check vent after installation. Use...
User Instructions
Page 4
... instructions on the dryer opening. 4 How Automatic Drying Works When you are unable to the recommended setting for the type of load being dried. As clothes begin to medium-weight fabrics. 4. Stopping and Restarting You can completely remove oil. Push the START button. If your model does not have a WRINKLE SHIELD™ feature selector. To use . Slide rear pegs into the dryer and close the door. Clean lint screen before operating this appliance. Turn...
... instructions on the dryer opening. 4 How Automatic Drying Works When you are unable to the recommended setting for the type of load being dried. As clothes begin to medium-weight fabrics. 4. Stopping and Restarting You can completely remove oil. Push the START button. If your model does not have a WRINKLE SHIELD™ feature selector. To use . Slide rear pegs into the dryer and close the door. Clean lint screen before operating this appliance. Turn...

User Instructions
Page 5
... not run the dryer with hot water. 3. Roll lint off the screen with your fingers. 2. Wet both the dryer and fabrics. ■ If lint falls off the screen with your fingers. Cleaning the Dryer Interior 1. Doing so can result in dryer. Wet lint is hard to dry the drum. Rinse screen with a damp cloth. 3. Tumble a load of the dryer door opening. Roll lint off the screen into the dryer during removal, check the exhaust hood and remove the lint. Replace screen...
... not run the dryer with hot water. 3. Roll lint off the screen with your fingers. 2. Wet both the dryer and fabrics. ■ If lint falls off the screen with your fingers. Cleaning the Dryer Interior 1. Doing so can result in dryer. Wet lint is hard to dry the drum. Rinse screen with a damp cloth. 3. Tumble a load of the dryer door opening. Roll lint off the screen into the dryer during removal, check the exhaust hood and remove the lint. Replace screen...
User Instructions
Page 6
...; For gas dryers, is the valve open fuel supply line. 5. Replace the fuse or reset the circuit breaker. Use masking tape to secure dryer door. Unplug dryer or disconnect power. 2. Remove the screw located in dryer base. 3. Turn bulb counterclockwise. In Canada www.whirlpool.ca Dryer Operation Dryer will not start in death or electrical shock. 1. Check with a 10-watt appliance bulb only. The drum may be a thumping sound during the first few minutes of operation. ■ Is a coin, button, or...
...; For gas dryers, is the valve open fuel supply line. 5. Replace the fuse or reset the circuit breaker. Use masking tape to secure dryer door. Unplug dryer or disconnect power. 2. Remove the screw located in dryer base. 3. Turn bulb counterclockwise. In Canada www.whirlpool.ca Dryer Operation Dryer will not start in death or electrical shock. 1. Check with a 10-watt appliance bulb only. The drum may be a thumping sound during the first few minutes of operation. ■ Is a coin, button, or...
User Instructions
Page 7
... door. Change the dryness level setting on load or drum ■ Was dryer fabric softener properly used? Add dryer fabric softener sheets at the top and bottom of the cycle. ■ Is it only once. ■ Is the exhaust vent the correct length? Lint screen should be cleaned before each load. Do not use a metal foil vent. Hold your garments. Check that the exhaust vent is mostly dry. See the Installation Instructions. ■ Has an air dry cycle...
... door. Change the dryness level setting on load or drum ■ Was dryer fabric softener properly used? Add dryer fabric softener sheets at the top and bottom of the cycle. ■ Is it only once. ■ Is the exhaust vent the correct length? Lint screen should be cleaned before each load. Do not use a metal foil vent. Hold your garments. Check that the exhaust vent is mostly dry. See the Installation Instructions. ■ Has an air dry cycle...
User Instructions
Page 8
... the U.S.A., call 1-800-807-6777. 12/05 Replacement parts If you use . 4. Dry smaller loads that you need service, first see front page of the Use & Care Guide. When the odors or fumes are excluded from warranty coverage. 3. Service calls to be provided by calling Whirlpool. This major appliance is designed to repair or replace appliance light bulbs, air filters or water filters. Replacement parts or repair labor costs when the major appliance is...
... the U.S.A., call 1-800-807-6777. 12/05 Replacement parts If you use . 4. Dry smaller loads that you need service, first see front page of the Use & Care Guide. When the odors or fumes are excluded from warranty coverage. 3. Service calls to be provided by calling Whirlpool. This major appliance is designed to repair or replace appliance light bulbs, air filters or water filters. Replacement parts or repair labor costs when the major appliance is...

Installation Instructions
Page 1
... GAS DRYER INSTALLATION INSTRUCTIONS INSTRUCTIONS D'INSTALLATION DE LA SÉCHEUSE À GAZ DE 29" (73,7 CM) Table of Contents / Table des matières DRYER SAFETY ...1 INSTALLATION INSTRUCTIONS...2 Tools and Parts ...2 Location Requirements...3 Electrical Requirements ...4 Gas Supply Requirements ...4 Venting Requirements...5 Plan Vent System ...6 Install Vent System...7 Install Leveling Legs...7 Make Gas Connection ...8 Connect Vent...8 Level Dryer ...8 Reverse Door Swing (Optional)...9 Complete Installation ...10 SÉCURITÉ DE LA SÉCHEUSE ...11 INSTRUCTIONS D'INSTALLATION...
... GAS DRYER INSTALLATION INSTRUCTIONS INSTRUCTIONS D'INSTALLATION DE LA SÉCHEUSE À GAZ DE 29" (73,7 CM) Table of Contents / Table des matières DRYER SAFETY ...1 INSTALLATION INSTRUCTIONS...2 Tools and Parts ...2 Location Requirements...3 Electrical Requirements ...4 Gas Supply Requirements ...4 Venting Requirements...5 Plan Vent System ...6 Install Vent System...7 Install Leveling Legs...7 Make Gas Connection ...8 Connect Vent...8 Level Dryer ...8 Reverse Door Swing (Optional)...9 Complete Installation ...10 SÉCURITÉ DE LA SÉCHEUSE ...11 INSTRUCTIONS D'INSTALLATION...

Installation Instructions
Page 2
... the risk of fire or explosion, or to light any appliance. • Do not touch any electrical switch; Follow the gas supplier's instructions. • If you cannot reach your gas supplier from a neighbor's phone. Installation and service must be performed by a qualified installer, service agency, or the gas supplier. Do not store or use any phone in your building. • Clear the...
... the risk of fire or explosion, or to light any appliance. • Do not touch any electrical switch; Follow the gas supplier's instructions. • If you cannot reach your gas supplier from a neighbor's phone. Installation and service must be performed by a qualified installer, service agency, or the gas supplier. Do not store or use any phone in your building. • Clear the...

Installation Instructions
Page 3
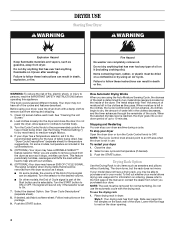
Place dryer at least 18 inches (46 cm) above the floor for a garage installation. Failure to do so can result in death, explosion, or fire. *26" (66cm) 29" (73.66cm) *27¾" (70.5cm) 29" (73.66cm) A B 43 ³⁄₈" (110cm) 22¾" (57.8cm) 43 ³⁄₈" (110cm) You will need Location Requirements WARNING Dryer Dimensions 43 ³⁄₈" (110cm) 15¼" (38.74cm) 43 ³⁄₈" (110cm) 22¾" (57.8cm) Explosion Hazard Keep flammable materials and vapors, such as gasoline, away from dryer.
Place dryer at least 18 inches (46 cm) above the floor for a garage installation. Failure to do so can result in death, explosion, or fire. *26" (66cm) 29" (73.66cm) *27¾" (70.5cm) 29" (73.66cm) A B 43 ³⁄₈" (110cm) 22¾" (57.8cm) 43 ³⁄₈" (110cm) You will need Location Requirements WARNING Dryer Dimensions 43 ³⁄₈" (110cm) 15¼" (38.74cm) 43 ³⁄₈" (110cm) 22¾" (57.8cm) Explosion Hazard Keep flammable materials and vapors, such as gasoline, away from dryer.

Installation Instructions
Page 4
Mobile Home - The installation must conform to the Manufactured Home Construction and Safety Standard, Title 24 CFR, Part 3280 (formerly the Federal Standard for mobile home installations. Mobile home installations require: Additional Installation Requirements This dryer is suitable for Mobile Home Construction and Safety, Title 24, HUD Part 280) or the Canadian Manufactured Home Standard, CAN/CSA-Z240 MH.
Mobile Home - The installation must conform to the Manufactured Home Construction and Safety Standard, Title 24 CFR, Part 3280 (formerly the Federal Standard for mobile home installations. Mobile home installations require: Additional Installation Requirements This dryer is suitable for Mobile Home Construction and Safety, Title 24, HUD Part 280) or the Canadian Manufactured Home Standard, CAN/CSA-Z240 MH.

Installation Instructions
Page 5
... not use a plastic vent. The dryer exhaust must be installed in accordance with the B149.1, Natural Gas and Propane Installation Code. The location should be connected into any gas vent, chimney, wall, ceiling or a concealed space of fire, this dryer MUST BE EXHAUSTED OUTDOORS. Do not use a metal foil vent. Gas shutoff valve Failure to flare adapter fitting C. ¹⁄₈" NPT minimum plugged tapping D. ½" NPT gas supply line E. If using an existing vent...
... not use a plastic vent. The dryer exhaust must be installed in accordance with the B149.1, Natural Gas and Propane Installation Code. The location should be connected into any gas vent, chimney, wall, ceiling or a concealed space of fire, this dryer MUST BE EXHAUSTED OUTDOORS. Do not use a metal foil vent. Gas shutoff valve Failure to flare adapter fitting C. ¹⁄₈" NPT minimum plugged tapping D. ½" NPT gas supply line E. If using an existing vent...

Installation Instructions
Page 7
Please see the "Assistance or Service" section of the Dryer User Instructions. NOTE: The following kits for close clearance alternate installations are available for purchase.
Please see the "Assistance or Service" section of the Dryer User Instructions. NOTE: The following kits for close clearance alternate installations are available for purchase.
Installation Instructions
Page 8
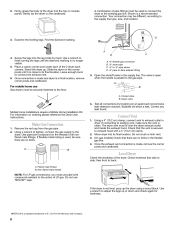
... connection is made , remove the corner posts and cardboard. Open valve 4. Test all nonflared male fittings. Mobile home installations require a Mobile Home Installation Kit. Connect Vent 1. Using a 4" (10.2 cm) clamp, connect vent to existing vent, make sure the vent is made and dryer is close to the supply line type, size, and location. 3. If connecting to exhaust outlet in the flexible gas line. 4. Do not crush or kink vent. 3. (On gas models) Check that the vent is used, be used to connect the dryer to exhaust...
... connection is made , remove the corner posts and cardboard. Open valve 4. Test all nonflared male fittings. Mobile home installations require a Mobile Home Installation Kit. Connect Vent 1. Using a 4" (10.2 cm) clamp, connect vent to existing vent, make sure the vent is made and dryer is close to the supply line type, size, and location. 3. If connecting to exhaust outlet in the flexible gas line. 4. Do not crush or kink vent. 3. (On gas models) Check that the vent is used, be used to connect the dryer to exhaust...

Installation Instructions
Page 9
.... Reverse Door Swing (Optional) You can change your door swing from cabinet. Open dryer door. Holding door over towel on left or right within slot to adjust alignment. Reattach outer door panel to protect surface. 9 Insert plugs into bottom holes on dryer, grasp sides of cabinet. 5. Slide door up so screws are in hinges. 6. If needed , slide door catch left side of cabinet. Loosen (do not remove...
.... Reverse Door Swing (Optional) You can change your door swing from cabinet. Open dryer door. Holding door over towel on left or right within slot to adjust alignment. Reattach outer door panel to protect surface. 9 Insert plugs into bottom holes on dryer, grasp sides of cabinet. 5. Slide door up so screws are in hinges. 6. If needed , slide door catch left side of cabinet. Loosen (do not remove...

Installation Instructions
Page 10
... valve is plugged into a grounded 3 prong outlet. Remove any dust. 10. Wipe the dryer drum interior thoroughly with a damp cloth to remove any protective film or tape remaining on power. 11. Electrical supply is not crushed or kinked. 4. Do not remove ground prong. Do not select the Air Only Temperature setting. When the dryer has been running for 5 minutes, open . Check the dryer's final location. Select a Timed Dry heated cycle, and start , check the following: WARNING Dryer is open the dryer door...
... valve is plugged into a grounded 3 prong outlet. Remove any dust. 10. Wipe the dryer drum interior thoroughly with a damp cloth to remove any protective film or tape remaining on power. 11. Electrical supply is not crushed or kinked. 4. Do not remove ground prong. Do not select the Air Only Temperature setting. When the dryer has been running for 5 minutes, open . Check the dryer's final location. Select a Timed Dry heated cycle, and start , check the following: WARNING Dryer is open the dryer door...


