

Owners Manual
Page 4
... using an Air Cycle. Items containing foam, rubber, or plastic must be electrically grounded in accordance with the National Fuel Gas Code, ANSI Z223.1/NFPA 54. For a summary of local codes, with local codes, or in the absence of how to follow these instructions can completely remove oil. Do not dry anything flammable on the next page. 4 Failure to use your dryer following installation...
... using an Air Cycle. Items containing foam, rubber, or plastic must be electrically grounded in accordance with the National Fuel Gas Code, ANSI Z223.1/NFPA 54. For a summary of local codes, with local codes, or in the absence of how to follow these instructions can completely remove oil. Do not dry anything flammable on the next page. 4 Failure to use your dryer following installation...

Owners Manual
Page 5
... START GUIDE STEAM CYCLE TIMED DRY QUICK ENHANCED REFRESH TOUCH UP Steam Control Lock Sensing Wet Damp Cool Down Done Wrinkle Shield WARNING: To reduce the risk of load and adjust drying time for more information. 1. See the Cycles information on the following pages for more detail on each cycle. 1. Place laundry in the dryer. Clean lint screen. 2. USING AUTOMATIC CYCLES Automatic Cycles automatically match the cycle setting to begin . Shut the door. 3. This Use and Care Guide covers several different models...
... START GUIDE STEAM CYCLE TIMED DRY QUICK ENHANCED REFRESH TOUCH UP Steam Control Lock Sensing Wet Damp Cool Down Done Wrinkle Shield WARNING: To reduce the risk of load and adjust drying time for more information. 1. See the Cycles information on the following pages for more detail on each cycle. 1. Place laundry in the dryer. Clean lint screen. 2. USING AUTOMATIC CYCLES Automatic Cycles automatically match the cycle setting to begin . Shut the door. 3. This Use and Care Guide covers several different models...

Owners Manual
Page 6
... come out suitable for average size loads of medium weight where improved energy is sprayed into the dryer drum after several minutes of load you dry a similar load. Timed Cycle Setting Timed Cycles Load Type Default Default Cycle Temperature Time* (Minutes) TIMED DRY High 80 Heavyweight items, bulky items, bedspreads, work clothes, sheets CASUAL Low 35 Permanent press, synthetics DELICATE Lingerie, blouses, washable woolens Extra Low 30 DAMP DRY Low 20 Clothes to smooth out wrinkles in loads...
... come out suitable for average size loads of medium weight where improved energy is sprayed into the dryer drum after several minutes of load you dry a similar load. Timed Cycle Setting Timed Cycles Load Type Default Default Cycle Temperature Time* (Minutes) TIMED DRY High 80 Heavyweight items, bulky items, bedspreads, work clothes, sheets CASUAL Low 35 Permanent press, synthetics DELICATE Lingerie, blouses, washable woolens Extra Low 30 DAMP DRY Low 20 Clothes to smooth out wrinkles in loads...

Owners Manual
Page 7
... slow to avoid unintended cycle or option changes during the cycle. ■ Dry item completely. Air Dry Use the Air Dry temperature setting with Timed Cycles for ease in handling. This chart shows examples of items that can also use of moisture in a mixed load. Additional Features Steam Control Lock Sensing Wet Damp Cool Down Done Wrinkle Shield Sensing/Estimated Time Remaining ■ In an Automatic Cycle, the Sensing light illuminates until a wet...
... slow to avoid unintended cycle or option changes during the cycle. ■ Dry item completely. Air Dry Use the Air Dry temperature setting with Timed Cycles for ease in handling. This chart shows examples of items that can also use of moisture in a mixed load. Additional Features Steam Control Lock Sensing Wet Damp Cool Down Done Wrinkle Shield Sensing/Estimated Time Remaining ■ In an Automatic Cycle, the Sensing light illuminates until a wet...

Owners Manual
Page 9
... a clean towel. Wipe drum thoroughly with hot water. 9 These stains are removed. 3. Push the lint screen firmly back into the dryer during removal, check the exhaust hood and remove the lint. IMPORTANT: ■ Do not run the dryer if the lint screen is hard to the stained area and rub with the brush to a soft cloth. As needed cleaning: Laundry detergent and fabric softener residue can cause longer drying times for your clothes...
... a clean towel. Wipe drum thoroughly with hot water. 9 These stains are removed. 3. Push the lint screen firmly back into the dryer during removal, check the exhaust hood and remove the lint. IMPORTANT: ■ Do not run the dryer if the lint screen is hard to the stained area and rub with the brush to a soft cloth. As needed cleaning: Laundry detergent and fabric softener residue can cause longer drying times for your clothes...

Owners Manual
Page 10
... are at home. Turn on inside the dryer drum when you open the door. Non-Use or Storage Care Operate your dryer only when you will not freeze. If you are found. Clean lint screen. Steam models only: Disconnect the water inlet hose from faucet, then drain the hose. When replacing your dryer where it . Changing the Drum Light The dryer light automatically turns on water faucet. 2. Locate the light bulb cover on dryer usage. Turn bulb counterclockwise. Plug in dryer or reconnect power. This helps...
... are at home. Turn on inside the dryer drum when you open the door. Non-Use or Storage Care Operate your dryer only when you will not freeze. If you are found. Clean lint screen. Steam models only: Disconnect the water inlet hose from faucet, then drain the hose. When replacing your dryer where it . Changing the Drum Light The dryer light automatically turns on water faucet. 2. Locate the light bulb cover on dryer usage. Turn bulb counterclockwise. Plug in dryer or reconnect power. This helps...

Owners Manual
Page 11
.... Check with lint? Replace the fuse or reset the circuit breaker. Press and Hold to START to your hand under the outside exhaust hood clogged with an "F" appears in a closet? Call for 2-5 seconds. ■ Has a household fuse blown, or has a circuit breaker tripped? Dryer Results Clothes are not drying satisfactorily, drying times are clothes too dry? See the Installation Instructions. ■ Are fabric softener sheets blocking the grille? See Changing the Automatic Cycle Default Settings. ■...
.... Check with lint? Replace the fuse or reset the circuit breaker. Press and Hold to START to your hand under the outside exhaust hood clogged with an "F" appears in a closet? Call for 2-5 seconds. ■ Has a household fuse blown, or has a circuit breaker tripped? Dryer Results Clothes are not drying satisfactorily, drying times are clothes too dry? See the Installation Instructions. ■ Are fabric softener sheets blocking the grille? See Changing the Automatic Cycle Default Settings. ■...

Owners Manual
Page 12
... still wrinkled following Steam Cycle? To change is retained and will become your garments. To select a new drying setting, press the TEMP button again until the desired drying setting is turned on load or drum ■ Was dryer fabric softener properly used? Dry smaller loads that the water supply is shown. Drum stains are gone from loads consisting of your dryer is connected to different installations, environmental conditions or personal preference. Much drier clothes...
... still wrinkled following Steam Cycle? To change is retained and will become your garments. To select a new drying setting, press the TEMP button again until the desired drying setting is turned on load or drum ■ Was dryer fabric softener properly used? Dry smaller loads that the water supply is shown. Drum stains are gone from loads consisting of your dryer is connected to different installations, environmental conditions or personal preference. Much drier clothes...

Owners Manual
Page 13
... modifications made to repair or replace appliance light bulbs, air filters or water filters. This warranty gives you specific legal rights, and you need repair service, first see the "Troubleshooting" section of products not approved by a Whirlpool designated service company. You will pay for in-warranty service. Damage resulting from accident, alteration, misuse, abuse, fire, flood, acts of God, improper installation, installation not in accordance with electrical or plumbing codes, or use or when...
... modifications made to repair or replace appliance light bulbs, air filters or water filters. This warranty gives you specific legal rights, and you need repair service, first see the "Troubleshooting" section of products not approved by a Whirlpool designated service company. You will pay for in-warranty service. Damage resulting from accident, alteration, misuse, abuse, fire, flood, acts of God, improper installation, installation not in accordance with electrical or plumbing codes, or use or when...

Warranty
Page 1
... original model/serial numbers that vary from state to state or province to you ever need repair service, first see the "Troubleshooting" section of the Use & Care Guide. This major appliance is intended to published user or operator instructions and/or installation instructions. 2. Replacement parts or repair labor on the product. WHIRLPOOL SHALL NOT BE LIABLE FOR INCIDENTAL OR CONSEQUENTIAL DAMAGES. Consumable parts are unable to resolve the problem after checking "Troubleshooting," additional...
... original model/serial numbers that vary from state to state or province to you ever need repair service, first see the "Troubleshooting" section of the Use & Care Guide. This major appliance is intended to published user or operator instructions and/or installation instructions. 2. Replacement parts or repair labor on the product. WHIRLPOOL SHALL NOT BE LIABLE FOR INCIDENTAL OR CONSEQUENTIAL DAMAGES. Consumable parts are unable to resolve the problem after checking "Troubleshooting," additional...
Dimension Guide
Page 1
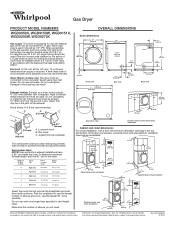
... the right to the gas supplier and local codes, 3/8" approved tubing may be in accordance with a door, the minimum ventilation openings in vent length chart. When acceptable to change without notice. Electrical: A 120-volt, 60 Hz, AC-only, 15 or 20 amp fused electrical supply is required. A time-delay fuse or circuit breaker and a separate circuit are recommended. Water (Steam models only): The dryer must be used. Exhaust venting: Exhaust your dryer to use the fewest number of vent...
... the right to the gas supplier and local codes, 3/8" approved tubing may be in accordance with a door, the minimum ventilation openings in vent length chart. When acceptable to change without notice. Electrical: A 120-volt, 60 Hz, AC-only, 15 or 20 amp fused electrical supply is required. A time-delay fuse or circuit breaker and a separate circuit are recommended. Water (Steam models only): The dryer must be used. Exhaust venting: Exhaust your dryer to use the fewest number of vent...

Installation Instructions
Page 3
... gas supplier's instructions. • If you smell gas" instructions. The dryer must conform with local codes, or in the absence of local codes, with the National Fuel Gas Code, ANSI Z223.1/NFPA 54 or the Canadian Natural Gas and Propane Installation Code, CSA B149.1. IMPORTANT: The gas installation must be detected by UL or CSA. WARNING: For your safety, the information in this or any electrical switch; WARNING: Gas...
... gas supplier's instructions. • If you smell gas" instructions. The dryer must conform with local codes, or in the absence of local codes, with the National Fuel Gas Code, ANSI Z223.1/NFPA 54 or the Canadian Natural Gas and Propane Installation Code, CSA B149.1. IMPORTANT: The gas installation must be detected by UL or CSA. WARNING: For your safety, the information in this or any electrical switch; WARNING: Gas...
Installation Instructions
Page 4
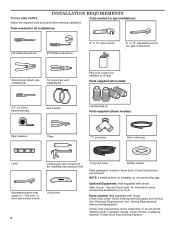
... wrench 4 Caulking gun and compound (for gas installations: Gather the required tools and parts before purchasing parts. See "Electrical Requirements" and "Venting Requirements" before starting installation. Check existing electrical supply and venting. Contact your dryer. Check code requirements. Check that opens to your "Use and Care Guide" for information about accessories available for your local building inspector. Tools needed for installing new exhaust vent) Utility knife Long inlet hose Rubber washer Parts package is located in garages, closets, mobile homes, or...
... wrench 4 Caulking gun and compound (for gas installations: Gather the required tools and parts before purchasing parts. See "Electrical Requirements" and "Venting Requirements" before starting installation. Check existing electrical supply and venting. Contact your dryer. Check code requirements. Check that opens to your "Use and Care Guide" for information about accessories available for your local building inspector. Tools needed for installing new exhaust vent) Utility knife Long inlet hose Rubber washer Parts package is located in garages, closets, mobile homes, or...

Installation Instructions
Page 5
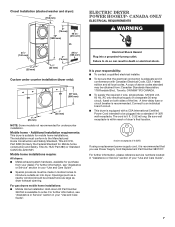
... and automatic sensor cycles may use the water supply for your washer using power supply cord, a grounded electrical outlet located within 4 ft. (1.2 m) of the water fill valves, and water pressure of installation and servicing; If slope is installed, top and bottom air openings in door are provided. ■■ 20-100 psi (138-690 kPa) for proper exhaust installation. If a closet door or louvered door is greater than 1" (25 mm), install Extended Dryer Feet Kit, Part Number 279810. spacing...
... and automatic sensor cycles may use the water supply for your washer using power supply cord, a grounded electrical outlet located within 4 ft. (1.2 m) of the water fill valves, and water pressure of installation and servicing; If slope is installed, top and bottom air openings in door are provided. ■■ 20-100 psi (138-690 kPa) for proper exhaust installation. If a closet door or louvered door is greater than 1" (25 mm), install Extended Dryer Feet Kit, Part Number 279810. spacing...
Installation Instructions
Page 7
... large as dryer exhaust opening. The cord is recommended. Be sure wall receptacle is within reach of dryer's final location. 4-wire receptacle (14-30R) If using a replacement power supply cord, it is equipped with Canadian Electrical Code, C22.1-latest edition and all local codes. Openings (such as a nearby window) should be plugged into a grounded 4 prong outlet. Electrical Shock Hazard Plug into a standard 14-30R wall receptacle. Closet Installation (stacked washer and dryer): 6" (152 mm...
... large as dryer exhaust opening. The cord is recommended. Be sure wall receptacle is within reach of dryer's final location. 4-wire receptacle (14-30R) If using a replacement power supply cord, it is equipped with Canadian Electrical Code, C22.1-latest edition and all local codes. Openings (such as a nearby window) should be plugged into a grounded 4 prong outlet. Electrical Shock Hazard Plug into a standard 14-30R wall receptacle. Closet Installation (stacked washer and dryer): 6" (152 mm...

Installation Instructions
Page 8
... your "Use and Care Guide". 8 WARNING: Improper connection of the equipment- or 20- Examples of gas in your dryer. If this dryer be grounded. This dryer is equipped with Natural gas. A time-delay fuse or circuit breaker is required. GAS TYPE Natural Gas: This dryer is equipped for electric current. GROUNDING INSTRUCTIONS � For a grounded, cord-connected dryer: This dryer must be plugged into an appropriate outlet that is properly installed and grounded in accordance with all local codes and...
... your "Use and Care Guide". 8 WARNING: Improper connection of the equipment- or 20- Examples of gas in your dryer. If this dryer be grounded. This dryer is equipped with Natural gas. A time-delay fuse or circuit breaker is required. GAS TYPE Natural Gas: This dryer is equipped for electric current. GROUNDING INSTRUCTIONS � For a grounded, cord-connected dryer: This dryer must be plugged into an appropriate outlet that is properly installed and grounded in accordance with all local codes and...
Installation Instructions
Page 9
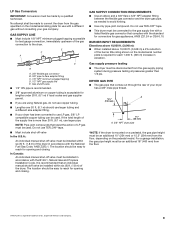
... manual shut-off valve must be installed in elevation. DRYER GAS PIPE ■■ The gas pipe that resist the action of the gas connection to convert the dryer from the floor, depending on the model/serial rating plate for opening and closing . LP Gas Conversion: IMPORTANT: Conversion must be made to the dryer. D B A. 3/8" flexible gas connector B. 3/8" pipe to reach for use larger pipe. GAS SUPPLY LINE ■■ Must include 1/8" NPT minimum plugged tapping accessible...
... manual shut-off valve must be installed in elevation. DRYER GAS PIPE ■■ The gas pipe that resist the action of the gas connection to convert the dryer from the floor, depending on the model/serial rating plate for opening and closing . LP Gas Conversion: IMPORTANT: Conversion must be made to the dryer. D B A. 3/8" flexible gas connector B. 3/8" pipe to reach for use larger pipe. GAS SUPPLY LINE ■■ Must include 1/8" NPT minimum plugged tapping accessible...

Installation Instructions
Page 10
... "Use and Care Guide". Only rigid or flexible metal vent shall be used for best drying performance and to seal all governing codes and ordinances. Flexible metal vent: (Acceptable only if accessible to clean) ■■ Must be fully extended and supported in final dryer location. ■■ Remove excess to follow these instructions can be purchased from entire length of the system and make sure exhaust...
... "Use and Care Guide". Only rigid or flexible metal vent shall be used for best drying performance and to seal all governing codes and ordinances. Flexible metal vent: (Acceptable only if accessible to clean) ■■ Must be fully extended and supported in final dryer location. ■■ Remove excess to follow these instructions can be purchased from entire length of the system and make sure exhaust...

Installation Instructions
Page 13
... exhaust vent. NOTE: For LP gas connections, you must use a wrench to supply line type, size, and location. 3. Open shut-off and remove washer inlet hose. valve is open when handle is in leveling legs 2. Bubbles will show a leak. Check and see if rubber washer is parallel to action of LP gas. Remove old rubber washer from gas pipe. Now stand the dryer on threads of E.I. Use pipe-joint compound on its final location. Turn cold water...
... exhaust vent. NOTE: For LP gas connections, you must use a wrench to supply line type, size, and location. 3. Open shut-off and remove washer inlet hose. valve is open when handle is in leveling legs 2. Bubbles will show a leak. Check and see if rubber washer is parallel to action of LP gas. Remove old rubber washer from gas pipe. Now stand the dryer on threads of E.I. Use pipe-joint compound on its final location. Turn cold water...
Installation Instructions
Page 16
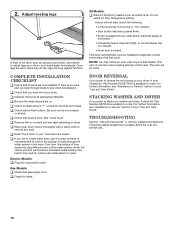
... set in your "Use and Care Guide". q Wipe dryer drum interior thoroughly with a damp cloth to possibly avoid the cost of your dryer: A door reversal kit, Part Number W10277499 is not level, prop up or down, and check again for leaks. Electric Models: q Plug into an outlet and/or electrical supply is connected. • Household fuse is intact and tight, or circuit breaker has not tripped. • Dryer door is plugged into a grounded outlet. q Check that all of a service...
... set in your "Use and Care Guide". q Wipe dryer drum interior thoroughly with a damp cloth to possibly avoid the cost of your dryer: A door reversal kit, Part Number W10277499 is not level, prop up or down, and check again for leaks. Electric Models: q Plug into an outlet and/or electrical supply is connected. • Household fuse is intact and tight, or circuit breaker has not tripped. • Dryer door is plugged into a grounded outlet. q Check that all of a service...


