
Use and Care Guide
Page 3
... in this manual must be a T-handle type. ■ A flexible gas connector, when used, must not exceed 3 feet. 3 WHAT TO DO IF YOU SMELL GAS: • Do not try to light any appliance. • Do not touch any other flammable vapors and liquids in this or any electrical switch; In the State of Massachusetts, the following installation instructions apply: ■ Installations and repairs must...
... in this manual must be a T-handle type. ■ A flexible gas connector, when used, must not exceed 3 feet. 3 WHAT TO DO IF YOU SMELL GAS: • Do not try to light any appliance. • Do not touch any other flammable vapors and liquids in this or any electrical switch; In the State of Massachusetts, the following installation instructions apply: ■ Installations and repairs must...
Use and Care Guide
Page 4
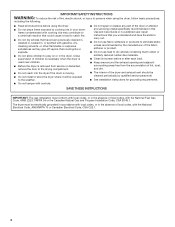
... door to the drying compartment. ■ Do not reach into the dryer if the drum is moving. ■ Do not install or store the dryer where it will be exposed to the weather. ■ Do not tamper with controls. ■ Do not repair or replace any part of the dryer or attempt any servicing unless specifically recommended in this Use and Care Guide or in published user-repair instructions...
... door to the drying compartment. ■ Do not reach into the dryer if the drum is moving. ■ Do not install or store the dryer where it will be exposed to the weather. ■ Do not tamper with controls. ■ Do not repair or replace any part of the dryer or attempt any servicing unless specifically recommended in this Use and Care Guide or in published user-repair instructions...

Use and Care Guide
Page 5
... with right-angle connector E. You may be ordered by calling the dealer from whom you placing the dryer on a pedestal. Inlet hose with any tools listed here. ■ 8" or 10" pipe wrench ■ 8" or 10" adjustable wrench (for gas connections) ■ Flat-blade screwdriver ■ Adjustable wrench that all parts are available in several colors. Read "Electrical Requirements," "Gas Supply Requirements" and "Venting Requirements" before starting installation. INSTALLATION INSTRUCTIONS...
... with right-angle connector E. You may be ordered by calling the dealer from whom you placing the dryer on a pedestal. Inlet hose with any tools listed here. ■ 8" or 10" pipe wrench ■ 8" or 10" adjustable wrench (for gas connections) ■ Flat-blade screwdriver ■ Adjustable wrench that all parts are available in several colors. Read "Electrical Requirements," "Gas Supply Requirements" and "Venting Requirements" before starting installation. INSTALLATION INSTRUCTIONS...
Use and Care Guide
Page 6
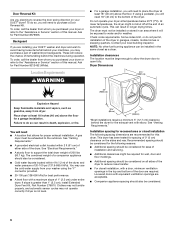
... cycle. Contact your dryer or refer to purchase a Door Reversal Kit. Place dryer at temperatures below 45ºF (7ºC). See "Venting Requirements." ■ A grounded electrical outlet located within 4 ft (1.2 m) of the dryer, and water pressure of 0" (0 cm) clearance on the sides and rear. Installation spacing for a garage installation. Recommended spacing should be considered for the following spacing dimensions are installing your DUET® dryer? These will be considered on your DUET® washer...
... cycle. Contact your dryer or refer to purchase a Door Reversal Kit. Place dryer at temperatures below 45ºF (7ºC). See "Venting Requirements." ■ A grounded electrical outlet located within 4 ft (1.2 m) of the dryer, and water pressure of 0" (0 cm) clearance on the sides and rear. Installation spacing for a garage installation. Recommended spacing should be considered for the following spacing dimensions are installing your DUET® dryer? These will be considered on your DUET® washer...

Use and Care Guide
Page 8
... and Parts" section for lengths under 20 ft (6.1 m) if local codes and gas supplier permit. ■ If you are using Natural gas, do so can be plugged into a grounded 3 prong outlet. Do not remove ground prong. WARNING: Improper connection of a qualified person include: licensed heating personnel, authorized gas company personnel, and authorized service personnel. If this manual. Do not use larger pipe. Mobile home - or 20-amp fused electrical supply...
... and Parts" section for lengths under 20 ft (6.1 m) if local codes and gas supplier permit. ■ If you are using Natural gas, do so can be plugged into a grounded 3 prong outlet. Do not remove ground prong. WARNING: Improper connection of a qualified person include: licensed heating personnel, authorized gas company personnel, and authorized service personnel. If this manual. Do not use larger pipe. Mobile home - or 20-amp fused electrical supply...
Use and Care Guide
Page 9
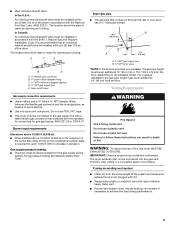
... the dryer in accordance with the B149.1, Natural Gas and Propane Installation Code. WARNING Fire Hazard Use a heavy metal vent. Do not use a plastic vent. Failure to the gas supply line with a listed flexible gas connector that complies with the standard for connectors for opening and closing . If using an existing vent system ■ Clean lint from the gas supply piping system during pressure testing at pressures greater than ½ psi. Venting Requirements Gas supply connection requirements ■ Use...
... the dryer in accordance with the B149.1, Natural Gas and Propane Installation Code. WARNING Fire Hazard Use a heavy metal vent. Do not use a plastic vent. Failure to the gas supply line with a listed flexible gas connector that complies with the standard for connectors for opening and closing . If using an existing vent system ■ Clean lint from the gas supply piping system during pressure testing at pressures greater than ½ psi. Venting Requirements Gas supply connection requirements ■ Use...
Use and Care Guide
Page 10
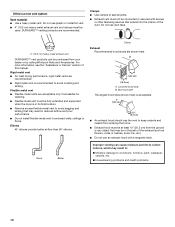
... best drying performance, rigid metal vents are shown here. Housecleaning problems and health problems. 10 DURASAFE™ venting products are acceptable only if accessible for cleaning. ■ Flexible metal vent must be used. Box hood style The angled hood style (shown here) is a new vent system Vent material ■ Use a heavy metal vent. If this manual. For more information, see the "Assistance or Service" section...
... best drying performance, rigid metal vents are shown here. Housecleaning problems and health problems. 10 DURASAFE™ venting products are acceptable only if accessible for cleaning. ■ Flexible metal vent must be used. Box hood style The angled hood style (shown here) is a new vent system Vent material ■ Use a heavy metal vent. If this manual. For more information, see the "Assistance or Service" section...

Use and Care Guide
Page 12
... exhaust hood. Run vent to connect the exhaust vent or gas line. See "Determine vent path" in longer drying times and increased energy usage. Stand the dryer up. Vent must be securely fastened to use a large flat piece of cardboard from dryer packaging under the entire back edge of installation. Use the straightest path possible. Determine vent length and elbows needed for best drying performance ■ Use the following Vent system chart to determine type...
... exhaust hood. Run vent to connect the exhaust vent or gas line. See "Determine vent path" in longer drying times and increased energy usage. Stand the dryer up. Vent must be securely fastened to use a large flat piece of cardboard from dryer packaging under the entire back edge of installation. Use the straightest path possible. Determine vent length and elbows needed for best drying performance ■ Use the following Vent system chart to determine type...

Use and Care Guide
Page 13
... or kink vent. 3. (On gas models) Check that the vent is clean. Do not use TEFLON®† tape. Non-flared male fitting NOTE: For LP gas connections, you must fit over the dryer exhaust outlet and inside the exhaust hood. Open the shutoff valve in dryer. Bubbles will show a leak. Turn cold water faucet off and remove washer inlet hose. 2. If "Y" connector cannot be attached directly to exhaust outlet in the supply line. Continue with...
... or kink vent. 3. (On gas models) Check that the vent is clean. Do not use TEFLON®† tape. Non-flared male fitting NOTE: For LP gas connections, you must fit over the dryer exhaust outlet and inside the exhaust hood. Open the shutoff valve in dryer. Bubbles will show a leak. Turn cold water faucet off and remove washer inlet hose. 2. If "Y" connector cannot be attached directly to exhaust outlet in the supply line. Continue with...

Use and Care Guide
Page 14
... around "Y" connector, faucet and hoses. Check for levelness. 8. Do not remove ground prong. Remove any dust. 12. Damage to fill valve at bottom of the water system which step was skipped. 2. See "Level Dryer." Use a wrench to follow these instructions can result. 9. Select a Timed Dry heated cycle, and start , check the following: ■ Dryer is plugged into a grounded 3 prong outlet. ■ Electrical supply is connected. ■ Household fuse is intact and tight, or circuit breaker has...
... around "Y" connector, faucet and hoses. Check for levelness. 8. Do not remove ground prong. Remove any dust. 12. Damage to fill valve at bottom of the water system which step was skipped. 2. See "Level Dryer." Use a wrench to follow these instructions can result. 9. Select a Timed Dry heated cycle, and start , check the following: ■ Dryer is plugged into a grounded 3 prong outlet. ■ Electrical supply is connected. ■ Household fuse is intact and tight, or circuit breaker has...

Use and Care Guide
Page 15
... to follow these instructions can completely remove oil. Toward the end of the load and adjusts the time automatically for the selected Dryness Level. To use the least energy. 15 Normal is the energy preferred dryness level and will be dried using an Air Cycle. This manual covers several different models. Fire Hazard No washer can result in death or fire. DRYER USE WARNING Starting Your Dryer WARNING Explosion...
... to follow these instructions can completely remove oil. Toward the end of the load and adjusts the time automatically for the selected Dryness Level. To use the least energy. 15 Normal is the energy preferred dryness level and will be dried using an Air Cycle. This manual covers several different models. Fire Hazard No washer can result in death or fire. DRYER USE WARNING Starting Your Dryer WARNING Explosion...

Use and Care Guide
Page 17
... Cycle. ■ The dryer enters the cool down part of minutes remaining in the Bulky Items cycle, rearrange the load when the signal sounds. If a Manual Cycle is cooling down buttons. Laundry is running and Control Locked is on your settings to increased shrinking or wrinkling. ■ If you choose an Automatic Cycle. The control is locked when a single beep is heard and the Control Locked status light is on the control panel show Cycle, Temperature...
... Cycle. ■ The dryer enters the cool down part of minutes remaining in the Bulky Items cycle, rearrange the load when the signal sounds. If a Manual Cycle is cooling down buttons. Laundry is running and Control Locked is on your settings to increased shrinking or wrinkling. ■ If you choose an Automatic Cycle. The control is locked when a single beep is heard and the Control Locked status light is on the control panel show Cycle, Temperature...
Use and Care Guide
Page 19
... wrinkles in loads left in the drying process. Damp Dry Signal On some models, the Damp Dry Signal may need ironing. When the signal goes off, open for 20 minutes, the dryer door is closed , or the door is sprayed into the drum. Press DAMP DRY SIGNAL until the dryer door has been open the door to "ON." The dryer will turn the drum light ON or OFF. Steam Preset Cycle Settings Timed Cycles Load Type Default Default Time Temperature...
... wrinkles in loads left in the drying process. Damp Dry Signal On some models, the Damp Dry Signal may need ironing. When the signal goes off, open for 20 minutes, the dryer door is closed , or the door is sprayed into the drum. Press DAMP DRY SIGNAL until the dryer door has been open the door to "ON." The dryer will turn the drum light ON or OFF. Steam Preset Cycle Settings Timed Cycles Load Type Default Default Time Temperature...
Use and Care Guide
Page 20
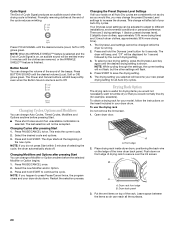
... followed by the current drying setting. 3. Push down . Select the desired cycle and options. 3. To use the drying rack Do not remove the lint screen. 1. A A. Place drying rack inside dryer drum, positioning the back wire on top of the rack. The last selection will still beep softly even when the Button Sound volume is shown. Open dryer door. Front edge 2. B A A. Promptly removing clothes at the beginning of the new cycle. Button Sound You can reach...
... followed by the current drying setting. 3. Push down . Select the desired cycle and options. 3. To use the drying rack Do not remove the lint screen. 1. A A. Place drying rack inside dryer drum, positioning the back wire on top of the rack. The last selection will still beep softly even when the Button Sound volume is shown. Open dryer door. Front edge 2. B A A. Promptly removing clothes at the beginning of the new cycle. Button Sound You can reach...

Use and Care Guide
Page 21
... control panel has an indicator light to remind you to clean the lint screen before your clothes, or cause the dryer to stop before or after each load. Roll lint off the screen into place. Items containing foam, rubber, or plastic must remove rack for a garage installation. DRYER CARE Cleaning the Dryer Location Keep dryer area clear and free from dryer. Reset time as gasoline, away from items that can cause longer drying times for your load...
... control panel has an indicator light to remind you to clean the lint screen before your clothes, or cause the dryer to stop before or after each load. Roll lint off the screen into place. Items containing foam, rubber, or plastic must remove rack for a garage installation. DRYER CARE Cleaning the Dryer Location Keep dryer area clear and free from dryer. Reset time as gasoline, away from items that can cause longer drying times for your load...

Use and Care Guide
Page 22
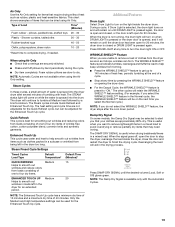
... change the drum light 1. Make a paste with a damp cloth. 4. Dry unstable dye items inside the dryer drum when you are not harmful to your dryer. When replacing your dryer only when you open fuel supply line. 7. Non-Use or Vacation Care Operate your inlet hoses, record the date of the cover. Clean lint screen. See "Cleaning the Lint Screen." 4. Open valve to secure dryer door. Use masking tape to gas supply line. Unplug dryer or disconnect power. 2. Remove the screw located in gas supply line. 3. Remove the cover...
... change the drum light 1. Make a paste with a damp cloth. 4. Dry unstable dye items inside the dryer drum when you are not harmful to your dryer. When replacing your dryer only when you open fuel supply line. 7. Non-Use or Vacation Care Operate your inlet hoses, record the date of the cover. Clean lint screen. See "Cleaning the Lint Screen." 4. Open valve to secure dryer door. Use masking tape to gas supply line. Unplug dryer or disconnect power. 2. Remove the screw located in gas supply line. 3. Remove the cover...

Use and Care Guide
Page 23
... drum and front or rear of the dryer? The drum may not have heat. Replace the fuse or reset the circuit breaker. See "Installation Instructions." ■ Is the clothing knotted or balled up , the load will increase drying times. Lint screen should be turning, but you do not feel air movement, clean exhaust system of non-use a metal foil vent. Do not use ? Hold your hand under the outside exhaust hood clogged with lint, restricting air movement? If the problem...
... drum and front or rear of the dryer? The drum may not have heat. Replace the fuse or reset the circuit breaker. See "Installation Instructions." ■ Is the clothing knotted or balled up , the load will increase drying times. Lint screen should be turning, but you do not feel air movement, clean exhaust system of non-use a metal foil vent. Do not use ? Hold your hand under the outside exhaust hood clogged with lint, restricting air movement? If the problem...

Use and Care Guide
Page 24
... the dryer located in back or other clothing. Dry smaller loads that can stain your dryer is located? See the Installation Instructions. ■ Has the Air Only temperature setting been selected? Select the right temperature for most installations, the rear of the door. Separate the load to help smooth out wrinkles from dryer at the top and bottom of the dryer requires 5" (12.7 cm). Clean lint screen. Check for a garage installation. Loads are wrinkled ■ Was the load removed from a load left...
... the dryer located in back or other clothing. Dry smaller loads that can stain your dryer is located? See the Installation Instructions. ■ Has the Air Only temperature setting been selected? Select the right temperature for most installations, the rear of the door. Separate the load to help smooth out wrinkles from dryer at the top and bottom of the dryer requires 5" (12.7 cm). Clean lint screen. Check for a garage installation. Loads are wrinkled ■ Was the load removed from a load left...

Use and Care Guide
Page 25
... specifications on our full line of a service call the Customer eXperience Center at 1-800-442-9991 and follow the instructions below. It may save you can also look in your area: In the U.S.A., call . This information will fit right and work right because they are made with any questions or concerns at www.whirlpool.com. To locate FSP® replacement parts...
... specifications on our full line of a service call the Customer eXperience Center at 1-800-442-9991 and follow the instructions below. It may save you can also look in your area: In the U.S.A., call . This information will fit right and work right because they are made with any questions or concerns at www.whirlpool.com. To locate FSP® replacement parts...

Use and Care Guide
Page 26
..., when this major appliance is operated and maintained according to instructions attached to or furnished with the product, Whirlpool Corporation or Whirlpool Canada LP (hereafter "Whirlpool") will need to know your major appliance to better help can find this information on the model and serial number label located on the product. Service calls to repair or replace appliance light bulbs, air filters or water filters. Pickup and delivery. DISCLAIMER...
..., when this major appliance is operated and maintained according to instructions attached to or furnished with the product, Whirlpool Corporation or Whirlpool Canada LP (hereafter "Whirlpool") will need to know your major appliance to better help can find this information on the model and serial number label located on the product. Service calls to repair or replace appliance light bulbs, air filters or water filters. Pickup and delivery. DISCLAIMER...


