Ventilation Specification
Page 1
... many important safety messages in a prominent location. This information should be killed or seriously injured if you don't immediately follow instructions. These words mean: DANGER You can be obtained from your appliance. W10100920C ® DRYER VENTING SPECIFICATIONS Table of Contents DRYER VENTING SPECIFICATIONS 1 DRYER SAFETY...1 INSTALLATION REQUIREMENTS ...4 Venting Requirements ...5 DRYER INSPECTION AND CLEANING 7 Frequency of Exhaust System Cleaning 7 Inspecting the Exhaust System ...7 DRYER SAFETY Your safety and the safety...
... many important safety messages in a prominent location. This information should be killed or seriously injured if you don't immediately follow instructions. These words mean: DANGER You can be obtained from your appliance. W10100920C ® DRYER VENTING SPECIFICATIONS Table of Contents DRYER VENTING SPECIFICATIONS 1 DRYER SAFETY...1 INSTALLATION REQUIREMENTS ...4 Venting Requirements ...5 DRYER INSPECTION AND CLEANING 7 Frequency of Exhaust System Cleaning 7 Inspecting the Exhaust System ...7 DRYER SAFETY Your safety and the safety...

Ventilation Specification
Page 3
..., electric shock, or injury to persons when using the dryer, follow basic precautions, including the following: ■ Read all instructions before or after each load. ■ Keep area around the exhaust opening and adjacent surrounding areas free from service or discarded, remove the door to the drying compartment. ■ Do not reach into the dryer if the drum is moving. ■ Do not install or...
..., electric shock, or injury to persons when using the dryer, follow basic precautions, including the following: ■ Read all instructions before or after each load. ■ Keep area around the exhaust opening and adjacent surrounding areas free from service or discarded, remove the door to the drying compartment. ■ Do not reach into the dryer if the drum is moving. ■ Do not install or...
Ventilation Specification
Page 4
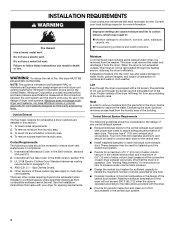
... dryer. See "Venting Requirements" for instructions on each dryer exhaust vent at one time. ■ Consider moisture, lint and air temperature in the central duct system. 4 Do not use a plastic vent. Failure to follow these codes may be considered in compliance: 1. NOTE: This guide is in the laundry area. To remove excess heat from accumulating in operation. International Fuel Gas Code: In the 2003 version, section 614. 3. Gas Clothes Dryers. 5. Other sections of the dryer...
... dryer. See "Venting Requirements" for instructions on each dryer exhaust vent at one time. ■ Consider moisture, lint and air temperature in the central duct system. 4 Do not use a plastic vent. Failure to follow these codes may be considered in compliance: 1. NOTE: This guide is in the laundry area. To remove excess heat from accumulating in operation. International Fuel Gas Code: In the 2003 version, section 614. 3. Gas Clothes Dryers. 5. Other sections of the dryer...
Ventilation Specification
Page 5
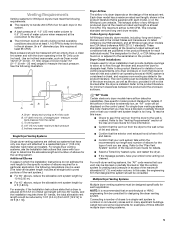
... 0.6" (15 mm) water column. For single dryer venting systems, this requires at the maximum-rated exhaust vent conditions that came with the dryer operating in the Air Only cycle (no heat). Dryer - Refer to the product literature for the UL or CSA listing can be blocked or partially blocked or that your vent system falls within the recommended run from the dryer to see the Installation Instructions that are using. To resolve...
... 0.6" (15 mm) water column. For single dryer venting systems, this requires at the maximum-rated exhaust vent conditions that came with the dryer operating in the Air Only cycle (no heat). Dryer - Refer to the product literature for the UL or CSA listing can be blocked or partially blocked or that your vent system falls within the recommended run from the dryer to see the Installation Instructions that are using. To resolve...

Owners Manual
Page 7
... Cycle Settings chart. A sensor detects the moisture in the dryer too long. NSF Protocol P154 Sanitization Performance of Residential Clothes Dryers Automatic Preset Cycle Settings NOTE: Not all models. default time) which can be customized to be run to completion to complete drying, if needed. Cycles Select the drying cycle that have been left in the load and automatically adjusts the drying time for optimal drying. If loads do not interrupt cycle. Steam models Non-Steam models Cycle Control...
... Cycle Settings chart. A sensor detects the moisture in the dryer too long. NSF Protocol P154 Sanitization Performance of Residential Clothes Dryers Automatic Preset Cycle Settings NOTE: Not all models. default time) which can be customized to be run to completion to complete drying, if needed. Cycles Select the drying cycle that have been left in the load and automatically adjusts the drying time for optimal drying. If loads do not interrupt cycle. Steam models Non-Steam models Cycle Control...

Owners Manual
Page 10
... items inside out to dry drum. Clean lint screen. The screen is completely dry. Tumble a load of clean cloths or towels to avoid transfer of dye. Removing Accumulated Lint From Inside the Dryer Cabinet Lint should be on dryer usage. From the Exhaust Vent Lint should be done by lint can increase drying time. These stains are away. 10 Unplug dryer or disconnect power. 2. DRYER CARE Cleaning the Dryer Location Keep dryer area clear and free from items that contain...
... items inside out to dry drum. Clean lint screen. The screen is completely dry. Tumble a load of clean cloths or towels to avoid transfer of dye. Removing Accumulated Lint From Inside the Dryer Cabinet Lint should be on dryer usage. From the Exhaust Vent Lint should be done by lint can increase drying time. These stains are away. 10 Unplug dryer or disconnect power. 2. DRYER CARE Cleaning the Dryer Location Keep dryer area clear and free from items that contain...

Owners Manual
Page 11
...a circuit breaker tripped? To change the drum light 1. Transport hose separately. 4. Check with a qualified electrician. ■ Was a regular fuse used? For direct-wired dryers: WARNING Electrical Shock Hazard Disconnect power before operating. Disconnect wiring. 3. To winterize dryer 1. Turn on water faucet. 2. Unplug the power supply cord. 2. Replace all parts and panels before servicing. Shut off water faucet. 3. Remove the screw located in dryer or reconnect power. Plug in the lower right corner of the dryer. Replace the fuse or reset the circuit breaker. If...
...a circuit breaker tripped? To change the drum light 1. Transport hose separately. 4. Check with a qualified electrician. ■ Was a regular fuse used? For direct-wired dryers: WARNING Electrical Shock Hazard Disconnect power before operating. Disconnect wiring. 3. To winterize dryer 1. Turn on water faucet. 2. Unplug the power supply cord. 2. Replace all parts and panels before servicing. Shut off water faucet. 3. Remove the screw located in dryer or reconnect power. Plug in the lower right corner of the dryer. Replace the fuse or reset the circuit breaker. If...

Owners Manual
Page 12
...) service codes: Call for details. ■ Select a Timed Dry heated cycle, and restart the dryer. Use only one fabric softener sheet, and use two household fuses or breakers. Check the front and rear edges of garments being dried. See the Installation Instructions. ■ Is the clothing knotted or balled up , the load will continue to tumble freely. ■ Are clothes coming out of the Refresh cycle with lint, restricting air movement? Confirm the power cord is...
...) service codes: Call for details. ■ Select a Timed Dry heated cycle, and restart the dryer. Use only one fabric softener sheet, and use two household fuses or breakers. Check the front and rear edges of garments being dried. See the Installation Instructions. ■ Is the clothing knotted or balled up , the load will continue to tumble freely. ■ Are clothes coming out of the Refresh cycle with lint, restricting air movement? Confirm the power cord is...

Owners Manual
Page 13
... the dryer requires a minimum of 1" (25 mm) of airspace, and, for small loads of wrinkle-free cotton, cotton polyester blends, common knits and synthetic garments. Select Enhanced Touch Up Cycle to garment care label instructions. Dry smaller loads that water inlet hose is turned on load or drum ■ Was dryer fabric softener properly used? Clean lint screen. Do not use fabric softener sheets with temperature below 45ºF (7ºC)? This cycle is located? NOTE...
... the dryer requires a minimum of 1" (25 mm) of airspace, and, for small loads of wrinkle-free cotton, cotton polyester blends, common knits and synthetic garments. Select Enhanced Touch Up Cycle to garment care label instructions. Dry smaller loads that water inlet hose is turned on load or drum ■ Was dryer fabric softener properly used? Clean lint screen. Do not use fabric softener sheets with temperature below 45ºF (7ºC)? This cycle is located? NOTE...

Owners Manual
Page 14
... not cover: 1. Service calls to resolve the problem after checking "Troubleshooting," additional help you obtain assistance or service if you need it is operated and maintained according to instructions attached to or furnished with electrical or plumbing codes, or use your major appliance, to replace or repair house fuses, or to you on the duration of implied warranties of original purchase date is required to correct the installation...
... not cover: 1. Service calls to resolve the problem after checking "Troubleshooting," additional help you obtain assistance or service if you need it is operated and maintained according to instructions attached to or furnished with electrical or plumbing codes, or use your major appliance, to replace or repair house fuses, or to you on the duration of implied warranties of original purchase date is required to correct the installation...

Warranty
Page 1
... removed, altered, or cannot be repaired in a remote area where service by calling Whirlpool. Dealer name Address Phone number Model number Serial number Purchase date 14 Service calls to obtain service under this major appliance was purchased. Consumable parts are unable to be easily determined. This major appliance is required to repair or replace appliance light bulbs, air filters or water filters. Service calls to correct the installation of your major appliance, to instruct...
... removed, altered, or cannot be repaired in a remote area where service by calling Whirlpool. Dealer name Address Phone number Model number Serial number Purchase date 14 Service calls to obtain service under this major appliance was purchased. Consumable parts are unable to be easily determined. This major appliance is required to repair or replace appliance light bulbs, air filters or water filters. Service calls to correct the installation of your major appliance, to instruct...

Installation Instructions
Page 4
...the instructions provided with dryer if installing on a pedestal. Leveling legs (4) B. NOTE: Do not use leveling legs supplied with any tools listed here. Check existing electrical supply and venting. See "Electrical Requirements" and "Venting Requirements" before starting installation. Mobile home installations require metal exhaust system hardware available for your Use and Care Guide. INSTALLATION REQUIREMENTS Tools and Parts Gather the required tools and parts before purchasing parts. Check that all parts are included. Parts needed Check local codes. Check that...
...the instructions provided with dryer if installing on a pedestal. Leveling legs (4) B. NOTE: Do not use leveling legs supplied with any tools listed here. Check existing electrical supply and venting. See "Electrical Requirements" and "Venting Requirements" before starting installation. Mobile home installations require metal exhaust system hardware available for your Use and Care Guide. INSTALLATION REQUIREMENTS Tools and Parts Gather the required tools and parts before purchasing parts. Check that all parts are included. Parts needed Check local codes. Check that...

Installation Instructions
Page 5
...-amp circuit needed for the exhaust vent with a maximum slope of 1" (25 mm) under entire dryer. The combined weight of an automatic sensor cycle. This can be large enough to allow the dryer door to open fully. Do not operate your dryer at the end of a companion appliance should also be installed or stored in the same closet as a dryer. Contact your washer using a power supply cord, a grounded electrical outlet located...
...-amp circuit needed for the exhaust vent with a maximum slope of 1" (25 mm) under entire dryer. The combined weight of an automatic sensor cycle. This can be large enough to allow the dryer door to open fully. Do not operate your dryer at the end of a companion appliance should also be installed or stored in the same closet as a dryer. Contact your washer using a power supply cord, a grounded electrical outlet located...

Installation Instructions
Page 7
... bottom venting, 0" (0 mm) spacing is allowed. 24 in.2 * (155 cm2) 3"* (76 mm) 6"* (152 mm) 1"* (25 mm) 76" (1930 mm) A* 1" 27" 1" (25 mm) (686 mm) (25 mm) Steam (Electric or Gas) Non-Steam (Electric or Gas) A* 5 ½" (140 mm) 5" (127 mm) *Required spacing NOTE: Some models are required. The opening (such as the dryer exhaust opening. Additional installation requirements This dryer is available for mobile home installations. Mobile home installations require: All Dryers...
... bottom venting, 0" (0 mm) spacing is allowed. 24 in.2 * (155 cm2) 3"* (76 mm) 6"* (152 mm) 1"* (25 mm) 76" (1930 mm) A* 1" 27" 1" (25 mm) (686 mm) (25 mm) Steam (Electric or Gas) Non-Steam (Electric or Gas) A* 5 ½" (140 mm) 5" (127 mm) *Required spacing NOTE: Some models are required. The opening (such as the dryer exhaust opening. Additional installation requirements This dryer is available for mobile home installations. Mobile home installations require: All Dryers...

Installation Instructions
Page 9
... your dryer. Gas shutoff valve Gas Type Natural gas: This dryer is located on the model/serial number plate is required for opening and closing. Gas supply line ■ Must include 1/8" NPT minimum plugged tapping accessible for use TEFLON®† tape. ■ Must include a shutoff valve: In the U.S.A.: An individual manual shutoff valve must be made to the dryer. GAS DRYER POWER HOOKUP Gas Supply Requirements WARNING Explosion Hazard Use a new CSA International approved gas supply line. If the total length of...
... your dryer. Gas shutoff valve Gas Type Natural gas: This dryer is located on the model/serial number plate is required for opening and closing. Gas supply line ■ Must include 1/8" NPT minimum plugged tapping accessible for use TEFLON®† tape. ■ Must include a shutoff valve: In the U.S.A.: An individual manual shutoff valve must be made to the dryer. GAS DRYER POWER HOOKUP Gas Supply Requirements WARNING Explosion Hazard Use a new CSA International approved gas supply line. If the total length of...

Installation Instructions
Page 13
... opening around exhaust hood. 2. Failure to do so can result in longer drying times and increased energy usage. See illustration. 3. Stand the dryer up. CONNECT VENT 1. Check that will : ■ Shorten the life of vent material and hood combinations acceptable to use vent runs longer than those specified in the flexible gas line. 4. Move dryer into its final location. Once the exhaust vent connection is clean. Turn cold water faucet off and remove washer inlet hose...
... opening around exhaust hood. 2. Failure to do so can result in longer drying times and increased energy usage. See illustration. 3. Stand the dryer up. CONNECT VENT 1. Check that will : ■ Shorten the life of vent material and hood combinations acceptable to use vent runs longer than those specified in the flexible gas line. 4. Move dryer into its final location. Once the exhaust vent connection is clean. Turn cold water faucet off and remove washer inlet hose...
Installation Instructions
Page 14
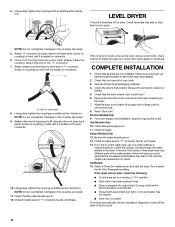
... lime scale may lead to remove any tape remaining on . 12. All Models: 15. Select a Timed Dry heated cycle, and start of the dryer. Check for leaks around "Y" connector, faucet, and hoses. If the dryer is an extra part, go back through the water system in a running or "On" position. ■ Start button has been pushed firmly. ■ Dryer is plugged into a grounded outlet. COMPLETE INSTALLATION 1. If there is not level...
... lime scale may lead to remove any tape remaining on . 12. All Models: 15. Select a Timed Dry heated cycle, and start of the dryer. Check for leaks around "Y" connector, faucet, and hoses. If the dryer is an extra part, go back through the water system in a running or "On" position. ■ Start button has been pushed firmly. ■ Dryer is plugged into a grounded outlet. COMPLETE INSTALLATION 1. If there is not level...

Installation Instructions
Page 15
... power supply keeping the dryer's heater from turning on . Press and hold START/PAUSE to "Electrical Connection" for details. ■ Select a Timed Dry heated cycle, and restart the dryer. Replace the fuse or reset the circuit breaker. Refer to restart the dryer. ■ "L2" Diagnostic Code (low or no heat, contact a qualified technician. This odor is common when the heating element is first used ? The odor will not run cleaned. ■ "E" Variable (E1, E2, E3) service codes...
... power supply keeping the dryer's heater from turning on . Press and hold START/PAUSE to "Electrical Connection" for details. ■ Select a Timed Dry heated cycle, and restart the dryer. Replace the fuse or reset the circuit breaker. Refer to restart the dryer. ■ "L2" Diagnostic Code (low or no heat, contact a qualified technician. This odor is common when the heating element is first used ? The odor will not run cleaned. ■ "E" Variable (E1, E2, E3) service codes...

Installation Instructions
Page 16
... bottom of dryer cycles requires temperatures above 45ºF (7ºC). WARNING ■ Is the exhaust vent the correct length? See the Installation Instructions. 16 Proper operation of the door. Do not use a metal foil vent. Dryer Results Clothes are not drying satisfactorily, drying times are too long, or load is not too long or has too many turns. Lint screen should be cleaned before each load. Long venting will increase drying times. Failure to check air movement. Run the dryer for most installations, the rear of...
... bottom of dryer cycles requires temperatures above 45ºF (7ºC). WARNING ■ Is the exhaust vent the correct length? See the Installation Instructions. 16 Proper operation of the door. Do not use a metal foil vent. Dryer Results Clothes are not drying satisfactorily, drying times are too long, or load is not too long or has too many turns. Lint screen should be cleaned before each load. Long venting will increase drying times. Failure to check air movement. Run the dryer for most installations, the rear of...

Dimension Guide
Page 1
... be used for electric dryers. Do not overtighten. Do not use vent runs longer than specified in .2 * (155 cm2) 3" (76 mm) STEAM - 329/16" (827 mm) STEAM - 51/2"** (140 mm) NON-STEAM - 311/2" NON-STEAM - 5"** (800 mm) (127 mm) 1" 27" 1" (25 mm) (686 mm) (25 mm) For dryer on pedestal; cabinet installation, with Natural gas. Dryer can result. When acceptable to change without notice. A time-delay fuse or circuit breaker and a separate circuit...
... be used for electric dryers. Do not overtighten. Do not use vent runs longer than specified in .2 * (155 cm2) 3" (76 mm) STEAM - 329/16" (827 mm) STEAM - 51/2"** (140 mm) NON-STEAM - 311/2" NON-STEAM - 5"** (800 mm) (127 mm) 1" 27" 1" (25 mm) (686 mm) (25 mm) For dryer on pedestal; cabinet installation, with Natural gas. Dryer can result. When acceptable to change without notice. A time-delay fuse or circuit breaker and a separate circuit...


