Ventilation Specification
Page 1
... event the customer smells gas. All safety messages will follow instructions. WARNING You can kill or hurt you are very important. FOR YOUR SAFETY Do not store or use in this or any other appliance. ® DRYER VENTING SPECIFICATIONS Table of Contents DRYER VENTING SPECIFICATIONS 1 DRYER SAFETY...1 INSTALLATION REQUIREMENTS ...4 Venting Requirements ...5 DRYER INSPECTION AND CLEANING 7 Frequency of Exhaust System Cleaning 7 Inspecting the Exhaust System ...7 DRYER SAFETY Your safety...
... event the customer smells gas. All safety messages will follow instructions. WARNING You can kill or hurt you are very important. FOR YOUR SAFETY Do not store or use in this or any other appliance. ® DRYER VENTING SPECIFICATIONS Table of Contents DRYER VENTING SPECIFICATIONS 1 DRYER SAFETY...1 INSTALLATION REQUIREMENTS ...4 Venting Requirements ...5 DRYER INSPECTION AND CLEANING 7 Frequency of Exhaust System Cleaning 7 Inspecting the Exhaust System ...7 DRYER SAFETY Your safety...
Ventilation Specification
Page 4
... single and multi-dryer unit venting systems for Whirlpool Corporation dryers sold in operation. To meet codes requirements. 2. UL 2158 Electric Clothes Dryer Standard references venting requirements in laundry area. 4. Gas Clothes Dryers. 5. Heat In order to handle the maximum number of dryers operated at the connection of the building. The dryer has 4" (102 mm) exhaust duct connections. NOTE: This guide is generated to measure water column back pressure...
... single and multi-dryer unit venting systems for Whirlpool Corporation dryers sold in operation. To meet codes requirements. 2. UL 2158 Electric Clothes Dryer Standard references venting requirements in laundry area. 4. Gas Clothes Dryers. 5. Heat In order to handle the maximum number of dryers operated at the connection of the building. The dryer has 4" (102 mm) exhaust duct connections. NOTE: This guide is generated to measure water column back pressure...
Ventilation Specification
Page 5
... mm) water column. Dryer Airflow The airflow of a dryer depends on the control panel. The exhaust airflow of any Whirlpool produced dryer at the maximum rated vent length is recommended that have airflow detection capabilities. (See specific model product literature for each application. Codes Agency Approvals All Whirlpool electric dryer models, including "long vent dryers," that are defined as Dryer model 102 (0"-2" [0 mm - 51 mm] range) or Dryer model 172 (0"-1" [0 mm...
... mm) water column. Dryer Airflow The airflow of a dryer depends on the control panel. The exhaust airflow of any Whirlpool produced dryer at the maximum rated vent length is recommended that have airflow detection capabilities. (See specific model product literature for each application. Codes Agency Approvals All Whirlpool electric dryer models, including "long vent dryers," that are defined as Dryer model 102 (0"-2" [0 mm - 51 mm] range) or Dryer model 172 (0"-1" [0 mm...

Owners Manual
Page 1
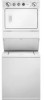
..., for assistance, installation or service, call us at the top inside dryer door well. ® WASHER/DRYER USER INSTRUCTIONS INSTRUCTIONS POUR L'UTILISATEUR DE LA LAVEUSE/SÉCHEUSE Table of purchase or installation date for in-warranty service. Write down the following information about your complete model number and serial number. Information may also be obtained by calling our Customer eXperience Center at www.whirlpool.com.
..., for assistance, installation or service, call us at the top inside dryer door well. ® WASHER/DRYER USER INSTRUCTIONS INSTRUCTIONS POUR L'UTILISATEUR DE LA LAVEUSE/SÉCHEUSE Table of purchase or installation date for in-warranty service. Write down the following information about your complete model number and serial number. Information may also be obtained by calling our Customer eXperience Center at www.whirlpool.com.

Owners Manual
Page 2
... Canada call 1-800-901-2042, or visit us at www.whirlpool.com/accessories. This is , tell you how to reduce the chance of others . Part Number Accessory Part Number Accessory 20-48KITRC 4 ft (1.2 m) gas line dryer connector installation kit 8212656RP 10 ft (3.0 m) Inlet hose, Black EPDM (2 pack) PT220L 4 ft (1.2 m) dryer cord, 3-wire, 30 amp 8212638RP 6 ft (1.8 m) Nylon braided inlet hose, spacesaving...
... Canada call 1-800-901-2042, or visit us at www.whirlpool.com/accessories. This is , tell you how to reduce the chance of others . Part Number Accessory Part Number Accessory 20-48KITRC 4 ft (1.2 m) gas line dryer connector installation kit 8212656RP 10 ft (3.0 m) Inlet hose, Black EPDM (2 pack) PT220L 4 ft (1.2 m) dryer cord, 3-wire, 30 amp 8212638RP 6 ft (1.8 m) Nylon braided inlet hose, spacesaving...

Owners Manual
Page 4
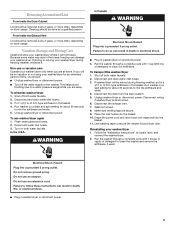
.... ■ Do not repair or replace any accumulated hydrogen gas. IMPORTANT SAFETY INSTRUCTIONS WARNING: To reduce the risk of fire, electric shock, or injury to persons when using the washing machine, turn on all hot water faucets and let the water flow from the accumulation of lint, dust, and dirt. ■ The interior of the machine and dryer exhaust vent should be produced...
.... ■ Do not repair or replace any accumulated hydrogen gas. IMPORTANT SAFETY INSTRUCTIONS WARNING: To reduce the risk of fire, electric shock, or injury to persons when using the washing machine, turn on all hot water faucets and let the water flow from the accumulation of lint, dust, and dirt. ■ The interior of the machine and dryer exhaust vent should be produced...
Owners Manual
Page 5
... the interior of vent. Clean exhaust vent periodically, depending on use plastic vent or metal foil vent. Failure to follow the Installation Instructions supplied with your dryer in a new location. If the dryer is complete, be sure to follow these instructions can catch lint. 5. Use a 4" (102 mm) exhaust hood. 3. Do not use a metal foil vent. Use the straightest path possible when routing the vent. Use the minimum recommended installation clearances found in...
... the interior of vent. Clean exhaust vent periodically, depending on use plastic vent or metal foil vent. Failure to follow the Installation Instructions supplied with your dryer in a new location. If the dryer is complete, be sure to follow these instructions can catch lint. 5. Use a 4" (102 mm) exhaust hood. 3. Do not use a metal foil vent. Use the straightest path possible when routing the vent. Use the minimum recommended installation clearances found in...

Owners Manual
Page 8
... discolor the dryer interior. it becomes clogged due to remove lint. Whirlpool Corporation recommends use to remove lint. Periodically inspect and replace water inlet hoses if bulges, kinks, cuts, wear, or leaks are manufactured and tested to the stained area of dye. 8 Every Load Cleaning Style 1: 1. Roll lint off the screen with a permanent marker. Cleaning Your Washer Cleaning the exterior Use a soft, damp cloth or sponge...
... discolor the dryer interior. it becomes clogged due to remove lint. Whirlpool Corporation recommends use to remove lint. Periodically inspect and replace water inlet hoses if bulges, kinks, cuts, wear, or leaks are manufactured and tested to the stained area of dye. 8 Every Load Cleaning Style 1: 1. Roll lint off the screen with a permanent marker. Cleaning Your Washer Cleaning the exterior Use a soft, damp cloth or sponge...
Owners Manual
Page 9
... Lint should be removed every 2 years, or more often, depending on dryer usage. Shut off both water faucets. 2. Turn on a drain and spin setting for about 30 seconds to follow these instructions can damage your washer/dryer for about 30 seconds to a water pressure surge) while you are away. Disconnect the exhaust vent. 7. Place the inlet hoses into the basket. 11. Follow the "Installation Instructions...
... Lint should be removed every 2 years, or more often, depending on dryer usage. Shut off both water faucets. 2. Turn on a drain and spin setting for about 30 seconds to follow these instructions can damage your washer/dryer for about 30 seconds to a water pressure surge) while you are away. Disconnect the exhaust vent. 7. Place the inlet hoses into the basket. 11. Follow the "Installation Instructions...

Owners Manual
Page 10
... with the lid open ? See the Installation Instructions. ■ Are the gears engaging after the drain and before starting the washer. ■ Is water splashing off the load? See the Installation Instructions. ■ Is the sink or drain clogged? Center the tub before spin, or is the upper part of agitator clicking during wash? Do not remove ground prong. Plug power cord into...
... with the lid open ? See the Installation Instructions. ■ Are the gears engaging after the drain and before starting the washer. ■ Is water splashing off the load? See the Installation Instructions. ■ Is the sink or drain clogged? Center the tub before spin, or is the upper part of agitator clicking during wash? Do not remove ground prong. Plug power cord into...
Owners Manual
Page 11
... the Installation Instructions. ■ Does the drain hose fit too tightly in suspension. Washer won't drain or spin; See the Installation Instructions. ■ Is the lid open . ■ Is there excessive sudsing? Clothes should move freely during washing to reduce wrinkling, tangling, and twisting. ■ Was the wash water warm enough to fill or drain; Wash water colder than the control knobs on some lint on...
... the Installation Instructions. ■ Does the drain hose fit too tightly in suspension. Washer won't drain or spin; See the Installation Instructions. ■ Is the lid open . ■ Is there excessive sudsing? Clothes should move freely during washing to reduce wrinkling, tangling, and twisting. ■ Was the wash water warm enough to fill or drain; Wash water colder than the control knobs on some lint on...
Owners Manual
Page 14
... major appliances with Whirlpool's published installation instructions. 10. To locate FSP® replacement parts in materials or workmanship that is inconsistent to resolve the problem after checking "Troubleshooting," additional help can be provided by a Whirlpool designated service company. This limited warranty is valid only in materials or workmanship and is reported to repair or replace appliance light bulbs, air filters or water filters. Proof of...
... major appliances with Whirlpool's published installation instructions. 10. To locate FSP® replacement parts in materials or workmanship that is inconsistent to resolve the problem after checking "Troubleshooting," additional help can be provided by a Whirlpool designated service company. This limited warranty is valid only in materials or workmanship and is reported to repair or replace appliance light bulbs, air filters or water filters. Proof of...

Installation Instructions
Page 1
... of Contents / Table des matières WASHER/DRYER SAFETY 1 INSTALLATION INSTRUCTIONS 3 Tools and Parts 3 Alternate Parts 3 Location Requirements 3 Drain System 4 Electrical Requirements 5 Gas Supply Requirements 5 Venting Requirements 6 Remove Shipping Strap 7 Install Leveling Legs 8 Connect the Drain Hose 8 Connect the Inlet Hoses 8 Secure the Drain Hose 9 Plan Vent System 10 Install Vent System 11 Level Washer/Dryer 11 Make Gas Connection 11 Connect Vent 12 Complete Installation 12 SÉCURITÉ DE LA...
... of Contents / Table des matières WASHER/DRYER SAFETY 1 INSTALLATION INSTRUCTIONS 3 Tools and Parts 3 Alternate Parts 3 Location Requirements 3 Drain System 4 Electrical Requirements 5 Gas Supply Requirements 5 Venting Requirements 6 Remove Shipping Strap 7 Install Leveling Legs 8 Connect the Drain Hose 8 Connect the Inlet Hoses 8 Secure the Drain Hose 9 Plan Vent System 10 Install Vent System 11 Level Washer/Dryer 11 Make Gas Connection 11 Connect Vent 12 Complete Installation 12 SÉCURITÉ DE LA...

Installation Instructions
Page 3
...) Floor drain Siphon break, Part Number 285320, additional drain hose, Part Number 285702 and connector kit, Part Number 285442 Drain hose too short Drain hose, Part Number 285664 and connector kit, Part Number 285442 Lint clogged drain Drain protector, Part Number 367031 Water faucets beyond reach of the Washer/ Dryer User Instructions. Clothes may not tumble properly and automatic sensor cycles may require additional parts. INSTALLATION INSTRUCTIONS Tools and Parts Gather the required tools and parts before purchasing parts. Call the toll-free number listed on the...
...) Floor drain Siphon break, Part Number 285320, additional drain hose, Part Number 285702 and connector kit, Part Number 285442 Drain hose too short Drain hose, Part Number 285664 and connector kit, Part Number 285442 Lint clogged drain Drain protector, Part Number 367031 Water faucets beyond reach of the Washer/ Dryer User Instructions. Clothes may not tumble properly and automatic sensor cycles may require additional parts. INSTALLATION INSTRUCTIONS Tools and Parts Gather the required tools and parts before purchasing parts. Call the toll-free number listed on the...

Installation Instructions
Page 4
... the Washer/Dryer User Instructions for mobile home installations. Washer/Dryer Dimensions 71 5⁄8" (1819 mm) 23 3⁄4" (603 mm) 32 1⁄4" (819 mm) *32" (813 mm) 27" (686 mm) *Most installations require a minimum 5" (127 mm) clearance behind the dryer for the following spacing dimensions are required. Mobile Home - Mobile Home Installation Kit Part Number 346764. See "Alternate Parts." Recommended spacing should be considered for the exhaust vent...
... the Washer/Dryer User Instructions for mobile home installations. Washer/Dryer Dimensions 71 5⁄8" (1819 mm) 23 3⁄4" (603 mm) 32 1⁄4" (819 mm) *32" (813 mm) 27" (686 mm) *Most installations require a minimum 5" (127 mm) clearance behind the dryer for the following spacing dimensions are required. Mobile Home - Mobile Home Installation Kit Part Number 346764. See "Alternate Parts." Recommended spacing should be considered for the exhaust vent...

Installation Instructions
Page 5
... or service representative or personnel if you are in a risk of gas available, contact your gas company. 5 Do not use an adapter. No attempt shall be a minimum of 28" (711 mm) from the gas specified on the model/serial rating plate for electric current. The top of the Washer/Dryer User Instructions. It is located on the front page of the laundry tub...
... or service representative or personnel if you are in a risk of gas available, contact your gas company. 5 Do not use an adapter. No attempt shall be a minimum of 28" (711 mm) from the gas specified on the model/serial rating plate for electric current. The top of the Washer/Dryer User Instructions. It is located on the front page of the laundry tub...

Installation Instructions
Page 6
... closing. Replace any gas vent, chimney, wall, ceiling, attic, crawlspace, or a concealed space of the dryer. If your washer/dryer has been converted to the gas supply line. Do not use at the Btu rating indicated on the model/serial number plate is more than ½ psi. Must include a shutoff valve: In the U.S.A.: An individual manual shutoff valve must be installed within...
... closing. Replace any gas vent, chimney, wall, ceiling, attic, crawlspace, or a concealed space of the dryer. If your washer/dryer has been converted to the gas supply line. Do not use at the Btu rating indicated on the model/serial number plate is more than ½ psi. Must include a shutoff valve: In the U.S.A.: An individual manual shutoff valve must be installed within...

Installation Instructions
Page 7
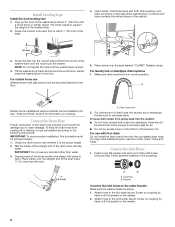
... vent pipe. Move washer/dryer close to move and install washer/dryer. Louvered hood style B. Look for cleaning. For more people to its final location. To avoid floor damage, set washer/dryer onto cardboard before moving across floor. There should be used. Remove the hang tag and pin from your dealer or by calling Whirlpool Parts and Accessories. Rigid metal vent is required for free movement. Clamp Exhaust...
... vent pipe. Move washer/dryer close to move and install washer/dryer. Louvered hood style B. Look for cleaning. For more people to its final location. To avoid floor damage, set washer/dryer onto cardboard before moving across floor. There should be used. Remove the hang tag and pin from your dealer or by calling Whirlpool Parts and Accessories. Rigid metal vent is required for free movement. Clamp Exhaust...
Installation Instructions
Page 8
.... See Floor drain under "Tools and Parts." Connect the Inlet Hoses 1. Coupling B. Washer Connect the inlet hoses to open. Tilt the washer/dryer back and remove the wood block. Release clamp. A Mobile home installations require a Mobile Home Installation Kit. Wet the inside of the straight end of the washer/dryer. Squeeze ears of the washer/dryer about 4" (102 mm) with tap water. To keep...
.... See Floor drain under "Tools and Parts." Connect the Inlet Hoses 1. Coupling B. Washer Connect the inlet hoses to open. Tilt the washer/dryer back and remove the wood block. Release clamp. A Mobile home installations require a Mobile Home Installation Kit. Wet the inside of the straight end of the washer/dryer. Squeeze ears of the washer/dryer about 4" (102 mm) with tap water. To keep...
Installation Instructions
Page 10
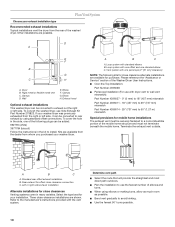
... exhausted from the rear of the Washer/Dryer User Instructions. Rigid metal or flexible metal vent C. Loop system with dryer vent to wall vent mismatch): Part Number 4396037 - 0" (0 mm) to 18" (457 mm) mismatch Part Number 4396011 - 18" (457 mm) to 29" (737 mm) mismatch Part Number 4396014 - 29" (737 mm) to the manufacturer's instructions provided with standard elbows B. Standard rear offset exhaust installation B. Plan the installation to install. When using...
... exhausted from the rear of the Washer/Dryer User Instructions. Rigid metal or flexible metal vent C. Loop system with dryer vent to wall vent mismatch): Part Number 4396037 - 0" (0 mm) to 18" (457 mm) mismatch Part Number 4396011 - 18" (457 mm) to 29" (737 mm) mismatch Part Number 4396014 - 29" (737 mm) to the manufacturer's instructions provided with standard elbows B. Standard rear offset exhaust installation B. Plan the installation to install. When using...


