
Installation Instructions
Page 1
...very important. This symbol alerts you don't immediately follow instructions. All safety messages will follow instructions. 27" (69 CM) GAS WASHER/DRYER INSTALLATION INSTRUCTIONS INSTRUCTIONS D'INSTALLATION - We have provided many important safety messages in this manual ...;res WASHER/DRYER SAFETY 1 INSTALLATION INSTRUCTIONS 3 Tools and Parts 3 Alternate Parts 3 Location Requirements 3 Drain System 4 Electrical Requirements 5 Gas Supply Requirements 5 Venting Requirements 6 Remove Shipping Strap 7 Install Leveling Legs 8 Connect the Drain Hose 8 Connect the Inlet Hoses 8 Secure...
...very important. This symbol alerts you don't immediately follow instructions. All safety messages will follow instructions. 27" (69 CM) GAS WASHER/DRYER INSTALLATION INSTRUCTIONS INSTRUCTIONS D'INSTALLATION - We have provided many important safety messages in this manual ...;res WASHER/DRYER SAFETY 1 INSTALLATION INSTRUCTIONS 3 Tools and Parts 3 Alternate Parts 3 Location Requirements 3 Drain System 4 Electrical Requirements 5 Gas Supply Requirements 5 Venting Requirements 6 Remove Shipping Strap 7 Install Leveling Legs 8 Connect the Drain Hose 8 Connect the Inlet Hoses 8 Secure...

Installation Instructions
Page 4
... Parts." Do not operate your dealer. At lower temperatures, the dryer might be installed using the standpipe drain system (floor or wall), the laundry tub drain system, or the floor drain system. Check code requirements. Some codes limit, or do not permit, installation of 5-100 psi (...34.5-689.6 kPa). Washer/Dryer Dimensions 71 5⁄8" (1819 mm) 23 3⁄4" (603 mm) 32 1⁄4" (819 mm) *32" (813 mm) 27" (686 mm) *Most installations require a minimum 5" (127 mm) clearance behind the dryer for the exhaust vent with equivalent ventilation openings are recommended for ease of...
... Parts." Do not operate your dealer. At lower temperatures, the dryer might be installed using the standpipe drain system (floor or wall), the laundry tub drain system, or the floor drain system. Check code requirements. Some codes limit, or do not permit, installation of 5-100 psi (...34.5-689.6 kPa). Washer/Dryer Dimensions 71 5⁄8" (1819 mm) 23 3⁄4" (603 mm) 32 1⁄4" (819 mm) *32" (813 mm) 27" (686 mm) *Most installations require a minimum 5" (127 mm) clearance behind the dryer for the exhaust vent with equivalent ventilation openings are recommended for ease of...
Installation Instructions
Page 10
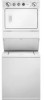
... mobile home structure and must not terminate beneath the mobile home. Three close clearances Venting systems come in many varieties. Plan the installation to 50" (1.27 m) mismatch Special provisions for close -clearance installations are available from the dealer from the rear of the following kits for close clearance connection C. When using...
... mobile home structure and must not terminate beneath the mobile home. Three close clearances Venting systems come in many varieties. Plan the installation to 50" (1.27 m) mismatch Special provisions for close -clearance installations are available from the dealer from the rear of the following kits for close clearance connection C. When using...

Installation Instructions
Page 11
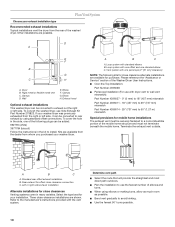
... metal 37 ft (11.3 m) 35 ft (10.7 m) 1 Rigid metal 32 ft (9.7 m) 27 ft (8.2 m) 2 Rigid metal 24 ft (7.3 m) 19 ft (5.8 m) Install Vent System 1. Make Gas Connection 1. AB C D E A. ½" rigid gas supply pipe B. Do not use an adjustable or open-end wrench to back. 2. Reduce performance, resulting... Properly leveling your washer/dryer avoids excessive noise and vibration. 1. Remove wood block. 3. Remove the red cap from the flexible gas connector (it is a registered trademark of the vent to the chart. NOTE: It may be necessary to achieve the best drying...
... metal 37 ft (11.3 m) 35 ft (10.7 m) 1 Rigid metal 32 ft (9.7 m) 27 ft (8.2 m) 2 Rigid metal 24 ft (7.3 m) 19 ft (5.8 m) Install Vent System 1. Make Gas Connection 1. AB C D E A. ½" rigid gas supply pipe B. Do not use an adjustable or open-end wrench to back. 2. Reduce performance, resulting... Properly leveling your washer/dryer avoids excessive noise and vibration. 1. Remove wood block. 3. Remove the red cap from the flexible gas connector (it is a registered trademark of the vent to the chart. NOTE: It may be necessary to achieve the best drying...
