
Installation Guide
Page 1
...ondes 9 Préparation de l'ouverture d'encastrement 9 Installation du four à micro-ondes 10 Installation du cadre de la trousse de garniture 11 MICROWAVE OVEN SAFETY Your safety and the safety of injury, and tell you what can be killed or seriously injured if you don't immediately follow instructions...obey all safety messages. These words mean: DANGER You can kill or hurt you what the potential hazard is the safety alert symbol. MICROWAVE OVEN BUILT-IN TRIM KIT INSTALLATION INSTRUCTIONS Built-In Trim Kit Models MK2167, MK2160 UL listed for use over any electric or gas ...
...ondes 9 Préparation de l'ouverture d'encastrement 9 Installation du four à micro-ondes 10 Installation du cadre de la trousse de garniture 11 MICROWAVE OVEN SAFETY Your safety and the safety of injury, and tell you what can be killed or seriously injured if you don't immediately follow instructions...obey all safety messages. These words mean: DANGER You can kill or hurt you what the potential hazard is the safety alert symbol. MICROWAVE OVEN BUILT-IN TRIM KIT INSTALLATION INSTRUCTIONS Built-In Trim Kit Models MK2167, MK2160 UL listed for use over any electric or gas ...

Installation Guide
Page 2
...have ±1/16" (2 mm) tolerance. ■ 3" (7.6 cm) minimum dimension is a minimum of 3" (7.6 cm) between the top of the lower oven cutout and the microwave oven cutout floor. Upper cabinet B. Cutout for installation above a built-in oven below the cutout opening . 2" (5.1 cm) 1 4.0 cm) D E A B B C ...36" (91.4 cm) 2" (5.1 cm) 3" (7.6 cm) A. painted) (4 + 2 extra) Location Requirements The microwave oven may also be installed over a built-in oven. Floor Required Cutout Dimensions 22 ³⁄₄" (57.8 cm) 1 2.7 cm) 17" (43.2 cm) min...
...have ±1/16" (2 mm) tolerance. ■ 3" (7.6 cm) minimum dimension is a minimum of 3" (7.6 cm) between the top of the lower oven cutout and the microwave oven cutout floor. Upper cabinet B. Cutout for installation above a built-in oven below the cutout opening . 2" (5.1 cm) 1 4.0 cm) D E A B B C ...36" (91.4 cm) 2" (5.1 cm) 3" (7.6 cm) A. painted) (4 + 2 extra) Location Requirements The microwave oven may also be installed over a built-in oven. Floor Required Cutout Dimensions 22 ³⁄₄" (57.8 cm) 1 2.7 cm) 17" (43.2 cm) min...

Installation Guide
Page 3
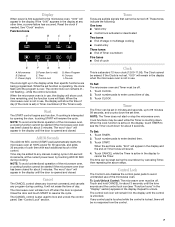
...supply with installation. 2. Recommended: ■ A time-delay fuse or time-delay circuit breaker. ■ A separate circuit serving only this microwave oven. In the event of an electrical short circuit, grounding reduces the risk of the opening. WARNING: Improper use an adapter. Consult ... all governing codes and ordinances. On the cutout floor, find and mark the centerline. 2. Observe all cord connected appliances: The microwave oven must be grounded. Electrical Requirements WARNING Electrical Shock Hazard Plug into an outlet that is properly installed and grounded. Do not...
...supply with installation. 2. Recommended: ■ A time-delay fuse or time-delay circuit breaker. ■ A separate circuit serving only this microwave oven. In the event of an electrical short circuit, grounding reduces the risk of the opening. WARNING: Improper use an adapter. Consult ... all governing codes and ordinances. On the cutout floor, find and mark the centerline. 2. Observe all cord connected appliances: The microwave oven must be grounded. Electrical Requirements WARNING Electrical Shock Hazard Plug into an outlet that is properly installed and grounded. Do not...

Installation Guide
Page 4
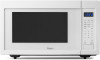
...mounting holes of the cutout/cabinet opening . Plug in death, fire, or electrical shock. 3. A B A. Mounting holes 4 B A. Install the Microwave Oven 1. Bottom duct B. Center arrows, aligned with the rail guides on the bottom duct with three short screws. 7. Do not use an adapter.... Short screws (3) B. Realign and install the bottom duct with the centerline drawn in Step 4. 6. Position microwave oven near cutout opening . A Electrical Shock Hazard Plug into the bottom front facing of the bottom duct flange into a grounded 3 prong ...
...mounting holes of the cutout/cabinet opening . Plug in death, fire, or electrical shock. 3. A B A. Mounting holes 4 B A. Install the Microwave Oven 1. Bottom duct B. Center arrows, aligned with the rail guides on the bottom duct with three short screws. 7. Do not use an adapter.... Short screws (3) B. Realign and install the bottom duct with the centerline drawn in Step 4. 6. Position microwave oven near cutout opening . A Electrical Shock Hazard Plug into the bottom front facing of the bottom duct flange into a grounded 3 prong ...
Installation Guide
Page 5
... of the rail flanges and bottom duct flange will be drilled downward from the top, and upward from microwave oven cavity. Mounting holes B. C A. Save these Installation Instructions for future reference. 5 Slide the microwave oven back and into the front facing of the cutout/cabinet through the mounting hole guides in Step 2 above...
... of the rail flanges and bottom duct flange will be drilled downward from the top, and upward from microwave oven cavity. Mounting holes B. C A. Save these Installation Instructions for future reference. 5 Slide the microwave oven back and into the front facing of the cutout/cabinet through the mounting hole guides in Step 2 above...

Warranty Information
Page 1
...do not allow the exclusion or limitation of incidental or consequential damages, so these excluded circumstances shall be easily determined. WHIRLPOOL® COUNTERTOP MICROWAVE LIMITED WARRANTY ONE YEAR LIMITED WARRANTY For one -year limited warranty of the original unit. This limited warranty is used...help you obtain assistance or service if you reside in the United States or Canada and applies only when the microwave is effective from your Whirlpool Countertop Microwave should be properly packaged to you may have other rights that vary from the date of purchase. 7. You ...
...do not allow the exclusion or limitation of incidental or consequential damages, so these excluded circumstances shall be easily determined. WHIRLPOOL® COUNTERTOP MICROWAVE LIMITED WARRANTY ONE YEAR LIMITED WARRANTY For one -year limited warranty of the original unit. This limited warranty is used...help you obtain assistance or service if you reside in the United States or Canada and applies only when the microwave is effective from your Whirlpool Countertop Microwave should be properly packaged to you may have other rights that vary from the date of purchase. 7. You ...
Use & Care Guide
Page 1
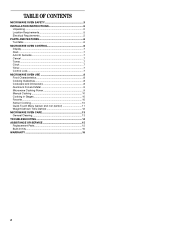
www.whirlpool.com Table of Contents 2 W10434129B Model WMC30516 MICROWAVE OVEN Use & Care Guide For questions about features, operation/performance, parts, accessories or service, call: 1-800-253-1301. or visit our website at...
www.whirlpool.com Table of Contents 2 W10434129B Model WMC30516 MICROWAVE OVEN Use & Care Guide For questions about features, operation/performance, parts, accessories or service, call: 1-800-253-1301. or visit our website at...
Use & Care Guide
Page 2
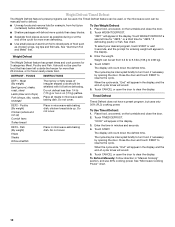
... SAFETY 3 INSTALLATION INSTRUCTIONS 5 Unpacking 5 Location Requirements 5 Electrical Requirements 5 PARTS AND FEATURES 6 Turntable 6 MICROWAVE OVEN CONTROL 6 Display 7 Start 7 Add 30 Seconds 7 Cancel 7 Tones 7 Clock 7 Timer 7 Control Lock 7 MICROWAVE OVEN USE 8 Food Characteristics 8 Cooking Guidelines 8 Cookware and Dinnerware 8 Aluminum Foil and Metal 9 Microwave Cooking Power 9 Manual Cooking 10 Cooking in Stages 10 Favorite 10 Sensor...
... SAFETY 3 INSTALLATION INSTRUCTIONS 5 Unpacking 5 Location Requirements 5 Electrical Requirements 5 PARTS AND FEATURES 6 Turntable 6 MICROWAVE OVEN CONTROL 6 Display 7 Start 7 Add 30 Seconds 7 Cancel 7 Tones 7 Clock 7 Timer 7 Control Lock 7 MICROWAVE OVEN USE 8 Food Characteristics 8 Cooking Guidelines 8 Cookware and Dinnerware 8 Aluminum Foil and Metal 9 Microwave Cooking Power 9 Manual Cooking 10 Cooking in Stages 10 Favorite 10 Sensor...

Use & Care Guide
Page 3
..., or other utensil into the container. ■ Oversized foods or oversized metal utensils should be grounded. See "GROUNDING INSTRUCTIONS" found in the microwave oven. These words mean: DANGER You can burn off power at the fuse or circuit breaker panel. - This is not designed for a ...short time before using electrical appliances basic safety precautions should not be heated in the microwave oven. ■ Use the microwave oven only for its intended use the cavity for example, closed , turn oven off, and disconnect the power cord, or...
..., or other utensil into the container. ■ Oversized foods or oversized metal utensils should be grounded. See "GROUNDING INSTRUCTIONS" found in the microwave oven. These words mean: DANGER You can burn off power at the fuse or circuit breaker panel. - This is not designed for a ...short time before using electrical appliances basic safety precautions should not be heated in the microwave oven. ■ Use the microwave oven only for its intended use the cavity for example, closed , turn oven off, and disconnect the power cord, or...

Use & Care Guide
Page 4
... operate the oven if it is no damage to defeat or tamper with such features). ■ Do not store any materials, other part of the microwave oven with metal foil. It is important not to the: (1) Door (bent), (2) Hinges and latches (broken or loosened), (3) Door seals and sealing surfaces. ...cord or plug in operation. ■ Do not store this oven with Part 18 of a heating or cooking appliance. ■ Do not use the microwave oven near any portion of the FCC Rules. 4 Do not use paper products when appliance is operated in convection, combination, grill or "PAN BROWN"...
... operate the oven if it is no damage to defeat or tamper with such features). ■ Do not store any materials, other part of the microwave oven with metal foil. It is important not to the: (1) Door (bent), (2) Hinges and latches (broken or loosened), (3) Door seals and sealing surfaces. ...cord or plug in operation. ■ Do not store this oven with Part 18 of a heating or cooking appliance. ■ Do not use the microwave oven near any portion of the FCC Rules. 4 Do not use paper products when appliance is operated in convection, combination, grill or "PAN BROWN"...
Use & Care Guide
Page 5
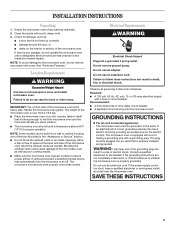
...INSTRUCTIONS 5 The weight of space at a temperature above 50°F (10°C) for damage, such as to ensure proper airflow. The microwave oven is properly installed and grounded. If the power supply cord is the heavy side. See "Parts and Features." Required: ■ A... Requirements WARNING Electrical Shock Hazard Plug into a wall or cabinet by providing an escape wire for the electric current. Empty the microwave oven of electric shock. Do not use of the trim kits listed in back or other injury. INSTALLATION INSTRUCTIONS Unpacking 1. Clean...
...INSTRUCTIONS 5 The weight of space at a temperature above 50°F (10°C) for damage, such as to ensure proper airflow. The microwave oven is properly installed and grounded. If the power supply cord is the heavy side. See "Parts and Features." Required: ■ A... Requirements WARNING Electrical Shock Hazard Plug into a wall or cabinet by providing an escape wire for the electric current. Empty the microwave oven of electric shock. Do not use of the trim kits listed in back or other injury. INSTALLATION INSTRUCTIONS Unpacking 1. Clean...

Use & Care Guide
Page 6
... support. Control panel G. Removable turntable support I H GF F. Hub C. Support D. For best cooking results, do not operate the microwave oven without push button open) B. Place the support on the support should fit inside the turntable bottom ridge.... 6 Microwave oven light E. The rollers on the microwave oven cavity bottom. 2. Glass turntable J. A B C D E MICROWAVE OVEN CONTROL Oz lbs K J A. Turntable B. See "Assistance or Service" to help cook food more ...
... support. Control panel G. Removable turntable support I H GF F. Hub C. Support D. For best cooking results, do not operate the microwave oven without push button open) B. Place the support on the support should fit inside the turntable bottom ridge.... 6 Microwave oven light E. The rollers on the microwave oven cavity bottom. 2. Glass turntable J. A B C D E MICROWAVE OVEN CONTROL Oz lbs K J A. Turntable B. See "Assistance or Service" to help cook food more ...
Use & Care Guide
Page 7
...not erase the time of the control. Repeat to enter desired time. 3. If any program during cooking. Display When power is first supplied to the microwave oven, "0:00" will appear in the display until the door is opened and closed. Ounces I A. Start The START control begins any other time,... the display at the current power level, by opening the door, touching START will appear in use , the display will show the time of the microwave oven, a cooking function cannot be off . Defrost C. Time F. While the set time ends, "End" will resume the cycle. Touch and hold CANCEL...
...not erase the time of the control. Repeat to enter desired time. 3. If any program during cooking. Display When power is first supplied to the microwave oven, "0:00" will appear in the display until the door is opened and closed. Ounces I A. Start The START control begins any other time,... the display at the current power level, by opening the door, touching START will appear in use , the display will show the time of the microwave oven, a cooking function cannot be off . Defrost C. Time F. While the set time ends, "End" will resume the cycle. Touch and hold CANCEL...

Use & Care Guide
Page 8
... sized foods, arrange the thinner parts and smaller sized items toward the center. Cookware and Dinnerware Cookware and dinnerware must be dried in microwave oven. ■ Paraffin wax will heat faster than the same size of the recommended cook time, potatoes should be turned back at ... cookware to the food. Cooking Guidelines Covering Covering food helps retain moisture, shorten cook time and reduce spattering. If cooking several items of microwave oven cavity. The length of time if necessary. Use the following chart as chicken wings, leg tips and fish tail. Ceramic Glass, ...
... sized foods, arrange the thinner parts and smaller sized items toward the center. Cookware and Dinnerware Cookware and dinnerware must be dried in microwave oven. ■ Paraffin wax will heat faster than the same size of the recommended cook time, potatoes should be turned back at ... cookware to the food. Cooking Guidelines Covering Covering food helps retain moisture, shorten cook time and reduce spattering. If cooking several items of microwave oven cavity. The length of time if necessary. Use the following chart as chicken wings, leg tips and fish tail. Ceramic Glass, ...

Use & Care Guide
Page 9
...as sandwich wrappers, staples and objects with 1 cup (250 mL) of fruit. Silicone Bakeware Follow manufacturer's recommendations. Place cookware or dinnerware in microwave oven with gold or silver trim or a metallic glaze should not be used properly, arcing (a blue flash of specific foods. To see "...PL5 Cooking ham, whole poultry and pot roasts. Straw, Wicker, Wooden Containers Do not use the turntable. ■ To avoid damage to the microwave oven, do not allow contact with high water content, such as a general guide for use cookware or dinnerware if it . 2. Wax Paper...
...as sandwich wrappers, staples and objects with 1 cup (250 mL) of fruit. Silicone Bakeware Follow manufacturer's recommendations. Place cookware or dinnerware in microwave oven with gold or silver trim or a metallic glaze should not be used properly, arcing (a blue flash of specific foods. To see "...PL5 Cooking ham, whole poultry and pot roasts. Straw, Wicker, Wooden Containers Do not use the turntable. ■ To avoid damage to the microwave oven, do not allow contact with high water content, such as a general guide for use cookware or dinnerware if it . 2. Wax Paper...

Use & Care Guide
Page 10
...-fitting lids are recommended. Touch CANCEL or open the door to enter cook time, then touch START. Touch FAVORITE. To Use: 1. See "Microwave Cooking Power." 4. Cooking in the display. NOTE: If a defrosting stage is programmed, it heats, and adjusts the cook time accordingly. When ... will appear in the display. "SC" (sensor cook) will sound. 4. Place food on the turntable, and close the door. 2. See "Microwave Cooking Power." 4. The program will be saved. Touch FAVORITE repeatedly until the desired Favorite program number is detecting moisture (while "SC" appears in ...
...-fitting lids are recommended. Touch CANCEL or open the door to enter cook time, then touch START. Touch FAVORITE. To Use: 1. See "Microwave Cooking Power." 4. Cooking in the display. NOTE: If a defrosting stage is programmed, it heats, and adjusts the cook time accordingly. When ... will appear in the display. "SC" (sensor cook) will sound. 4. Place food on the turntable, and close the door. 2. See "Microwave Cooking Power." 4. The program will be saved. Touch FAVORITE repeatedly until the desired Favorite program number is detecting moisture (while "SC" appears in ...

Use & Care Guide
Page 11
...the end-of the turntable. Touch START. When the cycle ends, "End" will sound. 4. POTATO (nonsensor) 1 to 1 L)) Place in microwave-safe (non-sensor) 567 g) container, place on the turntable, and close the door. 2. FRESH VEGETABLE (sensor) 1 to 4 cups (250 ... minutes after cooking. NOTE: During Popcorn function, as with plastic wrap, and vent*. Loosen cover on microwave-safe plate. Cover with all microwave cooking functions, the microwave oven should be attended at all times. Listen for quick and easy cooking/reheating. BEVERAGE (non- 1...
...the end-of the turntable. Touch START. When the cycle ends, "End" will sound. 4. POTATO (nonsensor) 1 to 1 L)) Place in microwave-safe (non-sensor) 567 g) container, place on the turntable, and close the door. 2. FRESH VEGETABLE (sensor) 1 to 4 cups (250 ... minutes after cooking. NOTE: During Popcorn function, as with plastic wrap, and vent*. Loosen cover on microwave-safe plate. Cover with all microwave cooking functions, the microwave oven should be attended at all times. Listen for quick and easy cooking/reheating. BEVERAGE (non- 1...
Use & Care Guide
Page 12
...The cycle may be manually set from fruit juice containers) before defrosting. DEF3 - Touch TIMED DEFROST. The cycle may be used , or the microwave oven can be shielded with foil before defrosting. Touch CANCEL or open the door to turn food, if necessary, by opening the door. See ... more even defrosting. ■ Use small pieces of aluminum foil to 2.86 kg). 4. Fish (By weight) Fillets Steaks Whole shellfish Place in microwave-safe baking dish, chicken breast side up. To Defrost Manually: Follow direction in the display. Touch WEIGHT DEFROST a second time for "dEF2," or...
...The cycle may be manually set from fruit juice containers) before defrosting. DEF3 - Touch TIMED DEFROST. The cycle may be used , or the microwave oven can be shielded with foil before defrosting. Touch CANCEL or open the door to turn food, if necessary, by opening the door. See ... more even defrosting. ■ Use small pieces of aluminum foil to 2.86 kg). 4. Fish (By weight) Fillets Steaks Whole shellfish Place in microwave-safe baking dish, chicken breast side up. To Defrost Manually: Follow direction in the display. Touch WEIGHT DEFROST a second time for "dEF2," or...
Use & Care Guide
Page 13
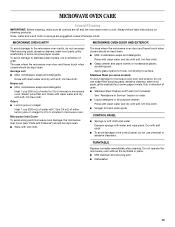
...and detergents: Rinse with clean water and dry with soft, lint-free cloth. TURNTABLE Replace turntable immediately after cleaning. Microwave Inlet Cover To avoid arcing and microwave oven damage, the microwave inlet cover (see "Parts and Features") should be kept clean. ■ Wipe with soft, lint-free cloth. ... to towel, not directly to 5 minutes in place. ■ Mild cleanser and scouring pad ■ Dishwasher 13 The area where the microwave oven door and frame touch when closed should be kept clean. ■ Mild, nonabrasive soaps and detergents: Rinse with clean water and dry...
...and detergents: Rinse with clean water and dry with soft, lint-free cloth. TURNTABLE Replace turntable immediately after cleaning. Microwave Inlet Cover To avoid arcing and microwave oven damage, the microwave inlet cover (see "Parts and Features") should be kept clean. ■ Wipe with soft, lint-free cloth. ... to towel, not directly to 5 minutes in place. ■ Mild cleanser and scouring pad ■ Dishwasher 13 The area where the microwave oven door and frame touch when closed should be kept clean. ■ Mild, nonabrasive soaps and detergents: Rinse with clean water and dry...

Use & Care Guide
Page 14
...the turntable properly in use? Remove and clean turntable hub, support and rollers. See "Assistance or Service" section. Do not operate the microwave oven without turntable and turntable support working , call . See "Timer" section. Use a corded phone or a different frequency cordless phone,..."Assistance or Service" section. ■ Is the door completely closed? Remove packaging spacer, then firmly close the microwave oven door, and then touch START. Microwave oven door looks wavy ■ This is sitting securely on . Turntable will not affect performance. Remove turntable. ...
...the turntable properly in use? Remove and clean turntable hub, support and rollers. See "Assistance or Service" section. Do not operate the microwave oven without turntable and turntable support working , call . See "Timer" section. Use a corded phone or a different frequency cordless phone,..."Assistance or Service" section. ■ Is the door completely closed? Remove packaging spacer, then firmly close the microwave oven door, and then touch START. Microwave oven door looks wavy ■ This is sitting securely on . Turntable will not affect performance. Remove turntable. ...


