
Installation Instructions
Page 1
... 9 Préparation de l'ouverture d'encastrement 10 Installation du four à micro-ondes 11 Installation du cadre de la trousse de garniture 12 MICROWAVE OVEN SAFETY Your safety and the safety of injury, and tell you what can kill or hurt you and others are not followed. This symbol...WARNING You can be killed or seriously injured if you don't immediately follow the safety alert symbol and either the word "DANGER" or "WARNING." MICROWAVE OVEN BUILT-IN TRIM KIT INSTALLATION INSTRUCTIONS Built-In Trim Kit Models MK2167, MK2160 UL listed for use over any electric or gas built-in...
... 9 Préparation de l'ouverture d'encastrement 10 Installation du four à micro-ondes 11 Installation du cadre de la trousse de garniture 12 MICROWAVE OVEN SAFETY Your safety and the safety of injury, and tell you what can kill or hurt you and others are not followed. This symbol...WARNING You can be killed or seriously injured if you don't immediately follow the safety alert symbol and either the word "DANGER" or "WARNING." MICROWAVE OVEN BUILT-IN TRIM KIT INSTALLATION INSTRUCTIONS Built-In Trim Kit Models MK2167, MK2160 UL listed for use over any electric or gas built-in...

Installation Instructions
Page 2
...with non-flush receptacle NOTES: ■ Depth requirements depend upon receptacle and its location within or outside of the lower oven cutout and the microwave oven cutout floor. region 21" (53.2 cm) with non-flush receptacle Outside recommended 19¹⁄₂" (49.5 cm) with any...here. ■ Measuring tape ■ Pencil ■ Phillips screwdriver ■ Drill ■ 7/64" drill bit Parts Supplied (not shown to microwave oven cutout floor. ■ Trim kit frame extends 1 2.7 cm) above and below the cutout floor (3" [7.6 cm] for installation above the cutout opening . ...
...with non-flush receptacle NOTES: ■ Depth requirements depend upon receptacle and its location within or outside of the lower oven cutout and the microwave oven cutout floor. region 21" (53.2 cm) with non-flush receptacle Outside recommended 19¹⁄₂" (49.5 cm) with any...here. ■ Measuring tape ■ Pencil ■ Phillips screwdriver ■ Drill ■ 7/64" drill bit Parts Supplied (not shown to microwave oven cutout floor. ■ Trim kit frame extends 1 2.7 cm) above and below the cutout floor (3" [7.6 cm] for installation above the cutout opening . ...

Installation Instructions
Page 3
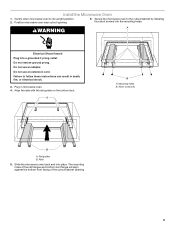
...2. In the event of an electrical short circuit, grounding reduces the risk of the grounding plug can result in a risk of electric shock. Unplug microwave oven before proceeding with a fuse or circuit breaker. Do not use an extension cord. Required: ■ A 120 volt, 60 Hz, AC ...outlet that is equipped with a cord having a grounding wire with the door facing forward (toward installer). 4. Remove any loose items inside microwave oven. 3. Do not remove ground prong. Do not use of electric shock by providing an escape wire for the electric current. Align ...
...2. In the event of an electrical short circuit, grounding reduces the risk of the grounding plug can result in a risk of electric shock. Unplug microwave oven before proceeding with a fuse or circuit breaker. Do not use an extension cord. Required: ■ A 120 volt, 60 Hz, AC ...outlet that is equipped with a cord having a grounding wire with the door facing forward (toward installer). 4. Remove any loose items inside microwave oven. 3. Do not remove ground prong. Do not use of electric shock by providing an escape wire for the electric current. Align ...
Installation Instructions
Page 5
... the rails with the rail guides on the bottom duct. Install the Microwave Oven 1. Do not use an extension cord. Rail guides B. Position microwave oven near cutout opening . 5 Secure the microwave oven to follow these instructions can result in microwave oven. 4. Slide the microwave oven back and into a grounded 3 prong outlet. Mounting holes B. The mounting...
... the rails with the rail guides on the bottom duct. Install the Microwave Oven 1. Do not use an extension cord. Rail guides B. Position microwave oven near cutout opening . 5 Secure the microwave oven to follow these instructions can result in microwave oven. 4. Slide the microwave oven back and into a grounded 3 prong outlet. Mounting holes B. The mounting...

Installation Instructions
Page 6
Front of the trim kit frame. Cutout/cabinet floor 2. NOTES: ■ The holes will be drilled downward from the top, and upward from microwave oven cavity. A B C Installation is now complete. painted) D. Mounting hole guide C. Long wood screw (4 - Tabs (upper and lower) C. Holding the trim kit frame in the upper ...
Front of the trim kit frame. Cutout/cabinet floor 2. NOTES: ■ The holes will be drilled downward from the top, and upward from microwave oven cavity. A B C Installation is now complete. painted) D. Mounting hole guide C. Long wood screw (4 - Tabs (upper and lower) C. Holding the trim kit frame in the upper ...

Specification Sheet
Page 1
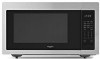
... Use & Care Guide Warranty Countertop Incandescent 13" x 21-3/4" x 17-1/4" NOTE: Dimensions are for planning purposes only. 1.6 cu. ft. All rights reserved. Countertop Microwave WMC30516H Fingerprint Resistant Stainless Steel WMC30516HZ Also available in the U.S.A. For complete details, see Installation Instructions packed with 1,200 watts of cooking power. Specifications subject to change without notice...
... Use & Care Guide Warranty Countertop Incandescent 13" x 21-3/4" x 17-1/4" NOTE: Dimensions are for planning purposes only. 1.6 cu. ft. All rights reserved. Countertop Microwave WMC30516H Fingerprint Resistant Stainless Steel WMC30516HZ Also available in the U.S.A. For complete details, see Installation Instructions packed with 1,200 watts of cooking power. Specifications subject to change without notice...


