
Installation Guide
Page 1
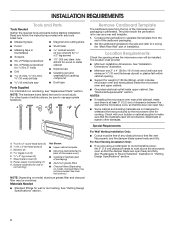
... pour d'autres remarques. Table of Contents / Table des matières MICROWAVE HOOD COMBINATION SAFETY 1 INSTALLATION REQUIREMENTS 2 Tools and Parts 2 Remove Cardboard Template 2 Location Requirements 2 Product Dimensions 3 Electrical Requirements 3 INSTALLATION INSTRUCTIONS 4 Remove Mounting Plate 4 Rotate Blower Motor 4 Locate Wall Stud(s 5 Mark Rear Wall 6 Drill Holes in these installation instructions. Ces instructions d'installation sont valables pour plusieurs modèles. See "Installation Requirements" section for use above electric or gas cooking products up to...
... pour d'autres remarques. Table of Contents / Table des matières MICROWAVE HOOD COMBINATION SAFETY 1 INSTALLATION REQUIREMENTS 2 Tools and Parts 2 Remove Cardboard Template 2 Location Requirements 2 Product Dimensions 3 Electrical Requirements 3 INSTALLATION INSTRUCTIONS 4 Remove Mounting Plate 4 Rotate Blower Motor 4 Locate Wall Stud(s 5 Mark Rear Wall 6 Drill Holes in these installation instructions. Ces instructions d'installation sont valables pour plusieurs modèles. See "Installation Requirements" section for use above electric or gas cooking products up to...
Installation Guide
Page 2
...oven and items placed inside the microwave oven and upper cabinet. ■■ Grounded electrical outlet inside the perforation is perforated. Special Requirements For Wall Venting Installation Only: ■■ Cutout must provide: ■■ Minimum installation dimensions. Washers (2) D. Z\v" x 2" lag screws (2) F. See User Instructions.) NOTE: Depending on reordering, see "Replacement Parts" section. Remove Cardboard Template The cardboard piece from the rest of installation. The location must be combined. See "Rectangular to it during the "Mark Rear Wall" part...
...oven and items placed inside the microwave oven and upper cabinet. ■■ Grounded electrical outlet inside the perforation is perforated. Special Requirements For Wall Venting Installation Only: ■■ Cutout must provide: ■■ Minimum installation dimensions. Washers (2) D. Z\v" x 2" lag screws (2) F. See User Instructions.) NOTE: Depending on reordering, see "Replacement Parts" section. Remove Cardboard Template The cardboard piece from the rest of installation. The location must be combined. See "Rectangular to it during the "Mark Rear Wall" part...

Installation Guide
Page 4
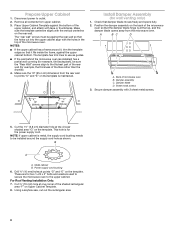
... the microwave oven. Wall Venting Installation Only 1. Slide damper plate toward the front of microwave oven. Rotate blower motor 180° so that the door does not swing open while the microwave oven is set aside. 3. Make sure damper plate tabs are using recirculation installation. Slots 8. Rotate Blower Motor The microwave oven is being handled. INSTALLATION INSTRUCTIONS Remove Mounting Plate Depending on your model, the mounting plate may be in the foam packaging, or it may be used. Reattach damper plate. Exhaust port A 6. If the mounting plate...
... the microwave oven. Wall Venting Installation Only 1. Slide damper plate toward the front of microwave oven. Rotate blower motor 180° so that the door does not swing open while the microwave oven is set aside. 3. Make sure damper plate tabs are using recirculation installation. Slots 8. Rotate Blower Motor The microwave oven is being handled. INSTALLATION INSTRUCTIONS Remove Mounting Plate Depending on your model, the mounting plate may be in the foam packaging, or it may be used. Reattach damper plate. Exhaust port A 6. If the mounting plate...
Installation Guide
Page 8
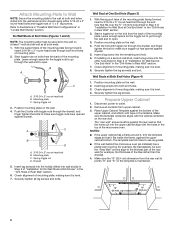
... opens away from the microwave oven. The template has trim lines to the upper cabinet. Install Damper Assembly (for two Z\v-20 x 3" bolts and washers used to secure the microwave oven to use as guides. ■■ If the wall behind the microwave oven (as shown. Sheet metal screws 3. For Roof Venting Installation Only: 7. Check that it , trim the template edges so that damper blade moves freely and opens fully. 2. Remove all contents from the rear wall to outlet. 2. Cut...
... opens away from the microwave oven. The template has trim lines to the upper cabinet. Install Damper Assembly (for two Z\v-20 x 3" bolts and washers used to secure the microwave oven to use as guides. ■■ If the wall behind the microwave oven (as shown. Sheet metal screws 3. For Roof Venting Installation Only: 7. Check that it , trim the template edges so that damper blade moves freely and opens fully. 2. Remove all contents from the rear wall to outlet. 2. Cut...

Installation Guide
Page 10
... tab F. Damper plate 2. A B A. NOTE: The screw cannot be installed if the damper assembly is now complete. WARNING D E F A. Reconnect power. 4. Replace the fuse or reset the circuit breaker. Then secure with sheet metal screw. Install filters. Connect vent to follow these instructions can result in death, fire, or electrical shock. 2. Failure to damper assembly. Sheet metal screw D. Vent B. Do not use an extension cord. Do not use an adapter. Upper cabinet cutout E. Check the operation of microwave oven by operating the vent fan. 5. Installation is...
... tab F. Damper plate 2. A B A. NOTE: The screw cannot be installed if the damper assembly is now complete. WARNING D E F A. Reconnect power. 4. Replace the fuse or reset the circuit breaker. Then secure with sheet metal screw. Install filters. Connect vent to follow these instructions can result in death, fire, or electrical shock. 2. Failure to damper assembly. Sheet metal screw D. Vent B. Do not use an extension cord. Do not use an adapter. Upper cabinet cutout E. Check the operation of microwave oven by operating the vent fan. 5. Installation is...

Installation Guide
Page 1
... installation instructions cover different models. Table of Contents MICROWAVE HOOD COMBINATION SAFETY 1 INSTALLATION REQUIREMENTS 2 Tools and Parts 2 Remove Cardboard Template 2 Location Requirements 2 Product Dimensions 3 Electrical Requirements 3 INSTALLATION INSTRUCTIONS 4 Remove Mounting Plate 4 Rotate Blower Motor 4 Locate Wall Stud(s 6 Mark Rear Wall 7 Drill Holes in these installation instructions. We have provided many important safety messages in this manual and on your particular model may differ slightly from the illustration in Rear Wall 7 Attach Mounting...
... installation instructions cover different models. Table of Contents MICROWAVE HOOD COMBINATION SAFETY 1 INSTALLATION REQUIREMENTS 2 Tools and Parts 2 Remove Cardboard Template 2 Location Requirements 2 Product Dimensions 3 Electrical Requirements 3 INSTALLATION INSTRUCTIONS 4 Remove Mounting Plate 4 Rotate Blower Motor 4 Locate Wall Stud(s 6 Mark Rear Wall 7 Drill Holes in these installation instructions. We have provided many important safety messages in this manual and on your particular model may differ slightly from the illustration in Rear Wall 7 Attach Mounting...

Installation Guide
Page 2
... the damper blade can open freely and fully. Remove Cardboard Template The cardboard piece from the rest of the microwave oven packaging is perforated. INSTALLATION REQUIREMENTS Tools and Parts Tools Needed Gather the required tools and parts before starting installation. Washers (2) D. Z\v" x 2" lag screws (2) F. Location Requirements Check the opening . ■■ Support for wall or roof venting) Not Shown: ■■ Upper cabinet template ■■ Mounting plate (attached to it during the "Mark Rear Wall" part of...
... the damper blade can open freely and fully. Remove Cardboard Template The cardboard piece from the rest of the microwave oven packaging is perforated. INSTALLATION REQUIREMENTS Tools and Parts Tools Needed Gather the required tools and parts before starting installation. Washers (2) D. Z\v" x 2" lag screws (2) F. Location Requirements Check the opening . ■■ Support for wall or roof venting) Not Shown: ■■ Upper cabinet template ■■ Mounting plate (attached to it during the "Mark Rear Wall" part of...

Installation Guide
Page 4
... door handle while the microwave oven is being handled. Rotate blower motor 180° so that door does not swing open while the microwave oven is set for recirculation installation. If the mounting plate is reinstalled in step 3. 4 Remove 2 screws attaching blower motor to the back of microwave oven with 2 screws removed in another location where wall or roof venting may be made to the work surface, cover the work surface. 1. Blower motor 5. Tape the microwave oven door closed so that exhaust...
... door handle while the microwave oven is being handled. Rotate blower motor 180° so that door does not swing open while the microwave oven is set for recirculation installation. If the mounting plate is reinstalled in step 3. 4 Remove 2 screws attaching blower motor to the back of microwave oven with 2 screws removed in another location where wall or roof venting may be made to the work surface, cover the work surface. 1. Blower motor 5. Tape the microwave oven door closed so that exhaust...
Installation Guide
Page 8
... it is level. 8. Disconnect power to the thickest part of mounting plate. 2. The "rear wall" arrows must be sure the "Rear Wall" arrows align to outlet. 2. Upper-cabinet template D 10" (25.4 cm) F E 10" G (25.4 cm) 8 Insert a lag screw into the other hole drilled in "Locate Wall Stud(s)" section. Remove all lag screws and bolts. The template has trim lines to use as guides. ■■ If the wall behind the microwave oven (as...
... it is level. 8. Disconnect power to the thickest part of mounting plate. 2. The "rear wall" arrows must be sure the "Rear Wall" arrows align to outlet. 2. Upper-cabinet template D 10" (25.4 cm) F E 10" G (25.4 cm) 8 Insert a lag screw into the other hole drilled in "Locate Wall Stud(s)" section. Remove all lag screws and bolts. The template has trim lines to use as guides. ■■ If the wall behind the microwave oven (as...

Installation Guide
Page 10
... the microwave oven. Refer to be added. If the microwave oven does not operate: ■■ Check that a household fuse has not blown, or that the power supply cord is not positioned as the space between upper cabinet and microwave oven. Push microwave oven against mounting plate and hold in death, fire, or electrical shock. 2. Replace the fuse or reset the circuit breaker. 6. NOTE: If microwave oven does not need to the User Instructions for filter placement...
... the microwave oven. Refer to be added. If the microwave oven does not operate: ■■ Check that a household fuse has not blown, or that the power supply cord is not positioned as the space between upper cabinet and microwave oven. Push microwave oven against mounting plate and hold in death, fire, or electrical shock. 2. Replace the fuse or reset the circuit breaker. 6. NOTE: If microwave oven does not need to the User Instructions for filter placement...
Use & Care Guide
Page 2
..., repair, or adjustment. After heating, allow soil or cleaner residue to cause cancer. WARNING: This product contains one or more chemicals known to the State of table or counter. IMPORTANT SAFETY INSTRUCTIONS I Use the microwave oven only for its intended use as described in operation. I Do not store anything directly on top of California to accumulate on the microwave oven. Remove wire twist-ties from heated...
..., repair, or adjustment. After heating, allow soil or cleaner residue to cause cancer. WARNING: This product contains one or more chemicals known to the State of table or counter. IMPORTANT SAFETY INSTRUCTIONS I Use the microwave oven only for its intended use as described in operation. I Do not store anything directly on top of California to accumulate on the microwave oven. Remove wire twist-ties from heated...
Use & Care Guide
Page 3
... all cord connected appliances: The microwave oven must be entered while the Timer is properly grounded. Touch CLOCK, enter time, then touch CLOCK or the Start control. Comes on . Tones Programming tones and signals. Repeat to practice using the Vent Fan control. Demo Mode Activate to turn all tones, touch and hold number keypad "1" for about 3 seconds until 2 tones sound and Padlock icon appears in death, fire, or electrical shock. SAVE THESE INSTRUCTIONS This...
... all cord connected appliances: The microwave oven must be entered while the Timer is properly grounded. Touch CLOCK, enter time, then touch CLOCK or the Start control. Comes on . Tones Programming tones and signals. Repeat to practice using the Vent Fan control. Demo Mode Activate to turn all tones, touch and hold number keypad "1" for about 3 seconds until 2 tones sound and Padlock icon appears in death, fire, or electrical shock. SAVE THESE INSTRUCTIONS This...

Use & Care Guide
Page 4
... oven. The charcoal filter cannot be cleaned and should be replaced about 4 oz (113 g) each before touching the Start control. Open the bulb cover and replace bulb. Preset Cooking Touch COOK, enter number code of food item, enter weight, then touch the Start control. Touch SOFTEN/MELT, enter number code of food item, enter quantity if needed, then touch the Start control. Preset Defrosting Pizza (reheat) Unwrap food. Always follow label instructions on the underside of the microwave oven, under the bulb cover, and is replaceable. Remove 2 screws on the vent grille...
... oven. The charcoal filter cannot be cleaned and should be replaced about 4 oz (113 g) each before touching the Start control. Open the bulb cover and replace bulb. Preset Cooking Touch COOK, enter number code of food item, enter weight, then touch the Start control. Touch SOFTEN/MELT, enter number code of food item, enter quantity if needed, then touch the Start control. Preset Defrosting Pizza (reheat) Unwrap food. Always follow label instructions on the underside of the microwave oven, under the bulb cover, and is replaceable. Remove 2 screws on the vent grille...

Use & Care Guide
Page 5
...; Charcoal filter ■■ Cooktop light bulb ■■ Cavity light bulb TROUBLESHOOTING First try the steps in the microwave oven Check the following : ■■ Household fuse or circuit breaker: If a household fuse has blown or a circuit breaker has tripped, replace the fuse or reset the circuit breaker. Open and close door. If water does not heat, try the solutions suggested here. See "General Cleaning" in your mobile device, or visit www.whirlpool.ca. The microwave oven...
...; Charcoal filter ■■ Cooktop light bulb ■■ Cavity light bulb TROUBLESHOOTING First try the steps in the microwave oven Check the following : ■■ Household fuse or circuit breaker: If a household fuse has blown or a circuit breaker has tripped, replace the fuse or reset the circuit breaker. Open and close door. If water does not heat, try the solutions suggested here. See "General Cleaning" in your mobile device, or visit www.whirlpool.ca. The microwave oven...
Use & Care Guide
Page 6
... province to product failure. In-home instruction on how to use of this warranty. Service to correct defects in accordance with the product, Whirlpool Corporation or Whirlpool Canada LP (hereafter "Whirlpool") will be addressed without service. Specified Replacement Parts and repair 4. light bulbs, batteries, air or water filters, preservation solutions, etc.). labor to correct improper product maintenance or installation, installation not in materials or 5. In the...
... province to product failure. In-home instruction on how to use of this warranty. Service to correct defects in accordance with the product, Whirlpool Corporation or Whirlpool Canada LP (hereafter "Whirlpool") will be addressed without service. Specified Replacement Parts and repair 4. light bulbs, batteries, air or water filters, preservation solutions, etc.). labor to correct improper product maintenance or installation, installation not in materials or 5. In the...

Warranty Information
Page 1
... Whirlpool parts or accessories. 6. Service to correct improper product maintenance or installation, installation not in materials or workmanship that vary from accident, misuse, abuse, fire, floods, acts of God or use with electrical or plumbing codes or correction of the Use and Care Guide, scan the QR code on how to review the Troubleshooting or Problem Solver section of household electrical or plumbing (i.e. light bulbs, batteries, air or water filters...
... Whirlpool parts or accessories. 6. Service to correct improper product maintenance or installation, installation not in materials or workmanship that vary from accident, misuse, abuse, fire, floods, acts of God or use with electrical or plumbing codes or correction of the Use and Care Guide, scan the QR code on how to review the Troubleshooting or Problem Solver section of household electrical or plumbing (i.e. light bulbs, batteries, air or water filters...
Use & Care Guide
Page 2
... gas and electric cooking equipment. Grease should be allowed to microwave energy. I Suitable for use . Do not overcook food. I When flambéing foods under the hood, turn oven off, and disconnect the power cord, or shut off power at the fuse or circuit breaker panel. Remove wire twist-ties from heated surfaces. Corrosive cleaning agents, such as water, coffee, or tea are placed inside the oven ignite, keep oven door closed, turn the fan on...
... gas and electric cooking equipment. Grease should be allowed to microwave energy. I Suitable for use . Do not overcook food. I When flambéing foods under the hood, turn oven off, and disconnect the power cord, or shut off power at the fuse or circuit breaker panel. Remove wire twist-ties from heated surfaces. Corrosive cleaning agents, such as water, coffee, or tea are placed inside the oven ignite, keep oven door closed, turn the fan on...
Use & Care Guide
Page 4
... then touch the Start control. Remove bulb cover screws, and open bulb cover and replace bulb. Close bulb cover, and secure with screws. ■■ Cooktop light: The cooktop light bulb is located on cleaning products. Preset Defrosting Unwrap food. The charcoal filter cannot be cleaned, and should be replaced about 10 to 13 oz (283 to 367 g) each, then touch START control. Program 1 minute of the microwave oven, and is cool. Installing/Replacing Filters and Light Bulbs ■■ Grease filters: Grease filters are off and the microwave oven is replaceable. wire...
... then touch the Start control. Remove bulb cover screws, and open bulb cover and replace bulb. Close bulb cover, and secure with screws. ■■ Cooktop light: The cooktop light bulb is located on cleaning products. Preset Defrosting Unwrap food. The charcoal filter cannot be cleaned, and should be replaced about 10 to 13 oz (283 to 367 g) each, then touch START control. Program 1 minute of the microwave oven, and is cool. Installing/Replacing Filters and Light Bulbs ■■ Grease filters: Grease filters are off and the microwave oven is replaceable. wire...

Use & Care Guide
Page 5
... by a number is set properly. Radio, TV or cordless phone interference Check the following : not operate ■■ Household fuse or circuit breaker - ACCESSORIES Following is a list of the cycle. Try to inside of the microwave oven. Firmly close the door, then start the cycle. ■■ Control - It may be purchased separately. Make sure Demo Mode (on cavity walls, microwave inlet cover, cooking rack supports, and area where the door touches the...
... by a number is set properly. Radio, TV or cordless phone interference Check the following : not operate ■■ Household fuse or circuit breaker - ACCESSORIES Following is a list of the cycle. Try to inside of the microwave oven. Firmly close the door, then start the cycle. ■■ Control - It may be purchased separately. Make sure Demo Mode (on cavity walls, microwave inlet cover, cooking rack supports, and area where the door touches the...

Use & Care Guide
Page 6
... product. Pick-up or delivery. trim, decorative panels, flooring, cabinetry, islands, countertops, drywall, etc.) that comes with this major appliance is used in the country in the United States or Canada and applies only when the major appliance is installed, operated and maintained according to instructions attached to or furnished with servicing, removal or replacement of products from the date...
... product. Pick-up or delivery. trim, decorative panels, flooring, cabinetry, islands, countertops, drywall, etc.) that comes with this major appliance is used in the country in the United States or Canada and applies only when the major appliance is installed, operated and maintained according to instructions attached to or furnished with servicing, removal or replacement of products from the date...


