
Installation Guide
Page 1
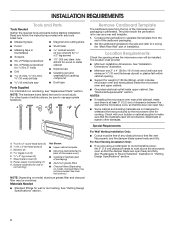
... different models. The appearance of Contents / Table des matières MICROWAVE HOOD COMBINATION SAFETY 1 INSTALLATION REQUIREMENTS 2 Tools and Parts 2 Remove Cardboard Template 2 Location Requirements 2 Product Dimensions 3 Electrical Requirements 3 INSTALLATION INSTRUCTIONS 4 Remove Mounting Plate 4 Rotate Blower...8 Install Damper Assembly 8 Install the Microwave Oven 9 Complete Installation 10 VENTING DESIGN SPECIFICATIONS 11 ASSISTANCE 12 Replacement Parts 12 Accessories 12 SÉCURITÉ DE L'ENSEMBLE FOUR À MICRO-ONDES/HOTTE..... 13 EXIGENCES D'INSTALLATION...
... different models. The appearance of Contents / Table des matières MICROWAVE HOOD COMBINATION SAFETY 1 INSTALLATION REQUIREMENTS 2 Tools and Parts 2 Remove Cardboard Template 2 Location Requirements 2 Product Dimensions 3 Electrical Requirements 3 INSTALLATION INSTRUCTIONS 4 Remove Mounting Plate 4 Rotate Blower...8 Install Damper Assembly 8 Install the Microwave Oven 9 Complete Installation 10 VENTING DESIGN SPECIFICATIONS 11 ASSISTANCE 12 Replacement Parts 12 Accessories 12 SÉCURITÉ DE L'ENSEMBLE FOUR À MICRO-ONDES/HOTTE..... 13 EXIGENCES D'INSTALLATION...
Installation Guide
Page 2
... ■■ Caulking gun and weatherproof caulking compound ■■ C\v" (19 mm) hole saw ■■ Duct tape Parts Supplied For information on model, aluminum grease filter and charcoal filter may not be included. See "Installation Dimensions" illustration. ■&#... Power supply cord bushing (1) H. The piece inside upper cabinet. See User Instructions.) NOTE: Depending on reordering, see "Replacement Parts" section. Remove Cardboard Template The cardboard piece from the rest of the microwave oven packaging is perforated. Set the cardboard template ...
... ■■ Caulking gun and weatherproof caulking compound ■■ C\v" (19 mm) hole saw ■■ Duct tape Parts Supplied For information on model, aluminum grease filter and charcoal filter may not be included. See "Installation Dimensions" illustration. ■&#... Power supply cord bushing (1) H. The piece inside upper cabinet. See User Instructions.) NOTE: Depending on reordering, see "Replacement Parts" section. Remove Cardboard Template The cardboard piece from the rest of the microwave oven packaging is perforated. Set the cardboard template ...
Installation Guide
Page 8
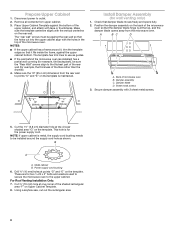
... supply cord. Place Upper Cabinet Template against the upper cabinet bottom. Make sure the 10" (25.4 cm) dimension from the rear wall to the thickest part of the shaded rectangular area "F" on the template. Check that the damper blade hinge is maintained. Sheet metal screws 3. Cut the 1¹⁄₂" (3.8 cm...
... supply cord. Place Upper Cabinet Template against the upper cabinet bottom. Make sure the 10" (25.4 cm) dimension from the rear wall to the thickest part of the shaded rectangular area "F" on the template. Check that the damper blade hinge is maintained. Sheet metal screws 3. Cut the 1¹⁄₂" (3.8 cm...
Installation Guide
Page 12
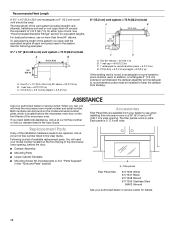
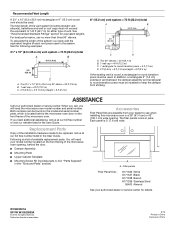
...;₄" x 10" (8.3 x 25.4 cm) rectangular or 6" (15.2 cm) round vent should be replaced, call us at our toll free number listed in the "Tools and Parts" section) A A. Two 90° elbows = 20 ft (6.1 m) B. 1 wall cap = 40 ft (12.2 m) C. 1 rectangular to round transition piece = 5 ft (1.5 m) D. 2 ft (0.6 m) +.... ■■ Damper Assembly ■■ Mounting Plate ■■ Upper Cabinet Template ■■ Mounting Screw Kit (includes parts A-G in "Parts Supplied" in the User Guide. For best performance, use when installing this microwave oven in a 36" (91.4 cm) or 42...
...;₄" x 10" (8.3 x 25.4 cm) rectangular or 6" (15.2 cm) round vent should be replaced, call us at our toll free number listed in the "Tools and Parts" section) A A. Two 90° elbows = 20 ft (6.1 m) B. 1 wall cap = 40 ft (12.2 m) C. 1 rectangular to round transition piece = 5 ft (1.5 m) D. 2 ft (0.6 m) +.... ■■ Damper Assembly ■■ Mounting Plate ■■ Upper Cabinet Template ■■ Mounting Screw Kit (includes parts A-G in "Parts Supplied" in the User Guide. For best performance, use when installing this microwave oven in a 36" (91.4 cm) or 42...

Installation Guide
Page 1
...you what can happen if the instructions are very important. W10823831A The appearance of Contents MICROWAVE HOOD COMBINATION SAFETY 1 INSTALLATION REQUIREMENTS 2 Tools and Parts 2 Remove Cardboard Template 2 Location Requirements 2 Product Dimensions 3 Electrical Requirements 3 INSTALLATION INSTRUCTIONS 4 Remove Mounting Plate 4 Rotate Blower Motor 4 ... 9 Install the Microwave Oven 9 Complete Installation 10 VENTING DESIGN SPECIFICATIONS 11 ASSISTANCE 12 Replacement Parts 12 Accessories 12 MICROWAVE HOOD COMBINATION SAFETY Your safety and the safety of others .
...you what can happen if the instructions are very important. W10823831A The appearance of Contents MICROWAVE HOOD COMBINATION SAFETY 1 INSTALLATION REQUIREMENTS 2 Tools and Parts 2 Remove Cardboard Template 2 Location Requirements 2 Product Dimensions 3 Electrical Requirements 3 INSTALLATION INSTRUCTIONS 4 Remove Mounting Plate 4 Rotate Blower Motor 4 ... 9 Install the Microwave Oven 9 Complete Installation 10 VENTING DESIGN SPECIFICATIONS 11 ASSISTANCE 12 Replacement Parts 12 Accessories 12 MICROWAVE HOOD COMBINATION SAFETY Your safety and the safety of others .

Installation Guide
Page 2
... can open fully. ■■ Some cabinet and building materials are not designed to back of microwave oven) ■■ Cardboard template (part of the microwave oven packaging is for Z\v" x 2" lag screws ■■ 1½" (3.8 cm) diam. Sheet metal screws (2) G....combined. Washers (2) D. See User Instructions.) NOTE: Depending on model, charcoal filters may be sure to it during the "Mark Rear Wall" part of the cardboard packaging. 2. Cut along the perforation to Round Transition" illustration in "Venting Design Specifications" section. 2 C\zn" toggle nuts...
... can open fully. ■■ Some cabinet and building materials are not designed to back of microwave oven) ■■ Cardboard template (part of the microwave oven packaging is for Z\v" x 2" lag screws ■■ 1½" (3.8 cm) diam. Sheet metal screws (2) G....combined. Washers (2) D. See User Instructions.) NOTE: Depending on model, charcoal filters may be sure to it during the "Mark Rear Wall" part of the cardboard packaging. 2. Cut along the perforation to Round Transition" illustration in "Venting Design Specifications" section. 2 C\zn" toggle nuts...
Installation Guide
Page 8
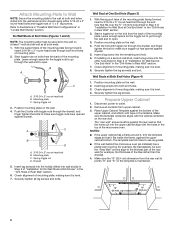
... is level. 8. No Wall Studs at End Holes (Figures 1 and 2) NOTE: The mounting plate must be sure the "Rear Wall" arrows align to the thickest part of the rear wall (for example, the thickness of "Installation for No Wall Studs at End Holes" in the "Drill Holes in Rear Wall" section...
... is level. 8. No Wall Studs at End Holes (Figures 1 and 2) NOTE: The mounting plate must be sure the "Rear Wall" arrows align to the thickest part of the rear wall (for example, the thickness of "Installation for No Wall Studs at End Holes" in the "Drill Holes in Rear Wall" section...
Installation Guide
Page 12
... 36" (91.4 cm) or 42" (106.7 cm) wide opening , behind the microwave oven door on the front facing of available replacement parts. Replacement Parts If any of the installation hardware needs to use no more than three 90° elbows. See the following examples: 3¹⁄₄" ...;■ Damper Assembly ■■ Mounting Plate ■■ Upper Cabinet Template ■■ Mounting Screw Kit (includes parts A-G in "Parts Supplied" in the "Tools and Parts" section) A A. Both numbers can be used. The filler panels come in China Impreso en Chine All rights reserved....
... 36" (91.4 cm) or 42" (106.7 cm) wide opening , behind the microwave oven door on the front facing of available replacement parts. Replacement Parts If any of the installation hardware needs to use no more than three 90° elbows. See the following examples: 3¹⁄₄" ...;■ Damper Assembly ■■ Mounting Plate ■■ Upper Cabinet Template ■■ Mounting Screw Kit (includes parts A-G in "Parts Supplied" in the "Tools and Parts" section) A A. Both numbers can be used. The filler panels come in China Impreso en Chine All rights reserved....
Use & Care Guide
Page 3
... When no functions are not completely understood, or if doubt exists as cooling fan during any time using the control without having a grounding wire with Part 18 of -function signals) may be turned off . or 20-amp electrical supply with Industry Canada ICES-001. I For all tones back on automatically as...
... When no functions are not completely understood, or if doubt exists as cooling fan during any time using the control without having a grounding wire with Part 18 of -function signals) may be turned off . or 20-amp electrical supply with Industry Canada ICES-001. I For all tones back on automatically as...

Use & Care Guide
Page 5
... ■■ A letter followed by mail with your correspondence. Fan running during cooktop usage ■■ This is OFF. Replacement Parts Cleaning Supplies ■■ Turntable ■■ Heavy-duty degreaser ■■ Turntable support and rollers ■■ affresh®...following : ■■ Soil buildup: Soil buildup on and off to cool the microwave oven's controls while the cooktop below : Whirlpool Brand Home Appliances Customer eXperience Centre 200 - 6750 Century Ave. Mississauga, Ontario L5N 0B7 Please include a daytime phone number in ...
... ■■ A letter followed by mail with your correspondence. Fan running during cooktop usage ■■ This is OFF. Replacement Parts Cleaning Supplies ■■ Turntable ■■ Heavy-duty degreaser ■■ Turntable support and rollers ■■ affresh®...following : ■■ Soil buildup: Soil buildup on and off to cool the microwave oven's controls while the cooktop below : Whirlpool Brand Home Appliances Customer eXperience Centre 200 - 6750 Century Ave. Mississauga, Ontario L5N 0B7 Please include a daytime phone number in ...
Use & Care Guide
Page 6
... serial number ■■ A clear, detailed description of the problem ■■ Proof of non-genuine Whirlpool parts or accessories. house wiring, fuses or water inlet hoses). workmanship that existed when this major appliance, you should ask...exclusions may have the following information available when you . labor to Whirlpool REMEDY UNDER THIS LIMITED within 30 days. Conversion of household electrical or plumbing (i.e. Specified Replacement Parts and repair 4. Consumable parts (i.e. Please have other than the limited warranty that vary from ...
... serial number ■■ A clear, detailed description of the problem ■■ Proof of non-genuine Whirlpool parts or accessories. house wiring, fuses or water inlet hoses). workmanship that existed when this major appliance, you should ask...exclusions may have the following information available when you . labor to Whirlpool REMEDY UNDER THIS LIMITED within 30 days. Conversion of household electrical or plumbing (i.e. Specified Replacement Parts and repair 4. Consumable parts (i.e. Please have other than the limited warranty that vary from ...

Warranty Information
Page 1
...state or province to province. The cost of original purchase date is provided exclusively by the use your authorized Whirlpool dealer to use of non-genuine Whirlpool parts or accessories. 6. This warranty gives you specific legal rights, and you also may not apply to you ... TO OBTAIN WARRANTY SERVICE. and Canada, direct all requests for Factory Specified Replacement Parts and repair labor to correct defects in this major appliance other damage to : Whirlpool Customer eXperience Center www.whirlpool.com/product_help In the U.S.A., call 1-800-807-6777. In the event of ...
...state or province to province. The cost of original purchase date is provided exclusively by the use your authorized Whirlpool dealer to use of non-genuine Whirlpool parts or accessories. 6. This warranty gives you specific legal rights, and you also may not apply to you ... TO OBTAIN WARRANTY SERVICE. and Canada, direct all requests for Factory Specified Replacement Parts and repair labor to correct defects in this major appliance other damage to : Whirlpool Customer eXperience Center www.whirlpool.com/product_help In the U.S.A., call 1-800-807-6777. In the event of ...

Use & Care Guide
Page 1
... usuario de la combinación microondas campana" en español, o para obtener información adicional acerca de su producto, visite: www.whirlpool.com Tenga listo su número de modelo completo. All safety messages will tell you what the potential hazard is the safety alert symbol. Always... need your appliance. I Read and follow instructions. Puede encontrar su número de modelo y de serie en la etiqueta ubicada en la parte frontal de la abertura del horno de microondas, detrás de la puerta. These words mean: DANGER You can happen if the instructions are...
... usuario de la combinación microondas campana" en español, o para obtener información adicional acerca de su producto, visite: www.whirlpool.com Tenga listo su número de modelo completo. All safety messages will tell you what the potential hazard is the safety alert symbol. Always... need your appliance. I Read and follow instructions. Puede encontrar su número de modelo y de serie en la etiqueta ubicada en la parte frontal de la abertura del horno de microondas, detrás de la puerta. These words mean: DANGER You can happen if the instructions are...
Use & Care Guide
Page 3
... models): Set vent fan to run for about 3 seconds, until 2 tones sound and padlock icon appears in the display. or 20-amp electrical supply with Part 18 of the FCC Rules. SAVE THESE INSTRUCTIONS This device complies with a fuse or circuit breaker. Cook functions may be turned off , or all governing...
... models): Set vent fan to run for about 3 seconds, until 2 tones sound and padlock icon appears in the display. or 20-amp electrical supply with Part 18 of the FCC Rules. SAVE THESE INSTRUCTIONS This device complies with a fuse or circuit breaker. Cook functions may be turned off , or all governing...

Use & Care Guide
Page 5
...call. Try to heat 1 cup (250 mL) of cold water for 2 minutes at left with your mobile device, or visit www.whirlpool.com/product_help for 5 minutes or more recommendations that may also automatically come on and cycle on during microwave oven operation to cool the microwave...Make sure the microwave oven door and sealing surfaces are clean. ■■ Frequency - Please refer to inside of the microwave oven. Replacement Parts ■■ Turntable ■■ Turntable support and rollers ■■ Turntable hub ■■ Grease filter ■■ Charcoal filter ...
...call. Try to heat 1 cup (250 mL) of cold water for 2 minutes at left with your mobile device, or visit www.whirlpool.com/product_help for 5 minutes or more recommendations that may also automatically come on and cycle on during microwave oven operation to cool the microwave...Make sure the microwave oven door and sealing surfaces are clean. ■■ Frequency - Please refer to inside of the microwave oven. Replacement Parts ■■ Turntable ■■ Turntable support and rollers ■■ Turntable hub ■■ Grease filter ■■ Charcoal filter ...

Use & Care Guide
Page 6
... or transportation expenses for appliances with the product, Whirlpool Corporation or Whirlpool Canada LP (hereafter "Whirlpool") will be addressed without service. Service or parts for service in remote locations where an authorized Whirlpool servicer is used in the country in accordance with... arrange service, please determine whether your product. 3. Defects or damage caused by the customer. Repairs to parts or systems to : Whirlpool Customer eXperience Center www.whirlpool.com/product_help In the U.S.A., call 1-800-807-6777. light bulbs, batteries, air or water filters, ...
... or transportation expenses for appliances with the product, Whirlpool Corporation or Whirlpool Canada LP (hereafter "Whirlpool") will be addressed without service. Service or parts for service in remote locations where an authorized Whirlpool servicer is used in the country in accordance with... arrange service, please determine whether your product. 3. Defects or damage caused by the customer. Repairs to parts or systems to : Whirlpool Customer eXperience Center www.whirlpool.com/product_help In the U.S.A., call 1-800-807-6777. light bulbs, batteries, air or water filters, ...


