
Installation Guide
Page 1
... 8 Install Damper Assembly 8 Install the Microwave Oven 9 Complete Installation 10 VENTING DESIGN SPECIFICATIONS 11 ASSISTANCE 12 Replacement Parts 12 Accessories 12 SÉCURITÉ DE L'ENSEMBLE FOUR À MICRO-ONDES/HOTTE..... 13 EXIGENCES D'INSTALLATION 13...plusieurs modèles. Table of Contents / Table des matières MICROWAVE HOOD COMBINATION SAFETY 1 INSTALLATION REQUIREMENTS 2 Tools and Parts 2 Remove Cardboard Template 2 Location Requirements 2 Product Dimensions 3 Electrical Requirements 3 INSTALLATION INSTRUCTIONS 4 Remove Mounting Plate 4 Rotate Blower ...
... 8 Install Damper Assembly 8 Install the Microwave Oven 9 Complete Installation 10 VENTING DESIGN SPECIFICATIONS 11 ASSISTANCE 12 Replacement Parts 12 Accessories 12 SÉCURITÉ DE L'ENSEMBLE FOUR À MICRO-ONDES/HOTTE..... 13 EXIGENCES D'INSTALLATION 13...plusieurs modèles. Table of Contents / Table des matières MICROWAVE HOOD COMBINATION SAFETY 1 INSTALLATION REQUIREMENTS 2 Tools and Parts 2 Remove Cardboard Template 2 Location Requirements 2 Product Dimensions 3 Electrical Requirements 3 INSTALLATION INSTRUCTIONS 4 Remove Mounting Plate 4 Rotate Blower ...
Installation Guide
Page 2
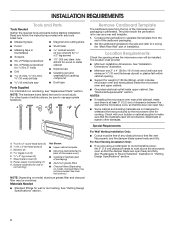
...9632; Caulking gun and weatherproof caulking compound ■■ C\v" (19 mm) hole saw ■■ Duct tape Parts Supplied For information on model, aluminum grease filter and charcoal filter may not be free of installation. The piece inside upper...C\zn" toggle nuts (2) E. Sheet metal screws (2) G. Power supply cord bushing (1) H. See User Instructions.) NOTE: Depending on reordering, see "Replacement Parts" section. Materials Needed ■■ Standard fittings for wood studs. Cut along the perforation to separate the template from the top of the microwave oven...
...9632; Caulking gun and weatherproof caulking compound ■■ C\v" (19 mm) hole saw ■■ Duct tape Parts Supplied For information on model, aluminum grease filter and charcoal filter may not be free of installation. The piece inside upper...C\zn" toggle nuts (2) E. Sheet metal screws (2) G. Power supply cord bushing (1) H. See User Instructions.) NOTE: Depending on reordering, see "Replacement Parts" section. Materials Needed ■■ Standard fittings for wood studs. Cut along the perforation to separate the template from the top of the microwave oven...
Installation Guide
Page 8
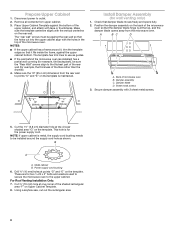
... of microwave oven B. Make sure the 10" (25.4 cm) dimension from the rear wall to be sure the "Rear Wall" arrows align to the thickest part of the microwave oven. Place Upper Cabinet Template against the upper cabinet bottom. NOTES: ■■ If the upper cabinet has a frame around the supply...
... of microwave oven B. Make sure the 10" (25.4 cm) dimension from the rear wall to be sure the "Rear Wall" arrows align to the thickest part of the microwave oven. Place Upper Cabinet Template against the upper cabinet bottom. NOTES: ■■ If the upper cabinet has a frame around the supply...
Installation Guide
Page 12
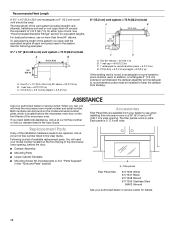
... to round transition piece must not exceed the equivalent of 140 ft (42.7 m) for equivalent lengths. Both numbers can be used in the "Tools and Parts" section) A A. See the following examples: 3¹⁄₄" x 10" (8.3 x 25.4 cm) vent system = 73 ft (22.2 m) total A B 6 ft ...D A. If you need additional assistance, call us at our toll free number or visit our website listed in the User Guide. Replacement Parts If any of available replacement parts. Recommended Vent Length A 3¹⁄₄" x 10" (8.3 x 25.4 cm) rectangular or 6" (15.2 cm) round vent ...
... to round transition piece must not exceed the equivalent of 140 ft (42.7 m) for equivalent lengths. Both numbers can be used in the "Tools and Parts" section) A A. See the following examples: 3¹⁄₄" x 10" (8.3 x 25.4 cm) vent system = 73 ft (22.2 m) total A B 6 ft ...D A. If you need additional assistance, call us at our toll free number or visit our website listed in the User Guide. Replacement Parts If any of available replacement parts. Recommended Vent Length A 3¹⁄₄" x 10" (8.3 x 25.4 cm) rectangular or 6" (15.2 cm) round vent ...

Installation Guide
Page 1
... Damper Assembly 9 Install the Microwave Oven 9 Complete Installation 10 VENTING DESIGN SPECIFICATIONS 11 ASSISTANCE 12 Replacement Parts 12 Accessories 12 MICROWAVE HOOD COMBINATION SAFETY Your safety and the safety of injury, and tell you and...or seriously injured if you don't immediately follow instructions. Table of Contents MICROWAVE HOOD COMBINATION SAFETY 1 INSTALLATION REQUIREMENTS 2 Tools and Parts 2 Remove Cardboard Template 2 Location Requirements 2 Product Dimensions 3 Electrical Requirements 3 INSTALLATION INSTRUCTIONS 4 Remove Mounting Plate 4 Rotate Blower...
... Damper Assembly 9 Install the Microwave Oven 9 Complete Installation 10 VENTING DESIGN SPECIFICATIONS 11 ASSISTANCE 12 Replacement Parts 12 Accessories 12 MICROWAVE HOOD COMBINATION SAFETY Your safety and the safety of injury, and tell you and...or seriously injured if you don't immediately follow instructions. Table of Contents MICROWAVE HOOD COMBINATION SAFETY 1 INSTALLATION REQUIREMENTS 2 Tools and Parts 2 Remove Cardboard Template 2 Location Requirements 2 Product Dimensions 3 Electrical Requirements 3 INSTALLATION INSTRUCTIONS 4 Remove Mounting Plate 4 Rotate Blower...

Installation Guide
Page 2
...saw ■■ Caulking gun and weatherproof caulking compound ■■ C\v" (19 mm) hole saw ■■ Duct tape Parts Supplied For information on model, charcoal filters may be installed. Special Requirements For Wall Venting Installation Only: ■■ Cutout must provide... using a rectangular to round transition piece, the 3" (7.6 cm) clearance needs to back of microwave oven) ■■ Cardboard template (part of any tools listed here. ■■ Measuring tape ■■ Diagonal wire cutting pliers ■■ Pencil ■■ Stud...
...saw ■■ Caulking gun and weatherproof caulking compound ■■ C\v" (19 mm) hole saw ■■ Duct tape Parts Supplied For information on model, charcoal filters may be installed. Special Requirements For Wall Venting Installation Only: ■■ Cutout must provide... using a rectangular to round transition piece, the 3" (7.6 cm) clearance needs to back of microwave oven) ■■ Cardboard template (part of any tools listed here. ■■ Measuring tape ■■ Diagonal wire cutting pliers ■■ Pencil ■■ Stud...
Installation Guide
Page 8
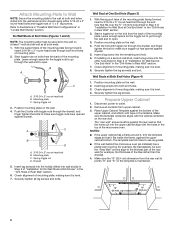
... plate must be sure the "Rear Wall" arrows align to the wall on the wall. 4. The "rear wall" arrows must be secured to the thickest part of the tiles rather than the drywall). 4. Refer to outlet. 2.
... plate must be sure the "Rear Wall" arrows align to the wall on the wall. 4. The "rear wall" arrows must be secured to the thickest part of the tiles rather than the drywall). 4. Refer to outlet. 2.
Installation Guide
Page 12
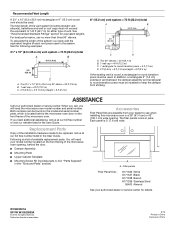
...■■ Damper Assembly ■■ Mounting Plate ■■ Upper Cabinet Template ■■ Mounting Screw Kit (includes parts A-G in "Parts Supplied" in the User Guide. You will need , add the equivalent lengths of the microwave oven opening . Filler panels Filler ... length of the installation hardware needs to be replaced, call us at our toll free number or visit our website listed in the "Tools and Parts" section) A A. One 3¹⁄₄" x 10" (8.3 x 25.4 cm) 90° elbow = 25 ft (7.6 m) B. 1 wall cap = 40 ft (12.2 m) C. 2 ft (0.6 m) + 6 ft (1.8 m) ...
...■■ Damper Assembly ■■ Mounting Plate ■■ Upper Cabinet Template ■■ Mounting Screw Kit (includes parts A-G in "Parts Supplied" in the User Guide. You will need , add the equivalent lengths of the microwave oven opening . Filler panels Filler ... length of the installation hardware needs to be replaced, call us at our toll free number or visit our website listed in the "Tools and Parts" section) A A. One 3¹⁄₄" x 10" (8.3 x 25.4 cm) 90° elbow = 25 ft (7.6 m) B. 1 wall cap = 40 ft (12.2 m) C. 2 ft (0.6 m) + 6 ft (1.8 m) ...
Use & Care Guide
Page 3
... counting down. Do not remove ground prong. Do not use an extension cord. Observe all governing codes and ordinances. or 20-amp electrical supply with Part 18 of electric shock by providing an escape wire for exactly 30 minutes or to Standby Power mode and dim the LED brightness after 30...
... counting down. Do not remove ground prong. Do not use an extension cord. Observe all governing codes and ordinances. or 20-amp electrical supply with Part 18 of electric shock by providing an escape wire for exactly 30 minutes or to Standby Power mode and dim the LED brightness after 30...

Use & Care Guide
Page 5
...this manual and scan the code with any questions or concerns at 100% cooking power. See "General Cleaning" in your mobile device, or visit www.whirlpool.ca. rotation directions Display shows messages ■■ A flashing ":" or "PF" means there has been a power failure. The microwave oven's cooling...using these items during microwave oven operation to avoid unintended starting of the cycle. Please refer to heat 1 cup (250 mL) of available parts and supplies which is separate from the microwave oven or adjust the radio or TV antenna. ■■ Soil: Make sure the microwave...
...this manual and scan the code with any questions or concerns at 100% cooking power. See "General Cleaning" in your mobile device, or visit www.whirlpool.ca. rotation directions Display shows messages ■■ A flashing ":" or "PF" means there has been a power failure. The microwave oven's cooling...using these items during microwave oven operation to avoid unintended starting of the cycle. Please refer to heat 1 cup (250 mL) of available parts and supplies which is separate from the microwave oven or adjust the radio or TV antenna. ■■ Soil: Make sure the microwave...
Use & Care Guide
Page 6
... modification of the product. 15. Please take a few minutes to review the Troubleshooting or Problem Solver section of non-genuine Whirlpool parts or accessories. In-home instruction on the right to use of the Use and Care Guide, scan the QR code on how... to access additional resources, or visit www.whirlpool.com/product_help. 2. Specified Replacement Parts and repair 4. Consumable parts (i.e. the United States or Canada and 13. Service or parts for service in materials and workmanship and is not available. Some states and ...
... modification of the product. 15. Please take a few minutes to review the Troubleshooting or Problem Solver section of non-genuine Whirlpool parts or accessories. In-home instruction on the right to use of the Use and Care Guide, scan the QR code on how... to access additional resources, or visit www.whirlpool.com/product_help. 2. Specified Replacement Parts and repair 4. Consumable parts (i.e. the United States or Canada and 13. Service or parts for service in materials and workmanship and is not available. Some states and ...

Warranty Information
Page 1
..., durability, or need for the remaining term of non-genuine Whirlpool parts or accessories. 6. Before contacting us to arrange service, please determine whether your appliance will pay for Factory Specified Replacement Parts and repair labor to correct defects in accordance with this warranty.... Commercial, non-residential, multiple-family use, or use your authorized Whirlpool dealer to use inconsistent with original model/serial numbers removed, altered or not easily determined. Consumable parts (i.e. Conversion of the Use and Care Guide, scan the QR code on...
..., durability, or need for the remaining term of non-genuine Whirlpool parts or accessories. 6. Before contacting us to arrange service, please determine whether your appliance will pay for Factory Specified Replacement Parts and repair labor to correct defects in accordance with this warranty.... Commercial, non-residential, multiple-family use, or use your authorized Whirlpool dealer to use inconsistent with original model/serial numbers removed, altered or not easily determined. Consumable parts (i.e. Conversion of the Use and Care Guide, scan the QR code on...

Use & Care Guide
Page 1
..."Instrucciones para el usuario de la combinación microondas campana" en español, o para obtener información adicional acerca de su producto, visite: www.whirlpool.com Tenga listo su número de modelo completo. All safety messages will need assistance, call us at www... the microwave oven only in this high-quality product. Puede encontrar su número de modelo y de serie en la etiqueta ubicada en la parte frontal de la abertura del horno de microondas, detrás de la puerta. Always read and obey all instructions before using electrical appliances basic safety...
..."Instrucciones para el usuario de la combinación microondas campana" en español, o para obtener información adicional acerca de su producto, visite: www.whirlpool.com Tenga listo su número de modelo completo. All safety messages will need assistance, call us at www... the microwave oven only in this high-quality product. Puede encontrar su número de modelo y de serie en la etiqueta ubicada en la parte frontal de la abertura del horno de microondas, detrás de la puerta. Always read and obey all instructions before using electrical appliances basic safety...
Use & Care Guide
Page 3
... device complies with a fuse or circuit breaker. Repeat to standby power mode and dim the brightness after 30 minutes). or 20-amp electrical supply with Part 18 of -function signals) may be grounded.
... device complies with a fuse or circuit breaker. Repeat to standby power mode and dim the brightness after 30 minutes). or 20-amp electrical supply with Part 18 of -function signals) may be grounded.

Use & Care Guide
Page 5
...door. Turntable alternates ■■ This is normal and depends on motor rotation at left with your mobile device, or visit www.whirlpool.com/product_help for 2 minutes at 100% cooking power. Move the receiver away from the vent fan, automatically comes on during microwave... be purchased separately. Fan running during microwave oven operation. 5 Please refer to heat 1 cup (250 mL) of the microwave oven. Replacement Parts ■■ Turntable ■■ Turntable support and rollers ■■ Turntable hub ■■ Grease filter ■■ Charcoal filter...
...door. Turntable alternates ■■ This is normal and depends on motor rotation at left with your mobile device, or visit www.whirlpool.com/product_help for 2 minutes at 100% cooking power. Move the receiver away from the vent fan, automatically comes on during microwave... be purchased separately. Fan running during microwave oven operation. 5 Please refer to heat 1 cup (250 mL) of the microwave oven. Replacement Parts ■■ Turntable ■■ Turntable support and rollers ■■ Turntable hub ■■ Grease filter ■■ Charcoal filter...

Use & Care Guide
Page 6
... This product is intended for appliances with published user, operator or installation instructions. 2. Service or parts for in remote locations where an authorized Whirlpool servicer is used in the country in this major appliance was purchased. DISCLAIMER OF REPRESENTATIONS OUTSIDE OF...number ■ Model number and serial number ■ A clear, detailed description of the problem ■ Proof of non-genuine Whirlpool parts or accessories. 6. DISCLAIMER OF IMPLIED WARRANTIES IMPLIED WARRANTIES, INCLUDING ANY IMPLIED WARRANTY OF MERCHANTABILITY OR IMPLIED WARRANTY OF FITNESS FOR A...
... This product is intended for appliances with published user, operator or installation instructions. 2. Service or parts for in remote locations where an authorized Whirlpool servicer is used in the country in this major appliance was purchased. DISCLAIMER OF REPRESENTATIONS OUTSIDE OF...number ■ Model number and serial number ■ A clear, detailed description of the problem ■ Proof of non-genuine Whirlpool parts or accessories. 6. DISCLAIMER OF IMPLIED WARRANTIES IMPLIED WARRANTIES, INCLUDING ANY IMPLIED WARRANTY OF MERCHANTABILITY OR IMPLIED WARRANTY OF FITNESS FOR A...


