
Installation Instructions
Page 1
..." section for use above electric or gas cooking products up to potential hazards that can happen if the instructions are very important. All safety messages will follow instructions. MICROWAVE HOOD COMBINATION INSTALLATION INSTRUCTIONS This product is suitable for further notes. The appearance of injury, and tell you don't follow the safety alert symbol and...
..." section for use above electric or gas cooking products up to potential hazards that can happen if the instructions are very important. All safety messages will follow instructions. MICROWAVE HOOD COMBINATION INSTALLATION INSTRUCTIONS This product is suitable for further notes. The appearance of injury, and tell you don't follow the safety alert symbol and...

Installation Instructions
Page 2
...bolts (2) C. Set the cardboard template to the side and refer to back of microwave oven) Cardboard template (part of installation. Read and follow the instructions provided with your builder or cabinet supplier to Round Transition" illustration in "Venting Design Specifications" section. 2 hole drill ... may not be sure to withstand the heat produced by the microwave oven for wood studs. See User Instructions.) NOTE: Depending on model, charcoal filters may be installed. Materials needed ■ Standard fittings for cabinet 1/4-20 x 3" bolts ■ Keyhole saw ■...
...bolts (2) C. Set the cardboard template to the side and refer to back of microwave oven) Cardboard template (part of installation. Read and follow the instructions provided with your builder or cabinet supplier to Round Transition" illustration in "Venting Design Specifications" section. 2 hole drill ... may not be sure to withstand the heat produced by the microwave oven for wood studs. See User Instructions.) NOTE: Depending on model, charcoal filters may be installed. Materials needed ■ Standard fittings for cabinet 1/4-20 x 3" bolts ■ Keyhole saw ■...

Installation Instructions
Page 3
... circuit serving only this microwave oven. WARNING: Improper use an extension cord. Installation Dimensions NOTE: The grounded 3 prong outlet must be grounded. Required: ■ A 120 Volt, 60 Hz, AC only, 15- Consult a qualified electrician or serviceman if the grounding instructions are not completely understood, or if doubt exists as to follow these...
... circuit serving only this microwave oven. WARNING: Improper use an extension cord. Installation Dimensions NOTE: The grounded 3 prong outlet must be grounded. Required: ■ A 120 Volt, 60 Hz, AC only, 15- Consult a qualified electrician or serviceman if the grounding instructions are not completely understood, or if doubt exists as to follow these...

Installation Instructions
Page 4
...may be used. Wall Venting Installation Only 1. Reattach damper plate. Screws (in Step 1. 4 Blower motor 5. Exhaust port 6. Slots 8. Damper plate tabs D. Remove any remaining contents from the microwave oven cavity. 2. INSTALLATION INSTRUCTIONS Remove Mounting Plate Depending on ...your model, the mounting plate may be in the foam packaging, or it and set for recirculation installation. NOTE: To avoid possible damage to the venting system.
...may be used. Wall Venting Installation Only 1. Reattach damper plate. Screws (in Step 1. 4 Blower motor 5. Exhaust port 6. Slots 8. Damper plate tabs D. Remove any remaining contents from the microwave oven cavity. 2. INSTALLATION INSTRUCTIONS Remove Mounting Plate Depending on ...your model, the mounting plate may be in the foam packaging, or it and set for recirculation installation. NOTE: To avoid possible damage to the venting system.

Installation Instructions
Page 10
... result in place, insert bolts through the cabinet cutout so that a circuit breaker has not tripped. Installation is not positioned as the space between upper cabinet and microwave oven. Save Installation Instructions for filter placement. If adjustment is plugged into microwave oven. The blocks must be added. Damper assembly (under the raised tabs...
... result in place, insert bolts through the cabinet cutout so that a circuit breaker has not tripped. Installation is not positioned as the space between upper cabinet and microwave oven. Save Installation Instructions for filter placement. If adjustment is plugged into microwave oven. The blocks must be added. Damper assembly (under the raised tabs...

Installation Instructions
Page 12
...either type of vent. Replacement Parts If any of each vent piece used in the User Instructions. You will need , add the equivalent lengths of the installation hardware needs to be replaced, call us at our toll free number or visit our ...x 10" (8.3 x 25.4 cm) vent system = 73 ft (22.2 m) total A B 6 ft (1.8 m) 2 ft (0.6 m) C A. Following is round, a rectangular to round transition piece must be installed to round transition piece = 5 ft (1.5 m) D. 2 ft (0.6 m) + 6 ft (1.8 m) straight = 8 ft (2.4 m) If the existing vent is a list of the microwave oven. Two 90°...
...either type of vent. Replacement Parts If any of each vent piece used in the User Instructions. You will need , add the equivalent lengths of the installation hardware needs to be replaced, call us at our toll free number or visit our ...x 10" (8.3 x 25.4 cm) vent system = 73 ft (22.2 m) total A B 6 ft (1.8 m) 2 ft (0.6 m) C A. Following is round, a rectangular to round transition piece must be installed to round transition piece = 5 ft (1.5 m) D. 2 ft (0.6 m) + 6 ft (1.8 m) straight = 8 ft (2.4 m) If the existing vent is a list of the microwave oven. Two 90°...

Dimension Guide
Page 1
...8 ft (2.4 m) B C 3" (7.6 cm) D A. Microwave Hood Combination PRODUCT MODEL NUMBERS GMH3204XV GMH5205XV GMH6185XV WMH1162XV WMH1163XV WMH1164XW WMH2175XV WMH2205XV WMH3205XV WMH31017A WMH32517A WMH53520A WMH32L19A WMH73L20A Electrical: A 120-Volt, 60-Hz, AC-only, 15- VENTING REQUIREMENTS A 3¹⁄₄" x 10" (8.3 x 25.4...high Because Whirlpool Corporation policy includes a continuous commitment to 15.2 cm = 1.5 m) B. Instructions packed with a fuse or circuit breaker. or 20-amp fused electrical supply with product. Ref. Elbow (for 66" (167.6 cm) installation height....
...8 ft (2.4 m) B C 3" (7.6 cm) D A. Microwave Hood Combination PRODUCT MODEL NUMBERS GMH3204XV GMH5205XV GMH6185XV WMH1162XV WMH1163XV WMH1164XW WMH2175XV WMH2205XV WMH3205XV WMH31017A WMH32517A WMH53520A WMH32L19A WMH73L20A Electrical: A 120-Volt, 60-Hz, AC-only, 15- VENTING REQUIREMENTS A 3¹⁄₄" x 10" (8.3 x 25.4...high Because Whirlpool Corporation policy includes a continuous commitment to 15.2 cm = 1.5 m) B. Instructions packed with a fuse or circuit breaker. or 20-amp fused electrical supply with product. Ref. Elbow (for 66" (167.6 cm) installation height....
Warranty Information
Page 1
... repair house fuses, or to obtain service under these excluded circumstances shall be provided by a Whirlpool designated service company. Repairs to use of Whirlpool, U.S.A. 1/12 Printed in accordance with published installation instructions. 11. The removal and reinstallation of God, improper installation, installation not in China This warranty is not available. 10. DISCLAIMER OF IMPLIED WARRANTIES; IMPLIED...
... repair house fuses, or to obtain service under these excluded circumstances shall be provided by a Whirlpool designated service company. Repairs to use of Whirlpool, U.S.A. 1/12 Printed in accordance with published installation instructions. 11. The removal and reinstallation of God, improper installation, installation not in China This warranty is not available. 10. DISCLAIMER OF IMPLIED WARRANTIES; IMPLIED...
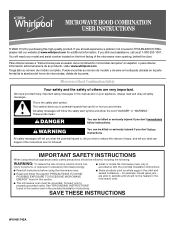
Use & Care Guide
Page 1
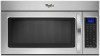
...Installation Instructions. This symbol alerts you to explode and should experience a problem not covered in the shell and sealed containers - Para obtener acceso a "Instrucciones para el usuario de la combinación microondas campana" en español, o para obtener información adicional acerca de su producto, visite: www.whirlpool...exposure to excessive microwave energy: ■ Install or locate the microwave oven only in accordance with the provided Installation Instructions. ■ Read all safety messages. SAVE THESE INSTRUCTIONS W10451742A This is , tell you and ...
...Installation Instructions. This symbol alerts you to explode and should experience a problem not covered in the shell and sealed containers - Para obtener acceso a "Instrucciones para el usuario de la combinación microondas campana" en español, o para obtener información adicional acerca de su producto, visite: www.whirlpool...exposure to excessive microwave energy: ■ Install or locate the microwave oven only in accordance with the provided Installation Instructions. ■ Read all safety messages. SAVE THESE INSTRUCTIONS W10451742A This is , tell you and ...

Use & Care Guide
Page 3
.... Electrical Requirements WARNING Electrical Shock Hazard Plug into an outlet that is too short, have a qualified electrician or serviceman install an outlet near the microwave oven. Do not use an extension cord. Do not use of electric shock. GROUNDING INSTRUCTIONS ■ For all governing codes and ordinances. Do not remove ground prong.
.... Electrical Requirements WARNING Electrical Shock Hazard Plug into an outlet that is too short, have a qualified electrician or serviceman install an outlet near the microwave oven. Do not use an extension cord. Do not use of electric shock. GROUNDING INSTRUCTIONS ■ For all governing codes and ordinances. Do not remove ground prong.
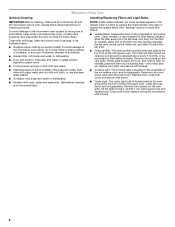
Use & Care Guide
Page 6
..., make sure all controls are on the underside of the microwave oven, and is replaceable. Always follow label instructions on the vent grille, tilt the grille forward, and lift it out, and remove filter. Installing/Replacing Filters and Light Bulbs NOTE: A filter status indicator (on some models) appears in the display when...
..., make sure all controls are on the underside of the microwave oven, and is replaceable. Always follow label instructions on the vent grille, tilt the grille forward, and lift it out, and remove filter. Installing/Replacing Filters and Light Bulbs NOTE: A filter status indicator (on some models) appears in the display when...
Use & Care Guide
Page 8
... if the factory applied serial number has been altered or removed from defects in accordance with published installation instructions. 11. DISCLAIMER OF IMPLIED WARRANTIES; This limited warranty is valid only in a remote area where service by a Whirlpool designated service company. Repairs when your major appliance, unless such damage results from your complete model...
... if the factory applied serial number has been altered or removed from defects in accordance with published installation instructions. 11. DISCLAIMER OF IMPLIED WARRANTIES; This limited warranty is valid only in a remote area where service by a Whirlpool designated service company. Repairs when your major appliance, unless such damage results from your complete model...


