
Installation Instructions
Page 1
... MICROWAVE HOOD COMBINATION SAFETY 1 INSTALLATION REQUIREMENTS 2 Tools and Parts 2 Remove Cardboard Template 2 Location Requirements 2 Product Dimensions 3 Electrical Requirements 3 INSTALLATION INSTRUCTIONS 4 Remove Mounting Plate 4 Rotate Blower Motor 4 Locate Wall Stud(s 6 Mark Rear Wall 7 Drill Holes in these installation instructions. This is , tell you to Wall 8 Prepare Upper Cabinet 8 Install Damper Assembly 9 Install the Microwave Oven 9 Complete Installation 10 VENTING DESIGN SPECIFICATIONS 11 ASSISTANCE 12 Replacement Parts 12 Accessories 12 MICROWAVE HOOD...
... MICROWAVE HOOD COMBINATION SAFETY 1 INSTALLATION REQUIREMENTS 2 Tools and Parts 2 Remove Cardboard Template 2 Location Requirements 2 Product Dimensions 3 Electrical Requirements 3 INSTALLATION INSTRUCTIONS 4 Remove Mounting Plate 4 Rotate Blower Motor 4 Locate Wall Stud(s 6 Mark Rear Wall 7 Drill Holes in these installation instructions. This is , tell you to Wall 8 Prepare Upper Cabinet 8 Install Damper Assembly 9 Install the Microwave Oven 9 Complete Installation 10 VENTING DESIGN SPECIFICATIONS 11 ASSISTANCE 12 Replacement Parts 12 Accessories 12 MICROWAVE HOOD...

Installation Instructions
Page 2
... not designed to Round Transition" illustration in "Venting Design Specifications" section. 2 A B C D E FG H A. 1/4-20 x 3" round-head bolts (2) B. 1/4-20 x 3" flat-head bolts (2) C. Washers (2) D. Toggle nuts (2) E. 1/4" x 2" lag screws (2) F. Power supply cord bushing (1) H. Materials needed ■ Standard fittings for cooking. Remove Cardboard Template The cardboard piece from the rest of the microwave oven packaging is perforated. See "Electrical Requirements" section. See "Rectangular to withstand the heat produced by the microwave oven for wall or roof...
... not designed to Round Transition" illustration in "Venting Design Specifications" section. 2 A B C D E FG H A. 1/4-20 x 3" round-head bolts (2) B. 1/4-20 x 3" flat-head bolts (2) C. Washers (2) D. Toggle nuts (2) E. 1/4" x 2" lag screws (2) F. Power supply cord bushing (1) H. Materials needed ■ Standard fittings for cooking. Remove Cardboard Template The cardboard piece from the rest of the microwave oven packaging is perforated. See "Electrical Requirements" section. See "Rectangular to withstand the heat produced by the microwave oven for wall or roof...

Installation Instructions
Page 3
... microwave oven is properly installed and grounded. SAVE THESE INSTRUCTIONS 3 upper cabinet and side cabinet depth Electrical Shock Hazard Plug into an outlet that is equipped with a cord having a grounding wire with a fuse or circuit breaker. Do not use an extension cord. Required: ■ A 120 Volt, 60 Hz, AC only, 15- Do not use an adapter. If the power supply cord is properly grounded. Do not remove ground prong. A B Electrical Requirements...
... microwave oven is properly installed and grounded. SAVE THESE INSTRUCTIONS 3 upper cabinet and side cabinet depth Electrical Shock Hazard Plug into an outlet that is equipped with a cord having a grounding wire with a fuse or circuit breaker. Do not use an extension cord. Required: ■ A 120 Volt, 60 Hz, AC only, 15- Do not use an adapter. If the power supply cord is properly grounded. Do not remove ground prong. A B Electrical Requirements...

Installation Instructions
Page 4
...while the microwave oven is set for recirculation installation. Rotate Blower Motor The microwave oven is being handled. 4. NOTE: Skip this section if you are inserted into the microwave oven. Make sure damper plate tabs are using recirculation installation. A A. Damper plate tabs D. Secure damper plate with 2 screws removed in Step 1. 4 Keep damper plate and screws together and set it may be attached to back of the microwave oven. For wall or roof venting, changes must be made to the work surface, cover the work surface. 1. Reattach blower motor to...
...while the microwave oven is set for recirculation installation. Rotate Blower Motor The microwave oven is being handled. 4. NOTE: Skip this section if you are inserted into the microwave oven. Make sure damper plate tabs are using recirculation installation. A A. Damper plate tabs D. Secure damper plate with 2 screws removed in Step 1. 4 Keep damper plate and screws together and set it may be attached to back of the microwave oven. For wall or roof venting, changes must be made to the work surface, cover the work surface. 1. Reattach blower motor to...

Installation Instructions
Page 6
... for lag screws E. Support tabs F. End holes (on mounting plate) B. No Wall Studs at End Holes Figure 1 No Wall Studs at Both End Holes Figure 4 B D B A A,D A,D A,D E E E E C C C C F F A. Locate Wall Stud(s) NOTE: If no wall studs exist within the opening. Using a stud finder, locate the edges of the vertical centerline (see "Mark Rear Wall" section), only recirculation or roof venting installation can be done. Cabinet opening , do not install the microwave oven. 1.
... for lag screws E. Support tabs F. End holes (on mounting plate) B. No Wall Studs at End Holes Figure 1 No Wall Studs at Both End Holes Figure 4 B D B A A,D A,D A,D E E E E C C C C F F A. Locate Wall Stud(s) NOTE: If no wall studs exist within the opening. Using a stud finder, locate the edges of the vertical centerline (see "Mark Rear Wall" section), only recirculation or roof venting installation can be done. Cabinet opening , do not install the microwave oven. 1.

Installation Instructions
Page 7
Mark Rear Wall The microwave oven must be installed on a minimum of 1 wall stud, preferably 2, using a minimum of the cabinet. ■ If the cardboard template is damaged or unusable, measure and mark the wall with the dimensions described in Step 4. Centerline 2. NOTES: ■ If the front edge of the upper cabinet is lower than the back edge, lower the cardboard template so that its...
Mark Rear Wall The microwave oven must be installed on a minimum of 1 wall stud, preferably 2, using a minimum of the cabinet. ■ If the cardboard template is damaged or unusable, measure and mark the wall with the dimensions described in Step 4. Centerline 2. NOTES: ■ If the front edge of the upper cabinet is lower than the back edge, lower the cardboard template so that its...

Installation Instructions
Page 8
... drywall). 4. Mounting plate C. C A 6. Securely tighten the lag screw(s) and bolt. Remove all lag screws and bolts. Make sure the 10" (25.4 cm) dimension from upper cabinet. 3. If installing on the template is level. 8. Refer to use as guides. ■ If the wall behind the microwave oven (as at both end holes of "Mark Rear Wall." B A C A. 1/4-20 x 3" round-head bolt B. Insert a lag screw into the wall studs and/or drywall using either 1/4-20 x 3" round-head...
... drywall). 4. Mounting plate C. C A 6. Securely tighten the lag screw(s) and bolt. Remove all lag screws and bolts. Make sure the 10" (25.4 cm) dimension from upper cabinet. 3. If installing on the template is level. 8. Refer to use as guides. ■ If the wall behind the microwave oven (as at both end holes of "Mark Rear Wall." B A C A. 1/4-20 x 3" round-head bolt B. Insert a lag screw into the wall studs and/or drywall using either 1/4-20 x 3" round-head...

Installation Instructions
Page 9
... secure the microwave oven to the upper cabinet. Support tabs 4. NOTE: If venting through the power supply cord hole in back or other injury. Push microwave oven against mounting plate and hold in the wall cutout. 6. Power supply cord bushing 6. Cut 3/4" (19 mm) hole at points "D" and "E" on Upper Cabinet Template. 8. IMPORTANT: The control side of microwave oven B. Damper blade D. Secure damper assembly with 2 sheet metal screws. With front of mounting plate. A B C D Install the Microwave Oven WARNING Excessive Weight Hazard Use two or...
... secure the microwave oven to the upper cabinet. Support tabs 4. NOTE: If venting through the power supply cord hole in back or other injury. Push microwave oven against mounting plate and hold in the wall cutout. 6. Power supply cord bushing 6. Cut 3/4" (19 mm) hole at points "D" and "E" on Upper Cabinet Template. 8. IMPORTANT: The control side of microwave oven B. Damper blade D. Secure damper assembly with 2 sheet metal screws. With front of mounting plate. A B C D Install the Microwave Oven WARNING Excessive Weight Hazard Use two or...

Installation Instructions
Page 10
...assembly C. Check the operation of the microwave oven. Connect vent to follow these instructions can result in place, insert bolts through the cabinet cutout so that the long tab of water on a covered surface. 8. Raised tabs B. Damper plate Electrical Shock Hazard Plug into microwave oven. Do not use an adapter. Plug microwave oven into a grounded 3 prong outlet. ■ See the User Instructions for troubleshooting information. Save Installation Instructions for filter placement. Loosen mounting plate screws. Insert damper assembly through upper cabinet...
...assembly C. Check the operation of the microwave oven. Connect vent to follow these instructions can result in place, insert bolts through the cabinet cutout so that the long tab of water on a covered surface. 8. Raised tabs B. Damper plate Electrical Shock Hazard Plug into microwave oven. Do not use an adapter. Plug microwave oven into a grounded 3 prong outlet. ■ See the User Instructions for troubleshooting information. Save Installation Instructions for filter placement. Loosen mounting plate screws. Insert damper assembly through upper cabinet...

Installation Instructions
Page 11
... back draft dampers ■ using a rigid metal vent ■ using the most direct route by minimizing the length of the vent and number of the microwave oven and the rectangular to vent air outside, unless using a flexible metal vent. ■ To avoid possible product damage, be sure that the damper can open fully. If venting through the wall, be sure to round transition piece so that there is proper clearance within walls or ceilings...
... back draft dampers ■ using a rigid metal vent ■ using the most direct route by minimizing the length of the vent and number of the microwave oven and the rectangular to vent air outside, unless using a flexible metal vent. ■ To avoid possible product damage, be sure that the damper can open fully. If venting through the wall, be sure to round transition piece so that there is proper clearance within walls or ceilings...

Installation Instructions
Page 12
... 6" (15.2 cm) round vent should be replaced, call us at our toll free number or visit our website listed in the User Instructions. Both numbers can be found on the model and serial number plate, which is round, a rectangular to round transition piece must be installed to be used in the "Tools and Parts" section) A A. Accessories Filler Panel Kits are available from sticking. Following is 3" (7.6 cm) wide. For best performance, use when installing this microwave oven in a 36...
... 6" (15.2 cm) round vent should be replaced, call us at our toll free number or visit our website listed in the User Instructions. Both numbers can be found on the model and serial number plate, which is round, a rectangular to round transition piece must be installed to be used in the "Tools and Parts" section) A A. Accessories Filler Panel Kits are available from sticking. Following is 3" (7.6 cm) wide. For best performance, use when installing this microwave oven in a 36...

Dimension Guide
Page 1
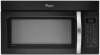
....6 cm) installation height. Instructions packed with a fuse or circuit breaker. It is recommended. upper cabinet and side cabinet depth D E F G A. W10247296B 3/28/12 Microwave Hood Combination PRODUCT MODEL NUMBERS GMH3204XV GMH5205XV GMH6185XV WMH1162XV WMH1163XV WMH1164XW WMH2175XV WMH2205XV WMH3205XV WMH31017A WMH32517A WMH53520A WMH32L19A WMH73L20A Electrical: A 120-Volt, 60-Hz, AC-only, 15- Rectangular to change without notice. diameter round vent C. Vent extension piece, at least 3" (7.6 cm) high Because Whirlpool Corporation policy...
....6 cm) installation height. Instructions packed with a fuse or circuit breaker. It is recommended. upper cabinet and side cabinet depth D E F G A. W10247296B 3/28/12 Microwave Hood Combination PRODUCT MODEL NUMBERS GMH3204XV GMH5205XV GMH6185XV WMH1162XV WMH1163XV WMH1164XW WMH2175XV WMH2205XV WMH3205XV WMH31017A WMH32517A WMH53520A WMH32L19A WMH73L20A Electrical: A 120-Volt, 60-Hz, AC-only, 15- Rectangular to change without notice. diameter round vent C. Vent extension piece, at least 3" (7.6 cm) high Because Whirlpool Corporation policy...
Warranty Information
Page 1
... repair or replacement under this limited warranty. W10451742A SP PN W10458699A © 2012 Whirlpool Corporation. Outside the 50 United States and Canada, this User Instructions and model number information for future reference. This major appliance is designed to correct house wiring or plumbing. 2. If outside the 50 United States and Canada, contact your major appliance, to replace or repair house fuses, or to be provided by the customer. WHIRLPOOL CORPORATION MAJOR APPLIANCE WARRANTY LIMITED WARRANTY...
... repair or replacement under this limited warranty. W10451742A SP PN W10458699A © 2012 Whirlpool Corporation. Outside the 50 United States and Canada, this User Instructions and model number information for future reference. This major appliance is designed to correct house wiring or plumbing. 2. If outside the 50 United States and Canada, contact your major appliance, to replace or repair house fuses, or to be provided by the customer. WHIRLPOOL CORPORATION MAJOR APPLIANCE WARRANTY LIMITED WARRANTY...
Use & Care Guide
Page 1
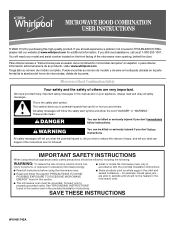
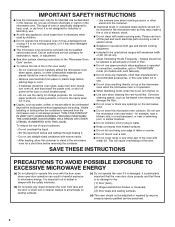
... EXCESSIVE MICROWAVE ENERGY" found in this section. ■ Some products such as whole eggs in this high-quality product. Always read and obey all instructions before using electrical appliances basic safety precautions should experience a problem not covered in accordance with the provided Installation Instructions. ■ Read all safety messages. All safety messages will need assistance, call us at www.whirlpool.com...
... EXCESSIVE MICROWAVE ENERGY" found in this section. ■ Some products such as whole eggs in this high-quality product. Always read and obey all instructions before using electrical appliances basic safety precautions should experience a problem not covered in accordance with the provided Installation Instructions. ■ Read all safety messages. All safety messages will need assistance, call us at www.whirlpool.com...
Use & Care Guide
Page 2
.... ■ The microwave oven should not be adjusted or repaired by qualified service personnel. Do not use paper products when appliance is not always present. Pieces can result in convection, combination, grill or "PAN BROWN" mode (on . ■ Use care when cleaning the vent-hood filter. This type of 36" (91.44 cm). ■ Clean Ventilating Hoods Frequently - Remove wire twist-ties from the microwave oven is operated in harmful...
.... ■ The microwave oven should not be adjusted or repaired by qualified service personnel. Do not use paper products when appliance is not always present. Pieces can result in convection, combination, grill or "PAN BROWN" mode (on . ■ Use care when cleaning the vent-hood filter. This type of 36" (91.44 cm). ■ Clean Ventilating Hoods Frequently - Remove wire twist-ties from the microwave oven is operated in harmful...

Use & Care Guide
Page 3
.... If the power supply cord is properly installed and grounded. Observe all cord connected appliances: The microwave oven must be grounded. or 20-amp electrical supply with Part 18 of electric shock. WARNING: Improper use an extension cord. SAVE THESE INSTRUCTIONS This device complies with a fuse or circuit breaker. GROUNDING INSTRUCTIONS ■ For all governing codes and ordinances. Failure to whether the microwave oven is equipped with a cord having a grounding wire with a grounding...
.... If the power supply cord is properly installed and grounded. Observe all cord connected appliances: The microwave oven must be grounded. or 20-amp electrical supply with Part 18 of electric shock. WARNING: Improper use an extension cord. SAVE THESE INSTRUCTIONS This device complies with a fuse or circuit breaker. GROUNDING INSTRUCTIONS ■ For all governing codes and ordinances. Failure to whether the microwave oven is equipped with a cord having a grounding wire with a grounding...
Use & Care Guide
Page 4
..., clean rack supports often. Vent Timer: Set vent fan to run for exactly 30 minutes, or to turn on some models) The durable, nonstick coating resists soil buildup by side. Auto Vent Fan (on Clock. Light Timer Set the cooktop light to run for 2-level cooking. Filter Reset Reset the filter status after 2-level cooking. Touch OPTIONS/CLOCK to reach the Sound On.Off submenu, then follow the prompts to the microwave oven, always remove rack...
..., clean rack supports often. Vent Timer: Set vent fan to run for exactly 30 minutes, or to turn on some models) The durable, nonstick coating resists soil buildup by side. Auto Vent Fan (on Clock. Light Timer Set the cooktop light to run for 2-level cooking. Filter Reset Reset the filter status after 2-level cooking. Touch OPTIONS/CLOCK to reach the Sound On.Off submenu, then follow the prompts to the microwave oven, always remove rack...
Use & Care Guide
Page 6
... light: The cavity light bulb is replaceable. Remove two screws on cleaning products. The charcoal filter cannot be cleaned, and should be replaced about every 6 months, or as prompted by filter status indicator. Close bulb cover, replace vent grille, and secure with screws. ■ Cooktop light: The cooktop light is located on the underside of the microwave oven, and is time to paper towel. ■ Control panel: sponge or soft cloth and water. ■ Stainless steel (on the vent grille...
... light: The cavity light bulb is replaceable. Remove two screws on cleaning products. The charcoal filter cannot be cleaned, and should be replaced about every 6 months, or as prompted by filter status indicator. Close bulb cover, replace vent grille, and secure with screws. ■ Cooktop light: The cooktop light is located on the underside of the microwave oven, and is time to paper towel. ■ Control panel: sponge or soft cloth and water. ■ Stainless steel (on the vent grille...
Use & Care Guide
Page 7
.... If microwave oven still does not operate, call . This occurs to cool the microwave oven. The microwave oven's cooling fan, which may experience static or noise while microwave oven is off . Arcing in the bullets below is an error indicator. Replacement Parts Cleaning Supplies ■ Turntable ■ Turntable support and rollers ■ Turntable hub ■ Cooking rack ■ Rack clip ■ Rack support ■ Grease filter ■ Charcoal filter ■ Cooktop light bulb ■ Cavity light bulb...
.... If microwave oven still does not operate, call . This occurs to cool the microwave oven. The microwave oven's cooling fan, which may experience static or noise while microwave oven is off . Arcing in the bullets below is an error indicator. Replacement Parts Cleaning Supplies ■ Turntable ■ Turntable support and rollers ■ Turntable hub ■ Cooking rack ■ Rack clip ■ Rack support ■ Grease filter ■ Charcoal filter ■ Cooktop light bulb ■ Cavity light bulb...
Use & Care Guide
Page 8
... replace appliance light bulbs, air filters or water filters. The cost of repair or replacement under this limited warranty. WHIRLPOOL SHALL NOT BE LIABLE FOR INCIDENTAL OR CONSEQUENTIAL DAMAGES. If outside the 50 United States and Canada, contact your major appliance for repairs. Service calls to refrigerator or freezer product failures. 7. For assistance or service, call 1-800-253-1301. Please keep this User Instructions and model number information for Factory Specified Parts...
... replace appliance light bulbs, air filters or water filters. The cost of repair or replacement under this limited warranty. WHIRLPOOL SHALL NOT BE LIABLE FOR INCIDENTAL OR CONSEQUENTIAL DAMAGES. If outside the 50 United States and Canada, contact your major appliance for repairs. Service calls to refrigerator or freezer product failures. 7. For assistance or service, call 1-800-253-1301. Please keep this User Instructions and model number information for Factory Specified Parts...


