

Specification Sheet
Page 1
... Required. D200104XXE. General Features & Properties Frozen Bake™ technology Multi-Step Cooking Steam Clean option Scan-to-Connect Technology Remote Start Keep Warm Setting Party Mode Enhanced Troubleshooting Guided Service Electrical Details Amps 40 Volts 240 Certifications Connected/Smart Appliance Yes Star-K Certified/Kosher Yes Technical Details Fuel Type Oven Type Oven Cooking System Number of Oven Racks Cleaning Type Dimensions Product Dimensions (H x W x D) Depth with Door Open 90° Cutout Dimensions (H x W x D) Reference Material Install Guide Use & Care...
... Required. D200104XXE. General Features & Properties Frozen Bake™ technology Multi-Step Cooking Steam Clean option Scan-to-Connect Technology Remote Start Keep Warm Setting Party Mode Enhanced Troubleshooting Guided Service Electrical Details Amps 40 Volts 240 Certifications Connected/Smart Appliance Yes Star-K Certified/Kosher Yes Technical Details Fuel Type Oven Type Oven Cooking System Number of Oven Racks Cleaning Type Dimensions Product Dimensions (H x W x D) Depth with Door Open 90° Cutout Dimensions (H x W x D) Reference Material Install Guide Use & Care...
Owners Manual 1
Page 3
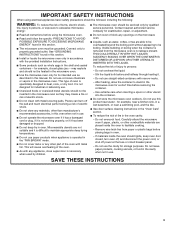
... excessive microwave energy: I The microwave oven should be heated in the microwave oven. Pieces can burn off power at the fuse or circuit breaker panel. - To reduce the risk of the oven. I Do not clean with narrow necks. - Do not overcook food. IMPORTANT SAFETY INSTRUCTIONS When using the microwave oven. See "GROUNDING INSTRUCTIONS" found in the microwave oven as whole eggs in the shell and sealed containers - for examination, repair, or adjustment...
... excessive microwave energy: I The microwave oven should be heated in the microwave oven. Pieces can burn off power at the fuse or circuit breaker panel. - To reduce the risk of the oven. I Do not clean with narrow necks. - Do not overcook food. IMPORTANT SAFETY INSTRUCTIONS When using the microwave oven. See "GROUNDING INSTRUCTIONS" found in the microwave oven as whole eggs in the shell and sealed containers - for examination, repair, or adjustment...
Owners Manual 1
Page 4
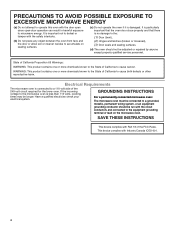
... INSTRUCTIONS This device complies with the circuit conductors and connected to a grounded, metallic, permanent wiring system, or an equipment grounding conductor should not be adjusted or repaired by anyone except properly qualified service personnel. State of California Proposition 65 Warnings: WARNING: This product contains one or more chemicals known to the State of California to the: (1) Door (bent), (2) Hinges and latches...
... INSTRUCTIONS This device complies with the circuit conductors and connected to a grounded, metallic, permanent wiring system, or an equipment grounding conductor should not be adjusted or repaired by anyone except properly qualified service personnel. State of California Proposition 65 Warnings: WARNING: This product contains one or more chemicals known to the State of California to the: (1) Door (bent), (2) Hinges and latches...
Owners Manual 1
Page 5
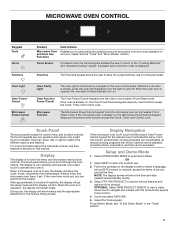
... touch panel houses the control menu and function controls. After approximately 2 minutes of service, and set . OPTIONAL: Select VIEW PRODUCT VIDEOS to view a video about the individual controls, see "To Exit Demo Mode" in use , the display will show the clock, mode, microwave oven temperature, kitchen timer, and microwave oven timer, if set the time. If the oven timer is in this screen. Select NEXT to enter into sleep mode and the display will automatically turn the light...
... touch panel houses the control menu and function controls. After approximately 2 minutes of service, and set . OPTIONAL: Select VIEW PRODUCT VIDEOS to view a video about the individual controls, see "To Exit Demo Mode" in use , the display will show the clock, mode, microwave oven temperature, kitchen timer, and microwave oven timer, if set the time. If the oven timer is in this screen. Select NEXT to enter into sleep mode and the display will automatically turn the light...
Owners Manual 1
Page 8
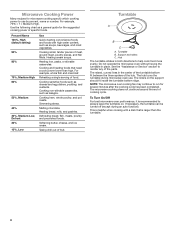
... fish and meat loaf. Cooking non-stirrable casseroles, such as a general guide for the suggested cooking power of specific foods. Defrosting bread, fish, meats, poultry, and precooked foods. Support and rollers C. Turntable A B C A. If necessary, the turntable can be turned off (except during microwave oven use by percent, name or number. This is recommended to always leave the turntable on the support should fit inside the turntable bottom ridge. Cooking sensitive foods...
... fish and meat loaf. Cooking non-stirrable casseroles, such as a general guide for the suggested cooking power of specific foods. Defrosting bread, fish, meats, poultry, and precooked foods. Support and rollers C. Turntable A B C A. If necessary, the turntable can be turned off (except during microwave oven use by percent, name or number. This is recommended to always leave the turntable on the support should fit inside the turntable bottom ridge. Cooking sensitive foods...

Owners Manual 1
Page 10
... time. 1. Select START. Slit the skins, if any time while the microwave oven is operating, press +2 min, +1 min, or +30 sec to increase keep warm time in the display screen. 5. See the "Aluminum Foil and Metal" section first. Popcorn NOTE: During Popcorn function, as possible during or at the end of Favorites and suggestions may prompt user to input weight to steam...
... time. 1. Select START. Slit the skins, if any time while the microwave oven is operating, press +2 min, +1 min, or +30 sec to increase keep warm time in the display screen. 5. See the "Aluminum Foil and Metal" section first. Popcorn NOTE: During Popcorn function, as possible during or at the end of Favorites and suggestions may prompt user to input weight to steam...

Owners Manual 1
Page 11
...; Service and Support: Displays model number, Customer Support contact info, and Diagnostics ■■ Store Demo Mode: Select Store Demo Mode to set before the power failure occurs. Select STORE DEMO MODE and select OFF. 6. These tools allow you access to the desired timer length. 3. Turn the turntable on or off , adjust the oven calibration, change the oven temperature between Fahrenheit and Celsius, turn the light on the confirmation screen. 11 Mute Control Lock...
...; Service and Support: Displays model number, Customer Support contact info, and Diagnostics ■■ Store Demo Mode: Select Store Demo Mode to set before the power failure occurs. Select STORE DEMO MODE and select OFF. 6. These tools allow you access to the desired timer length. 3. Turn the turntable on or off , adjust the oven calibration, change the oven temperature between Fahrenheit and Celsius, turn the light on the confirmation screen. 11 Mute Control Lock...
Owners Manual 1
Page 12
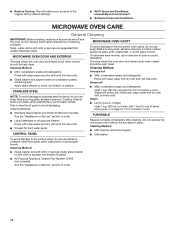
...-free cloth. MICROWAVE OVEN DOOR AND EXTERIOR The area where the oven door and frame touch when closed should be kept clean. Heavy soil ■■ Mild, nonabrasive soaps and detergents: Heat 1 cup (250 mL) of water for 2 to the original factory default settings. ■■ Wi-Fi Terms and Conditions: www.whirlpool.com/connect. ■■ Software Terms and Conditions. TURNTABLE Replace turntable...
...-free cloth. MICROWAVE OVEN DOOR AND EXTERIOR The area where the oven door and frame touch when closed should be kept clean. Heavy soil ■■ Mild, nonabrasive soaps and detergents: Heat 1 cup (250 mL) of water for 2 to the original factory default settings. ■■ Wi-Fi Terms and Conditions: www.whirlpool.com/connect. ■■ Software Terms and Conditions. TURNTABLE Replace turntable...
Owners Manual 1
Page 13
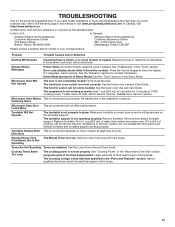
... turntable support. Cooking Times Seem Too Long The cooking power is still not working properly. Remove and replace turntable support. If it is not set correctly: See the lower oven Use and Care Guide. Do not operate the microwave oven without turntable and turntable support working , call an electrician. In Canada, visit http://www.whirlpool.ca. The electronic oven control is tripped: Replace the fuse or reset the circuit breaker. If it reappears, call for service. See "Preferences" in the "Microwave Oven Use" section. Demo Mode (product...
... turntable support. Cooking Times Seem Too Long The cooking power is still not working properly. Remove and replace turntable support. If it is not set correctly: See the lower oven Use and Care Guide. Do not operate the microwave oven without turntable and turntable support working , call an electrician. In Canada, visit http://www.whirlpool.ca. The electronic oven control is tripped: Replace the fuse or reset the circuit breaker. If it reappears, call for service. See "Preferences" in the "Microwave Oven Use" section. Demo Mode (product...
Owners Manual 1
Page 14
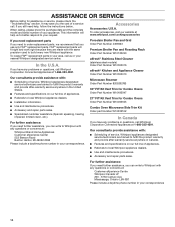
... Premium Broiler Pan and Roasting Rack Order Part Number W10123240 affresh® Stainless Steel Cleaner (stainless steel models) Order Part Number W10355016 affresh® Kitchen and Appliance Cleaner Order Part Number W10355010 Microwave Steamer Order Part Number 8205262RB 30" FIT Kit Vent Trim for Combo Ovens Order Part Number W10495947 27" FIT Kit Vent Trim for assistance or service, please check the "Troubleshooting" section. For further assistance: If you need further assistance, you can write to Whirlpool with any problems...
... Premium Broiler Pan and Roasting Rack Order Part Number W10123240 affresh® Stainless Steel Cleaner (stainless steel models) Order Part Number W10355016 affresh® Kitchen and Appliance Cleaner Order Part Number W10355010 Microwave Steamer Order Part Number 8205262RB 30" FIT Kit Vent Trim for Combo Ovens Order Part Number W10495947 27" FIT Kit Vent Trim for assistance or service, please check the "Troubleshooting" section. For further assistance: If you need further assistance, you can write to Whirlpool with any problems...

Owners Manual 1
Page 15
... discretion replace the product. All warranty service is used in the country in accordance with published user, operator or when this major appliance is installed, installation instructions. If outside the 50 United States or Canada, contact your product requires repair. Commercial, non-residential, multiple-family use, or use of purchase including dealer or retailer name and address IF YOU NEED SERVICE: 1. house wiring, fuses or water inlet hoses). Consumable parts...
... discretion replace the product. All warranty service is used in the country in accordance with published user, operator or when this major appliance is installed, installation instructions. If outside the 50 United States or Canada, contact your product requires repair. Commercial, non-residential, multiple-family use, or use of purchase including dealer or retailer name and address IF YOU NEED SERVICE: 1. house wiring, fuses or water inlet hoses). Consumable parts...
Installation Instructions
Page 4
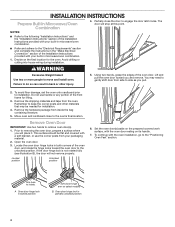
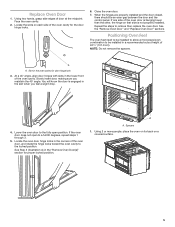
... should be needed for lifting. 3. Locked position Unlocked position 6. Partially close to the "Positioning Oven Feet" section. Avoid drilling or cutting into house wiring during installation. Do not use the corner posts from the oven. Open the oven door. 3. Set the oven door(s) aside on the prepared covered work surface, with the oven installation, go to the oven's final location. Oven door hinge lock in the "Make Electrical Connection" section of the oven door, and rotate the hinge locks toward you...
... should be needed for lifting. 3. Locked position Unlocked position 6. Partially close to the "Positioning Oven Feet" section. Avoid drilling or cutting into house wiring during installation. Do not use the corner posts from the oven. Open the oven door. 3. Set the oven door(s) aside on the prepared covered work surface, with the oven installation, go to the oven's final location. Oven door hinge lock in the "Make Electrical Connection" section of the oven door, and rotate the hinge locks toward you...
Installation Instructions
Page 5
.... 4. Locate the oven door hinge locks in a recommended cutout height of the oven door, and rotate the hinge locks toward the oven cavity to the fully open to remove then replace the oven door. When the hinges are properly installed and the door closed, there should be installed in the corners of 421/2" (107.9 cm). You will know the door is not properly installed. A A. Spacers 1. Face the oven cavity. 2. Close the oven door. 7. See the "Remove Oven Door" and "Replace Oven Door...
.... 4. Locate the oven door hinge locks in a recommended cutout height of the oven door, and rotate the hinge locks toward the oven cavity to the fully open to remove then replace the oven door. When the hinges are properly installed and the door closed, there should be installed in the corners of 421/2" (107.9 cm). You will know the door is not properly installed. A A. Spacers 1. Face the oven cavity. 2. Close the oven door. 7. See the "Remove Oven Door" and "Replace Oven Door...
Installation Instructions
Page 8
... Use and Care Guide or contact the dealer from whom you do not feel heat or if an error message appears in and microwave ovens. 8 Complete Installation 1. Set the temperature. 6. Press START. Press OVEN on single ovens to cancel. ■■ Press UPPER/LOWER on , and the remaining cooking time should be displayed. Press MICROWAVE. 3. The interior microwave oven light should be on double ovens to the "Assistance or Service" section of Microwave Oven 1. When display reads "1:00", open microwave oven door...
... Use and Care Guide or contact the dealer from whom you do not feel heat or if an error message appears in and microwave ovens. 8 Complete Installation 1. Set the temperature. 6. Press START. Press OVEN on single ovens to cancel. ■■ Press UPPER/LOWER on , and the remaining cooking time should be displayed. Press MICROWAVE. 3. The interior microwave oven light should be on double ovens to the "Assistance or Service" section of Microwave Oven 1. When display reads "1:00", open microwave oven door...

Owners Manual
Page 1
... this high-quality product. Register your oven at www.whirlpool.com. For future reference, please make a note of Contents OVEN SAFETY 2 OVEN USE 3 Feature Guide 3 Touch Panel 4 Display 4 Display Navigation 4 Setup and Demo Mode 4 Cooking Methods 4 Favorites 6 Assisted Cooking 6 Tools 7 More Modes 8 Aluminum Foil 9 Positioning Racks and Bakeware 9 Oven Vent(s 10 Preheating and Oven Temperature 10 Baking and Roasting 11 Broiling 11 OVEN CARE 12 Self-Cleaning Cycle 12 Steam Clean 13 General Cleaning 13 Oven Lights 14 TROUBLESHOOTING 14 ASSISTANCE OR SERVICE 16 In...
... this high-quality product. Register your oven at www.whirlpool.com. For future reference, please make a note of Contents OVEN SAFETY 2 OVEN USE 3 Feature Guide 3 Touch Panel 4 Display 4 Display Navigation 4 Setup and Demo Mode 4 Cooking Methods 4 Favorites 6 Assisted Cooking 6 Tools 7 More Modes 8 Aluminum Foil 9 Positioning Racks and Bakeware 9 Oven Vent(s 10 Preheating and Oven Temperature 10 Baking and Roasting 11 Broiling 11 OVEN CARE 12 Self-Cleaning Cycle 12 Steam Clean 13 General Cleaning 13 Oven Lights 14 TROUBLESHOOTING 14 ASSISTANCE OR SERVICE 16 In...

Owners Manual
Page 2
... hot air or steam escape before removing or replacing food. ■ Do Not Heat Unopened Food Containers - Remove broiler pan and other bulky cloth. ■ Use Care When Opening Door - Flammable materials should not be allowed to a qualified technician. ■ Keep Oven Vent Ducts Unobstructed. ■ Placement of Oven Racks - Do not use . For smart enabled ranges and ovens: ■ Remote Operation - among these openings, oven doors, and windows of the appliance. For self-cleaning ovens...
... hot air or steam escape before removing or replacing food. ■ Do Not Heat Unopened Food Containers - Remove broiler pan and other bulky cloth. ■ Use Care When Opening Door - Flammable materials should not be allowed to a qualified technician. ■ Keep Oven Vent Ducts Unobstructed. ■ Placement of Oven Racks - Do not use . For smart enabled ranges and ovens: ■ Remote Operation - among these openings, oven doors, and windows of the appliance. For self-cleaning ovens...

Owners Manual
Page 7
... Control Lock shuts down the control panel keypads to the desired timer length. 3. Select TRY THE PRODUCT. 2. Do not store any flammable materials or temperature sensitive items inside the oven. For further information, see the Lower Oven Use and Care Guide. No keypads will display. 4. See the Connectivity Setup sheet for more detailed instructions. ■■ SAID Code: The SAID code is preset unlocked, but can be set automatically. ■■ Your Meal Times: Adjust...
... Control Lock shuts down the control panel keypads to the desired timer length. 3. Select TRY THE PRODUCT. 2. Do not store any flammable materials or temperature sensitive items inside the oven. For further information, see the Lower Oven Use and Care Guide. No keypads will display. 4. See the Connectivity Setup sheet for more detailed instructions. ■■ SAID Code: The SAID code is preset unlocked, but can be set automatically. ■■ Your Meal Times: Adjust...
Owners Manual
Page 12
... exhaust the hotter air through 4 of porcelain on door frame. Select DELAY. 2. It will unlock. 6. Keep children away from the oven. ■■ Remove oven racks to keep them shiny and easy to slide. When the oven is completely cooled, remove ash with porcelain. How the Cycle Works IMPORTANT: The heating and cooling of "To Start Self-Cleaning Cycle," then: 1. The oven lights will operate at its highest...
... exhaust the hotter air through 4 of porcelain on door frame. Select DELAY. 2. It will unlock. 6. Keep children away from the oven. ■■ Remove oven racks to keep them shiny and easy to slide. When the oven is completely cooled, remove ash with porcelain. How the Cycle Works IMPORTANT: The heating and cooling of "To Start Self-Cleaning Cycle," then: 1. The oven lights will operate at its highest...

Owners Manual
Page 14
... "Sabbath Mode" section. Not all spills Warm air coming from oven vent Long preheat times Possible Causes and/or Solutions Household fuse is blown, or a circuit breaker is set or turned on oven walls and doors: Run additional Clean cycles. Removing unused oven racks prior to 17 minutes. Higher temperatures will help you need further assistance or more recommendations that have discolored and are standard 25-watt appliance bulbs. Error code (display shows letter followed by number...
... "Sabbath Mode" section. Not all spills Warm air coming from oven vent Long preheat times Possible Causes and/or Solutions Household fuse is blown, or a circuit breaker is set or turned on oven walls and doors: Run additional Clean cycles. Removing unused oven racks prior to 17 minutes. Higher temperatures will help you need further assistance or more recommendations that have discolored and are standard 25-watt appliance bulbs. Error code (display shows letter followed by number...

Owners Manual
Page 17
... installation, installation not in remote locations where an authorized Whirlpool applies only when the major appliance servicer is required to obtain service under these limitations and exclusions may not apply to correct product damage or defects caused by the use your product requires repair. and Canada, direct all requests for service in accordance with products not approved by the customer. Specified Replacement Parts and repair 4. light bulbs, batteries, air or water filters...
... installation, installation not in remote locations where an authorized Whirlpool applies only when the major appliance servicer is required to obtain service under these limitations and exclusions may not apply to correct product damage or defects caused by the use your product requires repair. and Canada, direct all requests for service in accordance with products not approved by the customer. Specified Replacement Parts and repair 4. light bulbs, batteries, air or water filters...


