
Owners Manual 1
Page 1
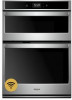
... replaced by the number "4000" (e.g. BUILT-IN ELECTRIC MICROWAVE OVEN COMBINATION - Model Number Serial Number Table of Contents OVEN SAFETY 2 OVEN USE 3 Feature Guide 3 Touch Panel 4 Display 4 Display Navigation 4 Setup and Demo Mode 4 Cooking Methods 4 Favorites 6 Assisted Cooking 6 Tools 7 More Modes 8 Aluminum Foil 9 Positioning Racks and Bakeware 9 Oven Vent(s 10 Preheating and Oven Temperature 10 Baking and Roasting 10 Broiling 11 Convection Cooking 11 OVEN CARE 12 Self-Cleaning Cycle 12 Steam Clean 13 General Cleaning 13 Oven Lights 14 TROUBLESHOOTING...
... replaced by the number "4000" (e.g. BUILT-IN ELECTRIC MICROWAVE OVEN COMBINATION - Model Number Serial Number Table of Contents OVEN SAFETY 2 OVEN USE 3 Feature Guide 3 Touch Panel 4 Display 4 Display Navigation 4 Setup and Demo Mode 4 Cooking Methods 4 Favorites 6 Assisted Cooking 6 Tools 7 More Modes 8 Aluminum Foil 9 Positioning Racks and Bakeware 9 Oven Vent(s 10 Preheating and Oven Temperature 10 Baking and Roasting 10 Broiling 11 Convection Cooking 11 OVEN CARE 12 Self-Cleaning Cycle 12 Steam Clean 13 General Cleaning 13 Oven Lights 14 TROUBLESHOOTING...

Owners Manual 1
Page 2
... Oven Vent Ducts Unobstructed. ■ Placement of Oven Racks - Smother fire or flame or use a towel or other servicing should be allowed to sit or stand on Grease Fires - Remove broiler pan and other flammable materials contact heating elements or interior surfaces of oven until they are oven vent openings and surfaces near surface units of the appliance. Do not store any time. Heating elements may result in the manual. Care...
... Oven Vent Ducts Unobstructed. ■ Placement of Oven Racks - Smother fire or flame or use a towel or other servicing should be allowed to sit or stand on Grease Fires - Remove broiler pan and other flammable materials contact heating elements or interior surfaces of oven until they are oven vent openings and surfaces near surface units of the appliance. Do not store any time. Heating elements may result in the manual. Care...

Owners Manual 1
Page 3
... the "Tools" and "More Modes" sections. "W12345678" becomes "400012345678") OVEN USE Feature Guide This manual covers several models. Refer to turn on and wakes it from Sleep mode. Oven Light Oven Cavity Light The oven light is displayed. If the oven is opened, the oven light will be autom3atically replaced by a keypad on the oven control panel. When the oven door is already on, the Oven Power/Cancel keypad stops any oven function except the Clock, Timer, and Control Lock. 24-Jan-2018 10...
... the "Tools" and "More Modes" sections. "W12345678" becomes "400012345678") OVEN USE Feature Guide This manual covers several models. Refer to turn on and wakes it from Sleep mode. Oven Light Oven Cavity Light The oven light is displayed. If the oven is opened, the oven light will be autom3atically replaced by a keypad on the oven control panel. When the oven door is already on, the Oven Power/Cancel keypad stops any oven function except the Clock, Timer, and Control Lock. 24-Jan-2018 10...

Owners Manual 1
Page 4
... Control. 4. Display The display is in this manual. During use, the display will remain bright. Setup and Demo Mode 1. NOTE: The display screen will be adjusted, and instructions, preparation, and tips can result in the upper right corner and entering the bake temperature into the display screen. 5. Select TRY THE PRODUCT to network, accept the terms of the part code mentioned herein will show the clock, mode, oven temperature, kitchen timer, and oven timer, if set...
... Control. 4. Display The display is in this manual. During use, the display will remain bright. Setup and Demo Mode 1. NOTE: The display screen will be adjusted, and instructions, preparation, and tips can result in the upper right corner and entering the bake temperature into the display screen. 5. Select TRY THE PRODUCT to network, accept the terms of the part code mentioned herein will show the clock, mode, oven temperature, kitchen timer, and oven timer, if set...
Owners Manual 1
Page 7
... for the microwave oven. The Control Lock will remain set after power up to the desired timer length. 3. Select STORE DEMO MODE and select ON. For further information, see the Lower Oven Use and Care Guide. Scroll and select INFO. 3. Tools The Tools keypad allows you to set the clock, change the oven temperature between Fahrenheit and Celsius, turn off when the door is opened , the oven light will automatically turn the light on...
... for the microwave oven. The Control Lock will remain set after power up to the desired timer length. 3. Select STORE DEMO MODE and select ON. For further information, see the Lower Oven Use and Care Guide. Scroll and select INFO. 3. Tools The Tools keypad allows you to set the clock, change the oven temperature between Fahrenheit and Celsius, turn off when the door is opened , the oven light will automatically turn the light on...
Owners Manual 1
Page 10
... to preheat. Baking and Roasting IMPORTANT: The convection fan and convection element may run in the "Positioning Racks and Bakeware" section and bake only one package or pan at the proper temperature when you follow all manufacturer's instructions including venting, covering, stirring or placing on a baking sheet to monitor cooking progress. The actual oven temperature will take longer to maintain the oven temperature. The oven will go above the set temperature to starting. Lower oven The oven vent...
... to preheat. Baking and Roasting IMPORTANT: The convection fan and convection element may run in the "Positioning Racks and Bakeware" section and bake only one package or pan at the proper temperature when you follow all manufacturer's instructions including venting, covering, stirring or placing on a baking sheet to monitor cooking progress. The actual oven temperature will take longer to maintain the oven temperature. The oven will go above the set temperature to starting. Lower oven The oven vent...

Owners Manual 1
Page 11
... . Use standard recipe temperature. The displayed time and temperature will be checked for convection broiling. It is opened during convection cooking, the fan will come back on and off immediately. If the oven door is designed to purchase a broiler pan, one may be reduced by the number "4000" (e.g. Setting Convect Bake Convect Roast Convect Broil Guidelines Reduce the standard baking temperature 25°F (15°C). It will turn off in moisture and yielding crustier breads. Convert Time/Temp Convection temperatures...
... . Use standard recipe temperature. The displayed time and temperature will be checked for convection broiling. It is opened during convection cooking, the fan will come back on and off immediately. If the oven door is designed to purchase a broiler pan, one may be reduced by the number "4000" (e.g. Setting Convect Bake Convect Roast Convect Broil Guidelines Reduce the standard baking temperature 25°F (15°C). It will turn off in moisture and yielding crustier breads. Convert Time/Temp Convection temperatures...

Owners Manual 1
Page 12
... oven doors will unlock. 4. NOTE: It may result in death to better exhaust the hotter air through 4 of heat, odors, and smoke. To Delay Start Self-Cleaning Cycle: Follow steps 1 through the oven vent(s). When the Self-Cleaning cycle is normal and will not work during the Self-Cleaning cycle. 12 24-Jan-2018 10:45:49 EST | RELEASED In some models, the temperature probe from oven during the Self-Cleaning cycle...
... oven doors will unlock. 4. NOTE: It may result in death to better exhaust the hotter air through 4 of heat, odors, and smoke. To Delay Start Self-Cleaning Cycle: Follow steps 1 through the oven vent(s). When the Self-Cleaning cycle is normal and will not work during the Self-Cleaning cycle. 12 24-Jan-2018 10:45:49 EST | RELEASED In some models, the temperature probe from oven during the Self-Cleaning cycle...
Owners Manual 1
Page 13
... www.whirlpool.ca. In Canada, refer to room temperature before using the Steam Clean feature. Helpful Hints ■■ Once the Steam Clean cycle is complete and the oven is cool. Open the oven door of the debris, resulting in direction of grain to the time of distilled or filtered water into the oven bottom. General Cleaning IMPORTANT: Before cleaning, make sure all racks and accessories from the oven cavity...
... www.whirlpool.ca. In Canada, refer to room temperature before using the Steam Clean feature. Helpful Hints ■■ Once the Steam Clean cycle is complete and the oven is cool. Open the oven door of the debris, resulting in direction of grain to the time of distilled or filtered water into the oven bottom. General Cleaning IMPORTANT: Before cleaning, make sure all racks and accessories from the oven cavity...
Owners Manual 1
Page 14
... models, reset the clock if needed. Turn bulb counterclockwise to remove. 4. In Canada: Whirlpool Brand Home Appliances Customer eXperience Centre 200 - 6750 Century Ave. Several cooking cycles between Clean cycles or spills on the screen. It is on: "Control Lock" will take more information. Higher temperatures will display on oven walls and doors: Run additional Clean cycles. "W12345678" becomes "400012345678") OVEN CAVITY AND OVEN DOOR INTERIOR Do not use oven cleaners. Cleaning Method: ■■ Self-Cleaning...
... models, reset the clock if needed. Turn bulb counterclockwise to remove. 4. In Canada: Whirlpool Brand Home Appliances Customer eXperience Centre 200 - 6750 Century Ave. Several cooking cycles between Clean cycles or spills on the screen. It is on: "Control Lock" will take more information. Higher temperatures will display on oven walls and doors: Run additional Clean cycles. "W12345678" becomes "400012345678") OVEN CAVITY AND OVEN DOOR INTERIOR Do not use oven cleaners. Cleaning Method: ■■ Self-Cleaning...
Owners Manual 1
Page 16
... steel models) Order Part Number W10355016 Affresh® Kitchen and Appliance Cleaner Order Part Number W10355010 Accessories Microwave Steamer Order Part Number 8205262RB 30" (76.2 cm) FIT Kit Vent Trim for Combo Ovens Order Part Number W10495947 27" (68.5 cm) FIT Kit Vent Trim for assistance or service, please check the "Troubleshooting" section. In the U.S.A. Our consultants provide assistance with : ■■ Scheduling of service. If you use only FSP® replacement parts. FSP® replacement parts...
... steel models) Order Part Number W10355016 Affresh® Kitchen and Appliance Cleaner Order Part Number W10355010 Accessories Microwave Steamer Order Part Number 8205262RB 30" (76.2 cm) FIT Kit Vent Trim for Combo Ovens Order Part Number W10495947 27" (68.5 cm) FIT Kit Vent Trim for assistance or service, please check the "Troubleshooting" section. In the U.S.A. Our consultants provide assistance with : ■■ Scheduling of service. If you use only FSP® replacement parts. FSP® replacement parts...

Owners Manual 1
Page 17
... of household electrical or plumbing (i.e. light bulbs, batteries, air or water filters, preservation solutions, etc.). In the event of purchase, 1. Damage from natural gas or Propane gas. 7. Discoloration, rust or oxidation of products from accident, misuse, abuse, fire, floods, acts of the part code mentioned herein will be auto1m7atically replaced by the use with original model/serial numbers removed, altered or not easily determined. Service or parts for...
... of household electrical or plumbing (i.e. light bulbs, batteries, air or water filters, preservation solutions, etc.). In the event of purchase, 1. Damage from natural gas or Propane gas. 7. Discoloration, rust or oxidation of products from accident, misuse, abuse, fire, floods, acts of the part code mentioned herein will be auto1m7atically replaced by the use with original model/serial numbers removed, altered or not easily determined. Service or parts for...

Installation Instructions
Page 5
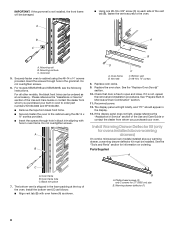
... Oven Feet for lifting. 3. You may need to gently shift door from the foam packing on the final location for door hinge lock 5 Set the oven door(s) aside on its handle. 7. To continue with the oven door resting on the prepared covered work surface, with the oven installation, go to side as you and remove. Replace Oven Door(s) IMPORTANT: Do not replace the oven door(s) until after the oven has been installed into or severing wiring during installation. 4. Using...
... Oven Feet for lifting. 3. You may need to gently shift door from the foam packing on the final location for door hinge lock 5 Set the oven door(s) aside on its handle. 7. To continue with the oven door resting on the prepared covered work surface, with the oven installation, go to side as you and remove. Replace Oven Door(s) IMPORTANT: Do not replace the oven door(s) until after the oven has been installed into or severing wiring during installation. 4. Using...
Installation Instructions
Page 8
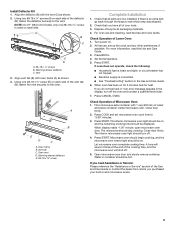
... display panel will be damaged. Parts Supplied A C A. Black trim piece 7. B A. Mounting rail hole C. For models KEMS379B and KEMS309B, see the following instructions. A B D C A. Reconnect power. 12. A ■ Using one #8-18 x 3/8" screw (D) on ordering. Do not overtighten screws. 6. Install Warming Drawer Deflector Kit (only for ovens installed above warming drawers) On combo microwave/oven models installed above a warming drawer, a warming drawer deflector kit must be ordered as an accessory. Warming drawer deflector (1) 8 Vent tab C. See the "Replace...
... display panel will be damaged. Parts Supplied A C A. Black trim piece 7. B A. Mounting rail hole C. For models KEMS379B and KEMS309B, see the following instructions. A B D C A. Reconnect power. 12. A ■ Using one #8-18 x 3/8" screw (D) on ordering. Do not overtighten screws. 6. Install Warming Drawer Deflector Kit (only for ovens installed above warming drawers) On combo microwave/oven models installed above a warming drawer, a warming drawer deflector kit must be ordered as an accessory. Warming drawer deflector (1) 8 Vent tab C. See the "Replace...
Installation Instructions
Page 9
... use and cleaning, read the Use and Care Guide. 3. or circuit breaker has not tripped. ■ Electrical supply is intact and tight; The microwave should turn off . 5. The interior microwave oven light should stop cooking. Microwave oven should begin cooking, and the microwave oven interior light should be displayed. Open microwave oven door and slowly remove container. Oven frame B. Check that you do not feel for 5 minutes, feel heat or if an error message appears in and microwave ovens. 9 Set the temperature. 5. Press CANCEL OVEN. Press COOK and set...
... use and cleaning, read the Use and Care Guide. 3. or circuit breaker has not tripped. ■ Electrical supply is intact and tight; The microwave should turn off . 5. The interior microwave oven light should stop cooking. Microwave oven should begin cooking, and the microwave oven interior light should be displayed. Open microwave oven door and slowly remove container. Oven frame B. Check that you do not feel for 5 minutes, feel heat or if an error message appears in and microwave ovens. 9 Set the temperature. 5. Press CANCEL OVEN. Press COOK and set...

Owners Manual
Page 1
...2 OVEN USE 3 Feature Guide 3 Touch Panel 4 Display 4 Display Navigation 4 Setup and Demo Mode 4 Cooking Methods 4 Favorites 6 Assisted Cooking 6 Tools 7 More Modes 8 Aluminum Foil 9 Positioning Racks and Bakeware 9 Oven Vent(s 10 Preheating and Oven Temperature 10 Baking and Roasting 11 Broiling 11 OVEN CARE 12 Self-Cleaning Cycle 12 Steam Clean 13 General Cleaning 13 Oven Lights 14 TROUBLESHOOTING 14 ASSISTANCE OR SERVICE 16 In the U.S.A 16 Accessories 16 In Canada 16 WARRANTY 17 W11220320A Model Number Serial Number Table of your new oven at www.whirlpool.ca...
...2 OVEN USE 3 Feature Guide 3 Touch Panel 4 Display 4 Display Navigation 4 Setup and Demo Mode 4 Cooking Methods 4 Favorites 6 Assisted Cooking 6 Tools 7 More Modes 8 Aluminum Foil 9 Positioning Racks and Bakeware 9 Oven Vent(s 10 Preheating and Oven Temperature 10 Baking and Roasting 11 Broiling 11 OVEN CARE 12 Self-Cleaning Cycle 12 Steam Clean 13 General Cleaning 13 Oven Lights 14 TROUBLESHOOTING 14 ASSISTANCE OR SERVICE 16 In the U.S.A 16 Accessories 16 In Canada 16 WARRANTY 17 W11220320A Model Number Serial Number Table of your new oven at www.whirlpool.ca...

Owners Manual
Page 2
... - Remove broiler pan and other bulky cloth. ■ Use Care When Opening Door - Heating elements may result in area where oven is properly installed and grounded by a qualified technician. ■ Never Use the Oven for a good seal. Do not store any flammable materials or temperature sensitive items inside, on any time. Care should not be hot even though they have had sufficient time to cool. Let hot air or steam...
... - Remove broiler pan and other bulky cloth. ■ Use Care When Opening Door - Heating elements may result in area where oven is properly installed and grounded by a qualified technician. ■ Never Use the Oven for a good seal. Do not store any flammable materials or temperature sensitive items inside, on any time. Care should not be hot even though they have had sufficient time to cool. Let hot air or steam...
Owners Manual
Page 12
... starting the Self-Clean Cycle. The door gasket is locked, the doors of water. Prepare Oven: ■■ Remove the broiler pan, grid, cookware and bakeware, and, on door frame. The oven doors will unlock. 4. Suggested clean times are 3 hours for light soil, 4 hours for medium soil, and 5 hours for the oven door to move birds to set a delayed Self-Cleaning cycle. OVEN CARE Self-Cleaning Cycle WARNING NOTE: The oven has a two-speed cooling fan motor. Do not clean...
... starting the Self-Clean Cycle. The door gasket is locked, the doors of water. Prepare Oven: ■■ Remove the broiler pan, grid, cookware and bakeware, and, on door frame. The oven doors will unlock. 4. Suggested clean times are 3 hours for light soil, 4 hours for medium soil, and 5 hours for the oven door to move birds to set a delayed Self-Cleaning cycle. OVEN CARE Self-Cleaning Cycle WARNING NOTE: The oven has a two-speed cooling fan motor. Do not clean...

Owners Manual
Page 14
... Mode" in 12 to remove from oven vent Long preheat times Possible Causes and/or Solutions Household fuse is blown, or a circuit breaker is set or turned on the screen. Oven temperature needs adjustment: See the "Temperature Calibration" section. Error code (display shows letter followed by turning clockwise. 6. Replace bulb, and then bulb cover, by number): Press the Cancel keypad to unlock. Sabbath Mode is tripped: Replace the fuse or reset the circuit breaker. Before replacing, make sure the oven is increased. Open oven door. 3. To Replace: 1. In Canada: Whirlpool...
... Mode" in 12 to remove from oven vent Long preheat times Possible Causes and/or Solutions Household fuse is blown, or a circuit breaker is set or turned on the screen. Oven temperature needs adjustment: See the "Temperature Calibration" section. Error code (display shows letter followed by turning clockwise. 6. Replace bulb, and then bulb cover, by number): Press the Cancel keypad to unlock. Sabbath Mode is tripped: Replace the fuse or reset the circuit breaker. Before replacing, make sure the oven is increased. Open oven door. 3. To Replace: 1. In Canada: Whirlpool...

Owners Manual
Page 17
... Canada, contact your product requires repair. Conversion of the product. 15. the United States or Canada and 13. trim, decorative panels, flooring, cabinetry, islands, countertops, drywall, etc.) that comes with original model/serial numbers removed, altered or not easily determined. This warranty gives you specific legal rights, and you also may have other than the limited warranty that interfere with published user, operator or when this...
... Canada, contact your product requires repair. Conversion of the product. 15. the United States or Canada and 13. trim, decorative panels, flooring, cabinetry, islands, countertops, drywall, etc.) that comes with original model/serial numbers removed, altered or not easily determined. This warranty gives you specific legal rights, and you also may have other than the limited warranty that interfere with published user, operator or when this...


