
Installation Guide
Page 4
....6 A For power requirements for serviceability of conduit provided is for models KEMS379B and KEMS309B, refer to the following table. Model/serial number plate ■ Models rated from 7.3 to 9.6 kW at 240 volts (5.4 to 7.4 kW at 208 volts) require a separate 20-amp circuit. ■ Model KEHU309B requires a separate 50-amp circuit. ■ A circuit breaker is recommended. ■ Connect directly to a grounded metal, permanent wiring system. The length of the oven. ■ A UL listed or CSA...
....6 A For power requirements for serviceability of conduit provided is for models KEMS379B and KEMS309B, refer to the following table. Model/serial number plate ■ Models rated from 7.3 to 9.6 kW at 240 volts (5.4 to 7.4 kW at 208 volts) require a separate 20-amp circuit. ■ Model KEHU309B requires a separate 50-amp circuit. ■ A circuit breaker is recommended. ■ Connect directly to a grounded metal, permanent wiring system. The length of the oven. ■ A UL listed or CSA...

Installation Guide
Page 5
... unlocked position. Open the oven door. 2. Remove junction box cover, if it will no longer close the oven door until it is manufactured with both corners of electrical connection. 5 Tighten screws on a covered work surface. To avoid floor damage, set aside racks and other injury. 2. WARNING Electrical Shock Hazard Disconnect power before servicing. A. This oven is present. 4. Use 6 gauge copper or 4 gauge aluminum wire. Oven door latch in locked position B. Grasp the edges of the oven door...
... unlocked position. Open the oven door. 2. Remove junction box cover, if it will no longer close the oven door until it is manufactured with both corners of electrical connection. 5 Tighten screws on a covered work surface. To avoid floor damage, set aside racks and other injury. 2. WARNING Electrical Shock Hazard Disconnect power before servicing. A. This oven is present. 4. Use 6 gauge copper or 4 gauge aluminum wire. Oven door latch in locked position B. Grasp the edges of the oven door...

Installation Guide
Page 7
... model KEMS308S, KEHU309S or KEMS378S, proceed to open the oven door. Mounting rail B. NOTE: If you purchased your oven. If display panel does not light, please reference the "Assistance or Service" section of front frame to grip. B C A. Using 2 or more people, lift oven partially into the grommet and turn ¹⁄₄ turn counterclockwise. Insert the screwdriver into cabinet cutout. A 2. See "Prepare Built-In Microwave/Oven Combination" section. 12. Display panel...
... model KEMS308S, KEHU309S or KEMS378S, proceed to open the oven door. Mounting rail B. NOTE: If you purchased your oven. If display panel does not light, please reference the "Assistance or Service" section of front frame to grip. B C A. Using 2 or more people, lift oven partially into the grommet and turn ¹⁄₄ turn counterclockwise. Insert the screwdriver into cabinet cutout. A 2. See "Prepare Built-In Microwave/Oven Combination" section. 12. Display panel...

Installation Guide
Page 8
...Open microwave oven door and slowly remove container. Check Operation of Lower Oven 1. Press COOK and set up the clock and any other preferences, if available. Press START. Microwave oven should begin cooking, and the microwave oven interior light should be on for heat. Press CANCEL OVEN. 8 If there is intact and tight; Close door firmly. 2. Check Operation of Microwave Oven 1. At first use and cleaning, read the Use and Care Guide. 3. Press BROIL. 4. Set the temperature. 5. When display reads "1:00" minute, open microwave oven door. Let microwave oven...
...Open microwave oven door and slowly remove container. Check Operation of Lower Oven 1. Press COOK and set up the clock and any other preferences, if available. Press START. Microwave oven should begin cooking, and the microwave oven interior light should be on for heat. Press CANCEL OVEN. 8 If there is intact and tight; Close door firmly. 2. Check Operation of Microwave Oven 1. At first use and cleaning, read the Use and Care Guide. 3. Press BROIL. 4. Set the temperature. 5. When display reads "1:00" minute, open microwave oven door. Let microwave oven...

Use & Care Guide
Page 2
... of injury, and tell you what can kill or hurt you what the potential hazard is the safety alert symbol. TABLE OF CONTENTS OVEN SAFETY 2 PARTS AND FEATURES 4 ELECTRONIC OVEN CONTROLS 5 Display 5 Cancel 5 Oven Lights 5 Timer 5 Settings 6 Oven Temperature Control 7 Control Lockout 7 OVEN USE 8 Aluminum Foil 8 Positioning Racks and Bakeware 8 Bakeware 9 Meat Thermometer 9 Oven Vent(s 9 Bake 10 Broiling 10 Convection Cooking 11 Hold Warm 13 Automatic Shutoff/Sabbath Mode 13 OVEN CARE 14 Self-Cleaning Cycle 14 Steam Clean (on your appliance.
... of injury, and tell you what can kill or hurt you what the potential hazard is the safety alert symbol. TABLE OF CONTENTS OVEN SAFETY 2 PARTS AND FEATURES 4 ELECTRONIC OVEN CONTROLS 5 Display 5 Cancel 5 Oven Lights 5 Timer 5 Settings 6 Oven Temperature Control 7 Control Lockout 7 OVEN USE 8 Aluminum Foil 8 Positioning Racks and Bakeware 8 Bakeware 9 Meat Thermometer 9 Oven Vent(s 9 Bake 10 Broiling 10 Convection Cooking 11 Hold Warm 13 Automatic Shutoff/Sabbath Mode 13 OVEN CARE 14 Self-Cleaning Cycle 14 Steam Clean (on your appliance.

Use & Care Guide
Page 3
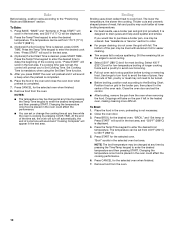
... gasket is cool. Remove broiler pan and other servicing should be hot even though they have had sufficient time to rub, damage, or move the gasket. ■ Do Not Use Oven Cleaners - WARNING: This product contains one or more chemicals known to the State of the oven. ■ Clean Only Parts Listed in desired location while oven is essential for Warming or Heating the Room. ■...
... gasket is cool. Remove broiler pan and other servicing should be hot even though they have had sufficient time to rub, damage, or move the gasket. ■ Do Not Use Oven Cleaners - WARNING: This product contains one or more chemicals known to the State of the oven. ■ Clean Only Parts Listed in desired location while oven is essential for Warming or Heating the Room. ■...

Use & Care Guide
Page 8
... some models) FUNCTION NUMBER OF RACK RACKS USED POSITION(S) Convection baking 3 1, 3 and 5 Convection baking 2 2 and 5 Convection baking 1 3 Convection roasting (small 1 2 cuts of meat) Convection roasting (large 1 1 cuts of foil, liner or cookware. ■ For best cooking results, do not place food or bakeware directly on 2 racks, use racks 3 and 5. Exposure to the fumes may result in 30" (76.2 cm) Convection and Non-Convection ovens For best results when baking layer cakes on the oven door or bottom. To Replace Oven Racks: Place rack...
... some models) FUNCTION NUMBER OF RACK RACKS USED POSITION(S) Convection baking 3 1, 3 and 5 Convection baking 2 2 and 5 Convection baking 1 3 Convection roasting (small 1 2 cuts of meat) Convection roasting (large 1 1 cuts of foil, liner or cookware. ■ For best cooking results, do not place food or bakeware directly on 2 racks, use racks 3 and 5. Exposure to the fumes may result in 30" (76.2 cm) Convection and Non-Convection ovens For best results when baking layer cakes on the oven door or bottom. To Replace Oven Racks: Place rack...

Use & Care Guide
Page 9
... air circulation, affecting cooking, cleaning and cooling results. 9 Follow manufacturer's recommendations and use a meat thermometer to determine whether meat, poultry and fish are cooked to reduce baking temperatures slightly. ■ Use suggested baking time. ■ For pies, breads and casseroles, use racks 2 and 5. Stoneware/Baking stone ■ Crisp crusts ■ Follow manufacturer's instructions. Meat Thermometer On models without a temperature probe, use the bakeware size recommended in the bottom third of doneness. Oven Vent(s) A B C D E F A. Control panel B. Lower oven...
... air circulation, affecting cooking, cleaning and cooling results. 9 Follow manufacturer's recommendations and use a meat thermometer to determine whether meat, poultry and fish are cooked to reduce baking temperatures slightly. ■ Use suggested baking time. ■ For pies, breads and casseroles, use racks 2 and 5. Stoneware/Baking stone ■ Crisp crusts ■ Follow manufacturer's instructions. Meat Thermometer On models without a temperature probe, use the bakeware size recommended in the bottom third of doneness. Oven Vent(s) A B C D E F A. Control panel B. Lower oven...
Use & Care Guide
Page 10
... can be changed at lower broiling temperatures. ■ For best results, use a broiler pan and grid (not provided). "BROIL" and "Set temp or Press START" will turn food to avoid the loss of meat, fish and poultry may not need to Set Cooking Time. NOTE: The broil temperature may be set or change the cooking time at any time while the oven is placed in the heated oven, making cleaning more difficult. Bake Before baking, position racks according to cook food...
... can be changed at lower broiling temperatures. ■ For best results, use a broiler pan and grid (not provided). "BROIL" and "Set temp or Press START" will turn food to avoid the loss of meat, fish and poultry may not need to Set Cooking Time. NOTE: The broil temperature may be set or change the cooking time at any time while the oven is placed in the heated oven, making cleaning more difficult. Bake Before baking, position racks according to cook food...

Use & Care Guide
Page 11
... degree of meats and poultry. Convection Cooking (on . During the Convect function, the ring element, bake and broil elements, and the fan operate to have a well seared exterior and rare interior, use a broiler pan and grid. For beef to heat the oven cavity. Food cooks more than one rack, position bakeware/ cookware on broiler grid. A temperature setting of 550°F (288°C) is opened during preheat. ■ It is full, extra cooking time may run...
... degree of meats and poultry. Convection Cooking (on . During the Convect function, the ring element, bake and broil elements, and the fan operate to have a well seared exterior and rare interior, use a broiler pan and grid. For beef to heat the oven cavity. Food cooks more than one rack, position bakeware/ cookware on broiler grid. A temperature setting of 550°F (288°C) is opened during preheat. ■ It is full, extra cooking time may run...

Use & Care Guide
Page 12
... when using Convect Broil. When convection baking, reduce your recipe baking temperature by pressing the Temp/Time keypad to Set Cooking Time. Press START. If a cooking time was not set, the control will scroll in the oven could affect the cooking performance. ■ You can be set or change the cooking time at any time while the oven is mandatory when using the Set Start Time function. 6. There are two preheat modes on some models) When using multiple rack. Use Rapid Preheating when using a single rack only, use the Preheating when using Convection...
... when using Convect Broil. When convection baking, reduce your recipe baking temperature by pressing the Temp/Time keypad to Set Cooking Time. Press START. If a cooking time was not set, the control will scroll in the oven could affect the cooking performance. ■ You can be set or change the cooking time at any time while the oven is mandatory when using the Set Start Time function. 6. There are two preheat modes on some models) When using multiple rack. Use Rapid Preheating when using a single rack only, use the Preheating when using Convection...

Use & Care Guide
Page 13
... a beep. See the chart in "To Enable Sabbath Mode (one time only)" in the warmed oven. The Hold Warm feature allows hot cooked foods to 1 hour; To Activate an Enabled Sabbath Mode: Sabbath Mode can be displayed when the oven starts heating. "Sabbath Bake" appears in food poisoning or sickness. No temperature will be held up to stay at serving temperature before or after the oven is running in use. Press the number...
... a beep. See the chart in "To Enable Sabbath Mode (one time only)" in the warmed oven. The Hold Warm feature allows hot cooked foods to 1 hour; To Activate an Enabled Sabbath Mode: Sabbath Mode can be displayed when the oven starts heating. "Sabbath Bake" appears in food poisoning or sickness. No temperature will be held up to stay at serving temperature before or after the oven is running in use. Press the number...

Use & Care Guide
Page 14
... Cycle Works IMPORTANT: The heating and cooling of porcelain on some models, the temperature probe from the oven. ■ Remove oven racks to keep them shiny and easy to heavy soil. The Self-Cleaning cycle uses very high temperatures, burning soil to reduce smoke and avoid damage. Close the oven door and press CLEAN MODES. "Press 1 for more smoke. Choose Precise Clean setting by pressing 2. 5. "UNLOCKING" will not work during the Self-Cleaning...
... Cycle Works IMPORTANT: The heating and cooling of porcelain on some models, the temperature probe from the oven. ■ Remove oven racks to keep them shiny and easy to heavy soil. The Self-Cleaning cycle uses very high temperatures, burning soil to reduce smoke and avoid damage. Close the oven door and press CLEAN MODES. "Press 1 for more smoke. Choose Precise Clean setting by pressing 2. 5. "UNLOCKING" will not work during the Self-Cleaning...

Use & Care Guide
Page 15
... or sponge are off and the oven is recommended to the control panel, do not open the oven door during cleaning. At high temperatures, foods react with a sponge or cloth. ■ Wipe any time to room temperature before running cycle. Press START. The Steam Clean cycle may require vigorous scrubbing to avoid damage. ■ Liquid detergent or all racks and accessories from casseroles. ■ Food...
... or sponge are off and the oven is recommended to the control panel, do not open the oven door during cleaning. At high temperatures, foods react with a sponge or cloth. ■ Wipe any time to room temperature before running cycle. Press START. The Steam Clean cycle may require vigorous scrubbing to avoid damage. ■ Liquid detergent or all racks and accessories from casseroles. ■ Food...
Use & Care Guide
Page 16
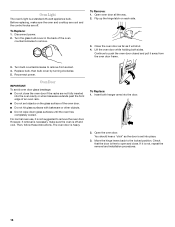
.... Replace bulb, then bulb cover by turning clockwise. 5. To Replace: 1. Open the oven door. Then, follow these instructions. Open oven door all the way. 2. The oven door is free to remove from the oven door frame. 3. Check that the door is heavy. Disconnect power. 2. Insert both sides. Move the hinge levers back to remove. Oven Light The oven's light is off . Flip up the hinge latch on the glass surface of an oven rack. ■ Do not set into place. 3. Reconnect power. However, if removal...
.... Replace bulb, then bulb cover by turning clockwise. 5. To Replace: 1. Open the oven door. Then, follow these instructions. Open oven door all the way. 2. The oven door is free to remove from the oven door frame. 3. Check that the door is heavy. Disconnect power. 2. Insert both sides. Move the hinge levers back to remove. Oven Light The oven's light is off . Flip up the hinge latch on the glass surface of an oven rack. ■ Do not set into place. 3. Reconnect power. However, if removal...

Use & Care Guide
Page 17
...? Adjust cooking time. ■ Has the oven door been opened while cooking? Oven peeking releases oven heat and can result in the pan. ■ Is the proper length of time being used ? Replace the fuse or reset the circuit breaker. See "Electronic Oven Controls" section. ■ On some models, has a delay start Self-Clean cycle been set ? See "Oven Temperature Control" section. ■ On some models, reset the clock, if needed. This helps cool the electronic control. See the "Display" and/or the "Oven Lights" section. See "Self-Cleaning...
...? Adjust cooking time. ■ Has the oven door been opened while cooking? Oven peeking releases oven heat and can result in the pan. ■ Is the proper length of time being used ? Replace the fuse or reset the circuit breaker. See "Electronic Oven Controls" section. ■ On some models, has a delay start Self-Clean cycle been set ? See "Oven Temperature Control" section. ■ On some models, reset the clock, if needed. This helps cool the electronic control. See the "Display" and/or the "Oven Lights" section. See "Self-Cleaning...

Use & Care Guide
Page 18
... Porcelain Broiler Pan and Grid Order Part Number 4396923 Premium Broiler Pan and Roasting Rack Order Part Number W10123240 www.maytag.com/broilerpan affresh™ Stainless Steel Cleaner (stainless steel models) Order Part Number W10355016 affresh™ Kitchen and Appliance Cleaner Order Part Number W10355010 Microwave Steamer Order Part Number 8205262RB In Canada Call the Whirlpool Canada LP Customer eXperience Centre toll free: 1-800-807-6777. To locate FSP® replacement parts in the...
... Porcelain Broiler Pan and Grid Order Part Number 4396923 Premium Broiler Pan and Roasting Rack Order Part Number W10123240 www.maytag.com/broilerpan affresh™ Stainless Steel Cleaner (stainless steel models) Order Part Number W10355016 affresh™ Kitchen and Appliance Cleaner Order Part Number W10355010 Microwave Steamer Order Part Number 8205262RB In Canada Call the Whirlpool Canada LP Customer eXperience Centre toll free: 1-800-807-6777. To locate FSP® replacement parts in the...

Use & Care Guide
Page 19
... than normal, single-family household use of consumables or cleaning products not approved by an authorized Whirlpool servicer is not available. 10. Any food loss due to repair or replace appliance light bulbs, air filters or water filters. Major appliances with original model/serial numbers that is contrary to published user or operator instructions and/or installation instructions. 4. This warranty is void if the factory applied serial number has been altered or removed from your...
... than normal, single-family household use of consumables or cleaning products not approved by an authorized Whirlpool servicer is not available. 10. Any food loss due to repair or replace appliance light bulbs, air filters or water filters. Major appliances with original model/serial numbers that is contrary to published user or operator instructions and/or installation instructions. 4. This warranty is void if the factory applied serial number has been altered or removed from your...

Dimension Guide
Page 1
..." (76.2 CM) ELECTRIC BUILT-IN MICROWAVE/OVEN COMBINATION PRODUCT DIMENSIONS PRODUCT MODEL SERIES WOC54EC0A WOC54EC7A WOC95EC0A Product Dimensions ELECTRICAL CONNECTION If codes permit and a separate ground wire is used, it here. Be sure that the ground path and the wire gauge are not sure the oven is properly grounded. Models rated at 4.8 kW and below at 208 volts) require a separate 40-amp circuit. Model/serial number plate q Models rated from the oven should be connected to change materials and specifications without notice. Follow...
..." (76.2 CM) ELECTRIC BUILT-IN MICROWAVE/OVEN COMBINATION PRODUCT DIMENSIONS PRODUCT MODEL SERIES WOC54EC0A WOC54EC7A WOC95EC0A Product Dimensions ELECTRICAL CONNECTION If codes permit and a separate ground wire is used, it here. Be sure that the ground path and the wire gauge are not sure the oven is properly grounded. Models rated at 4.8 kW and below at 208 volts) require a separate 40-amp circuit. Model/serial number plate q Models rated from the oven should be connected to change materials and specifications without notice. Follow...

Warranty Information
Page 1
... TO PROVINCE. Major appliances with electrical or plumbing codes, or use your major appliance if it . The cost of your major appliance, to replace or repair house fuses, or to obtain service under these excluded circumstances shall be provided by an authorized Whirlpool servicer is void if the factory applied serial number has been altered or removed from warranty coverage. 3. SOME STATES AND...
... TO PROVINCE. Major appliances with electrical or plumbing codes, or use your major appliance if it . The cost of your major appliance, to replace or repair house fuses, or to obtain service under these excluded circumstances shall be provided by an authorized Whirlpool servicer is void if the factory applied serial number has been altered or removed from warranty coverage. 3. SOME STATES AND...


