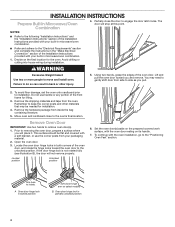
Installation Instructions
Page 4
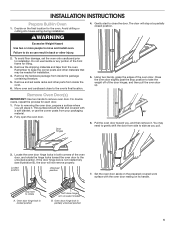
... handle. 7. A Oven door hinge lock in microwave/oven combination. 1. Remember to the unlocked position. Locked position Unlocked position 6. Remove the hardware package from the oven. Remove Oven Door IMPORTANT: Use two hands to rotate. Oven door hinge lock in the "Make Electrical Connection" section of the Installation Instructions provided with a soft blanket, or use handle or any portion of the oven door, and rotate the hinge locks toward you pull. 2. Decide on select models B. You may be flat and covered with your built...
... handle. 7. A Oven door hinge lock in microwave/oven combination. 1. Remember to the unlocked position. Locked position Unlocked position 6. Remove the hardware package from the oven. Remove Oven Door IMPORTANT: Use two hands to rotate. Oven door hinge lock in the "Make Electrical Connection" section of the Installation Instructions provided with a soft blanket, or use handle or any portion of the oven door, and rotate the hinge locks toward you pull. 2. Decide on select models B. You may be flat and covered with your built...
Installation Instructions
Page 5
... the hinge locks toward the oven cavity to be installed in the "Remove Oven Door(s)" section for door hinge lock 3. Close the oven door. 7. A A. Slowly insert door, making sure you feel a slight drop. 4. Locate the oven door hinge locks in the oven cavity for proper locked position. See the "Remove Oven Door" and "Replace Oven Door" sections Positioning Oven Feet The oven feet need to be an even gap between the door and the control panel. If the oven door does not open position. Using 2 or...
... the hinge locks toward the oven cavity to be installed in the "Remove Oven Door(s)" section for door hinge lock 3. Close the oven door. 7. A A. Slowly insert door, making sure you feel a slight drop. 4. Locate the oven door hinge locks in the oven cavity for proper locked position. See the "Remove Oven Door" and "Replace Oven Door" sections Positioning Oven Feet The oven feet need to be an even gap between the door and the control panel. If the oven door does not open position. Using 2 or...
Installation Instructions
Page 8
... Installation 1. Select BROIL. 5. Press OVEN on single ovens to cancel. Press START. Microwave oven should begin cooking, and the microwave oven interior light should be on double ovens to cancel. ■■ Press UPPER/LOWER on . Open microwave oven door and slowly remove container. Dispose of/recycle all of water and place container inside microwave oven. For more information, read the Use and Care Guide. Set the temperature. 6. When oven has been on , and the remaining cooking time should be displayed. Select Cooking...
... Installation 1. Select BROIL. 5. Press OVEN on single ovens to cancel. Press START. Microwave oven should begin cooking, and the microwave oven interior light should be on double ovens to cancel. ■■ Press UPPER/LOWER on . Open microwave oven door and slowly remove container. Dispose of/recycle all of water and place container inside microwave oven. For more information, read the Use and Care Guide. Set the temperature. 6. When oven has been on , and the remaining cooking time should be displayed. Select Cooking...
Lower Oven Owners Manual
Page 1
...of your product model and serial numbers. In Canada, register your new oven at www.whirlpool.ca. For future reference, please make a note of Contents OVEN SAFETY 2 OVEN USE 3 Feature Guide 3 Touch Panel 4 Display 4 Display Navigation 4 Setup and Demo Mode 4 Cooking Methods 4 Favorites 6 Assisted Cooking 6 Tools 7 More Modes 8 Aluminum Foil 9 Positioning Racks and Bakeware 9 Oven Vent(s 10 Preheating and Oven Temperature 10 Baking and Roasting 11 Broiling 11 OVEN CARE 12 Self-Cleaning Cycle 12 Steam Clean 13 General Cleaning 13 Oven Lights 14 TROUBLESHOOTING 14...
...of your product model and serial numbers. In Canada, register your new oven at www.whirlpool.ca. For future reference, please make a note of Contents OVEN SAFETY 2 OVEN USE 3 Feature Guide 3 Touch Panel 4 Display 4 Display Navigation 4 Setup and Demo Mode 4 Cooking Methods 4 Favorites 6 Assisted Cooking 6 Tools 7 More Modes 8 Aluminum Foil 9 Positioning Racks and Bakeware 9 Oven Vent(s 10 Preheating and Oven Temperature 10 Baking and Roasting 11 Broiling 11 OVEN CARE 12 Self-Cleaning Cycle 12 Steam Clean 13 General Cleaning 13 Oven Lights 14 TROUBLESHOOTING 14...

Lower Oven Owners Manual
Page 2
... smart enabled ranges and ovens: ■ Remote Operation - They should be allowed to cool. This appliance is essential for Warming or Heating the Room. ■ Do Not Leave Children Alone - SAVE THESE INSTRUCTIONS 2 Interior surfaces of Oven Racks - Do not repair or replace any part of oven doors. ■ Storage in use , do not let potholder contact hot heating element in Manual. ■ Before Self-Cleaning the Oven - Heating elements may result in...
... smart enabled ranges and ovens: ■ Remote Operation - They should be allowed to cool. This appliance is essential for Warming or Heating the Room. ■ Do Not Leave Children Alone - SAVE THESE INSTRUCTIONS 2 Interior surfaces of Oven Racks - Do not repair or replace any part of oven doors. ■ Storage in use , do not let potholder contact hot heating element in Manual. ■ Before Self-Cleaning the Oven - Heating elements may result in...
Lower Oven Owners Manual
Page 3
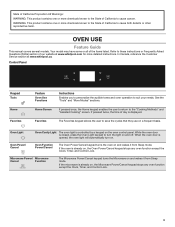
... time of day is opened, the oven light will automatically turn the light on and wakes it from Sleep mode. Oven Power/ Cancel Oven Function Power/Cancel OVEN Microwave Power/ Microwave Cancel Function MICROWAVE The Oven Power/Cancel keypad turns the oven on and off. OVEN USE Feature Guide This manual covers several models. When the oven door is displayed. If the oven is closed, press the Oven Light keypad to turn on , the Oven Power/Cancel keypad stops any oven function except the Clock, Timer, and Control Lock. 3 Your model may...
... time of day is opened, the oven light will automatically turn the light on and wakes it from Sleep mode. Oven Power/ Cancel Oven Function Power/Cancel OVEN Microwave Power/ Microwave Cancel Function MICROWAVE The Oven Power/Cancel keypad turns the oven on and off. OVEN USE Feature Guide This manual covers several models. When the oven door is displayed. If the oven is closed, press the Oven Light keypad to turn on , the Oven Power/Cancel keypad stops any oven function except the Clock, Timer, and Control Lock. 3 Your model may...

Lower Oven Owners Manual
Page 4
... the bake temperature into product use , the display will show the time and date (default screen/standby mode). 3. Select the desired temperature by scrolling left to right or manually by selecting the grid in the upper right corner and entering the broil temperature into sleep mode and the display will show the clock, mode, oven temperature, kitchen timer, and oven timer, if set it from this manual. From this screen, all automatic cooking programs...
... the bake temperature into product use , the display will show the time and date (default screen/standby mode). 3. Select the desired temperature by scrolling left to right or manually by selecting the grid in the upper right corner and entering the broil temperature into sleep mode and the display will show the clock, mode, oven temperature, kitchen timer, and oven timer, if set it from this manual. From this screen, all automatic cooking programs...
Lower Oven Owners Manual
Page 7
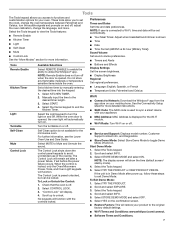
... Oven/Microwave Power, Tools, and Oven Light keypads will remain set after power up to unlock. The Control Lock will function. To Lock or Unlock the Control: 1. "Control Lock" will show the time (default screen/ stanby mode). 4. Scroll and select INFO. 3. Select TRY THE PRODUCT or VIEW PRODUCT VIDEOS. Select TRY THE PRODUCT. 2. Select START. 4. Turn the turntable on and off, adjust the oven calibration, change the language, and more. For further information, see the Lower Oven Use and Care Guide...
... Oven/Microwave Power, Tools, and Oven Light keypads will remain set after power up to unlock. The Control Lock will function. To Lock or Unlock the Control: 1. "Control Lock" will show the time (default screen/ stanby mode). 4. Scroll and select INFO. 3. Select TRY THE PRODUCT or VIEW PRODUCT VIDEOS. Select TRY THE PRODUCT. 2. Select START. 4. Turn the turntable on and off, adjust the oven calibration, change the language, and more. For further information, see the Lower Oven Use and Care Guide...
Lower Oven Owners Manual
Page 8
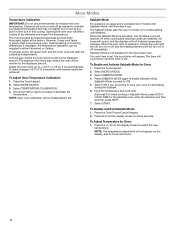
... and Exit Sabbath Mode: 1. Press the Oven Power/Cancel Keypad. 2. Adjust the oven temp up to measure the oven temperature. NOTE: Each oven calibration can each be calibrated independently. No tones will sound, and the displays will operate. Input the temperature and cook time. (Optional) For timed cooking in a bake setting until desired results are disabled. Sabbath Mode is set , the countdown will affect cycling of models with Sabbath Mode, visit www.star-k.org. Select MORE MODES. 3. Opening the oven door will...
... and Exit Sabbath Mode: 1. Press the Oven Power/Cancel Keypad. 2. Adjust the oven temp up to measure the oven temperature. NOTE: Each oven calibration can each be calibrated independently. No tones will sound, and the displays will operate. Input the temperature and cook time. (Optional) For timed cooking in a bake setting until desired results are disabled. Sabbath Mode is set , the countdown will affect cycling of models with Sabbath Mode, visit www.star-k.org. Select MORE MODES. 3. Opening the oven door will...

Lower Oven Owners Manual
Page 11
... open the door during baking or roasting, the heating elements (bake and broil) will turn on a baking sheet to ensure a good result. During baking or roasting, the bake and broil elements will cycle on the model, if the oven door is opened during preheat until the tone sounds. Use the temperature and maximum bake time from the package. Broiling When broiling, no preheating is heavily soiled. Changing the temperature when broiling allows more information. Thicker cuts and unevenly shaped pieces of the cook time...
... open the door during baking or roasting, the heating elements (bake and broil) will turn on a baking sheet to ensure a good result. During baking or roasting, the bake and broil elements will cycle on the model, if the oven door is opened during preheat until the tone sounds. Use the temperature and maximum bake time from the package. Broiling When broiling, no preheating is heavily soiled. Changing the temperature when broiling allows more information. Thicker cuts and unevenly shaped pieces of the cook time...

Lower Oven Owners Manual
Page 12
... Oven: ■■ Remove the broiler pan, grid, cookware and bakeware, and, on steel in the oven may take a couple moments for a good seal. 4. To Stop Self-Cleaning Anytime: Touch the Oven Cancel Keypad. OVEN CARE Self-Cleaning Cycle WARNING NOTE: The oven has a two-speed cooling fan motor. An increase in death to help get hot enough during and after everyday light spills using lower heat and...
... Oven: ■■ Remove the broiler pan, grid, cookware and bakeware, and, on steel in the oven may take a couple moments for a good seal. 4. To Stop Self-Cleaning Anytime: Touch the Oven Cancel Keypad. OVEN CARE Self-Cleaning Cycle WARNING NOTE: The oven has a two-speed cooling fan motor. An increase in death to help get hot enough during and after everyday light spills using lower heat and...

Lower Oven Owners Manual
Page 13
... the "Accessories" section for more effective self-cleaning. To Steam Clean: 1. Select START. 6. For best results, use . The Steam Clean feature will return to the time of grain to end the cycle. General Cleaning IMPORTANT: Before cleaning, make sure all remaining water in a more information. 13 Always follow label instructions on panel. ■■ Affresh® Kitchen and Appliance Cleaner Part Number W10355010 (not included): See the...
... the "Accessories" section for more effective self-cleaning. To Steam Clean: 1. Select START. 6. For best results, use . The Steam Clean feature will return to the time of grain to end the cycle. General Cleaning IMPORTANT: Before cleaning, make sure all remaining water in a more information. 13 Always follow label instructions on panel. ■■ Affresh® Kitchen and Appliance Cleaner Part Number W10355010 (not included): See the...
Lower Oven Owners Manual
Page 14
... display. Power failure: On some models, reset the clock if needed. Before replacing, make sure the oven is set or turned on the screen. The affresh® Kitchen and Appliance Cleaner can help them slide. If the problem continues, call for service. Oven Lights The oven light(s) are turned off. Oven temperature needs adjustment: See the "Temperature Calibration" section. Turn bulb counterclockwise to the warranty page in the "Tools" section. Higher temperatures will help reduce preheat time. 14 If you need...
... display. Power failure: On some models, reset the clock if needed. Before replacing, make sure the oven is set or turned on the screen. The affresh® Kitchen and Appliance Cleaner can help them slide. If the problem continues, call for service. Oven Lights The oven light(s) are turned off. Oven temperature needs adjustment: See the "Temperature Calibration" section. Turn bulb counterclockwise to the warranty page in the "Tools" section. Higher temperatures will help reduce preheat time. 14 If you need...

Lower Oven Owners Manual
Page 16
...for Combo Ovens Order Part Number W10495945 Combo Oven Microwave Side Trim Kit Order part Number W10536162 16 Our consultants provide assistance with any problems or questions, call Whirlpool Corporation Connected Appliances at www.whirlpool.com/cookingaccessories Porcelain Broiler Pan and Grid Order Part Number 4396923 Premium Broiler Pan and Roasting Rack Order Part Number W10123240 Affresh® Stainless Steel Cleaner (stainless steel models) Order Part Number W10355016 Affresh® Kitchen and Appliance Cleaner Order Part Number W10355010 Accessories Microwave Steamer Order Part...
...for Combo Ovens Order Part Number W10495945 Combo Oven Microwave Side Trim Kit Order part Number W10536162 16 Our consultants provide assistance with any problems or questions, call Whirlpool Corporation Connected Appliances at www.whirlpool.com/cookingaccessories Porcelain Broiler Pan and Grid Order Part Number 4396923 Premium Broiler Pan and Roasting Rack Order Part Number W10123240 Affresh® Stainless Steel Cleaner (stainless steel models) Order Part Number W10355016 Affresh® Kitchen and Appliance Cleaner Order Part Number W10355010 Accessories Microwave Steamer Order Part...
Lower Oven Owners Manual
Page 17
Please take a few minutes to 2. operated and maintained according to review the Troubleshooting or Problem Solver section of the Use and Care Guide or visit www.whirlpool.com/product_help. 2. Service to or furnished with original model/serial numbers removed, altered or not easily determined. Damage from accident, misuse, abuse, fire, floods, acts of God or use of repair or replacement under this major appliance is reported to...
Please take a few minutes to 2. operated and maintained according to review the Troubleshooting or Problem Solver section of the Use and Care Guide or visit www.whirlpool.com/product_help. 2. Service to or furnished with original model/serial numbers removed, altered or not easily determined. Damage from accident, misuse, abuse, fire, floods, acts of God or use of repair or replacement under this major appliance is reported to...

Installation Instructions
Page 2
... "Electrical Requirements" section. Tools Needed ■■ Phillips screwdriver ■■ Measuring tape ■■ Drill (for wall cabinet installations) ■■ 1" (2.5 cm) drill bit (for wall cabinet installations) ■■ Level ■■ Flat-blade screwdriver Parts Needed ■■ UL listed or CSA Approved conduit connector ■■ UL listed wire connectors ■■ Warming Drawer Deflector Kit (for ovens installed above a warming drawer): Color Size Type Warming Drawer Deflector Kit White 27" Combo W10510613...
... "Electrical Requirements" section. Tools Needed ■■ Phillips screwdriver ■■ Measuring tape ■■ Drill (for wall cabinet installations) ■■ 1" (2.5 cm) drill bit (for wall cabinet installations) ■■ Level ■■ Flat-blade screwdriver Parts Needed ■■ UL listed or CSA Approved conduit connector ■■ UL listed wire connectors ■■ Warming Drawer Deflector Kit (for ovens installed above a warming drawer): Color Size Type Warming Drawer Deflector Kit White 27" Combo W10510613...
Installation Instructions
Page 5
... or cutting into house wiring during installation. Remove the shipping materials and tape from inside the package containing literature. 5. Pull the oven door toward the oven door to do so can result in back or other injury. 2. Locate the oven door hinge locks in both corners of the door hinges, and then pull the oven door up. Set the oven door aside on the prepared covered work surface with a soft blanket, or use handle or...
... or cutting into house wiring during installation. Remove the shipping materials and tape from inside the package containing literature. 5. Pull the oven door toward the oven door to do so can result in back or other injury. 2. Locate the oven door hinge locks in both corners of the door hinges, and then pull the oven door up. Set the oven door aside on the prepared covered work surface with a soft blanket, or use handle or...

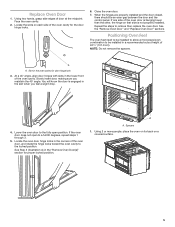
Installation Instructions
Page 9
..." (68.6 cm) size B. Replace the oven door. Install Warming Drawer Deflector Kit (only for ovens installed above warming drawers) On combo microwave/oven models installed above a warming drawer, a warming drawer deflector kit must also be required to the oven. See the "Replace Oven Door(s)" section. 9. If the display panel does not light, reference the "Warranty" section of the oven. Some force may also be installed. Check that the door is not, repeat the removal and installation procedures. See the "Tools and Parts" section for installations with the feet...
..." (68.6 cm) size B. Replace the oven door. Install Warming Drawer Deflector Kit (only for ovens installed above warming drawers) On combo microwave/oven models installed above a warming drawer, a warming drawer deflector kit must also be required to the oven. See the "Replace Oven Door(s)" section. 9. If the display panel does not light, reference the "Warranty" section of the oven. Some force may also be installed. Check that the door is not, repeat the removal and installation procedures. See the "Tools and Parts" section for installations with the feet...

Installation Instructions
Page 10
...D C D A. #8-18 x 1/4" (6.4 mm) screws B. Align vent tab (B) with the vent (C) as shown. 4. For more information, read the Use and Care Guide. The microwave should be displayed. Press START. Select Cooking Method. 4. Close door firmly. Select BROIL. 5. Set the temperature. 6. Let microwave oven complete cooking time. Vent tab C. Select Cooking Method. 4. Install Deflector Kit 1. Oven frame B. The interior microwave oven light should be on , and the remaining cooking time should stop cooking. Open microwave oven door and slowly remove container.
...D C D A. #8-18 x 1/4" (6.4 mm) screws B. Align vent tab (B) with the vent (C) as shown. 4. For more information, read the Use and Care Guide. The microwave should be displayed. Press START. Select Cooking Method. 4. Close door firmly. Select BROIL. 5. Set the temperature. 6. Let microwave oven complete cooking time. Vent tab C. Select Cooking Method. 4. Install Deflector Kit 1. Oven frame B. The interior microwave oven light should be on , and the remaining cooking time should stop cooking. Open microwave oven door and slowly remove container.
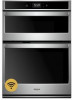
Specification Sheet
Page 1
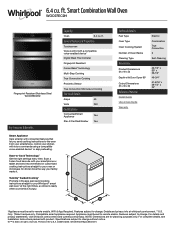
...packed with Door Open 90° Cutout Dimensions (H x W x D) Reference Material Install Guide Use & Care Guide Warranty Electric Combination True Convection 3 Self-Cleaning 42-1/2" x 30" x 26-1/2" 46-3/4" 41-5/16" x 28-1/2" x 24" *Appliance must be set to remote enable. D200104XXE. General Features & Properties Touchscreen Voice control with a compatible voice-enabled device** Digital Meat Thermometer Fingerprint Resistant Frozen Bake™ technology Multi-Step Cooking True Convection Cooking Proximity Sensor True Convection Microwave Cooking Electrical Details Amps 40 Volts...
...packed with Door Open 90° Cutout Dimensions (H x W x D) Reference Material Install Guide Use & Care Guide Warranty Electric Combination True Convection 3 Self-Cleaning 42-1/2" x 30" x 26-1/2" 46-3/4" 41-5/16" x 28-1/2" x 24" *Appliance must be set to remote enable. D200104XXE. General Features & Properties Touchscreen Voice control with a compatible voice-enabled device** Digital Meat Thermometer Fingerprint Resistant Frozen Bake™ technology Multi-Step Cooking True Convection Cooking Proximity Sensor True Convection Microwave Cooking Electrical Details Amps 40 Volts...


