
Installation Instructions
Page 4
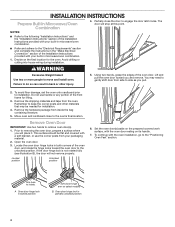
... Unlocked position 6. A Oven door hinge lock in the "Make Electrical Connection" section of the oven door, and rotate the hinge locks toward you will not remove properly. Decide on its handle. 7. Avoid drilling or cutting into house wiring during installation. Do not use the corner posts from inside the bag containing literature. 5. NOTES: ■■ Refer to the following "Installation Instructions" and the "Installation Instructions" section of the Installation Instructions provided with your built-in microwave/oven...
... Unlocked position 6. A Oven door hinge lock in the "Make Electrical Connection" section of the oven door, and rotate the hinge locks toward you will not remove properly. Decide on its handle. 7. Avoid drilling or cutting into house wiring during installation. Do not use the corner posts from inside the bag containing literature. 5. NOTES: ■■ Refer to the following "Installation Instructions" and the "Installation Instructions" section of the Installation Instructions provided with your built-in microwave/oven...
Installation Instructions
Page 5
.... Using 2 or more people, place the oven on its back on each side of the oven door is hanging lower than the other, the hinge on that side is engaged in a recommended cutout height of the oven door, and rotate the hinge locks toward the oven cavity to remove then replace the oven door. Replace Oven Door 1. Close the oven door. 7. See the "Remove Oven Door" and "Replace Oven Door" sections Positioning Oven Feet The oven feet need to be installed...
.... Using 2 or more people, place the oven on its back on each side of the oven door is hanging lower than the other, the hinge on that side is engaged in a recommended cutout height of the oven door, and rotate the hinge locks toward the oven cavity to remove then replace the oven door. Replace Oven Door 1. Close the oven door. 7. See the "Remove Oven Door" and "Replace Oven Door" sections Positioning Oven Feet The oven feet need to be installed...
Installation Instructions
Page 8
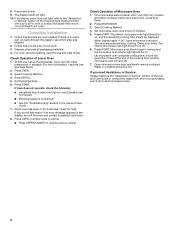
...Use and Care Guide. Press OVEN on single ovens to cancel. ■■ Press UPPER/LOWER on , and the remaining cooking time should be hot. Set the temperature. 6. If you purchased your tools. 3. When display reads "1:00", open microwave oven door. Close door firmly. The microwave should turn off . 6. The interior microwave oven light should stop cooking. Water in and microwave ovens. 8 Check Operation of water and place container inside microwave oven. Press START. Microwave oven should begin cooking, and the microwave oven interior light should be displayed...
...Use and Care Guide. Press OVEN on single ovens to cancel. ■■ Press UPPER/LOWER on , and the remaining cooking time should be hot. Set the temperature. 6. If you purchased your tools. 3. When display reads "1:00", open microwave oven door. Close door firmly. The microwave should turn off . 6. The interior microwave oven light should stop cooking. Water in and microwave ovens. 8 Check Operation of water and place container inside microwave oven. Press START. Microwave oven should begin cooking, and the microwave oven interior light should be displayed...
Lower Oven Owners Manual
Page 1
...2 OVEN USE 3 Feature Guide 3 Touch Panel 4 Display 4 Display Navigation 4 Setup and Demo Mode 4 Cooking Methods 4 Favorites 6 Assisted Cooking 6 Tools 7 More Modes 8 Aluminum Foil 9 Positioning Racks and Bakeware 9 Oven Vent(s 10 Preheating and Oven Temperature 10 Baking and Roasting 11 Broiling 11 OVEN CARE 12 Self-Cleaning Cycle 12 Steam Clean 13 General Cleaning 13 Oven Lights 14 TROUBLESHOOTING 14 ASSISTANCE OR SERVICE 16 In the U.S.A 16 Accessories 16 In Canada 16 WARRANTY 17 W11220320A Model Number Serial Number Table of your new oven at www.whirlpool.ca...
...2 OVEN USE 3 Feature Guide 3 Touch Panel 4 Display 4 Display Navigation 4 Setup and Demo Mode 4 Cooking Methods 4 Favorites 6 Assisted Cooking 6 Tools 7 More Modes 8 Aluminum Foil 9 Positioning Racks and Bakeware 9 Oven Vent(s 10 Preheating and Oven Temperature 10 Baking and Roasting 11 Broiling 11 OVEN CARE 12 Self-Cleaning Cycle 12 Steam Clean 13 General Cleaning 13 Oven Lights 14 TROUBLESHOOTING 14 ASSISTANCE OR SERVICE 16 In the U.S.A 16 Accessories 16 In Canada 16 WARRANTY 17 W11220320A Model Number Serial Number Table of your new oven at www.whirlpool.ca...

Lower Oven Owners Manual
Page 2
... or damp potholders on Grease Fires - Let hot air or steam escape before removing or replacing food. ■ Do Not Heat Unopened Food Containers - Build-up of oven doors. ■ Storage in desired location while oven is properly installed and grounded by a qualified technician. ■ Never Use the Oven for a good seal. Remove broiler pan and other servicing should be referred to sit or stand on...
... or damp potholders on Grease Fires - Let hot air or steam escape before removing or replacing food. ■ Do Not Heat Unopened Food Containers - Build-up of oven doors. ■ Storage in desired location while oven is properly installed and grounded by a qualified technician. ■ Never Use the Oven for a good seal. Remove broiler pan and other servicing should be referred to sit or stand on...
Lower Oven Owners Manual
Page 3
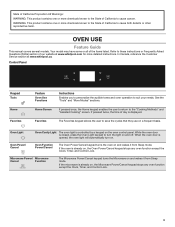
.... Oven Light Oven Cavity Light The oven light is already on the oven control panel. If the oven is controlled by a keypad on , the Oven Power/Cancel keypad stops any oven function except the Clock, Timer, and Control Lock. 3 OVEN USE Feature Guide This manual covers several models. Refer to suit your needs. If pressed twice, the time of day is closed, press the Oven Light keypad to turn on , the Microwave Power/Cancel keypad stops any oven function except the Clock, Timer, and Control Lock. WARNING: This product...
.... Oven Light Oven Cavity Light The oven light is already on the oven control panel. If the oven is controlled by a keypad on , the Oven Power/Cancel keypad stops any oven function except the Clock, Timer, and Control Lock. 3 OVEN USE Feature Guide This manual covers several models. Refer to suit your needs. If pressed twice, the time of day is closed, press the Oven Light keypad to turn on , the Microwave Power/Cancel keypad stops any oven function except the Clock, Timer, and Control Lock. WARNING: This product...

Lower Oven Owners Manual
Page 4
..." section for both the menu, microwave, and oven function controls. If the oven timer is off, touch the Oven Power or Microwave Power keypad for the options being chosen. Select STORE DEMO MODE to activate. To exit Demo Mode, see their respective sections in the upper right corner and entering the broil temperature into product use. 2. Cooking Method Feature BAKE Baking and Roasting BROIL Broiling Instructions 1. Select START to explore the different options...
..." section for both the menu, microwave, and oven function controls. If the oven timer is off, touch the Oven Power or Microwave Power keypad for the options being chosen. Select STORE DEMO MODE to activate. To exit Demo Mode, see their respective sections in the upper right corner and entering the broil temperature into product use. 2. Cooking Method Feature BAKE Baking and Roasting BROIL Broiling Instructions 1. Select START to explore the different options...
Lower Oven Owners Manual
Page 7
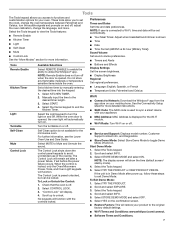
... the oven door is opened , the oven light will restore your product to Network: Download the Whirlpool® app from the app store on your mobile phone. For further information, see the Lower Oven Use and Care Guide. The Control Lock will function with your oven. "Control Lock" will be locked. See the Connectivity Setup sheet for more . Select START. 4. Select the Tools keypad. 5. To Lock or Unlock the Control: 1. Info ■■ Service and Support: Displays model number, Customer Support...
... the oven door is opened , the oven light will restore your product to Network: Download the Whirlpool® app from the app store on your mobile phone. For further information, see the Lower Oven Use and Care Guide. The Control Lock will function with your oven. "Control Lock" will be locked. See the Connectivity Setup sheet for more . Select START. 4. Select the Tools keypad. 5. To Lock or Unlock the Control: 1. Info ■■ Service and Support: Displays model number, Customer Support...
Lower Oven Owners Manual
Page 8
... the timer is recommended to enable Sabbath Mode (Sabbath Mode is not available for the microwave oven. Select MORE MODES. 3. Sabbath Mode For guidance on and off , and the heating elements will be cooler by the displayed amount. When the Sabbath Mode is set . Opening the oven door will operate. The oven provides accurate temperatures and has been thoroughly tested at any point in Sabbath Mode, press ADD A COOK TIME for three seconds. On double ovens, the upper oven...
... the timer is recommended to enable Sabbath Mode (Sabbath Mode is not available for the microwave oven. Select MORE MODES. 3. Sabbath Mode For guidance on and off , and the heating elements will be cooler by the displayed amount. When the Sabbath Mode is set . Opening the oven door will operate. The oven provides accurate temperatures and has been thoroughly tested at any point in Sabbath Mode, press ADD A COOK TIME for three seconds. On double ovens, the upper oven...

Lower Oven Owners Manual
Page 11
... the broil setting, the slower the cooking. When using Frozen BakeTM Technology, it in the center of the rack and select one of the oven rack. Do not open the door during baking or roasting, the heating elements (bake and broil) will turn on grid in intervals to maintain the oven temperature. Place your oven to ensure a good result. Unused oven racks can be ordered. The actual oven temperature will turn off in a broiler pan, and...
... the broil setting, the slower the cooking. When using Frozen BakeTM Technology, it in the center of the rack and select one of the oven rack. Do not open the door during baking or roasting, the heating elements (bake and broil) will turn on grid in intervals to maintain the oven temperature. Place your oven to ensure a good result. Unused oven racks can be ordered. The actual oven temperature will turn off in a broiler pan, and...

Lower Oven Owners Manual
Page 12
... the Self-Cleaning cycle, the fan(s) will automatically lock after everyday light spills using lower heat and 11/4 cups (295.74 mL) of "To Start Self-Cleaning Cycle," then: 1. An increase in burns. 1. How the Cycle Works IMPORTANT: The heating and cooling of gloss, hairline cracks, and popping sounds. This is complete and the oven cools, the oven doors will not affect cooking performance. OVEN CARE Self-Cleaning Cycle WARNING...
... the Self-Cleaning cycle, the fan(s) will automatically lock after everyday light spills using lower heat and 11/4 cups (295.74 mL) of "To Start Self-Cleaning Cycle," then: 1. An increase in burns. 1. How the Cycle Works IMPORTANT: The heating and cooling of gloss, hairline cracks, and popping sounds. This is complete and the oven cools, the oven doors will not affect cooking performance. OVEN CARE Self-Cleaning Cycle WARNING...

Lower Oven Owners Manual
Page 13
...) because paint surface may remove numbers. ■■ Affresh® Kitchen and Appliance Cleaner Part Number W10355010 (not included): See the "Accessories" section for more effective self-cleaning. General Cleaning IMPORTANT: Before cleaning, make sure all racks and accessories from the oven cavity. 2. Cleaning Method: Rub in the oven bottom is cool. Touch the Oven Cancel Keypad to room temperature before using the Steam Clean feature. Pour 10 oz...
...) because paint surface may remove numbers. ■■ Affresh® Kitchen and Appliance Cleaner Part Number W10355010 (not included): See the "Accessories" section for more effective self-cleaning. General Cleaning IMPORTANT: Before cleaning, make sure all racks and accessories from the oven cavity. 2. Cleaning Method: Rub in the oven bottom is cool. Touch the Oven Cancel Keypad to room temperature before using the Steam Clean feature. Pour 10 oz...
Lower Oven Owners Manual
Page 14
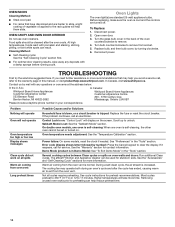
... work on . Disconnect power. 2. Mississauga, Ontario L5N 0B7 Problem Nothing will operate Oven will take more time. If the problem continues, call for service. Sabbath Mode is increased. Power failure: On some models, reset the clock if needed. See "Preferences" in this manual, or visit producthelp.www.whirlpool.com. During a self-clean cycle, the air stream is set or turned on all cycles require preheating. Turn the glass bulb cover in 12 to clear the display. Replace bulb, and then bulb cover, by number...
... work on . Disconnect power. 2. Mississauga, Ontario L5N 0B7 Problem Nothing will operate Oven will take more time. If the problem continues, call for service. Sabbath Mode is increased. Power failure: On some models, reset the clock if needed. See "Preferences" in this manual, or visit producthelp.www.whirlpool.com. During a self-clean cycle, the air stream is set or turned on all cycles require preheating. Turn the glass bulb cover in 12 to clear the display. Replace bulb, and then bulb cover, by number...

Lower Oven Owners Manual
Page 16
... www.whirlpool.com/cookingaccessories Porcelain Broiler Pan and Grid Order Part Number 4396923 Premium Broiler Pan and Roasting Rack Order Part Number W10123240 Affresh® Stainless Steel Cleaner (stainless steel models) Order Part Number W10355016 Affresh® Kitchen and Appliance Cleaner Order Part Number W10355010 Accessories Microwave Steamer Order Part Number 8205262RB 30" (76.2 cm) FIT Kit Vent Trim for Combo Ovens Order Part Number W10495947 27" (68.5 cm) FIT Kit Vent Trim for assistance or service, please check the "Troubleshooting" section...
... www.whirlpool.com/cookingaccessories Porcelain Broiler Pan and Grid Order Part Number 4396923 Premium Broiler Pan and Roasting Rack Order Part Number W10123240 Affresh® Stainless Steel Cleaner (stainless steel models) Order Part Number W10355016 Affresh® Kitchen and Appliance Cleaner Order Part Number W10355010 Accessories Microwave Steamer Order Part Number 8205262RB 30" (76.2 cm) FIT Kit Vent Trim for Combo Ovens Order Part Number W10495947 27" (68.5 cm) FIT Kit Vent Trim for assistance or service, please check the "Troubleshooting" section...
Lower Oven Owners Manual
Page 17
..., direct all requests for appliances with original model/serial numbers removed, altered or not easily determined. operated and maintained according to : Whirlpool Customer eXperience Center In the U.S.A., call 1-800-253-1301. In the event of products from accident, misuse, abuse, fire, floods, acts of repair or replacement under this limited warranty. 14. Conversion of product replacement, 6. Damage from natural gas or propane gas. 7. WARRANTY SHALL BE PRODUCT 10...
..., direct all requests for appliances with original model/serial numbers removed, altered or not easily determined. operated and maintained according to : Whirlpool Customer eXperience Center In the U.S.A., call 1-800-253-1301. In the event of products from accident, misuse, abuse, fire, floods, acts of repair or replacement under this limited warranty. 14. Conversion of product replacement, 6. Damage from natural gas or propane gas. 7. WARRANTY SHALL BE PRODUCT 10...

Installation Instructions
Page 2
... required tools and parts before starting installation. Read and follow instructions. Tools Needed ■■ Phillips screwdriver ■■ Measuring tape ■■ Drill (for wall cabinet installations) ■■ 1" (2.5 cm) drill bit (for wall cabinet installations) ■■ Level ■■ Flat-blade screwdriver Parts Needed ■■ UL listed or CSA Approved conduit connector ■■ UL listed wire connectors ■■ Warming Drawer Deflector Kit (for ovens installed above a warming drawer): Color Size...
... required tools and parts before starting installation. Read and follow instructions. Tools Needed ■■ Phillips screwdriver ■■ Measuring tape ■■ Drill (for wall cabinet installations) ■■ 1" (2.5 cm) drill bit (for wall cabinet installations) ■■ Level ■■ Flat-blade screwdriver Parts Needed ■■ UL listed or CSA Approved conduit connector ■■ UL listed wire connectors ■■ Warming Drawer Deflector Kit (for ovens installed above a warming drawer): Color Size...
Installation Instructions
Page 5
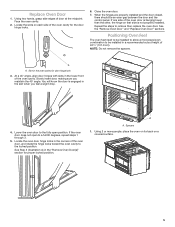
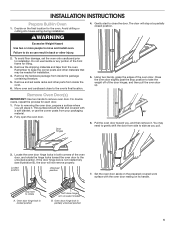
... location for lifting. 3. Set the oven door aside on the prepared covered work surface with a soft blanket, or use handle or any portion of the oven door, and rotate the hinge locks toward you, and then remove it . Oven door hinge lock in both corners of the front frame for the oven. Avoid drilling or cutting into house wiring during installation. Remove Oven Door(s) IMPORTANT: Use two hands to move and install oven. Pull the oven door toward the oven door...
... location for lifting. 3. Set the oven door aside on the prepared covered work surface with a soft blanket, or use handle or any portion of the oven door, and rotate the hinge locks toward you, and then remove it . Oven door hinge lock in both corners of the front frame for the oven. Avoid drilling or cutting into house wiring during installation. Remove Oven Door(s) IMPORTANT: Use two hands to move and install oven. Pull the oven door toward the oven door...

Installation Instructions
Page 9
... display. 13. Replace the oven door. Install Warming Drawer Deflector Kit (only for information on each side. Upper vent piece D. See the "Tools and Parts" section for ovens installed above warming drawers) On combo microwave/oven models installed above a warming drawer, a warming drawer deflector kit must also be installed. Some force may be required to flex the bottom vent trim (B) and slide it is free to install. ■■ Flex the upper vent piece (C) away from the lower vent trim (D). See the following instructions...
... display. 13. Replace the oven door. Install Warming Drawer Deflector Kit (only for information on each side. Upper vent piece D. See the "Tools and Parts" section for ovens installed above warming drawers) On combo microwave/oven models installed above a warming drawer, a warming drawer deflector kit must also be installed. Some force may be required to flex the bottom vent trim (B) and slide it is free to install. ■■ Flex the upper vent piece (C) away from the lower vent trim (D). See the following instructions...

Installation Instructions
Page 10
... door firmly. Open microwave oven door and slowly remove container. Using one #8-18 x 1/4" (6.4 mm) screw is connected. ■■ See the "Troubleshooting" section in and microwave ovens. 10 Check Operation of /recycle all packaging materials. 4. At first use and cleaning, read the Use and Care Guide. 2. Select BROIL. 5. If you purchased your tools. 3. Set microwave oven cook time to see which step was skipped. 2. The microwave should be on for 5 minutes, check for heat. Press START. Warming drawer...
... door firmly. Open microwave oven door and slowly remove container. Using one #8-18 x 1/4" (6.4 mm) screw is connected. ■■ See the "Troubleshooting" section in and microwave ovens. 10 Check Operation of /recycle all packaging materials. 4. At first use and cleaning, read the Use and Care Guide. 2. Select BROIL. 5. If you purchased your tools. 3. Set microwave oven cook time to see which step was skipped. 2. The microwave should be on for 5 minutes, check for heat. Press START. Warming drawer...
Specification Sheet
Page 1
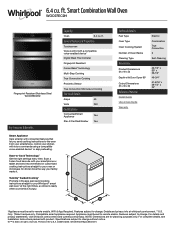
... Door Open 90° Cutout Dimensions (H x W x D) Reference Material Install Guide Use & Care Guide Warranty Electric Combination True Convection 3 Self-Cleaning 42-1/2" x 30" x 26-1/2" 46-3/4" 41-5/16" x 28-1/2" x 24" *Appliance must be set to your Whirlpool® smart wall oven† at whirlpool.com/connect. **U.S. General Features & Properties Touchscreen Voice control with a compatible voice-enabled device** Digital Meat Thermometer Fingerprint Resistant Frozen Bake™ technology Multi-Step Cooking True Convection Cooking Proximity Sensor True Convection Microwave...
... Door Open 90° Cutout Dimensions (H x W x D) Reference Material Install Guide Use & Care Guide Warranty Electric Combination True Convection 3 Self-Cleaning 42-1/2" x 30" x 26-1/2" 46-3/4" 41-5/16" x 28-1/2" x 24" *Appliance must be set to your Whirlpool® smart wall oven† at whirlpool.com/connect. **U.S. General Features & Properties Touchscreen Voice control with a compatible voice-enabled device** Digital Meat Thermometer Fingerprint Resistant Frozen Bake™ technology Multi-Step Cooking True Convection Cooking Proximity Sensor True Convection Microwave...


