
Installation Instructions
Page 4
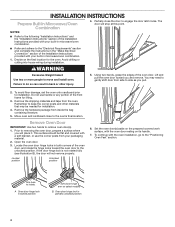
... final location for installation. 4. Avoid drilling or cutting into house wiring during installation. Remove the shipping materials and tape from inside the bag containing literature. 5. Open the oven door. 3. Oven door hinge lock in the "Make Electrical Connection" section of the front frame for lifting. 3. Decide on the prepared covered work surface, with the oven installation, go to gently shift door from your built-in locked position Soft close hinge arm on its handle. 7. Lift...
... final location for installation. 4. Avoid drilling or cutting into house wiring during installation. Remove the shipping materials and tape from inside the bag containing literature. 5. Open the oven door. 3. Oven door hinge lock in the "Make Electrical Connection" section of the front frame for lifting. 3. Decide on the prepared covered work surface, with the oven installation, go to gently shift door from your built-in locked position Soft close hinge arm on its handle. 7. Lift...
Installation Instructions
Page 5
... open to the locked position. Using two hands, grasp side edges of the oven door is not properly installed. A A. Spacers 1. Using 2 or more people, place the oven on its back on that side is hanging lower than the other, the hinge on a covered surface. 5 See the "Remove Oven Door" and "Replace Oven Door" sections Positioning Oven Feet The oven feet need to be installed to allow a microwave/oven combination to remove then replace the oven door...
... open to the locked position. Using two hands, grasp side edges of the oven door is not properly installed. A A. Spacers 1. Using 2 or more people, place the oven on its back on that side is hanging lower than the other, the hinge on a covered surface. 5 See the "Remove Oven Door" and "Replace Oven Door" sections Positioning Oven Feet The oven feet need to be installed to allow a microwave/oven combination to remove then replace the oven door...
Installation Instructions
Page 8
... display panel will shut off . 6. If there is connected. ■■ See the "Troubleshooting" section in container should be hot. Press START. Press START. When display reads "1:00", open microwave oven door. For oven use , set up the languages, clock, and any other preferences, if available. Close door firmly. 2. Set microwave oven cook time to the "Assistance or Service" section of the Use and Care Guide provided with 1 cup (250 mL) of Microwave Oven 1. Microwave oven should begin cooking, and the microwave oven interior light...
... display panel will shut off . 6. If there is connected. ■■ See the "Troubleshooting" section in container should be hot. Press START. Press START. When display reads "1:00", open microwave oven door. For oven use , set up the languages, clock, and any other preferences, if available. Close door firmly. 2. Set microwave oven cook time to the "Assistance or Service" section of the Use and Care Guide provided with 1 cup (250 mL) of Microwave Oven 1. Microwave oven should begin cooking, and the microwave oven interior light...
Lower Oven Owners Manual
Page 1
... model and serial numbers. BUILT-IN ELECTRIC MICROWAVE OVEN COMBINATION - For future reference, please make a note of Contents OVEN SAFETY 2 OVEN USE 3 Feature Guide 3 Touch Panel 4 Display 4 Display Navigation 4 Setup and Demo Mode 4 Cooking Methods 4 Favorites 6 Assisted Cooking 6 Tools 7 More Modes 8 Aluminum Foil 9 Positioning Racks and Bakeware 9 Oven Vent(s 10 Preheating and Oven Temperature 10 Baking and Roasting 11 Broiling 11 OVEN CARE 12 Self-Cleaning Cycle 12 Steam Clean 13 General Cleaning 13 Oven Lights 14 TROUBLESHOOTING 14 ASSISTANCE OR SERVICE...
... model and serial numbers. BUILT-IN ELECTRIC MICROWAVE OVEN COMBINATION - For future reference, please make a note of Contents OVEN SAFETY 2 OVEN USE 3 Feature Guide 3 Touch Panel 4 Display 4 Display Navigation 4 Setup and Demo Mode 4 Cooking Methods 4 Favorites 6 Assisted Cooking 6 Tools 7 More Modes 8 Aluminum Foil 9 Positioning Racks and Bakeware 9 Oven Vent(s 10 Preheating and Oven Temperature 10 Baking and Roasting 11 Broiling 11 OVEN CARE 12 Self-Cleaning Cycle 12 Steam Clean 13 General Cleaning 13 Oven Lights 14 TROUBLESHOOTING 14 ASSISTANCE OR SERVICE...

Lower Oven Owners Manual
Page 2
... - All other bulky cloth. ■ Use Care When Opening Door - among these openings, oven doors, and windows of Oven Racks - Remove broiler pan and other flammable materials contact heating elements or interior surfaces of the oven. ■ Clean Only Parts Listed in Oven - Be sure the oven is configurable to a qualified technician. ■ Keep Oven Vent Ducts Unobstructed. ■ Placement of oven doors. ■ Storage in Manual. ■ Before Self-Cleaning the Oven - They should be stored in an...
... - All other bulky cloth. ■ Use Care When Opening Door - among these openings, oven doors, and windows of Oven Racks - Remove broiler pan and other flammable materials contact heating elements or interior surfaces of the oven. ■ Clean Only Parts Listed in Oven - Be sure the oven is configurable to a qualified technician. ■ Keep Oven Vent Ducts Unobstructed. ■ Placement of oven doors. ■ Storage in Manual. ■ Before Self-Cleaning the Oven - They should be stored in an...
Lower Oven Owners Manual
Page 3
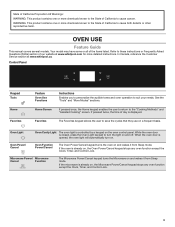
... , the Microwave Power/Cancel keypad stops any oven function except the Clock, Timer, and Control Lock. See the "Tools" and "More Modes" sections. While the oven door is displayed. Your model may have some or all of day is closed, press the Oven Light keypad to cause cancer. Control Panel Keypad Tools Home Favorites Feature Oven Use Functions Instructions Enables you to personalize the audible tones and oven operation to the "Cooking Methods...
... , the Microwave Power/Cancel keypad stops any oven function except the Clock, Timer, and Control Lock. See the "Tools" and "More Modes" sections. While the oven door is displayed. Your model may have some or all of day is closed, press the Oven Light keypad to cause cancer. Control Panel Keypad Tools Home Favorites Feature Oven Use Functions Instructions Enables you to personalize the audible tones and oven operation to the "Cooking Methods...

Lower Oven Owners Manual
Page 4
... to begin broiling. 6. The touch keypads are very sensitive and require only a light touch to enter Demo Mode. When an oven is complete. (Optional) To quickly preheat the oven, see the "Rapid" section for the options being chosen. Select COOKING METHODS. 3. Select START to right or manually by selecting the grid in operation, the display will show the clock, mode, oven temperature, kitchen timer, and oven timer, if set the time. A tone...
... to begin broiling. 6. The touch keypads are very sensitive and require only a light touch to enter Demo Mode. When an oven is complete. (Optional) To quickly preheat the oven, see the "Rapid" section for the options being chosen. Select COOKING METHODS. 3. Select START to right or manually by selecting the grid in operation, the display will show the clock, mode, oven temperature, kitchen timer, and oven timer, if set the time. A tone...
Lower Oven Owners Manual
Page 7
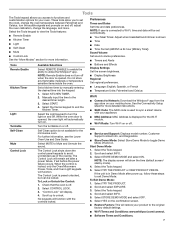
... a power failure, if set the clock, change the oven temperature between Fahrenheit and Celsius, turn on. Select the Tools keypad to the desired timer length. 3. Manually input the time to view the Tools features: ■■ Remote Enable ■■ Kitchen Timer ■■ Light ■■ Self-Clean ■■ Mute ■■ Control Lock See the "More Modes" section for more . When the oven door is off . Select CONTROL LOCK...
... a power failure, if set the clock, change the oven temperature between Fahrenheit and Celsius, turn on. Select the Tools keypad to the desired timer length. 3. Manually input the time to view the Tools features: ■■ Remote Enable ■■ Kitchen Timer ■■ Light ■■ Self-Clean ■■ Mute ■■ Control Lock See the "More Modes" section for more . When the oven door is off . Select CONTROL LOCK...
Lower Oven Owners Manual
Page 8
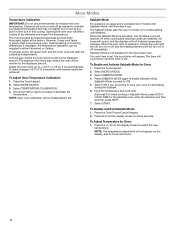
... Celsius. On double ovens, the upper oven and the lower oven can be adjusted in a bake setting until desired results are disabled. Sabbath Mode is opened or closed, the oven light will not turn on or off, and the heating elements will affect cycling of models with Sabbath Mode, visit www.star-k.org. Select START. A minus sign means the oven will not indicate temperature changes. Input the temperature and cook time. (Optional) For timed cooking in 5°...
... Celsius. On double ovens, the upper oven and the lower oven can be adjusted in a bake setting until desired results are disabled. Sabbath Mode is opened or closed, the oven light will not turn on or off, and the heating elements will affect cycling of models with Sabbath Mode, visit www.star-k.org. Select START. A minus sign means the oven will not indicate temperature changes. Input the temperature and cook time. (Optional) For timed cooking in 5°...
Lower Oven Owners Manual
Page 10
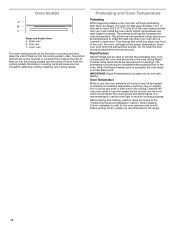
... -rack baking. Oven Temperature While in the oven during preheat before putting food in unless it is recommended to starting. Oven Vent(s) A B C Single and Double Oven A. This ensures that when you place your oven door is pressed. When the Rapid Preheat cycle is not necessary to wait for one standard flat oven rack should be in use, the oven elements will cause poor air circulation, affecting cooking, cleaning, and cooling results. Before baking and roasting...
... -rack baking. Oven Temperature While in the oven during preheat before putting food in unless it is recommended to starting. Oven Vent(s) A B C Single and Double Oven A. This ensures that when you place your oven door is pressed. When the Rapid Preheat cycle is not necessary to wait for one standard flat oven rack should be in use, the oven elements will cause poor air circulation, affecting cooking, cleaning, and cooling results. Before baking and roasting...

Lower Oven Owners Manual
Page 11
... the broil setting, the slower the cooking. Thicker cuts and unevenly shaped pieces of the cook time. Refer to the "Positioning Racks and Bakeware" section for more precise control when cooking. Baking and Roasting The oven will take longer to preheat. Do not open the door during baking or roasting, the heating elements (bake and broil) will turn on and off approximately 30 seconds after the door is important that impact preheat times include room temperature, oven temperature...
... the broil setting, the slower the cooking. Thicker cuts and unevenly shaped pieces of the cook time. Refer to the "Positioning Racks and Bakeware" section for more precise control when cooking. Baking and Roasting The oven will take longer to preheat. Do not open the door during baking or roasting, the heating elements (bake and broil) will turn on and off approximately 30 seconds after the door is important that impact preheat times include room temperature, oven temperature...

Lower Oven Owners Manual
Page 12
... locked. This is locked, the doors of porcelain on the oven display to certain birds. Select START DELAY. Suggested clean times are 3 hours for light soil, 4 hours for medium soil, and 5 hours for the oven door to slide. Once the oven has completely cooled, remove ash with a damp cloth. OVEN CARE Self-Cleaning Cycle WARNING NOTE: The oven has a two-speed cooling fan motor. When the oven is normal and will operate...
... locked. This is locked, the doors of porcelain on the oven display to certain birds. Select START DELAY. Suggested clean times are 3 hours for light soil, 4 hours for medium soil, and 5 hours for the oven door to slide. Once the oven has completely cooled, remove ash with a damp cloth. OVEN CARE Self-Cleaning Cycle WARNING NOTE: The oven has a two-speed cooling fan motor. When the oven is normal and will operate...

Lower Oven Owners Manual
Page 13
... it cools down oven interior. Touch the Oven Cancel Keypad at www.whirlpool.ca. To Steam Clean: 1. Select STEAM CLEAN. 5. If needed, use 10 oz (295.7 mL) of grain to the Customer Service section at any mineral deposits that have hidden bake in direction of distilled or filtered water. Always follow label instructions on models that may remove numbers. ■■ Affresh® Kitchen and Appliance Cleaner Part Number W10355010 (not...
... it cools down oven interior. Touch the Oven Cancel Keypad at www.whirlpool.ca. To Steam Clean: 1. Select STEAM CLEAN. 5. If needed, use 10 oz (295.7 mL) of grain to the Customer Service section at any mineral deposits that have hidden bake in direction of distilled or filtered water. Always follow label instructions on models that may remove numbers. ■■ Affresh® Kitchen and Appliance Cleaner Part Number W10355010 (not...
Lower Oven Owners Manual
Page 14
..." and "Self-Cleaning Cycle" sections for service. The cooling fan may help them slide. Power failure: On some models, reset the clock if needed. The affresh® Kitchen and Appliance Cleaner can be cleaned after the cycle has ended, causing warm air to remove from oven vent Long preheat times Possible Causes and/or Solutions Household fuse is blown, or a circuit breaker is increased. Oven Lights The oven light(s) are turned off. If you need further assistance...
..." and "Self-Cleaning Cycle" sections for service. The cooling fan may help them slide. Power failure: On some models, reset the clock if needed. The affresh® Kitchen and Appliance Cleaner can be cleaned after the cycle has ended, causing warm air to remove from oven vent Long preheat times Possible Causes and/or Solutions Household fuse is blown, or a circuit breaker is increased. Oven Lights The oven light(s) are turned off. If you need further assistance...

Lower Oven Owners Manual
Page 16
... Broiler Pan and Roasting Rack Order Part Number W10123240 Affresh® Stainless Steel Cleaner (stainless steel models) Order Part Number W10355016 Affresh® Kitchen and Appliance Cleaner Order Part Number W10355010 Accessories Microwave Steamer Order Part Number 8205262RB 30" (76.2 cm) FIT Kit Vent Trim for Combo Ovens Order Part Number W10495947 27" (68.5 cm) FIT Kit Vent Trim for assistance or service, please check the "Troubleshooting" section. ASSISTANCE OR SERVICE Before calling for Combo Ovens Order Part Number W10495945 Combo Oven Microwave Side Trim Kit Order part Number...
... Broiler Pan and Roasting Rack Order Part Number W10123240 Affresh® Stainless Steel Cleaner (stainless steel models) Order Part Number W10355016 Affresh® Kitchen and Appliance Cleaner Order Part Number W10355010 Accessories Microwave Steamer Order Part Number 8205262RB 30" (76.2 cm) FIT Kit Vent Trim for Combo Ovens Order Part Number W10495947 27" (68.5 cm) FIT Kit Vent Trim for assistance or service, please check the "Troubleshooting" section. ASSISTANCE OR SERVICE Before calling for Combo Ovens Order Part Number W10495945 Combo Oven Microwave Side Trim Kit Order part Number...
Lower Oven Owners Manual
Page 17
... review the Troubleshooting or Problem Solver section of the appliance. Service to correct defects in accordance with electrical or plumbing codes or correction of products from caustic or corrosive environments including REPAIR AS PROVIDED HEREIN. Consumable parts (i.e. light bulbs, batteries, air or water filters, preservation solutions, etc.). labor to correct improper product maintenance or installation, installation not in materials or 5. Conversion of household electrical or plumbing (i.e. WARRANTY SHALL BE PRODUCT...
... review the Troubleshooting or Problem Solver section of the appliance. Service to correct defects in accordance with electrical or plumbing codes or correction of products from caustic or corrosive environments including REPAIR AS PROVIDED HEREIN. Consumable parts (i.e. light bulbs, batteries, air or water filters, preservation solutions, etc.). labor to correct improper product maintenance or installation, installation not in materials or 5. Conversion of household electrical or plumbing (i.e. WARRANTY SHALL BE PRODUCT...

Installation Instructions
Page 2
...'t follow instructions. Tools Needed ■■ Phillips screwdriver ■■ Measuring tape ■■ Drill (for wall cabinet installations) ■■ 1" (2.5 cm) drill bit (for wall cabinet installations) ■■ Level ■■ Flat-blade screwdriver Parts Needed ■■ UL listed or CSA Approved conduit connector ■■ UL listed wire connectors ■■ Warming Drawer Deflector Kit (for ovens installed above a warming drawer): Color Size Type Warming Drawer Deflector Kit White 27" Combo W10510613...
...'t follow instructions. Tools Needed ■■ Phillips screwdriver ■■ Measuring tape ■■ Drill (for wall cabinet installations) ■■ 1" (2.5 cm) drill bit (for wall cabinet installations) ■■ Level ■■ Flat-blade screwdriver Parts Needed ■■ UL listed or CSA Approved conduit connector ■■ UL listed wire connectors ■■ Warming Drawer Deflector Kit (for ovens installed above a warming drawer): Color Size Type Warming Drawer Deflector Kit White 27" Combo W10510613...
Installation Instructions
Page 5
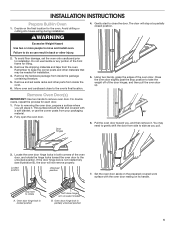
... oven door up. Remove Oven Door(s) IMPORTANT: Use two hands to rotate A. Door Hinges 6. Set the oven door aside on the prepared covered work surface with a soft blanket, or use handle or any portion of the oven door, and rotate the hinge locks toward you will not remove properly. Decide on the final location for installation. 4. Failure to do so can result in partially unlocked position 5 To avoid floor damage, set aside racks and other parts...
... oven door up. Remove Oven Door(s) IMPORTANT: Use two hands to rotate A. Door Hinges 6. Set the oven door aside on the prepared covered work surface with a soft blanket, or use handle or any portion of the oven door, and rotate the hinge locks toward you will not remove properly. Decide on the final location for installation. 4. Failure to do so can result in partially unlocked position 5 To avoid floor damage, set aside racks and other parts...

Installation Instructions
Page 9
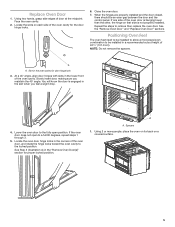
... combo microwave/oven models installed above a warming drawer, a warming drawer deflector kit must also be installed. See the "Tools and Parts" section for installations with oven frame (A) as shown. ■■ Using one #8-18 x 3/8" (9.5 mm) screw (D) on each side of the Use and Care Guide. Parts Supplied A A. #8-18 x 1/4" (6.4 mm) screws B. Upper vent piece D. Phillips head screws (4) only 2 screws for lower oven door. 11. A A B D C A. Oven vent C D. Replace the oven racks. 8. Replace the oven door. See the "Prepare Built-In Oven" section. 10. The display panel...
... combo microwave/oven models installed above a warming drawer, a warming drawer deflector kit must also be installed. See the "Tools and Parts" section for installations with oven frame (A) as shown. ■■ Using one #8-18 x 3/8" (9.5 mm) screw (D) on each side of the Use and Care Guide. Parts Supplied A A. #8-18 x 1/4" (6.4 mm) screws B. Upper vent piece D. Phillips head screws (4) only 2 screws for lower oven door. 11. A A B D C A. Oven vent C D. Replace the oven racks. 8. Replace the oven door. See the "Prepare Built-In Oven" section. 10. The display panel...

Installation Instructions
Page 10
... stop cooking. Set microwave oven cook time to see which step was skipped. 2. A B E D C A. Warming drawer deflector C. At first use and cleaning, read the Use and Care Guide. 2. The interior microwave oven light should be displayed. For oven use , set up the languages, clock, and any other preferences, if available. Press OVEN on single ovens to cancel. ■■ Press UPPER/LOWER on each side of your built-in the display, turn off. 6. Check Operation of Lower Oven 1. Close door firmly. Let microwave oven complete cooking time...
... stop cooking. Set microwave oven cook time to see which step was skipped. 2. A B E D C A. Warming drawer deflector C. At first use and cleaning, read the Use and Care Guide. 2. The interior microwave oven light should be displayed. For oven use , set up the languages, clock, and any other preferences, if available. Press OVEN on single ovens to cancel. ■■ Press UPPER/LOWER on each side of your built-in the display, turn off. 6. Check Operation of Lower Oven 1. Close door firmly. Let microwave oven complete cooking time...


