
Dimension Guide
Page 1
....0 cm) max. W10351242 2/15/12 The model/serial number rating plate is located under the control panel on single ovens and under the control panel on the upper oven cavity on the model/serial number rating plate. q Connect directly to aluminum. Connect the aluminum wiring to the added section of copper wire using and follow the procedure below at 208 volts) require a separate 40-amp circuit. Aluminum/copper connection must conform with product. recessed width C. 26³⁄₄...
....0 cm) max. W10351242 2/15/12 The model/serial number rating plate is located under the control panel on single ovens and under the control panel on the upper oven cavity on the model/serial number rating plate. q Connect directly to aluminum. Connect the aluminum wiring to the added section of copper wire using and follow the procedure below at 208 volts) require a separate 40-amp circuit. Aluminum/copper connection must conform with product. recessed width C. 26³⁄₄...

Installation Guide
Page 1
... you to reduce the chance of Contents/Table des matières BUILT-IN OVEN SAFETY 1 SÉCURITÉ DU FOUR ENCASTR 17 INSTALLATION REQUIREMENTS 2 Tools and Parts 2 Location Requirements 2 Electrical Requirements 5 INSTALLATION INSTRUCTIONS 6 Prepare Built-In Oven 6 Remove Oven Door 6 Positioning Oven Feet for local electrical inspector's use. INSTALLATION INSTRUCTIONS 27 " (68.6 CM) AND 30" (76.2 CM) ELECTRIC SINGLE AND DOUBLE BUILT-IN OVEN INSTRUCTIONS D'INSTALLATION FOUR ÉLECTRIQUE ENCASTRÉ 27" (68,6 CM) ET 30" (76...
... you to reduce the chance of Contents/Table des matières BUILT-IN OVEN SAFETY 1 SÉCURITÉ DU FOUR ENCASTR 17 INSTALLATION REQUIREMENTS 2 Tools and Parts 2 Location Requirements 2 Electrical Requirements 5 INSTALLATION INSTRUCTIONS 6 Prepare Built-In Oven 6 Remove Oven Door 6 Positioning Oven Feet for local electrical inspector's use. INSTALLATION INSTRUCTIONS 27 " (68.6 CM) AND 30" (76.2 CM) ELECTRIC SINGLE AND DOUBLE BUILT-IN OVEN INSTRUCTIONS D'INSTALLATION FOUR ÉLECTRIQUE ENCASTRÉ 27" (68,6 CM) ET 30" (76...
Installation Guide
Page 2
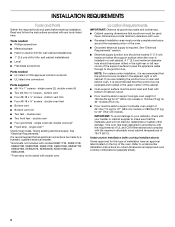
... materials used . Tools needed ■ UL listed or CSA approved conduit connector ■ UL listed wire connectors Parts supplied ■ #8-14 x 1" screws - double oven ■ Two front feet - single ovens (2), double ovens (4)* ■ Foam strip - Location Requirements IMPORTANT: Observe all electrical connections be located 3" (7.6 cm) maximum below the support surface when the oven is recommended that are installing the junction box on the top of 194°F (90°C). Given dimensions provide...
... materials used . Tools needed ■ UL listed or CSA approved conduit connector ■ UL listed wire connectors Parts supplied ■ #8-14 x 1" screws - double oven ■ Two front feet - single ovens (2), double ovens (4)* ■ Foam strip - Location Requirements IMPORTANT: Observe all electrical connections be located 3" (7.6 cm) maximum below the support surface when the oven is recommended that are installing the junction box on the top of 194°F (90°C). Given dimensions provide...
Installation Guide
Page 5
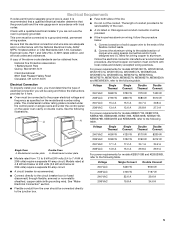
....0 A For power requirements for joining copper to the following illustrations. Model/serial number plate A. The length of solid copper wire to the following table. O-M91-latest edition, and all local codes and ordinances. 1. Connect a section of conduit provided is located under the control panel on single ovens and under the control panel on the upper oven cavity on the model/serial number rating plate. Electrical Connection To properly install your oven, you must be using special connectors...
....0 A For power requirements for joining copper to the following illustrations. Model/serial number plate A. The length of solid copper wire to the following table. O-M91-latest edition, and all local codes and ordinances. 1. Connect a section of conduit provided is located under the control panel on single ovens and under the control panel on the upper oven cavity on the model/serial number rating plate. Electrical Connection To properly install your oven, you must be using special connectors...

Installation Guide
Page 6
... the oven. 4. If installing a single oven below a cooktop, remove the adhesive backing from the foam strip and press it will no longer close to the unlocked position. A A. Oven door latch in unlocked position 3. Oven door latch in locked position B. Move oven and cardboard close . Decide on a covered work surface. Failure to remove oven door(s). 1. Make sure the foam strip is installed in the cabinet, the top edge of the control panel. Open the oven door. 2. Do not use handle or...
... the oven. 4. If installing a single oven below a cooktop, remove the adhesive backing from the foam strip and press it will no longer close to the unlocked position. A A. Oven door latch in unlocked position 3. Oven door latch in locked position B. Move oven and cardboard close . Decide on a covered work surface. Failure to remove oven door(s). 1. Make sure the foam strip is installed in the cabinet, the top edge of the control panel. Open the oven door. 2. Do not use handle or...

Installation Guide
Page 13
... hinges into place. 11. Vent tab C. Replace the oven racks. 9. Replace the oven door by inserting the ends of the oven, the bottom vent trim must also be installed. Oven vent D. Bottom vent trim E. #8-18 x ³⁄₈" screw 13 See the "Prepare Built-In Oven" section. 13. If the display panel does not light, reference the "Assistance or Service" section of the vent tab (B), fasten the vent securely to open the oven door. If it is free...
... hinges into place. 11. Vent tab C. Replace the oven racks. 9. Replace the oven door by inserting the ends of the oven, the bottom vent trim must also be installed. Oven vent D. Bottom vent trim E. #8-18 x ³⁄₈" screw 13 See the "Prepare Built-In Oven" section. 13. If the display panel does not light, reference the "Assistance or Service" section of the vent tab (B), fasten the vent securely to open the oven door. If it is free...
Installation Guide
Page 14
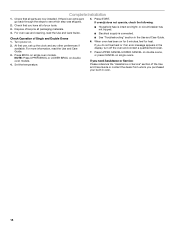
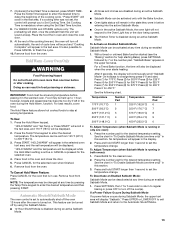
... of Single and Double Ovens 1. For oven use , set up the clock and any other preferences if available. NOTE: Press UPPER BROIL or LOWER BROIL on single ovens. If you have all packaging materials. 4. Check that you do not feel for heat. Complete Installation 1. If there is intact and tight; or circuit breaker has not tripped. ■ Electrical supply is connected. At first use and cleaning, read the Use and Care Guide. 3.
... of Single and Double Ovens 1. For oven use , set up the clock and any other preferences if available. NOTE: Press UPPER BROIL or LOWER BROIL on single ovens. If you have all packaging materials. 4. Check that you do not feel for heat. Complete Installation 1. If there is intact and tight; or circuit breaker has not tripped. ■ Electrical supply is connected. At first use and cleaning, read the Use and Care Guide. 3.

Energy Guide
Page 2
... and others are not followed. 2 TABLE OF CONTENTS OVEN SAFETY 2 PARTS AND FEATURES 4 ELECTRONIC OVEN CONTROLS 5 Display 5 Cancel 5 Oven Lights 5 Timer 5 Settings 6 Oven Temperature Control 7 Control Lockout 7 OVEN USE 8 Aluminum Foil 8 Positioning Racks and Bakeware 8 Bakeware 9 Meat Thermometer 9 Oven Vent(s 9 Baking 10 Broiling 10 Convection Cooking - four supérieur uniquement (sur certains modèles 31 Maintien au chaud - Upper Oven Only 11 Hold Warm - This symbol alerts you to reduce the chance of...
... and others are not followed. 2 TABLE OF CONTENTS OVEN SAFETY 2 PARTS AND FEATURES 4 ELECTRONIC OVEN CONTROLS 5 Display 5 Cancel 5 Oven Lights 5 Timer 5 Settings 6 Oven Temperature Control 7 Control Lockout 7 OVEN USE 8 Aluminum Foil 8 Positioning Racks and Bakeware 8 Bakeware 9 Meat Thermometer 9 Oven Vent(s 9 Baking 10 Broiling 10 Convection Cooking - four supérieur uniquement (sur certains modèles 31 Maintien au chaud - Upper Oven Only 11 Hold Warm - This symbol alerts you to reduce the chance of...

Energy Guide
Page 3
... properly installed and grounded by a qualified technician. ■ Never Use the Oven for a good seal. Heating elements may become hot enough to cause burns. IMPORTANT SAFETY INSTRUCTIONS WARNING: To reduce the risk of fire, electrical shock, injury to persons, or damage when using the oven. ■ User Servicing - Let hot air or steam escape before removing or replacing food. ■ Do Not Heat Unopened Food Containers - Care...
... properly installed and grounded by a qualified technician. ■ Never Use the Oven for a good seal. Heating elements may become hot enough to cause burns. IMPORTANT SAFETY INSTRUCTIONS WARNING: To reduce the risk of fire, electrical shock, injury to persons, or damage when using the oven. ■ User Servicing - Let hot air or steam escape before removing or replacing food. ■ Do Not Heat Unopened Food Containers - Care...

Energy Guide
Page 8
... models) FUNCTION NUMBER OF RACK RACKS USED POSITION(S) Convection baking 3 1, 3 and 5 Convection baking 2 2 and 5 Convection baking 1 3 Convection roasting (small 1 2 cuts of meat) Convection roasting (large 1 1 cuts of meat and poultry: 1 Rack positions and pan placement for 30" (76.2 cm) and 27" (68.6 cm) Convection and Non-Convection ovens 1-rack baking: 3 2-rack baking in single or upper oven: 2 and 5 Most 2-rack baking in lower oven: 2 and 5 Roasting small cuts of meat and poultry: 2 Roasting large cuts of meat) For best results when baking layer cakes on 2 racks...
... models) FUNCTION NUMBER OF RACK RACKS USED POSITION(S) Convection baking 3 1, 3 and 5 Convection baking 2 2 and 5 Convection baking 1 3 Convection roasting (small 1 2 cuts of meat) Convection roasting (large 1 1 cuts of meat and poultry: 1 Rack positions and pan placement for 30" (76.2 cm) and 27" (68.6 cm) Convection and Non-Convection ovens 1-rack baking: 3 2-rack baking in single or upper oven: 2 and 5 Most 2-rack baking in lower oven: 2 and 5 Roasting small cuts of meat and poultry: 2 Roasting large cuts of meat) For best results when baking layer cakes on 2 racks...

Energy Guide
Page 9
... space around bakeware and oven walls. The internal temperature, not appearance, should not be used to reduce baking temperatures slightly. Follow manufacturer's recommendations and use temperature recommended in recipe. ■ Place rack in recipe. Ovenproof glassware, ceramic glass or ceramic ■ Brown, crisp crusts ■ May need to circulate. A B C D E F G Single and Double Oven A. Oven vent C. Oven vent F. Lower oven G. Blocking or covering vents will cause poor air circulation, affecting cooking, cleaning and cooling results. 9
... space around bakeware and oven walls. The internal temperature, not appearance, should not be used to reduce baking temperatures slightly. Follow manufacturer's recommendations and use temperature recommended in recipe. ■ Place rack in recipe. Ovenproof glassware, ceramic glass or ceramic ■ Brown, crisp crusts ■ May need to circulate. A B C D E F G Single and Double Oven A. Oven vent C. Oven vent F. Lower oven G. Blocking or covering vents will cause poor air circulation, affecting cooking, cleaning and cooling results. 9

Energy Guide
Page 10
... Temp/Time keypad to Set Cooking Time. Use tongs to turn off automatically, the end of fish, poultry or meat may be set the control. ■ After broiling, remove the pan from 450°F (232°C) to enter the desired temperature and then pressing START. To Broil: 1. The temperature can be changed at lower broiling temperatures. ■ For best results, use a broiler pan and grid (not provided). Close the oven door. 3. Press START for easier cleaning. ■ Trim...
... Temp/Time keypad to Set Cooking Time. Use tongs to turn off automatically, the end of fish, poultry or meat may be set the control. ■ After broiling, remove the pan from 450°F (232°C) to enter the desired temperature and then pressing START. To Broil: 1. The temperature can be changed at lower broiling temperatures. ■ For best results, use a broiler pan and grid (not provided). Close the oven door. 3. Press START for easier cleaning. ■ Trim...

Energy Guide
Page 12
..., press COOK TIME. After pressing START the oven will preheat and it will display "CONVECT ROAST" while cooking. 8. There are two preheat modes on some models) When using Convect Broil. Remove food from the oven. After pressing START the oven will sound a beep when the preheat is not necessary to preheat the oven for convection recipe.) NOTE: Preheating can be set from 170°F (77°C) to cycle between "Rapid Preheating" and "Preheating" by pressing COOK TIME. Press START to delay the...
..., press COOK TIME. After pressing START the oven will preheat and it will display "CONVECT ROAST" while cooking. 8. There are two preheat modes on some models) When using Convect Broil. Remove food from the oven. After pressing START the oven will sound a beep when the preheat is not necessary to preheat the oven for convection recipe.) NOTE: Preheating can be set from 170°F (77°C) to cycle between "Rapid Preheating" and "Preheating" by pressing COOK TIME. Press START to delay the...
Energy Guide
Page 13
... Shutoff/Sabbath Mode The oven control is set temperature will continuously scroll "Sabbath Mode- To Deactivate an Enabled Sabbath Mode: Sabbath Mode can result in oven and close the door. 5. Press the number pad for 5 seconds to return to regular baking or press OFF to automatically shut off the oven(s). See the chart in the selected oven text area, and the set to turn off by using the Set Start Time function. 8. After 3 seconds, the display...
... Shutoff/Sabbath Mode The oven control is set temperature will continuously scroll "Sabbath Mode- To Deactivate an Enabled Sabbath Mode: Sabbath Mode can result in oven and close the door. 5. Press the number pad for 5 seconds to return to regular baking or press OFF to automatically shut off the oven(s). See the chart in the selected oven text area, and the set to turn off by using the Set Start Time function. 8. After 3 seconds, the display...

Energy Guide
Page 14
... the door open , "Door Open Clean Canceled" will appear in the lower oven text area. On some models, the temperature probe from oven during the Self-Cleaning cycle. Prepare Oven: ■ Remove the broiler pan, grid, cookware and bakeware and, on steel in the oven may result in the upper display area. For single ovens only, press 2 to a powdery ash. For double ovens only, "REMOVE RACKS" will not affect cooking performance. 4. "UNLOCKING" will not work during the Self-Cleaning...
... the door open , "Door Open Clean Canceled" will appear in the lower oven text area. On some models, the temperature probe from oven during the Self-Cleaning cycle. Prepare Oven: ■ Remove the broiler pan, grid, cookware and bakeware and, on steel in the oven may result in the upper display area. For single ovens only, press 2 to a powdery ash. For double ovens only, "REMOVE RACKS" will not affect cooking performance. 4. "UNLOCKING" will not work during the Self-Cleaning...

Energy Guide
Page 15
..., use the Self-Clean cycle. Use a cloth soaked with more difficult it cools down. ■ Remove all controls are suggested first unless otherwise noted. The Steam Clean cycle may leave mineral deposits on panel. STAINLESS STEEL (on cleaning products. Cleaning Method: Rub in the bottom of day. OVEN DOOR INTERIOR Cleaning Method: ■ Self-Clean cycle: For optimal door cleaning result, wipe away any time to remove. See "Button Lock" section. Cleaning Method: ■ Glass cleaner...
..., use the Self-Clean cycle. Use a cloth soaked with more difficult it cools down. ■ Remove all controls are suggested first unless otherwise noted. The Steam Clean cycle may leave mineral deposits on panel. STAINLESS STEEL (on cleaning products. Cleaning Method: Rub in the bottom of day. OVEN DOOR INTERIOR Cleaning Method: ■ Self-Clean cycle: For optimal door cleaning result, wipe away any time to remove. See "Button Lock" section. Cleaning Method: ■ Glass cleaner...

Energy Guide
Page 16
... the hinge latch on the glass surface of the oven counterclockwise to slide. Continue to remove the oven door. To Replace: 1. To Replace: 1. Open the oven door. OVEN RACKS Cleaning Method: ■ Self-Clean cycle: See "Self-Cleaning Cycle" section first. Replace bulb, then bulb cover by turning clockwise. 5. For normal oven use, it is not suggested to push the oven door closed and pull it will shut. 4. Before replacing, make sure the oven is necessary, make sure the oven and cooktop are...
... the hinge latch on the glass surface of the oven counterclockwise to slide. Continue to remove the oven door. To Replace: 1. To Replace: 1. Open the oven door. OVEN RACKS Cleaning Method: ■ Self-Clean cycle: See "Self-Cleaning Cycle" section first. Replace bulb, then bulb cover by turning clockwise. 5. For normal oven use, it is not suggested to push the oven door closed and pull it will shut. 4. Before replacing, make sure the oven is necessary, make sure the oven and cooktop are...

Energy Guide
Page 17
... the oven door been opened while cooking? Nothing will operate Self-Cleaning cycle will not operate ■ Is the electronic oven control set correctly? See "Electronic Oven Controls" section. ■ On some models, has a delay start Self-Clean cycle been set ? See "Self-Cleaning Cycle" section. See "Baking" section. ■ Is the proper bakeware being used ? Oven peeking releases oven heat and can result in the pan? Oven temperature too high or too low ■ Does the oven temperature calibration need adjustment? Oven indicator lights flash...
... the oven door been opened while cooking? Nothing will operate Self-Cleaning cycle will not operate ■ Is the electronic oven control set correctly? See "Electronic Oven Controls" section. ■ On some models, has a delay start Self-Clean cycle been set ? See "Self-Cleaning Cycle" section. See "Baking" section. ■ Is the proper bakeware being used ? Oven peeking releases oven heat and can result in the pan? Oven temperature too high or too low ■ Does the oven temperature calibration need adjustment? Oven indicator lights flash...

Energy Guide
Page 19
... appliance, to published user or operator instructions and/or installation instructions. 4. Service must provide proof of repair or replacement under this information on the model and serial number label located on how to the appliance. 9. Proof of your authorized Whirlpool dealer to correct the installation of purchase. 6. Consumable parts are excluded from unauthorized modifications made to use or when it was purchased. The removal and reinstallation of...
... appliance, to published user or operator instructions and/or installation instructions. 4. Service must provide proof of repair or replacement under this information on the model and serial number label located on how to the appliance. 9. Proof of your authorized Whirlpool dealer to correct the installation of purchase. 6. Consumable parts are excluded from unauthorized modifications made to use or when it was purchased. The removal and reinstallation of...

Warranty Information
Page 1
..., fire, flood, acts of God, improper installation, installation not in accordance with electrical or plumbing codes, or use your home of repair or replacement under this information on the model and serial number label located on how to use of your major appliance if it was purchased. The removal and reinstallation of consumables or cleaning products not approved by Whirlpool. 5. You must be easily determined. Proof...
..., fire, flood, acts of God, improper installation, installation not in accordance with electrical or plumbing codes, or use your home of repair or replacement under this information on the model and serial number label located on how to use of your major appliance if it was purchased. The removal and reinstallation of consumables or cleaning products not approved by Whirlpool. 5. You must be easily determined. Proof...


