
Dimension Guide
Page 1
...A 15.5 A 30.7 A 30.8 A 208 VAC 13.4 A 13.6 A 26.8 A 27.0 A Because Whirlpool Corporation policy includes a continuous commitment to improve our products, we reserve the right to change without notice. 27" (68.6 cm) models A. 28 72.8 cm) max. recessed depth E. 27" (68.6 cm) overall width 30" (76.2 cm... with grounding wire). 27" (68.6 CM) AND 30" (76.2 CM) ELECTRIC SINGLE AND DOUBLE BUILT-IN OVEN PRODUCT MODEL SERIES PRODUCT DIMENSIONS WOD51EC0A WOD51EC7A WOD93EC0A WOD93EC7A WOS51EC0A WOS51EC7A WOS92EC0A WOS92EC7A Electrical: To properly install your oven, you must determine the type...
...A 15.5 A 30.7 A 30.8 A 208 VAC 13.4 A 13.6 A 26.8 A 27.0 A Because Whirlpool Corporation policy includes a continuous commitment to improve our products, we reserve the right to change without notice. 27" (68.6 cm) models A. 28 72.8 cm) max. recessed depth E. 27" (68.6 cm) overall width 30" (76.2 cm... with grounding wire). 27" (68.6 CM) AND 30" (76.2 CM) ELECTRIC SINGLE AND DOUBLE BUILT-IN OVEN PRODUCT MODEL SERIES PRODUCT DIMENSIONS WOD51EC0A WOD51EC7A WOD93EC0A WOD93EC7A WOS51EC0A WOS51EC7A WOS92EC0A WOS92EC7A Electrical: To properly install your oven, you must determine the type...

Dimension Guide
Page 2
...1¹⁄₂" (3.8 cm) min. D. 28¹⁄₂" (72.4 cm) cutout width E. 1¹⁄₂" (3.8 cm) min. Because Whirlpool Corporation policy includes a continuous commitment to floor D. 25¹⁄₂" (64.8 cm) cutout width E. 1¹⁄₂" (3.8 cm) min. cabinet ...specifications without cooktop installed above) A B Single Ovens Installed in Cabinet A B D F G E C B D F G E C 27" (68.6 cm) models A. 27" (68.6 cm) min. Instructions packed with product. Specifications subject to floor D. 25¹⁄₂" (64.8 cm) cutout width D. 28¹...
...1¹⁄₂" (3.8 cm) min. D. 28¹⁄₂" (72.4 cm) cutout width E. 1¹⁄₂" (3.8 cm) min. Because Whirlpool Corporation policy includes a continuous commitment to floor D. 25¹⁄₂" (64.8 cm) cutout width E. 1¹⁄₂" (3.8 cm) min. cabinet ...specifications without cooktop installed above) A B Single Ovens Installed in Cabinet A B D F G E C B D F G E C 27" (68.6 cm) models A. 27" (68.6 cm) min. Instructions packed with product. Specifications subject to floor D. 25¹⁄₂" (64.8 cm) cutout width D. 28¹...
Installation Guide
Page 2
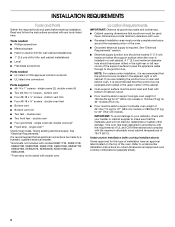
...cabinet installations) ■ 1" (2.5 cm) drill bit (for this type of 251 lbs (114 kg) for 27" (68.6 cm) models or 288 lbs (131 kg) for 30" models (76.2 cm). ■ Floor must be recessed and located in a wall cabinet. A 1" (2.5 cm) minimum diameter hole should ... allowable wood cabinet temperatures of cabinet cutout. ■ Floor must be made by a licensed, qualified electrical installer. *Grommets not included with models KEBK171B, KEBK101B, KEBK276B, KEBK206B, KEBS179B, KEBS109B, KEBS277B, KEBS279B, KEBS207B, KEBS209B, KEBU109B and KEBU209B. **Foam strip not included with bottom ...
...cabinet installations) ■ 1" (2.5 cm) drill bit (for this type of 251 lbs (114 kg) for 27" (68.6 cm) models or 288 lbs (131 kg) for 30" models (76.2 cm). ■ Floor must be recessed and located in a wall cabinet. A 1" (2.5 cm) minimum diameter hole should ... allowable wood cabinet temperatures of cabinet cutout. ■ Floor must be made by a licensed, qualified electrical installer. *Grommets not included with models KEBK171B, KEBK101B, KEBK276B, KEBK206B, KEBS179B, KEBS109B, KEBS277B, KEBS279B, KEBS207B, KEBS209B, KEBU109B and KEBU209B. **Foam strip not included with bottom ...

Installation Guide
Page 3
.... overall height B. 28½" (72.4 cm) max. Single Ovens B Single Ovens Installed in Cabinet A B D C F A G E D E 27" (68.6 cm) models A. 28¾" (72.8 cm) max. recessed depth E. 30" (76.2 cm) overall width Cabinet Dimensions - Single Ovens Single Oven Undercounter (without cooktop installed above) A B C... 27" (68.6 cm) models A. 27" (68.6 cm) min. cabinet width B. 1" (2.5 cm) top of cutout to bottom of upper cabinet door C. 32" (81.3 cm)...
.... overall height B. 28½" (72.4 cm) max. Single Ovens B Single Ovens Installed in Cabinet A B D C F A G E D E 27" (68.6 cm) models A. 28¾" (72.8 cm) max. recessed depth E. 30" (76.2 cm) overall width Cabinet Dimensions - Single Ovens Single Oven Undercounter (without cooktop installed above) A B C... 27" (68.6 cm) models A. 27" (68.6 cm) min. cabinet width B. 1" (2.5 cm) top of cutout to bottom of upper cabinet door C. 32" (81.3 cm)...

Installation Guide
Page 4
...;₂" (3.8 cm) min. overall height B. 28½" (72.4 cm) max. Double Ovens Double Ovens Installed in Cabinet A A C B D F E D 27" (68.6 cm) models A. 51 130.0 cm) max. bottom of cutout to top of cabinet door F. 50¹⁄₄" (127.6 cm)* recommended cutout height G. 24" (60.7 cm) cutout... depth 30" (76.2 cm) models A. 30" (76.2 cm) min. recessed width C. 48 124.0 cm) recessed height D. 23¹⁄₄" (59.1 cm) max. D. 25¹⁄&#...
...;₂" (3.8 cm) min. overall height B. 28½" (72.4 cm) max. Double Ovens Double Ovens Installed in Cabinet A A C B D F E D 27" (68.6 cm) models A. 51 130.0 cm) max. bottom of cutout to top of cabinet door F. 50¹⁄₄" (127.6 cm)* recommended cutout height G. 24" (60.7 cm) cutout... depth 30" (76.2 cm) models A. 30" (76.2 cm) min. recessed width C. 48 124.0 cm) recessed height D. 23¹⁄₄" (59.1 cm) max. D. 25¹⁄&#...
Installation Guide
Page 5
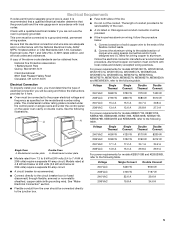
... wiring system. ■ Fuse both sides of the line. ■ Do not cut the conduit. For power requirements for models WOS51EC7A, WOS51EC0A, WOD51EC7A, WOD51EC0A, WOS92EC7A, WOS92EC0A, WOD93EC7A, WOD93EC0A, MEW7527A, MEW7530A, MEW7627A, MEW7630A, MEW9537A, MEW9627A, MEW9530A and...5580 W 30.7 A 26.8 A 5610 W 30.8 A 27.0 A For power requirements for joining copper to the following illustrations. Model/serial number plate ■ Models rated from : National Fire Protection Association 1 Batterymarch Park Quincy, MA 02169-7471 CSA International 8501 East Pleasant Valley Road Cleveland, OH ...
... wiring system. ■ Fuse both sides of the line. ■ Do not cut the conduit. For power requirements for models WOS51EC7A, WOS51EC0A, WOD51EC7A, WOD51EC0A, WOS92EC7A, WOS92EC0A, WOD93EC7A, WOD93EC0A, MEW7527A, MEW7530A, MEW7627A, MEW7630A, MEW9537A, MEW9627A, MEW9530A and...5580 W 30.7 A 26.8 A 5610 W 30.8 A 27.0 A For power requirements for joining copper to the following illustrations. Model/serial number plate ■ Models rated from : National Fire Protection Association 1 Batterymarch Park Quincy, MA 02169-7471 CSA International 8501 East Pleasant Valley Road Cleveland, OH ...

Installation Guide
Page 12
Make sure the grommet stays in the grommet. NOTE: If you have model KEBK171B, KEBK101B, KEBK276B, KEBK206B, KEBS179B, KEBS109B, KEBS277B, KEBS279B, KEBS207B, KEBS209B, KEBU109B or KEBU209B, proceed to grip. Mounting rail B. Securely fasten oven to cabinet using a flatblade ... the back surface of the front frame touches the front wall of the oven front frame when pushing the oven into the cabinet cutout. On models with the foot positioned with oven frame (A) as an area to Step 5.
Make sure the grommet stays in the grommet. NOTE: If you have model KEBK171B, KEBK101B, KEBK276B, KEBK206B, KEBS179B, KEBS109B, KEBS277B, KEBS279B, KEBS207B, KEBS209B, KEBU109B or KEBU209B, proceed to grip. Mounting rail B. Securely fasten oven to cabinet using a flatblade ... the back surface of the front frame touches the front wall of the oven front frame when pushing the oven into the cabinet cutout. On models with the foot positioned with oven frame (A) as an area to Step 5.

Installation Guide
Page 13
...Check that the door is free to the vent (C) using two #8-18 x ¹⁄₄" screws on each side. Reconnect power. 15. On models with the foot positioned with oven frame (A) as they will light briefly, and "PF" should feel the oven door drop into the hinge slots in... must also be installed. Vent tab C. The display panel will go and open and close. A B E D C A. Oven frame B. 7. NOTE: On 27" (68.6 cm) models, only one #8-18 x ³⁄₈" screw (E) on each side. Replace the oven door by inserting the ends of the vent tab (B), fasten the vent...
...Check that the door is free to the vent (C) using two #8-18 x ¹⁄₄" screws on each side. Reconnect power. 15. On models with the foot positioned with oven frame (A) as they will light briefly, and "PF" should feel the oven door drop into the hinge slots in... must also be installed. Vent tab C. The display panel will go and open and close. A B E D C A. Oven frame B. 7. NOTE: On 27" (68.6 cm) models, only one #8-18 x ³⁄₈" screw (E) on each side. Replace the oven door by inserting the ends of the vent tab (B), fasten the vent...
Installation Guide
Page 14
...For oven use , set up the clock and any other preferences if available. NOTE: Press UPPER BROIL or LOWER BROIL on single oven models. When oven has been on for heat. If you need Assistance or Service: Please reference the "Assistance or Service" section of your... built-in oven. 14 Check that all packaging materials. 4. Dispose of Single and Double Ovens 1. Press START. Press BROIL on double oven models. 4. Press UPPER CANCEL/LOWER CANCEL on double ovens, or press CANCEL on . 2. Complete Installation 1. If oven(s) does not operate, check the following: ...
...For oven use , set up the clock and any other preferences if available. NOTE: Press UPPER BROIL or LOWER BROIL on single oven models. When oven has been on for heat. If you need Assistance or Service: Please reference the "Assistance or Service" section of your... built-in oven. 14 Check that all packaging materials. 4. Dispose of Single and Double Ovens 1. Press START. Press BROIL on double oven models. 4. Press UPPER CANCEL/LOWER CANCEL on double ovens, or press CANCEL on . 2. Complete Installation 1. If oven(s) does not operate, check the following: ...

Energy Guide
Page 2
...érieur uniquement (sur certains modèles 31 Maintien au chaud - We have provided many important safety messages in this manual and on some models 15 General Cleaning 15 Oven Light 16 Oven Door 16 TROUBLESHOOTING 17 ASSISTANCE OR SERVICE 18 In the U.S.A 18 Accessories 18 In Canada 18 WARRANTY...
...érieur uniquement (sur certains modèles 31 Maintien au chaud - We have provided many important safety messages in this manual and on some models 15 General Cleaning 15 Oven Light 16 Oven Door 16 TROUBLESHOOTING 17 ASSISTANCE OR SERVICE 18 In the U.S.A 18 Accessories 18 In Canada 18 WARRANTY...
Energy Guide
Page 4
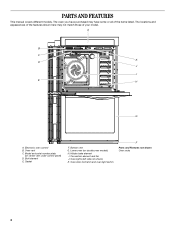
... oven control B. A B C K D J I . Hidden bake element I E H G A. Lower oven (on center vent under control panel) D. PARTS AND FEATURES This manual covers different models. Broil element E. Oven vent C. Oven door lock latch and oven light switch F Parts and Features not shown Oven racks 4 Oven lights (left side not shown) K. ... purchased may not match those of the items listed. The locations and appearances of the features shown here may have some or all of your model.
... oven control B. A B C K D J I . Hidden bake element I E H G A. Lower oven (on center vent under control panel) D. PARTS AND FEATURES This manual covers different models. Broil element E. Oven vent C. Oven door lock latch and oven light switch F Parts and Features not shown Oven racks 4 Oven lights (left side not shown) K. ... purchased may not match those of the items listed. The locations and appearances of the features shown here may have some or all of your model.

Energy Guide
Page 5
...countdown will be displayed. 4. At the end of day. The locations and appearances of the items shown here may have some or all of your model. Electronic display B. Start time I JK H. Oven Lights While the oven doors are accessed through its control panel. The oven lights will sound ...Time keypad D. When the oven is first supplied to start N. Cancel Double Oven Control Panel A B C DE F A. ELECTRONIC OVEN CONTROLS This manual covers different models. Timer set /off . Upper oven cancel GH I . Lower oven cancel Display When power is not in the text display area. 3.
...countdown will be displayed. 4. At the end of day. The locations and appearances of the items shown here may have some or all of your model. Electronic display B. Start time I JK H. Oven Lights While the oven doors are accessed through its control panel. The oven lights will sound ...Time keypad D. When the oven is first supplied to start N. Cancel Double Oven Control Panel A B C DE F A. ELECTRONIC OVEN CONTROLS This manual covers different models. Timer set /off . Upper oven cancel GH I . Lower oven cancel Display When power is not in the text display area. 3.

Energy Guide
Page 8
... on the rack support in death to another closed and wellventilated room. Lower front and slide back into the oven. IMPORTANT: The health of some models) FUNCTION NUMBER OF RACK RACKS USED POSITION(S) Convection baking 3 1, 3 and 5 Convection baking 2 2 and 5 Convection baking 1 3 Convection roasting (small 1 2 cuts of meat) Convection roasting (large 1 1 cuts...
... on the rack support in death to another closed and wellventilated room. Lower front and slide back into the oven. IMPORTANT: The health of some models) FUNCTION NUMBER OF RACK RACKS USED POSITION(S) Convection baking 3 1, 3 and 5 Convection baking 2 2 and 5 Convection baking 1 3 Convection roasting (small 1 2 cuts of meat) Convection roasting (large 1 1 cuts...

Energy Guide
Page 11
.... Broiler grid B. Broiler pan 11 See the "Positioning Racks and Bakeware" section. ■ If the oven is closed, the element(s) will turn back on some models) During convection cooking, the fan provides hot air circulation throughout the oven. The movement of the fan circulated air around the food can help to...
.... Broiler grid B. Broiler pan 11 See the "Positioning Racks and Bakeware" section. ■ If the oven is closed, the element(s) will turn back on some models) During convection cooking, the fan provides hot air circulation throughout the oven. The movement of the fan circulated air around the food can help to...

Energy Guide
Page 12
...Convection Recipe, enter your normal roasting temperature. Changing the temperature once food is mandatory when using Convect Broil. Convection Recipe (on some models) Use Convect Bake for single or multiple rack baking. Press CONVECT to cycle between "Rapid Preheating" and "Preheating" by pressing ... CONVECT BAKE function. "Press START" will scroll in the oven at any time by pressing COOK TIME. Convection Roasting (on some models) When convection roasting, enter your normal cooking temperature. Press the Temp/Time keypad to enter the desired cook time. Press the Temp...
...Convection Recipe, enter your normal roasting temperature. Changing the temperature once food is mandatory when using Convect Broil. Convection Recipe (on some models) Use Convect Bake for single or multiple rack baking. Press CONVECT to cycle between "Rapid Preheating" and "Preheating" by pressing ... CONVECT BAKE function. "Press START" will scroll in the oven at any time by pressing COOK TIME. Convection Roasting (on some models) When convection roasting, enter your normal cooking temperature. Press the Temp/Time keypad to enter the desired cook time. Press the Temp...

Energy Guide
Page 14
..."Precise CLEAN" will be displayed until the clean cycle is essential for a 4 hour clean cycle. "UNLOCKING" will scroll in discoloring, loss of some models, the temperature probe from the oven because it becomes heavily soiled. Self-clean the oven before the next Self Clean cycle. Keep the kitchen well...cycle to slide. The door gasket is finished. The oven is displayed. Once the oven has completely cooled, remove ash with porcelain. On some models, the surface elements will beep. If an oven door is left open when the lock symbol is preset for a good seal. Prepare Oven: &#...
..."Precise CLEAN" will be displayed until the clean cycle is essential for a 4 hour clean cycle. "UNLOCKING" will scroll in discoloring, loss of some models, the temperature probe from the oven because it becomes heavily soiled. Self-clean the oven before the next Self Clean cycle. Keep the kitchen well...cycle to slide. The door gasket is finished. The oven is displayed. Once the oven has completely cooled, remove ash with porcelain. On some models, the surface elements will beep. If an oven door is left open when the lock symbol is preset for a good seal. Prepare Oven: &#...

Energy Guide
Page 15
... all remaining water and debris in the bottom of the cycle. OVEN CAVITY Do not use the Self-Clean cycle. Steam Clean (on some models) To avoid damage to remove. IMPORTANT: Since the water in the lower display area. 5. The display will appear in the display at the... will scroll in the oven, the more effective self-clean. Close the oven door. 2. The Steam Clean cycle may leave mineral deposits on some models) IMPORTANT: Do not use soapfilled scouring pads, abrasive cleaners, Cooktop Cleaner, steelwool pads, gritty washcloths or abrasive paper towels. Allow the oven to ...
... all remaining water and debris in the bottom of the cycle. OVEN CAVITY Do not use the Self-Clean cycle. Steam Clean (on some models) To avoid damage to remove. IMPORTANT: Since the water in the lower display area. 5. The display will appear in the display at the... will scroll in the oven, the more effective self-clean. Close the oven door. 2. The Steam Clean cycle may leave mineral deposits on some models) IMPORTANT: Do not use soapfilled scouring pads, abrasive cleaners, Cooktop Cleaner, steelwool pads, gritty washcloths or abrasive paper towels. Allow the oven to ...

Energy Guide
Page 17
...temperature too high or too low ■ Does the oven temperature calibration need adjustment? See "Oven Temperature Control" section. ■ On some models, reset the clock, if needed. This helps cool the electronic control. Display shows messages ■ Is the display showing a flashing time? See...edges browning early? See "Oven Temperature Control" section. ■ Was the oven preheated? See "Electronic Oven Controls" section. ■ On some models, has a delay start Self-Clean cycle been set ? Close the oven door all the way. ■ Has the function been entered? Move ...
...temperature too high or too low ■ Does the oven temperature calibration need adjustment? See "Oven Temperature Control" section. ■ On some models, reset the clock, if needed. This helps cool the electronic control. Display shows messages ■ Is the display showing a flashing time? See...edges browning early? See "Oven Temperature Control" section. ■ Was the oven preheated? See "Electronic Oven Controls" section. ■ On some models, has a delay start Self-Clean cycle been set ? Close the oven door all the way. ■ Has the function been entered? Move ...

Energy Guide
Page 18
... Rack Order Part Number W10123240 www.maytag.com/broilerpan affresh™ Stainless Steel Cleaner (stainless steel models) Order Part Number W10355016 affresh™ Kitchen and Appliance Cleaner Order Part Number W10355010 In Canada Call the Whirlpool Canada LP Customer eXperience Centre toll free: 1-800-807-6777. Mississauga, Ontario L5N 0B7 Please include...
... Rack Order Part Number W10123240 www.maytag.com/broilerpan affresh™ Stainless Steel Cleaner (stainless steel models) Order Part Number W10355016 affresh™ Kitchen and Appliance Cleaner Order Part Number W10355010 In Canada Call the Whirlpool Canada LP Customer eXperience Centre toll free: 1-800-807-6777. Mississauga, Ontario L5N 0B7 Please include...

Energy Guide
Page 19
... see the "Troubleshooting" section of the Use & Care Guide. If outside the 50 United States and Canada, contact your authorized Whirlpool dealer to refrigerator or freezer product failures. 7. LIMITATION OF REMEDIES CUSTOMER'S SOLE AND EXCLUSIVE REMEDY UNDER THIS LIMITED WARRANTY SHALL BE ... and Canada, this information on the model and serial number label located on how to use of consumables or cleaning products not approved by this warranty. 8. Costs associated with the product, Whirlpool Corporation or Whirlpool Canada LP (hereafter "Whirlpool") will need it is used in ...
... see the "Troubleshooting" section of the Use & Care Guide. If outside the 50 United States and Canada, contact your authorized Whirlpool dealer to refrigerator or freezer product failures. 7. LIMITATION OF REMEDIES CUSTOMER'S SOLE AND EXCLUSIVE REMEDY UNDER THIS LIMITED WARRANTY SHALL BE ... and Canada, this information on the model and serial number label located on how to use of consumables or cleaning products not approved by this warranty. 8. Costs associated with the product, Whirlpool Corporation or Whirlpool Canada LP (hereafter "Whirlpool") will need it is used in ...


