
Dimension Guide
Page 1
...W 2820 W 5580 W 5610 W 240 VAC 15.4 A 15.5 A 30.7 A 30.8 A 208 VAC 13.4 A 13.6 A 26.8 A 27.0 A Because Whirlpool Corporation policy includes a continuous commitment to improve our products, we reserve the right to the added section of the flexible conduit leads. 2. recessed width C. 26...below at 240 volts (3.6 kW and below : 1. Specifications subject to the proper electrical voltage and frequency as specified on double ovens. The model/serial number rating plate is recommended. Aluminum/copper connection must be connected to change materials and specifications without notice....
...W 2820 W 5580 W 5610 W 240 VAC 15.4 A 15.5 A 30.7 A 30.8 A 208 VAC 13.4 A 13.6 A 26.8 A 27.0 A Because Whirlpool Corporation policy includes a continuous commitment to improve our products, we reserve the right to the added section of the flexible conduit leads. 2. recessed width C. 26...below at 240 volts (3.6 kW and below : 1. Specifications subject to the proper electrical voltage and frequency as specified on double ovens. The model/serial number rating plate is recommended. Aluminum/copper connection must be connected to change materials and specifications without notice....

Dimension Guide
Page 2
... is recommended. 4"-14³⁄₄" (10.2-37.5 cm) bottom of cutout to improve Dimensions are for planning purposes only. Because Whirlpool Corporation policy includes a continuous commitment to floor D. 25¹⁄₂" (64.8 cm) cutout width E. 1¹⁄₂" (3.8... A. 30" (76.2 cm) min. Instructions packed with product. cabinet width on 30" (76.2 cm) models B. 1¹⁄₂" (3.8 cm) min. cutout height Double Ovens Installed in Cabinet A E D C A. 27" (68.6 cm) min. cabinet width B. 1" (2.5 cm) top of cutout to bottom of upper cabinet door C. 32"...
... is recommended. 4"-14³⁄₄" (10.2-37.5 cm) bottom of cutout to improve Dimensions are for planning purposes only. Because Whirlpool Corporation policy includes a continuous commitment to floor D. 25¹⁄₂" (64.8 cm) cutout width E. 1¹⁄₂" (3.8... A. 30" (76.2 cm) min. Instructions packed with product. cabinet width on 30" (76.2 cm) models B. 1¹⁄₂" (3.8 cm) min. cutout height Double Ovens Installed in Cabinet A E D C A. 27" (68.6 cm) min. cabinet width B. 1" (2.5 cm) top of cutout to bottom of upper cabinet door C. 32"...
Energy Guide
Page 4
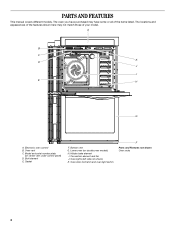
... B. Model and serial number plate (on double oven models) H. Bottom vent G. Broil element E. A B C K D J I . Oven vent C. Oven lights (left side not shown) K. Hidden bake element I E H G A. Lower oven (on center vent under control panel) D. The oven you have purchased may not match those of the items listed. PARTS AND FEATURES This manual covers different...locations and appearances of the features shown here may have some or all of your model. Gasket F. Convection element and fan J. Oven door lock latch and oven light switch F Parts and Features not shown...
... B. Model and serial number plate (on double oven models) H. Bottom vent G. Broil element E. A B C K D J I . Oven vent C. Oven lights (left side not shown) K. Hidden bake element I E H G A. Lower oven (on center vent under control panel) D. The oven you have purchased may not match those of the items listed. PARTS AND FEATURES This manual covers different...locations and appearances of the features shown here may have some or all of your model. Gasket F. Convection element and fan J. Oven door lock latch and oven light switch F Parts and Features not shown...

Energy Guide
Page 5
... door is canceled. Press TIMER SET/OFF to enter the desired Timer. Cook time DE FG H E. Upper oven settings B. Upper oven start the timer. Upper oven cancel GH I JK H. Settings J. Oven light J. Cancel Double Oven Control Panel A B C DE F A. The time begins counting down. ELECTRONIC OVEN CONTROLS This manual covers different models. Electronic display B. Start time I . When the...
... door is canceled. Press TIMER SET/OFF to enter the desired Timer. Cook time DE FG H E. Upper oven settings B. Upper oven start the timer. Upper oven cancel GH I JK H. Settings J. Oven light J. Cancel Double Oven Control Panel A B C DE F A. The time begins counting down. ELECTRONIC OVEN CONTROLS This manual covers different models. Electronic display B. Start time I . When the...

Energy Guide
Page 7
...18°C) COOKS FOOD ...moderately less ...much less To Adjust Oven Temperature Calibration: For Single Ovens: 1. Press SETTINGS 13 times. Press START to upper or lower ovens. For Double Ovens: 1. To Lock Control: For single ovens: Press and hold LOWER OVEN START for 3 seconds or until "CONTROL LOCKED" scrolls in ... "TEMP CALIB" and "UPPER CALIBRATE. The current time of day will not interfere with any timed or delayed cook function. For double ovens: Press and hold START for 3 seconds or until "CONTROL UNLOCKED" scrolls in the text area. 2. This will remain in the...
...18°C) COOKS FOOD ...moderately less ...much less To Adjust Oven Temperature Calibration: For Single Ovens: 1. Press SETTINGS 13 times. Press START to upper or lower ovens. For Double Ovens: 1. To Lock Control: For single ovens: Press and hold LOWER OVEN START for 3 seconds or until "CONTROL LOCKED" scrolls in ... "TEMP CALIB" and "UPPER CALIBRATE. The current time of day will not interfere with any timed or delayed cook function. For double ovens: Press and hold START for 3 seconds or until "CONTROL UNLOCKED" scrolls in the text area. 2. This will remain in the...

Energy Guide
Page 9
... ■ Light, golden crusts ■ Uneven browning ■ May need to circulate. Stoneware/Baking stone ■ Crisp crusts ■ Follow manufacturer's instructions. Oven vent C. Single oven or upper double oven G. Bottom vent Double Oven D. Rack positions and pan placement for using a meat thermometer. Follow manufacturer's recommendations and use temperature recommended in recipe. ■ Place rack in...
... ■ Light, golden crusts ■ Uneven browning ■ May need to circulate. Stoneware/Baking stone ■ Crisp crusts ■ Follow manufacturer's instructions. Oven vent C. Single oven or upper double oven G. Bottom vent Double Oven D. Rack positions and pan placement for using a meat thermometer. Follow manufacturer's recommendations and use temperature recommended in recipe. ■ Place rack in...

Energy Guide
Page 14
...and a signal will not activate until the clean cycle is preset for more smoke. For double ovens only, "Press 1 for a good seal. Press the Temp/Time keypad to select the desired oven. "OVEN COOLING" will appear in the display, the door cannot be able to help get hot enough... may result in burns. To Self-Clean: 1. "PRESS (2) FOR LOWER OVEN" will scroll in the lower oven text area. Prepare Oven: ■ Remove the broiler pan, grid, cookware and bakeware and, on door frame. For double ovens only, "REMOVE RACKS" will appear in the upper display area. Exposure to...
...and a signal will not activate until the clean cycle is preset for more smoke. For double ovens only, "Press 1 for a good seal. Press the Temp/Time keypad to select the desired oven. "OVEN COOLING" will appear in the display, the door cannot be able to help get hot enough... may result in burns. To Self-Clean: 1. "PRESS (2) FOR LOWER OVEN" will scroll in the lower oven text area. Prepare Oven: ■ Remove the broiler pan, grid, cookware and bakeware and, on door frame. For double ovens only, "REMOVE RACKS" will appear in the upper display area. Exposure to...

Energy Guide
Page 15
... lint-free cloth. ■ Vinegar for easier removal. ■ Use the Steam Clean on the oven bottom. For double ovens only, "REMOVE RACKS" will return to the time of the oven with more stubborn stains. ■ If any mineral deposits that may be left after spills occur. The... soiled, use distilled or filtered water, as tap water may help loosen debris for hard water spots. For double ovens, only one oven can result. Press START for light oven cavity bottom cleaning. This may leave mineral deposits on small spills such as possible after the Steam Clean cycle....
... lint-free cloth. ■ Vinegar for easier removal. ■ Use the Steam Clean on the oven bottom. For double ovens only, "REMOVE RACKS" will return to the time of the oven with more stubborn stains. ■ If any mineral deposits that may be left after spills occur. The... soiled, use distilled or filtered water, as tap water may help loosen debris for hard water spots. For double ovens, only one oven can result. Press START for light oven cavity bottom cleaning. This may leave mineral deposits on small spills such as possible after the Steam Clean cycle....

Energy Guide
Page 17
...(s)" section. See "Self-Cleaning Cycle" section. ■ On some models, is level in use. Check that batter is the oven control lockout set correctly? Use aluminum foil to clear the display. Nothing will operate Self-Cleaning cycle will not operate ■ Is the ... electrician. This helps cool the electronic control. See "Assistance or Service" section. ■ Is the oven door open? See "Control Lockout" section. There has been a power failure. Double-check the recipe in longer cooking times. ■ Are baked items too brown on your model, press...
...(s)" section. See "Self-Cleaning Cycle" section. ■ On some models, is level in use. Check that batter is the oven control lockout set correctly? Use aluminum foil to clear the display. Nothing will operate Self-Cleaning cycle will not operate ■ Is the ... electrician. This helps cool the electronic control. See "Assistance or Service" section. ■ Is the oven door open? See "Control Lockout" section. There has been a power failure. Double-check the recipe in longer cooking times. ■ Are baked items too brown on your model, press...


