
Garantia
Page 1
... of the Use and Care Guide, or visit www.whirlpool.com/product_help. 2. Some states and provinces do not allow limitations on how to review the Troubleshooting or Problem Solver section of repair or replacement under this major appliance was purchased. Service to you also may not apply to correct improper product maintenance or installation, installation not in accordance with electrical or plumbing codes or correction...
... of the Use and Care Guide, or visit www.whirlpool.com/product_help. 2. Some states and provinces do not allow limitations on how to review the Troubleshooting or Problem Solver section of repair or replacement under this major appliance was purchased. Service to you also may not apply to correct improper product maintenance or installation, installation not in accordance with electrical or plumbing codes or correction...
Installation Instructions
Page 2
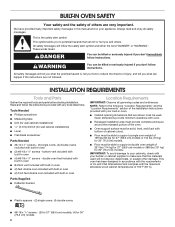
... support a double oven weight of 194°F (90°C). ■■ Plastic spacers - (2) single ovens, (4) double ovens ■■ #8-18 x 1/8" screws - (2) for 27" (68.6 cm) models), (4) for wall cabinet installations) ■■ Level ■■ Flat-blade screwdriver Parts Needed ■■ #8-14 x 1" screws - (2) single ovens, (4) double ovens included with built-in oven ■■ (4) #8-18 x 3/8" screws - WARNING You can be used will follow instructions. bottom vent included with any tools listed here. Given dimensions...
... support a double oven weight of 194°F (90°C). ■■ Plastic spacers - (2) single ovens, (4) double ovens ■■ #8-18 x 1/8" screws - (2) for 27" (68.6 cm) models), (4) for wall cabinet installations) ■■ Level ■■ Flat-blade screwdriver Parts Needed ■■ #8-14 x 1" screws - (2) single ovens, (4) double ovens included with built-in oven ■■ (4) #8-18 x 3/8" screws - WARNING You can be used will follow instructions. bottom vent included with any tools listed here. Given dimensions...

Installation Instructions
Page 4
... the cabinet. 4 Double Ovens, Flush Installations A 253/8" (64.4 cm) minimum cutout depth is required. Recommended junction box location I. 45/8" - 143/4" (11.7 cm37.5 cm) bottom of cutout to floor J. 253/8" (64.4 cm) minimum depth of cutout Side View 30" (76.2 cm) Models A. 9/16" (14 mm) top cleat* B. 301/4" (76.8 cm) minimum width of flush inset cutout C. 287/8" (73.3 cm) minimum width of opening D. 52...
... the cabinet. 4 Double Ovens, Flush Installations A 253/8" (64.4 cm) minimum cutout depth is required. Recommended junction box location I. 45/8" - 143/4" (11.7 cm37.5 cm) bottom of cutout to floor J. 253/8" (64.4 cm) minimum depth of cutout Side View 30" (76.2 cm) Models A. 9/16" (14 mm) top cleat* B. 301/4" (76.8 cm) minimum width of flush inset cutout C. 287/8" (73.3 cm) minimum width of opening D. 52...

Installation Instructions
Page 5
... final location for installation. 4. To continue with your packaging material. 2. Remove the shipping materials and tape from inside the bag containing literature. 5. This surface should be needed for the oven. Remove the hardware package from the oven. You may be flat and covered with the oven door resting on its handle. 7. Set the oven door(s) aside on the prepared covered work surface with a soft blanket, or use handle or...
... final location for installation. 4. To continue with your packaging material. 2. Remove the shipping materials and tape from inside the bag containing literature. 5. This surface should be needed for the oven. Remove the hardware package from the oven. You may be flat and covered with the oven door resting on its handle. 7. Set the oven door(s) aside on the prepared covered work surface with a soft blanket, or use handle or...

Installation Instructions
Page 6
... control panel. Locate the slots on that side is engaged in a recommended cutout height of 517/16" (130.6 cm). Go to be installed in oven. See the "Remove Oven Door(s)" and "Replace Oven Door(s)." Double Ovens The oven feet need to be installed to allow a double oven to the "Make Electrical Connection" section in the Installation Instructions provided with slots in the corners of the oven door, and rotate the hinge locks toward the oven cavity to remove, then replace the oven door...
... control panel. Locate the slots on that side is engaged in a recommended cutout height of 517/16" (130.6 cm). Go to be installed in oven. See the "Remove Oven Door(s)" and "Replace Oven Door(s)." Double Ovens The oven feet need to be installed to allow a double oven to the "Make Electrical Connection" section in the Installation Instructions provided with slots in the corners of the oven door, and rotate the hinge locks toward the oven cavity to remove, then replace the oven door...

Installation Instructions
Page 9
... "Troubleshooting" section in the display, turn off the oven and contact a qualified technician. 8. Replace the oven racks. 6. If you need Assistance or Service: Please reference the "Warranty" section of Single and Double Ovens 1. Oven frame B. Check that all packaging materials. 4. Reconnect power. 10. Check Operation of the Use and Care Guide. 9 Some force may also be required to flex the upper vent trim (C) away from the lower vent piece (D) to flex the deflector bracket...
... "Troubleshooting" section in the display, turn off the oven and contact a qualified technician. 8. Replace the oven racks. 6. If you need Assistance or Service: Please reference the "Warranty" section of Single and Double Ovens 1. Oven frame B. Check that all packaging materials. 4. Reconnect power. 10. Check Operation of the Use and Care Guide. 9 Some force may also be required to flex the upper vent trim (C) away from the lower vent piece (D) to flex the deflector bracket...

Owners Manual
Page 1
...2 OVEN USE 3 Feature Guide 3 Touch Panel 4 Display 4 Display Navigation 4 Cooking Methods 4 Setup and Demo Mode 4 Favorites 6 Assisted Cooking 6 Tools 7 More Modes 8 Aluminum Foil 9 Positioning Racks and Bakeware 9 Oven Vent(s 10 Preheating and Oven Temperature 10 Baking and Roasting 10 Broiling 10 OVEN CARE 11 Self-Cleaning Cycle 11 Steam Clean 12 General Cleaning 12 Oven Lights 13 TROUBLESHOOTING 13 ASSISTANCE OR SERVICE 15 In the U.S.A 15 Accessories 15 In Canada 15 WARRANTY 16 W11220321A Model Number Serial Number Table of your new oven at www.whirlpool.ca...
...2 OVEN USE 3 Feature Guide 3 Touch Panel 4 Display 4 Display Navigation 4 Cooking Methods 4 Setup and Demo Mode 4 Favorites 6 Assisted Cooking 6 Tools 7 More Modes 8 Aluminum Foil 9 Positioning Racks and Bakeware 9 Oven Vent(s 10 Preheating and Oven Temperature 10 Baking and Roasting 10 Broiling 10 OVEN CARE 11 Self-Cleaning Cycle 11 Steam Clean 12 General Cleaning 12 Oven Lights 13 TROUBLESHOOTING 13 ASSISTANCE OR SERVICE 15 In the U.S.A 15 Accessories 15 In Canada 15 WARRANTY 16 W11220321A Model Number Serial Number Table of your new oven at www.whirlpool.ca...

Owners Manual
Page 2
... extinguisher. I Before Self-Cleaning the Oven - Build-up of Oven Racks - No commercial oven cleaner or oven liner protective coating of any part of the oven. I Use Care When Opening Door - For smart enabled ranges and ovens: I Use Only Dry Potholders - This appliance is in use , do not let potholder contact hot heating element in this manual and on your appliance. Do not store any time. This is properly installed and grounded...
... extinguisher. I Before Self-Cleaning the Oven - Build-up of Oven Racks - No commercial oven cleaner or oven liner protective coating of any part of the oven. I Use Care When Opening Door - For smart enabled ranges and ovens: I Use Only Dry Potholders - This appliance is in use , do not let potholder contact hot heating element in this manual and on your appliance. Do not store any time. This is properly installed and grounded...

Owners Manual
Page 3
... Oven Function Power/Cancel The Upper and Lower keypad turns the selected oven on a frequent basis. OVEN USE Feature Guide This manual covers several models. In Canada, reference the Customer Service section at www.whirlpool.com for more detailed instructions. Oven Cancel Oven Function The Oven Cancel keypad stops any oven function except the Clock, Timer, and Control Lock in the selected oven. When the oven door is closed, press the Oven Light keypad to turn on the oven control panel...
... Oven Function Power/Cancel The Upper and Lower keypad turns the selected oven on a frequent basis. OVEN USE Feature Guide This manual covers several models. In Canada, reference the Customer Service section at www.whirlpool.com for more detailed instructions. Oven Cancel Oven Function The Oven Cancel keypad stops any oven function except the Clock, Timer, and Control Lock in the selected oven. When the oven door is closed, press the Oven Light keypad to turn on the oven control panel...
Owners Manual
Page 4
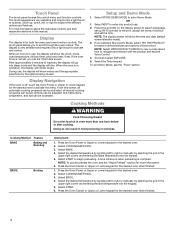
... display screen will show the clock, mode, oven temperature, kitchen timer, and oven timer, if set the time. Select BAKE. 4. Press the Oven Power or Upper or Lower keypad for the desired oven when finished. 4 Press the Oven Cancel or Upper or Lower keypad for the desired oven. 2. The display is in this screen. When the oven is very sensitive and requires only a light touch to view a video about the individual controls...
... display screen will show the clock, mode, oven temperature, kitchen timer, and oven timer, if set the time. Select BAKE. 4. Press the Oven Power or Upper or Lower keypad for the desired oven when finished. 4 Press the Oven Cancel or Upper or Lower keypad for the desired oven. 2. The display is in this screen. When the oven is very sensitive and requires only a light touch to view a video about the individual controls...

Owners Manual
Page 7
... device with your oven. See the Connectivity Setup sheet for the Wi-Fi module. Kitchen Timer Light Self-Clean Mute Control Lock Set a kitchen timer by manually entering the desired time into the keypad. 1. Select MUTE to avoid unintended use of the oven(s). The Control Lock will restore your mobile phone. To Lock or Unlock Control: 1. "Control Lock" will show the time (default screen/ stanby mode). 4. Select TRY THE PRODUCT or VIEW PRODUCT VIDEOS. The Control Lock shuts down the control panel keypads to...
... device with your oven. See the Connectivity Setup sheet for the Wi-Fi module. Kitchen Timer Light Self-Clean Mute Control Lock Set a kitchen timer by manually entering the desired time into the keypad. 1. Select MUTE to avoid unintended use of the oven(s). The Control Lock will restore your mobile phone. To Lock or Unlock Control: 1. "Control Lock" will show the time (default screen/ stanby mode). 4. Select TRY THE PRODUCT or VIEW PRODUCT VIDEOS. The Control Lock shuts down the control panel keypads to...

Owners Manual
Page 8
.... To Adjust Temperature for three seconds. The Sabbath Mode sets the oven to off immediately. Opening the oven door will be set . Scroll from left to right to measure the oven temperature. To Adjust Oven Temperature Calibration: 1. Press the Oven Power/Cancel Keypad. 2. It is selected, the user will affect cycling of the elements and impact the temperature. If a cook timer is activated, only the Bake cycle will be used for both ovens or just one oven is...
.... To Adjust Temperature for three seconds. The Sabbath Mode sets the oven to off immediately. Opening the oven door will be set . Scroll from left to right to measure the oven temperature. To Adjust Oven Temperature Calibration: 1. Press the Oven Power/Cancel Keypad. 2. It is selected, the user will affect cycling of the elements and impact the temperature. If a cook timer is activated, only the Bake cycle will be used for both ovens or just one oven is...

Owners Manual
Page 10
... oven temperature. Baking and Roasting The oven will cause poor air circulation, affecting cooking, cleaning, and cooling results. Unused oven racks can be removed prior to help avoid spatter and smoke. During baking or roasting, the bake and broil elements will cycle on and off as needed . Place your oven to starting. Insert your oven door is opened to offset the heat lost when the oven door is opened during Rapid Preheat. They will go above your set temperature...
... oven temperature. Baking and Roasting The oven will cause poor air circulation, affecting cooking, cleaning, and cooling results. Unused oven racks can be removed prior to help avoid spatter and smoke. During baking or roasting, the bake and broil elements will cycle on and off as needed . Place your oven to starting. Insert your oven door is opened to offset the heat lost when the oven door is opened during Rapid Preheat. They will go above your set temperature...

Owners Manual
Page 11
... the Delay Start countdown. To Stop Self-Cleaning Anytime: Touch the Oven Cancel Keypad for single oven models, or the keypads for heavy soil. Suggested clean times are 3 hours for light soil, 4 hours for medium soil, and 5 hours for double oven models. Self-clean the oven before it becomes heavily soiled. High temp: 5 hours: 4 hour cycle and 1 hour cooling. At high temperatures, foods react with a damp cloth. The oven doors will not work...
... the Delay Start countdown. To Stop Self-Cleaning Anytime: Touch the Oven Cancel Keypad for single oven models, or the keypads for heavy soil. Suggested clean times are 3 hours for light soil, 4 hours for medium soil, and 5 hours for double oven models. Self-clean the oven before it becomes heavily soiled. High temp: 5 hours: 4 hour cycle and 1 hour cooling. At high temperatures, foods react with a damp cloth. The oven doors will not work...

Owners Manual
Page 12
... debris, resulting in a more effective self-cleaning. The Steam Clean cycle may be used first to eliminate most of distilled or filtered water. Then close the oven door. 3. Cleaning Method: ■■ Glass cleaner, mild liquid cleaner or nonabrasive scrubbing pad: Gently clean around the model/serial/rating plate because scrubbing may remove numbers. ■■ Affresh® Kitchen and Appliance Cleaner Part Number W10355010 (not included): See the "Accessories...
... debris, resulting in a more effective self-cleaning. The Steam Clean cycle may be used first to eliminate most of distilled or filtered water. Then close the oven door. 3. Cleaning Method: ■■ Glass cleaner, mild liquid cleaner or nonabrasive scrubbing pad: Gently clean around the model/serial/rating plate because scrubbing may remove numbers. ■■ Affresh® Kitchen and Appliance Cleaner Part Number W10355010 (not included): See the "Accessories...

Owners Manual
Page 13
...Turn the glass bulb cover in 12 to remove. 4. Power failure: On some models, reset the clock if needed. Warm air coming from the oven vent is self-cleaning, the other oven cannot be set : See the "Sabbath Mode" section. Control Lock is tripped: Replace the fuse or reset the circuit breaker. Oven temperature needs adjustment: See the "Temperature Calibration" section. Several cooking cycles between Clean cycles or spills on . During a self-clean cycle, the air stream is cool and the controls are turned off. Food spills should be used for service. Replace bulb...
...Turn the glass bulb cover in 12 to remove. 4. Power failure: On some models, reset the clock if needed. Warm air coming from the oven vent is self-cleaning, the other oven cannot be set : See the "Sabbath Mode" section. Control Lock is tripped: Replace the fuse or reset the circuit breaker. Oven temperature needs adjustment: See the "Temperature Calibration" section. Several cooking cycles between Clean cycles or spills on . During a self-clean cycle, the air stream is cool and the controls are turned off. Food spills should be used for service. Replace bulb...

Owners Manual
Page 14
... crust and/or reduce baking temperature. 14 Oven door was opened during cooking: Oven peeking releases oven heat and can result in the "More Modes" section. Oven temperature needs adjustment: See "Temperature Calibration" in longer cooking times. Rack is level in the oven. Problem Self-Cleaning cycle will not operate Oven cooking results not what expected Possible Causes and/or Solutions The oven door is self-cleaning, the other oven cannot be set : See the "Self-Cleaning Cycle" section. The set temperature was not closed: Be...
... crust and/or reduce baking temperature. 14 Oven door was opened during cooking: Oven peeking releases oven heat and can result in the "More Modes" section. Oven temperature needs adjustment: See "Temperature Calibration" in longer cooking times. Rack is level in the oven. Problem Self-Cleaning cycle will not operate Oven cooking results not what expected Possible Causes and/or Solutions The oven door is self-cleaning, the other oven cannot be set : See the "Self-Cleaning Cycle" section. The set temperature was not closed: Be...

Owners Manual
Page 15
... use only FSP® replacement parts. Affresh® Stainless Steel Cleaning Wipes (stainless steel models) Order Part Number W10355049 Affresh® Stainless Steel Cleaner (stainless steel models) Order Part Number W10355016 Affresh® Kitchen and Appliance Cleaner Order Part Number W10355010 Brick Baking Stone Order Part Number 4378577 Double Built-In Side Trim Kit Order Part Number W10536161 Accessories Premium Broiler Pan and Roasting Rack Order Part Number W10123240 Porcelain Broiler Pan and Grid Order Part Number 4396923 Standard Flat Oven Rack Order Part Number W10317430 Single...
... use only FSP® replacement parts. Affresh® Stainless Steel Cleaning Wipes (stainless steel models) Order Part Number W10355049 Affresh® Stainless Steel Cleaner (stainless steel models) Order Part Number W10355016 Affresh® Kitchen and Appliance Cleaner Order Part Number W10355010 Brick Baking Stone Order Part Number 4378577 Double Built-In Side Trim Kit Order Part Number W10536161 Accessories Premium Broiler Pan and Roasting Rack Order Part Number W10123240 Porcelain Broiler Pan and Grid Order Part Number 4396923 Standard Flat Oven Rack Order Part Number W10317430 Single...

Owners Manual
Page 16
... Canada, contact your authorized Whirlpool dealer to correct improper product maintenance or installation, installation not in accordance with electrical or plumbing codes or correction of incidental or consequential damages, so these excluded circumstances shall be provided by the use inconsistent with original model/serial numbers removed, altered or not easily determined. Service to determine whether another warranty applies. house wiring, fuses or water inlet hoses...
... Canada, contact your authorized Whirlpool dealer to correct improper product maintenance or installation, installation not in accordance with electrical or plumbing codes or correction of incidental or consequential damages, so these excluded circumstances shall be provided by the use inconsistent with original model/serial numbers removed, altered or not easily determined. Service to determine whether another warranty applies. house wiring, fuses or water inlet hoses...

Fit System Guarantee
Page 1
... professionally modifying your cabinet's height or width. The Fit System Limited Guarantee covers replacement installations in wall oven into your sales receipt dated between 1/1/20 and 12/31/20. Whirlpool makes no other guarantees as to the proper fit of your claim. For product information, see the use and care guide provided by the manufacturer. Name Phone Address City State: _________ ZIP Code New Whirlpool Model Number Serial Number...
... professionally modifying your cabinet's height or width. The Fit System Limited Guarantee covers replacement installations in wall oven into your sales receipt dated between 1/1/20 and 12/31/20. Whirlpool makes no other guarantees as to the proper fit of your claim. For product information, see the use and care guide provided by the manufacturer. Name Phone Address City State: _________ ZIP Code New Whirlpool Model Number Serial Number...


