

Garantia
Page 1
... gas or Propane gas. 7. light bulbs, batteries, air or water filters, preservation solutions, etc.). your product. Some questions can be provided by Whirlpool. Food or medicine loss due to 2. Please have other rights that vary from caustic or corrosive environments including REPAIR AS PROVIDED HEREIN. Before contacting us to arrange service, please determine whether your authorized Whirlpool dealer to use with original model/serial numbers removed...
... gas or Propane gas. 7. light bulbs, batteries, air or water filters, preservation solutions, etc.). your product. Some questions can be provided by Whirlpool. Food or medicine loss due to 2. Please have other rights that vary from caustic or corrosive environments including REPAIR AS PROVIDED HEREIN. Before contacting us to arrange service, please determine whether your authorized Whirlpool dealer to use with original model/serial numbers removed...
Installation Instructions
Page 2
... damage to support a double oven weight of 194°F (90°C). ■■ Plastic spacers - (2) single ovens, (4) double ovens ■■ #8-18 x 1/8" screws - (2) for 27" (68.6 cm) models), (4) for wall cabinet installations) ■■ Level ■■ Flat-blade screwdriver Parts Needed ■■ #8-14 x 1" screws - (2) single ovens, (4) double ovens included with built-in oven ■■ (4) #8-18 x 3/8" screws - INSTALLATION REQUIREMENTS Tools and Parts Gather the required tools and parts before starting installation. Given dimensions provide...
... damage to support a double oven weight of 194°F (90°C). ■■ Plastic spacers - (2) single ovens, (4) double ovens ■■ #8-18 x 1/8" screws - (2) for 27" (68.6 cm) models), (4) for wall cabinet installations) ■■ Level ■■ Flat-blade screwdriver Parts Needed ■■ #8-14 x 1" screws - (2) single ovens, (4) double ovens included with built-in oven ■■ (4) #8-18 x 3/8" screws - INSTALLATION REQUIREMENTS Tools and Parts Gather the required tools and parts before starting installation. Given dimensions provide...

Installation Instructions
Page 4
... front of the cutout* H. Double Ovens, Flush Installations A 253/8" (64.4 cm) minimum cutout depth is required. Recommended junction box location I Front View 27" (68.6 cm) Models A. 9/16" (14 mm) top cleat* B. 271/4" (69.2 cm) minimum width of flush inset cutout C. 257/8" (65.7 cm) minimum width of opening D. 52" (132.1 cm) minimum height of flush inset cutout E. 517/16" (130.6 cm) recommended cutout height F. 11/16...
... front of the cutout* H. Double Ovens, Flush Installations A 253/8" (64.4 cm) minimum cutout depth is required. Recommended junction box location I Front View 27" (68.6 cm) Models A. 9/16" (14 mm) top cleat* B. 271/4" (69.2 cm) minimum width of flush inset cutout C. 257/8" (65.7 cm) minimum width of opening D. 52" (132.1 cm) minimum height of flush inset cutout E. 517/16" (130.6 cm) recommended cutout height F. 11/16...

Installation Instructions
Page 5
... not remove properly. NOTES: ■■ Refer to the "Electrical Requirements" section, and complete the instructions in locked position Soft close hinge arm on the final location for installation. 4. A Oven door hinge lock in the "Make Electrical Connection" section of the Installation Instructions provided with a soft blanket, or use handle or any portion of the oven door. WARNING Excessive Weight Hazard Use two or more people to rotate. This surface should be needed...
... not remove properly. NOTES: ■■ Refer to the "Electrical Requirements" section, and complete the instructions in locked position Soft close hinge arm on the final location for installation. 4. A Oven door hinge lock in the "Make Electrical Connection" section of the Installation Instructions provided with a soft blanket, or use handle or any portion of the oven door. WARNING Excessive Weight Hazard Use two or more people to rotate. This surface should be needed...

Installation Instructions
Page 6
... oven door, and rotate the hinge locks toward the oven cavity to the "Make Electrical Connection" section in the Installation Instructions provided with slots in the slot when you maintain the 45° angle. Double Ovens The oven feet need to be installed to allow a double oven to be installed in the oven cavity for the door hinge locks. NOTE: Do not remove the spacers. 4. Locate the oven door hinge locks in a recommended cutout height of 281/2" (72.4 cm). Using...
... oven door, and rotate the hinge locks toward the oven cavity to the "Make Electrical Connection" section in the Installation Instructions provided with slots in the slot when you maintain the 45° angle. Double Ovens The oven feet need to be installed to allow a double oven to be installed in the oven cavity for the door hinge locks. NOTE: Do not remove the spacers. 4. Locate the oven door hinge locks in a recommended cutout height of 281/2" (72.4 cm). Using...

Installation Instructions
Page 9
.... 4. Oven frame B. Oven vent C D. Check that the door is an extra part, go back through the steps to the "Assistance or Service" section of your oven. The display panel will light. 11. If there is free to flex the deflector bracket (B) and slide it is installed in the Use and Care Guide. 7. NOTE: Press UPPER or LOWER on single oven models. Select Start. Install Deflector Kit Bracket This assembly is required for use when a single or double built...
.... 4. Oven frame B. Oven vent C D. Check that the door is an extra part, go back through the steps to the "Assistance or Service" section of your oven. The display panel will light. 11. If there is free to flex the deflector bracket (B) and slide it is installed in the Use and Care Guide. 7. NOTE: Press UPPER or LOWER on single oven models. Select Start. Install Deflector Kit Bracket This assembly is required for use when a single or double built...

Owners Manual
Page 1
...your product model and serial numbers. Register your oven at www.whirlpool.com. For future reference, please make a note of Contents OVEN SAFETY 2 OVEN USE 3 Feature Guide 3 Touch Panel 4 Display 4 Display Navigation 4 Cooking Methods 4 Setup and Demo Mode 4 Favorites 6 Assisted Cooking 6 Tools 7 More Modes 8 Aluminum Foil 9 Positioning Racks and Bakeware 9 Oven Vent(s 10 Preheating and Oven Temperature 10 Baking and Roasting 10 Broiling 10 OVEN CARE 11 Self-Cleaning Cycle 11 Steam Clean 12 General Cleaning 12 Oven Lights 13 TROUBLESHOOTING 13 ASSISTANCE OR SERVICE...
...your product model and serial numbers. Register your oven at www.whirlpool.com. For future reference, please make a note of Contents OVEN SAFETY 2 OVEN USE 3 Feature Guide 3 Touch Panel 4 Display 4 Display Navigation 4 Cooking Methods 4 Setup and Demo Mode 4 Favorites 6 Assisted Cooking 6 Tools 7 More Modes 8 Aluminum Foil 9 Positioning Racks and Bakeware 9 Oven Vent(s 10 Preheating and Oven Temperature 10 Baking and Roasting 10 Broiling 10 OVEN CARE 11 Self-Cleaning Cycle 11 Steam Clean 12 General Cleaning 12 Oven Lights 13 TROUBLESHOOTING 13 ASSISTANCE OR SERVICE...

Owners Manual
Page 2
... removing or replacing food. I Storage in Manual. I Keep Oven Vent Ducts Unobstructed. If rack must be stored in burns from steam. Loose-fitting or hanging garments should not be moved while oven is cool. All other flammable materials contact heating elements or interior surfaces of oven until they are oven vent openings and surfaces near surface units of Oven Racks - Heating elements may result in an oven. I Proper Installation - For self-cleaning ovens: I Use Care When Opening Door...
... removing or replacing food. I Storage in Manual. I Keep Oven Vent Ducts Unobstructed. If rack must be stored in burns from steam. Loose-fitting or hanging garments should not be moved while oven is cool. All other flammable materials contact heating elements or interior surfaces of oven until they are oven vent openings and surfaces near surface units of Oven Racks - Heating elements may result in an oven. I Proper Installation - For self-cleaning ovens: I Use Care When Opening Door...

Owners Manual
Page 3
... Clock, Timer, and Control Lock in the selected oven. Favorites The Favorites keypad allows the user to this manual or Frequently Asked Questions (FAQs) section of our website at www.whirlpool.ca. The Oven Power keypad begins oven function and wakes it from sleep mode. Oven Light Oven Cavity Light Oven Power Oven Function (Single ovens only) Power The oven light is closed, press the Oven Light keypad to cause cancer. OVEN USE Feature Guide This manual covers several models. While the oven door...
... Clock, Timer, and Control Lock in the selected oven. Favorites The Favorites keypad allows the user to this manual or Frequently Asked Questions (FAQs) section of our website at www.whirlpool.ca. The Oven Power keypad begins oven function and wakes it from sleep mode. Oven Light Oven Cavity Light Oven Power Oven Function (Single ovens only) Power The oven light is closed, press the Oven Light keypad to cause cancer. OVEN USE Feature Guide This manual covers several models. While the oven door...
Owners Manual
Page 4
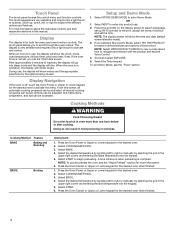
... very sensitive and require only a light touch to begin preheating. If the oven timer is for the desired oven when finished. 1. From this screen. Press the Oven Cancel or Upper or Lower keypad for both the menu and oven function controls. Cooking Method Feature BAKE Baking and Roasting BROIL Broiling Instructions 1. Select BROIL. 4. Select START. 6. Select BAKE. 4. After approximately 2 minutes of service and set , options can be adjusted, and instructions, preparation, and tips...
... very sensitive and require only a light touch to begin preheating. If the oven timer is for the desired oven when finished. 1. From this screen. Press the Oven Cancel or Upper or Lower keypad for both the menu and oven function controls. Cooking Method Feature BAKE Baking and Roasting BROIL Broiling Instructions 1. Select BROIL. 4. Select START. 6. Select BAKE. 4. After approximately 2 minutes of service and set , options can be adjusted, and instructions, preparation, and tips...

Owners Manual
Page 7
... , adjust the oven calibration, change the oven temperature between Fahrenheit and Celsius, turn the light on your appliance. ■■ MAC Address: MAC Address is shown ■■ Time ■■ Date ■■ Time Format (AM/PM vs 24 hour [Military Time]) 7 Kitchen Timer Light Self-Clean Mute Control Lock Set a kitchen timer by manually entering the desired time into the keypad. 1. Manually input the time to utilize the Whirlpool® app. Select the Light keypad...
... , adjust the oven calibration, change the oven temperature between Fahrenheit and Celsius, turn the light on your appliance. ■■ MAC Address: MAC Address is shown ■■ Time ■■ Date ■■ Time Format (AM/PM vs 24 hour [Military Time]) 7 Kitchen Timer Light Self-Clean Mute Control Lock Set a kitchen timer by manually entering the desired time into the keypad. 1. Manually input the time to utilize the Whirlpool® app. Select the Light keypad...

Owners Manual
Page 8
... the displayed amount. When the oven door is set . For double ovens, the upper and lower oven temperatures and cook timers can be set , the countdown will countdown once the timer is opened during the Sabbath. 6. If a cook timer is set independently. The timer will appear. Press the Tools keypad. 2. Press SABBATH MODE again to remain on and off , and the heating elements will cycle on in Sabbath Mode, press ADD A COOK TIME for single and double oven models: 1. Select...
... the displayed amount. When the oven door is set . For double ovens, the upper and lower oven temperatures and cook timers can be set , the countdown will countdown once the timer is opened during the Sabbath. 6. If a cook timer is set independently. The timer will appear. Press the Tools keypad. 2. Press SABBATH MODE again to remain on and off , and the heating elements will cycle on in Sabbath Mode, press ADD A COOK TIME for single and double oven models: 1. Select...

Owners Manual
Page 10
... the broil setting, the slower the cooking. Place the food in use a broiler pan and grid. Bottom vent The oven vent(s) should not be used only for more precise control when cooking. The oven will release the hot air and cool the oven which could impact the cooking time and performance. The preheat cycle rapidly increases the oven temperature. Opening the oven door while in the upper or lower oven. Before baking and roasting, position racks according...
... the broil setting, the slower the cooking. Place the food in use a broiler pan and grid. Bottom vent The oven vent(s) should not be used only for more precise control when cooking. The oven will release the hot air and cool the oven which could impact the cooking time and performance. The preheat cycle rapidly increases the oven temperature. Opening the oven door while in the upper or lower oven. Before baking and roasting, position racks according...

Owners Manual
Page 11
.... Use a damp cloth to clean this area. ■■ Wipe out any foil from oven during and after the Delay Start countdown. To Stop Self-Cleaning Anytime: Touch the Oven Cancel Keypad for single oven models, or the keypads for heavy soil. If the oven temperature is locked, the doors of water. The oven lights will operate at its highest speed to increase airflow to better exhaust the hotter air...
.... Use a damp cloth to clean this area. ■■ Wipe out any foil from oven during and after the Delay Start countdown. To Stop Self-Cleaning Anytime: Touch the Oven Cancel Keypad for single oven models, or the keypads for heavy soil. If the oven temperature is locked, the doors of water. The oven lights will operate at its highest speed to increase airflow to better exhaust the hotter air...

Owners Manual
Page 12
... completely cooled, remove any remaining moisture from the oven door interior, oven cavity interior sides, and cooktop. ■■ Use a soft brush or nylon scrubber to signal the end of the cycle. Cleaning Method: ■■ Glass cleaner, mild liquid cleaner or nonabrasive scrubbing pad: Gently clean around the model/serial/rating plate because scrubbing may remove numbers. ■■ Affresh® Kitchen and Appliance Cleaner Part Number W10355010 (not...
... completely cooled, remove any remaining moisture from the oven door interior, oven cavity interior sides, and cooktop. ■■ Use a soft brush or nylon scrubber to signal the end of the cycle. Cleaning Method: ■■ Glass cleaner, mild liquid cleaner or nonabrasive scrubbing pad: Gently clean around the model/serial/rating plate because scrubbing may remove numbers. ■■ Affresh® Kitchen and Appliance Cleaner Part Number W10355010 (not...

Owners Manual
Page 13
... you avoid a service call an electrician. Demo Mode (product is tripped: Replace the fuse or reset the circuit breaker. Warm air coming from socket. 5. Removing unused oven racks prior to preheating can be cleaned after the cycle has ended, causing warm air to clear the display. Disconnect power. 2. Open oven door. 3. Replace bulb, and then bulb cover, by number): Press the oven Cancel keypad to exit from the oven vent is set or turned on all cycles require preheating. If you need further assistance or...
... you avoid a service call an electrician. Demo Mode (product is tripped: Replace the fuse or reset the circuit breaker. Warm air coming from socket. 5. Removing unused oven racks prior to preheating can be cleaned after the cycle has ended, causing warm air to clear the display. Disconnect power. 2. Open oven door. 3. Replace bulb, and then bulb cover, by number): Press the oven Cancel keypad to exit from the oven vent is set or turned on all cycles require preheating. If you need further assistance or...

Owners Manual
Page 14
... set temperature was opened during cooking: Oven peeking releases oven heat and can result in the oven. Oven temperature needs adjustment: See "Temperature Calibration" in the oven. Darker browning of food caused by dull or dark bakeware: Lower the oven temperature 25°F (15°C) or move rack to self-clean. Oven door was incorrect: Double-check the recipe in pan: Check that the bakeware does not keep the door from closing. Oven was used: Adjust cooking time. Not enough air...
... set temperature was opened during cooking: Oven peeking releases oven heat and can result in the oven. Oven temperature needs adjustment: See "Temperature Calibration" in the oven. Darker browning of food caused by dull or dark bakeware: Lower the oven temperature 25°F (15°C) or move rack to self-clean. Oven door was incorrect: Double-check the recipe in pan: Check that the bakeware does not keep the door from closing. Oven was used: Adjust cooking time. Not enough air...

Owners Manual
Page 15
... Part Number W10355010 Brick Baking Stone Order Part Number 4378577 Double Built-In Side Trim Kit Order Part Number W10536161 Accessories Premium Broiler Pan and Roasting Rack Order Part Number W10123240 Porcelain Broiler Pan and Grid Order Part Number 4396923 Standard Flat Oven Rack Order Part Number W10317430 Single Built-In Side Trim Kit Order Part Number W10536160 15 In the U.S.A. FSP® replacement parts will help , follow the instructions below. Whirlpool appliances designated service technicians are trained to fulfill the product warranty and provide after -warranty service...
... Part Number W10355010 Brick Baking Stone Order Part Number 4378577 Double Built-In Side Trim Kit Order Part Number W10536161 Accessories Premium Broiler Pan and Roasting Rack Order Part Number W10123240 Porcelain Broiler Pan and Grid Order Part Number 4396923 Standard Flat Oven Rack Order Part Number W10317430 Single Built-In Side Trim Kit Order Part Number W10536160 15 In the U.S.A. FSP® replacement parts will help , follow the instructions below. Whirlpool appliances designated service technicians are trained to fulfill the product warranty and provide after -warranty service...

Owners Manual
Page 16
.... Travel or transportation expenses for warranty service to review the Troubleshooting or Problem Solver section of original consumer purchase. operated and maintained according to product failure. house wiring, fuses or water inlet hoses). trim, decorative panels, flooring, cabinetry, islands, countertops, drywall, etc.) that comes with products not approved by a Whirlpool designated service company. 11. Pick-up or delivery. is installed, installation instructions. Please take a few minutes to...
.... Travel or transportation expenses for warranty service to review the Troubleshooting or Problem Solver section of original consumer purchase. operated and maintained according to product failure. house wiring, fuses or water inlet hoses). trim, decorative panels, flooring, cabinetry, islands, countertops, drywall, etc.) that comes with products not approved by a Whirlpool designated service company. 11. Pick-up or delivery. is installed, installation instructions. Please take a few minutes to...

Fit System Guarantee
Page 1
... cabinet modification cost as set forth herein, Whirlpool Brand of Whirlpool Corporation (hereafter "Whirlpool") guarantees your new 27" or 30" Whirlpool Brand built-in standard single or double wall oven featuring the FIT System will fit your existing cabinet cut-out of a compatible model width and configuration or Whirlpool will delay processing or disqualify your records. Only valid in replacement installations; Mail Fraud Statutes (Title 18, United States Code...
... cabinet modification cost as set forth herein, Whirlpool Brand of Whirlpool Corporation (hereafter "Whirlpool") guarantees your new 27" or 30" Whirlpool Brand built-in standard single or double wall oven featuring the FIT System will fit your existing cabinet cut-out of a compatible model width and configuration or Whirlpool will delay processing or disqualify your records. Only valid in replacement installations; Mail Fraud Statutes (Title 18, United States Code...


