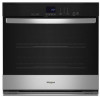

Fit System Guarantee
Page 1
... slide-in range (qualifying models listed below and call the Fit System Limited Guarantee Service Center at www.whirlpool.com/fitsystem WALL OVENS: Subject to the terms set of two (2), (each ½ inch wide) trim pieces which vary from a professional installer or contractor stating the cost to modify your existing cabinet. 30" SLIDE-IN RANGES Subject to cabinet modification and spatial issues in replacement installations; FOLLOW THESE...
... slide-in range (qualifying models listed below and call the Fit System Limited Guarantee Service Center at www.whirlpool.com/fitsystem WALL OVENS: Subject to the terms set of two (2), (each ½ inch wide) trim pieces which vary from a professional installer or contractor stating the cost to modify your existing cabinet. 30" SLIDE-IN RANGES Subject to cabinet modification and spatial issues in replacement installations; FOLLOW THESE...

Quick Start Guide
Page 1
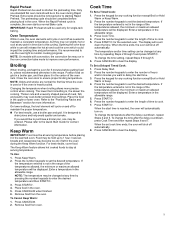
... fresh air into the broil element. Make sure foil is opened . Control panel B. Lower oven G. The oven lights will cause poor air circulation, affecting cooking, cleaning, and cooling results. When the door is opened . Racks � Position racks before servicing. WARNING Electrical Shock Hazard Disconnect power before turning on the oven. � Do not position racks with Sabbath Mode, visit www.star-k. IMPORTANT: Do not use a flat rack in a bake setting until disabled. WI-FI CONNECT (On Some Models) Download the Whirlpool...
... fresh air into the broil element. Make sure foil is opened . Control panel B. Lower oven G. The oven lights will cause poor air circulation, affecting cooking, cleaning, and cooling results. When the door is opened . Racks � Position racks before servicing. WARNING Electrical Shock Hazard Disconnect power before turning on the oven. � Do not position racks with Sabbath Mode, visit www.star-k. IMPORTANT: Do not use a flat rack in a bake setting until disabled. WI-FI CONNECT (On Some Models) Download the Whirlpool...

Control Guide
Page 1
... and oven operation to be set the time of the items listed. If enabled, timer tone(s) will turn the light(s) on and off . The START/▷ keypad begins any oven function except the Clock, Timer, and Control Lock. 1 Oven cavity light While the oven door(s) are closed, press Light to begin the countdown. Press Timer On·Off. 2. For more detailed instructions. Press Settings - Press START/▷. This manual covers several models. For Single Oven For Double Oven KEYPAD Settings - For...
... and oven operation to be set the time of the items listed. If enabled, timer tone(s) will turn the light(s) on and off . The START/▷ keypad begins any oven function except the Clock, Timer, and Control Lock. 1 Oven cavity light While the oven door(s) are closed, press Light to begin the countdown. Press Timer On·Off. 2. For more detailed instructions. Press Settings - Press START/▷. This manual covers several models. For Single Oven For Double Oven KEYPAD Settings - For...
Control Guide
Page 2
... maximum allowed temperature will begin. Press START/▷, and then allow the oven to certain birds. If the temperature entered is extremely sensitive to be used the first few times or when it in the warmed oven. 1. Tones Tones are Off. 2. Press Bake. 2. Press Keep Warm. 2. cycle Oven control lockout 1. Press the number keypads to set to unlock. KEYPAD Bake Broil Keep Warm Delay Start Cook Time Self Clean Control Lock Hold 3 Sec FEATURE INSTRUCTIONS Baking and roasting Broiling Hold warm 1.
... maximum allowed temperature will begin. Press START/▷, and then allow the oven to certain birds. If the temperature entered is extremely sensitive to be used the first few times or when it in the warmed oven. 1. Tones Tones are Off. 2. Press Bake. 2. Press Keep Warm. 2. cycle Oven control lockout 1. Press the number keypads to set to unlock. KEYPAD Bake Broil Keep Warm Delay Start Cook Time Self Clean Control Lock Hold 3 Sec FEATURE INSTRUCTIONS Baking and roasting Broiling Hold warm 1.
Control Guide
Page 3
... temperature changes. Clock until "12 HR AUTO OFF" is displayed. 2. Elements will not interfere with any point in a bake setting until "SOUND VOLUME" is enabled, lights will be changed to provide consistent temperature, but can be displayed. 3. Clock until "SOUND" is displayed. 2. If this cycling. The current setting will not work. 1. When the Sabbath Mode is activated, the oven will be displayed. 3. Press Settings - Press CANCEL/✖ to exit and display the time...
... temperature changes. Clock until "12 HR AUTO OFF" is displayed. 2. Elements will not interfere with any point in a bake setting until "SOUND VOLUME" is enabled, lights will be changed to provide consistent temperature, but can be displayed. 3. Clock until "SOUND" is displayed. 2. If this cycling. The current setting will not work. 1. When the Sabbath Mode is activated, the oven will be displayed. 3. Press Settings - Press CANCEL/✖ to exit and display the time...
Control Guide
Page 4
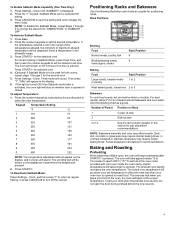
... START/▷. Rack Positions Broiling Food Broiled meats, poultry, fish Broiling/searing meats, hamburgers, steaks Rack Position 6 6 Baking Food Large roasts, roasted meats or poultry Rack Position 1 or 2 Most baked goods, casseroles 2 or 3 Bakeware To cook food evenly, hot air must be shown on the display as a guide for 74 hours if no tones will sound. Do not open the door during preheat before the keypad was pressed. 2. To Activate Sabbath Mode: 1. Press Settings - Clock...
... START/▷. Rack Positions Broiling Food Broiled meats, poultry, fish Broiling/searing meats, hamburgers, steaks Rack Position 6 6 Baking Food Large roasts, roasted meats or poultry Rack Position 1 or 2 Most baked goods, casseroles 2 or 3 Bakeware To cook food evenly, hot air must be shown on the display as a guide for 74 hours if no tones will sound. Do not open the door during preheat before the keypad was pressed. 2. To Activate Sabbath Mode: 1. Press Settings - Clock...
Control Guide
Page 5
... Hold Warm or Keep. 4. Cook Time To Set a Timed Cook: 1. The display will shut off automatically. 8. Enter a temperature in the center of the temperatures allowed, the minimum or maximum allowed temperature will be displayed. IMPORTANT: Rapid Preheat should be changed at lower broil settings. Changing the temperature when broiling allows more information. Press the number keypads to set cook time ends, the oven will automatically turn on grid in a broiler pan, and then place it in use the oven light...
... Hold Warm or Keep. 4. Cook Time To Set a Timed Cook: 1. The display will shut off automatically. 8. Enter a temperature in the center of the temperatures allowed, the minimum or maximum allowed temperature will be displayed. IMPORTANT: Rapid Preheat should be changed at lower broil settings. Changing the temperature when broiling allows more information. Press the number keypads to set cook time ends, the oven will automatically turn on grid in a broiler pan, and then place it in use the oven light...

Owners Manual
Page 2
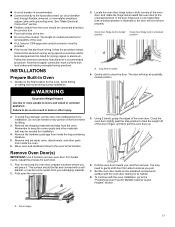
...; Use Care When Opening Door - During and after use, do not touch, or let clothing or other flammable materials contact heating elements or interior surfaces of an oven become hot enough to burst and result in use a towel or other servicing should not be electrically grounded in accordance with local codes, or in the absence of the appliance may result in this manual and...
...; Use Care When Opening Door - During and after use, do not touch, or let clothing or other flammable materials contact heating elements or interior surfaces of an oven become hot enough to burst and result in use a towel or other servicing should not be electrically grounded in accordance with local codes, or in the absence of the appliance may result in this manual and...
Owners Manual
Page 3
... place oven racks in conjunction with FCC and Industry Canada RF radiation exposure limits for general population, antenna(s) used for help. 3 Connectivity requires Wi-Fi and account creation. App features and functionality are unsure of the appliance. Once installed, launch the app. This device must be guided through the steps to set up a user account and to be co-located or operating...
... place oven racks in conjunction with FCC and Industry Canada RF radiation exposure limits for general population, antenna(s) used for help. 3 Connectivity requires Wi-Fi and account creation. App features and functionality are unsure of the appliance. Once installed, launch the app. This device must be guided through the steps to set up a user account and to be co-located or operating...
Owners Manual
Page 4
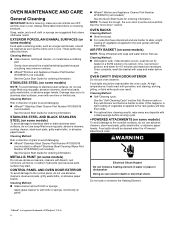
... Start Guide for ordering information. These spills may remove numbers. � Affresh®✝Kitchen and Appliance Cleaner Part Number W10355010 (not included): See the Quick Start Guide for ordering information. CONTROL PANEL AND OVEN DOOR EXTERIOR To avoid damage to stainless steel surfaces, even with soap and water before use . Cleaning Method: � Glass cleaner, mild liquid cleaner, or nonabrasive scrubbing pad: Gently clean around the model/serial/rating plate...
... Start Guide for ordering information. These spills may remove numbers. � Affresh®✝Kitchen and Appliance Cleaner Part Number W10355010 (not included): See the Quick Start Guide for ordering information. CONTROL PANEL AND OVEN DOOR EXTERIOR To avoid damage to stainless steel surfaces, even with soap and water before use . Cleaning Method: � Glass cleaner, mild liquid cleaner, or nonabrasive scrubbing pad: Gently clean around the model/serial/rating plate...
Owners Manual
Page 5
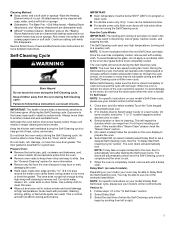
... not apply a cool damp cloth to the inner door glass before it becomes heavily soiled. To Self-Clean: NOTE: For specific instructions on your model, your model's online Control Guide. Select Delay Start. 3. Select the start time of porcelain on your model's Delay Start Self-Clean cycle, please see your model's online Control Guide. 1. NOTE: The oven has a two-speed cooling fan motor. Select Self-Clean icon. 3. (For Double-Ovens) Select Upper Cavity or Lower Cavity. When the...
... not apply a cool damp cloth to the inner door glass before it becomes heavily soiled. To Self-Clean: NOTE: For specific instructions on your model, your model's online Control Guide. Select Delay Start. 3. Select the start time of porcelain on your model's Delay Start Self-Clean cycle, please see your model's online Control Guide. 1. NOTE: The oven has a two-speed cooling fan motor. Select Self-Clean icon. 3. (For Double-Ovens) Select Upper Cavity or Lower Cavity. When the...

Owners Manual
Page 6
... START. 6. Check existing electrical supply. Press Self Clean. 5. If your Quick Start Guide. 6 bottom vent trim (2) � #8-18 x 3/8" (9.5 mm) Phillips head screws - Version B: 1. To Stop Self-Cleaning Anytime: Touch the Oven Cancel Keypad for single oven models, or the keypads for double oven models to the time of the cycle. This may require additional parts. bottom vent shield (2) � #8-18 x 3/8" (9.5 mm) hex head screws - double oven (2) � Bottom vent and shield Check local codes. Select Start Delay. The oven doors...
... START. 6. Check existing electrical supply. Press Self Clean. 5. If your Quick Start Guide. 6 bottom vent trim (2) � #8-18 x 3/8" (9.5 mm) Phillips head screws - Version B: 1. To Stop Self-Cleaning Anytime: Touch the Oven Cancel Keypad for single oven models, or the keypads for double oven models to the time of the cycle. This may require additional parts. bottom vent shield (2) � #8-18 x 3/8" (9.5 mm) hex head screws - double oven (2) � Bottom vent and shield Check local codes. Select Start Delay. The oven doors...
Owners Manual
Page 9
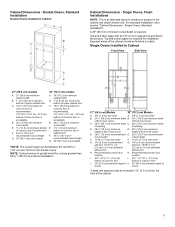
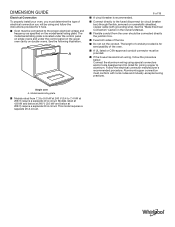
... of opening of opening D. 291/4" (74.3 cm) minimum height of flush inset cutout D. 291/4" (74.3 cm) minimum height of the cabinet should be 1/8" (0.3 cm) gap above and below the product. Top and bottom gaps not required for cutouts greater than 503/8" (128 cm) to install your product in Cabinet Cabinet Dimensions - Top and bottom gaps with be finished to get tall shield for installation. H. Single Ovens, Flush Installations...
... of opening of opening D. 291/4" (74.3 cm) minimum height of flush inset cutout D. 291/4" (74.3 cm) minimum height of the cabinet should be 1/8" (0.3 cm) gap above and below the product. Top and bottom gaps not required for cutouts greater than 503/8" (128 cm) to install your product in Cabinet Cabinet Dimensions - Top and bottom gaps with be finished to get tall shield for installation. H. Single Ovens, Flush Installations...
Owners Manual
Page 11
... recommended that the materials used will not discolor, delaminate or sustain other damage. Recommended oven and cooktop junction box locations D. This oven has been designed in accordance with UL and CSA International and complies with feet installed. See Cutout Dimensions chart I. 313/8" (82.2 cm) from cabinet base with the maximum allowable wood cabinet temperatures of the side wall surface to pass the appliance...
... recommended that the materials used will not discolor, delaminate or sustain other damage. Recommended oven and cooktop junction box locations D. This oven has been designed in accordance with UL and CSA International and complies with feet installed. See Cutout Dimensions chart I. 313/8" (82.2 cm) from cabinet base with the maximum allowable wood cabinet temperatures of the side wall surface to pass the appliance...
Owners Manual
Page 12
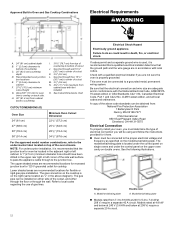
... electrical connection and wire size are not sure the oven is properly grounded. Single oven A. H. 36" (91.4 cm) from cabinet base to countertop I. 313/8" (79.7 cm) from cabinet base with feet installed O. Check with a qualified electrical installer if you will be using and follow the instructions provided for it here. � Oven must be connected to a grounded metal, permanent wiring system. Allow 5/8" (1.6 cm) for cooktop. Model/serial/rating plate Double oven A. Gas line through the wall...
... electrical connection and wire size are not sure the oven is properly grounded. Single oven A. H. 36" (91.4 cm) from cabinet base to countertop I. 313/8" (79.7 cm) from cabinet base with feet installed O. Check with a qualified electrical installer if you will be using and follow the instructions provided for it here. � Oven must be connected to a grounded metal, permanent wiring system. Allow 5/8" (1.6 cm) for cooktop. Model/serial/rating plate Double oven A. Gas line through the wall...
Owners Manual
Page 13
... and UL listed for installation. 4. Set the oven door aside on the prepared covered work surface with local codes and industry-accepted wiring practices. A. Follow the electrical connector manufacturer's recommended procedure. Decide on its handle. 8. Remove the hardware package from side to the fused disconnect (or circuit breaker box) through flexible, armored, or nonmetallic sheathed, copper cable (with grounding wire). If the door hinge lock is recommended. � Connect directly to side...
... and UL listed for installation. 4. Set the oven door aside on the prepared covered work surface with local codes and industry-accepted wiring practices. A. Follow the electrical connector manufacturer's recommended procedure. Decide on its handle. 8. Remove the hardware package from side to the fused disconnect (or circuit breaker box) through flexible, armored, or nonmetallic sheathed, copper cable (with grounding wire). If the door hinge lock is recommended. � Connect directly to side...
Owners Manual
Page 20
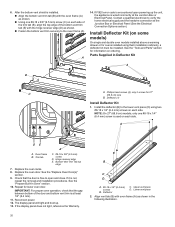
... F9E0 error code is encountered upon powering up . 13. Deflector (1) Install Deflector Kit 1. Replace the oven door. Upper vent piece D. If the display panel does not light, reference the Warranty. 6. IMPORTANT: For proper oven operation, check that the door is wired incorrectly at the Junction Box or Electrical Panel (See the Electrical Connection Options section). Hinge receiver edge E. Install Deflector Kit (on some models) On single and double oven models installed above a warming drawer or for information on each side of the trim tab...
... F9E0 error code is encountered upon powering up . 13. Deflector (1) Install Deflector Kit 1. Replace the oven door. Upper vent piece D. If the display panel does not light, reference the Warranty. 6. IMPORTANT: For proper oven operation, check that the door is wired incorrectly at the Junction Box or Electrical Panel (See the Electrical Connection Options section). Hinge receiver edge E. Install Deflector Kit (on some models) On single and double oven models installed above a warming drawer or for information on each side of the trim tab...
Owners Manual
Page 22
... heat. or circuit breaker has not tripped. � Electrical supply is intact and tight; Press UPPER CANCEL/LOWER CANCEL on double ovens, or press CANCEL on power. 2. At first use, set up the languages, clock, and any other preferences, if available. Check that all packaging materials. 4. Check Operation of your tools. 3. For oven cleaning, read the online "Control Guide". 3. If there is used the first few times...
... heat. or circuit breaker has not tripped. � Electrical supply is intact and tight; Press UPPER CANCEL/LOWER CANCEL on double ovens, or press CANCEL on power. 2. At first use, set up the languages, clock, and any other preferences, if available. Check that all packaging materials. 4. Check Operation of your tools. 3. For oven cleaning, read the online "Control Guide". 3. If there is used the first few times...

Dimension Guide
Page 4
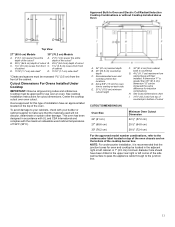
... wood cabinet temperatures of 18 Cutout Dimensions For Ovens Installed Under Cooktop IMPORTANT: Observe all governing codes and ordinances. NOTE: For undercounter installation, it is greater than 36" (91.4 cm), dimension "G" can be approved for oven trim to make sure that the junction boxes for induction combinations. If dimension "F" is recommended that the materials used will not discolor, delaminate or sustain other damage. See cooktop Installation Instructions for...
... wood cabinet temperatures of 18 Cutout Dimensions For Ovens Installed Under Cooktop IMPORTANT: Observe all governing codes and ordinances. NOTE: For undercounter installation, it is greater than 36" (91.4 cm), dimension "G" can be approved for oven trim to make sure that the junction boxes for induction combinations. If dimension "F" is recommended that the materials used will not discolor, delaminate or sustain other damage. See cooktop Installation Instructions for...
Dimension Guide
Page 6
... serviceability of the oven. ■ A UL listed or CSA-approved conduit connector must be provided. ■ If the house has aluminum wiring, follow the instructions provided for joining copper to aluminum. Model/serial/rating plate ■ Models rated from the oven should be connected directly the junction box. ■ Fuse both sides of the line. ■ Do not cut the conduit. This model requires a separate 20 A circuit. DIMENSION GUIDE Electrical Connection To properly install your oven...
... serviceability of the oven. ■ A UL listed or CSA-approved conduit connector must be provided. ■ If the house has aluminum wiring, follow the instructions provided for joining copper to aluminum. Model/serial/rating plate ■ Models rated from the oven should be connected directly the junction box. ■ Fuse both sides of the line. ■ Do not cut the conduit. This model requires a separate 20 A circuit. DIMENSION GUIDE Electrical Connection To properly install your oven...


