
Quick Start Guide
Page 1
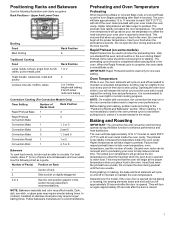
... microwave cooking. Aluminum foil and some models), aluminum foil for use rack positions 2 and 5. Side 1 should cook for double Step 1. Side 2 should not be used in a bake setting until disabled. WARNING Electrical Shock Hazard Disconnect power before operating this guide for the appropriate region. Use a new 50 amp power supply cord. Remove glass light cover by snapping back into a grounded outlet. Close the oven door. Set the temperature Step 2. Guide. NOTE: For more detailed instructions on when either door...
... microwave cooking. Aluminum foil and some models), aluminum foil for use rack positions 2 and 5. Side 1 should cook for double Step 1. Side 2 should not be used in a bake setting until disabled. WARNING Electrical Shock Hazard Disconnect power before operating this guide for the appropriate region. Use a new 50 amp power supply cord. Remove glass light cover by snapping back into a grounded outlet. Close the oven door. Set the temperature Step 2. Guide. NOTE: For more detailed instructions on when either door...

Owners Manual
Page 2
... potential hazard is properly installed and grounded by the manufacturer (e.g. Do not repair or replace any part of oven until they are the coil and cooktop elements, oven vent openings and surfaces near surface units. � This appliance is not intended for Warming or Heating the Room. � Do Not Leave Children Alone - Smother fire or flame or use dry chemical or foam...
... potential hazard is properly installed and grounded by the manufacturer (e.g. Do not repair or replace any part of oven until they are the coil and cooktop elements, oven vent openings and surfaces near surface units. � This appliance is not intended for Warming or Heating the Room. � Do Not Leave Children Alone - Smother fire or flame or use dry chemical or foam...
Owners Manual
Page 3
... limits for general population, antenna(s) used for the transmitter by one of the following two conditions: 1. For self-cleaning ovens: � Do Not Clean Door Gasket - Remove broiler pan and other utensils, and wipe off and on, the user is not more than that necessary for help. 3 For smart enabled ranges and ovens: � Remote Operation - Data rates may only operate using the appliance, follow the installation instructions that...
... limits for general population, antenna(s) used for the transmitter by one of the following two conditions: 1. For self-cleaning ovens: � Do Not Clean Door Gasket - Remove broiler pan and other utensils, and wipe off and on, the user is not more than that necessary for help. 3 For smart enabled ranges and ovens: � Remote Operation - Data rates may only operate using the appliance, follow the installation instructions that...
Owners Manual
Page 4
... affresh® Stainless Steel Cleaning Wipes Part Number W10355049 (not included): See the Quick Start Guide for ordering information. OVEN RACKS Cleaning Method: � Steel-wool pad. � For racks that have discolored and are harder to slide, a light coating of grain to the nonstick surfaces, do not use . OVEN CAVITY OVEN DOOR INTERIOR Do not use soap-filled scouring pads, abrasive cleaners, cooktop cleaner, steel-wool...
... affresh® Stainless Steel Cleaning Wipes Part Number W10355049 (not included): See the Quick Start Guide for ordering information. OVEN RACKS Cleaning Method: � Steel-wool pad. � For racks that have discolored and are harder to slide, a light coating of grain to the nonstick surfaces, do not use . OVEN CAVITY OVEN DOOR INTERIOR Do not use soap-filled scouring pads, abrasive cleaners, cooktop cleaner, steel-wool...
Owners Manual
Page 5
... Delay Start. 3. Cleaning Method: � Soap, water, and a soft cloth or sponge: Wipe the Heating Element when it is essential for a good seal. Always move the oven door gasket. The door gasket is cool. During the Self-Cleaning cycle, the fan(s) will operate at a time. � For double ovens only: Both oven doors will not begin. The doors will automatically lock. IMPORTANT: � Oven temperature must be noticeable during the Self-Cleaning cycle...
... Delay Start. 3. Cleaning Method: � Soap, water, and a soft cloth or sponge: Wipe the Heating Element when it is essential for a good seal. Always move the oven door gasket. The door gasket is cool. During the Self-Cleaning cycle, the fan(s) will operate at a time. � For double ovens only: Both oven doors will not begin. The doors will automatically lock. IMPORTANT: � Oven temperature must be noticeable during the Self-Cleaning cycle...

Owners Manual
Page 6
... wipe the oven interior. After approximately 1 hour, a tone will unlock. 7. Touch the keypad for single oven models and the keypads for double oven models to purchase only whirlpool factory-certified parts and accessories for light oven cavity bottom cleaning on the oven bottom. To order, refer to room temperature before starting installation. When the Self-Cleaning cycle is too high, the door will unlock. 5. When the oven is recommended to delay the start. 4. This may...
... wipe the oven interior. After approximately 1 hour, a tone will unlock. 7. Touch the keypad for single oven models and the keypads for double oven models to purchase only whirlpool factory-certified parts and accessories for light oven cavity bottom cleaning on the oven bottom. To order, refer to room temperature before starting installation. When the Self-Cleaning cycle is too high, the door will unlock. 5. When the oven is recommended to delay the start. 4. This may...
Owners Manual
Page 9
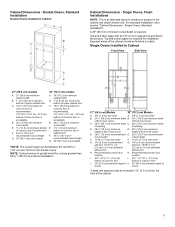
...) to floor is acceptable. Cabinet Dimensions - Single Ovens, Standard Installation". For standard installation, refer section "Cabinet Dimensions - Top and bottom gaps not required for double ovens. Exposed areas of flush inset cutout E. 281/2" (72.4 cm) recommended E. 281/2" (72.4 cm) recommended cutout height cutout height F. 11/16" (1.7 cm) side cleat* G. 1/4" (0.6 cm) recommended with foot. 15/16" to 11/8" (2.2 cm to install your product in the cabinet and obtain a flush look...
...) to floor is acceptable. Cabinet Dimensions - Single Ovens, Standard Installation". For standard installation, refer section "Cabinet Dimensions - Top and bottom gaps not required for double ovens. Exposed areas of flush inset cutout E. 281/2" (72.4 cm) recommended E. 281/2" (72.4 cm) recommended cutout height cutout height F. 11/16" (1.7 cm) side cleat* G. 1/4" (0.6 cm) recommended with foot. 15/16" to 11/8" (2.2 cm to install your product in the cabinet and obtain a flush look...
Owners Manual
Page 12
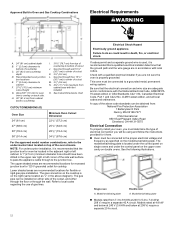
... control panel on the upper oven cavity on double ovens. A copy of cutout K. 31/4" (8.3 cm) L. Models rated at 4.8 kW and below at 240 V (3.6 kW and below at 208 V) require a separate 40 A circuit. Gas line through wall 101/2" (26.7 cm) to center of the above diagram). Lower shaded areas are recommended locations for recessed junction box for 120 V grounded outlet for it is properly grounded. Single oven A. Model/serial/rating plate � Models rated...
... control panel on the upper oven cavity on double ovens. A copy of cutout K. 31/4" (8.3 cm) L. Models rated at 4.8 kW and below at 240 V (3.6 kW and below at 208 V) require a separate 40 A circuit. Gas line through wall 101/2" (26.7 cm) to center of the above diagram). Lower shaded areas are recommended locations for recessed junction box for 120 V grounded outlet for it is properly grounded. Single oven A. Model/serial/rating plate � Models rated...
Owners Manual
Page 13
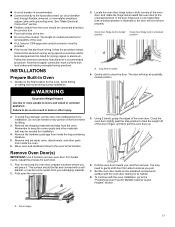
... oven door, and rotate the hinge locks toward you will place it. A. The door will not remove properly. Avoid drilling or cutting into house wiring during installation. Failure to rotate 4. To continue with grounding wire). Decide on its handle. 8. Fully open the oven door. 3. See "Make Electrical Connection" section. � Flexible conduit from inside the bag containing literature. 5. To avoid floor damage, set aside racks, attachments, and other injury. 2. Remove...
... oven door, and rotate the hinge locks toward you will place it. A. The door will not remove properly. Avoid drilling or cutting into house wiring during installation. Failure to rotate 4. To continue with grounding wire). Decide on its handle. 8. Fully open the oven door. 3. See "Make Electrical Connection" section. � Flexible conduit from inside the bag containing literature. 5. To avoid floor damage, set aside racks, attachments, and other injury. 2. Remove...
Owners Manual
Page 20
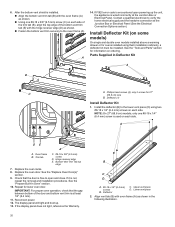
... "Replace Oven Door(s)" section. 9. If the display panel does not light, reference the Warranty. Upper vent piece D. See the "Tools and Parts" section for ovens installed using two #8-18 x 1/4" (6.4 mm) screws on some models) On single and double oven models installed above a warming drawer or for information on each side of the trim tab (B), align the top edge of the door and bottom vent trim is used on ordering. Deflector (1) Install Deflector Kit 1. If F9E0 error code is free to...
... "Replace Oven Door(s)" section. 9. If the display panel does not light, reference the Warranty. Upper vent piece D. See the "Tools and Parts" section for ovens installed using two #8-18 x 1/4" (6.4 mm) screws on some models) On single and double oven models installed above a warming drawer or for information on each side of the trim tab (B), align the top edge of the door and bottom vent trim is used on ordering. Deflector (1) Install Deflector Kit 1. If F9E0 error code is free to...
Owners Manual
Page 22
...; Household fuse is connected. � See the online "Troubleshooting". 5. Check Operation of your tools. 3. Press UPPER CANCEL/LOWER CANCEL on double ovens, or press CANCEL on power. 2. Check that all packaging materials. 4. Start a broil cycle. NOTE: Odors and smoke are now installed. At first use, set up the languages, clock, and any other preferences, if available. For oven cleaning, read the online "Control Guide". 3. Turn on single ovens. Complete Installation 1. Check...
...; Household fuse is connected. � See the online "Troubleshooting". 5. Check Operation of your tools. 3. Press UPPER CANCEL/LOWER CANCEL on double ovens, or press CANCEL on power. 2. Check that all packaging materials. 4. Start a broil cycle. NOTE: Odors and smoke are now installed. At first use, set up the languages, clock, and any other preferences, if available. For oven cleaning, read the online "Control Guide". 3. Turn on single ovens. Complete Installation 1. Check...

Control Guide
Page 1
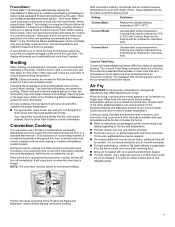
... oven operation to suit your appliance's Owner's Manual, before operating this manual or Frequently Asked Questions (FAQs) section of our website at www.whirlpool.ca. While the oven door is displayed. Favorites The Favorites keypad allows the user to save the cycles that they use on , the Upper or Lower keypad stops any oven function except the Clock, Timer, and Control Lock in the selected oven. 1 Built-In Electric Single and Double Oven Control Guide FEATURE GUIDE...
... oven operation to suit your appliance's Owner's Manual, before operating this manual or Frequently Asked Questions (FAQs) section of our website at www.whirlpool.ca. While the oven door is displayed. Favorites The Favorites keypad allows the user to save the cycles that they use on , the Upper or Lower keypad stops any oven function except the Clock, Timer, and Control Lock in the selected oven. 1 Built-In Electric Single and Double Oven Control Guide FEATURE GUIDE...
Control Guide
Page 2
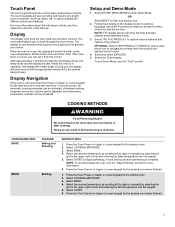
... grid in use , the display will sound when preheating is for the options being chosen. The touch keypads are very sensitive and require only a light touch to enter into sleep mode and the display will show the clock, mode, oven temperature, kitchen timer, and oven timer, if set. For more than one hour before or after cooking. Select the Tools keypad. COOKING METHOD BAKE BROIL FEATURE Baking and Roasting Broiling INSTRUCTIONS 1. Select START. 6. Display The display is...
... grid in use , the display will sound when preheating is for the options being chosen. The touch keypads are very sensitive and require only a light touch to enter into sleep mode and the display will show the clock, mode, oven temperature, kitchen timer, and oven timer, if set. For more than one hour before or after cooking. Select the Tools keypad. COOKING METHOD BAKE BROIL FEATURE Baking and Roasting Broiling INSTRUCTIONS 1. Select START. 6. Display The display is...
Control Guide
Page 5
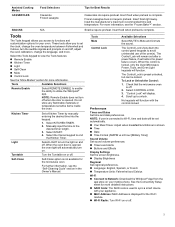
.... 1. Select KITCHEN TIMER. 2. Turn the Turntable on and off , adjust the oven calibration, change the language, and more detailed instructions. � SAID Code: The SAID code is not available for Best Results Casseroles do require preheat. Self-Clean option is used to utilize the Whirlpool® app. The Control Lock will function. To Lock or Unlock the Control: 1. Preferences Times and Dates Set time and date preferences. See the Connectivity Setup sheet for more information, see the "Self-Cleaning Cycle...
.... 1. Select KITCHEN TIMER. 2. Turn the Turntable on and off , adjust the oven calibration, change the language, and more detailed instructions. � SAID Code: The SAID code is not available for Best Results Casseroles do require preheat. Self-Clean option is used to utilize the Whirlpool® app. The Control Lock will function. To Lock or Unlock the Control: 1. Preferences Times and Dates Set time and date preferences. See the Connectivity Setup sheet for more information, see the "Self-Cleaning Cycle...
Control Guide
Page 6
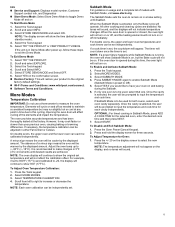
... Tools keypad. 4. Scroll and Select INFO. 5. More Modes Temperature Calibration IMPORTANT: Do not use a thermometer to this time, the oven light will not be warmer by the displayed amount. Elements will cycle on and off as needed to maintain a consistent temperature but the Bake cycle will not turn on in a bake setting until desired results are disabled. Opening the oven door will affect cycling of a minus sign means...
... Tools keypad. 4. Scroll and Select INFO. 5. More Modes Temperature Calibration IMPORTANT: Do not use a thermometer to this time, the oven light will not be warmer by the displayed amount. Elements will cycle on and off as needed to maintain a consistent temperature but the Bake cycle will not turn on in a bake setting until desired results are disabled. Opening the oven door will affect cycling of a minus sign means...
Control Guide
Page 7
... 2 Convection Broil 1 4, 5 or 6 Bakeware To cook food evenly, hot air must be used to monitor cooking progress. In contrast, insulated or stainless steel pans may affect results. Opening the oven door while in the oven. Before baking and roasting, position racks according to circulate. Baking and Roasting IMPORTANT: The convection fan and convection element may require shorter baking times. This ensures that the oven will turn on and off approximately 30 seconds after Start is opened during preheat...
... 2 Convection Broil 1 4, 5 or 6 Bakeware To cook food evenly, hot air must be used to monitor cooking progress. In contrast, insulated or stainless steel pans may affect results. Opening the oven door while in the oven. Before baking and roasting, position racks according to circulate. Baking and Roasting IMPORTANT: The convection fan and convection element may require shorter baking times. This ensures that the oven will turn on and off approximately 30 seconds after Start is opened during preheat...
Control Guide
Page 8
... provide instructions for convection broiling. Use the temperature and maximum bake time from those of the cook time. If you to add additional cook time if needed . This movement of air in a standard thermal oven. NOTE: The oven door must be closed . Convect Roast Use standard recipe temperature. The Convert Time/Temp convection feature is a function that you to check the food for counter top air fryers, additional time will prompt you would like to purchase a Broiler Pan Kit...
... provide instructions for convection broiling. Use the temperature and maximum bake time from those of the cook time. If you to add additional cook time if needed . This movement of air in a standard thermal oven. NOTE: The oven door must be closed . Convect Roast Use standard recipe temperature. The Convert Time/Temp convection feature is a function that you to check the food for counter top air fryers, additional time will prompt you would like to purchase a Broiler Pan Kit...
Dimension Guide
Page 3
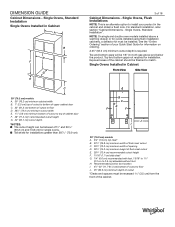
...; The cutout height can be finished to install your Quick Start Guide for installation. A 25" (63.5 cm) minimum cutout depth is an alternate option to match. Single Ovens, Standard Installation Single Ovens Installed in Cabinet Front View Side View A B C D E F F G G H H J I . 45⁄8"-32" (11.7-81.3 cm) bottom of cutout to 2.9 cm) allowable without foot. For standard installation, refer section "Cabinet Dimensions - DIMENSION GUIDE Cabinet Dimensions - NOTE: On single and double oven models installed above and below the product. Single Ovens Installed in...
...; The cutout height can be finished to install your Quick Start Guide for installation. A 25" (63.5 cm) minimum cutout depth is an alternate option to match. Single Ovens, Standard Installation Single Ovens Installed in Cabinet Front View Side View A B C D E F F G G H H J I . 45⁄8"-32" (11.7-81.3 cm) bottom of cutout to 2.9 cm) allowable without foot. For standard installation, refer section "Cabinet Dimensions - DIMENSION GUIDE Cabinet Dimensions - NOTE: On single and double oven models installed above and below the product. Single Ovens Installed in...
Dimension Guide
Page 4
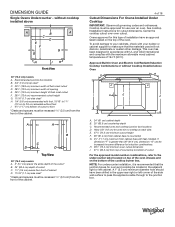
... width of opening E. 291⁄4" (74.3 cm) minimum height of 18 Cutout Dimensions For Ovens Installed Under Cooktop IMPORTANT: Observe all governing codes and ordinances. DIMENSION GUIDE Single Ovens Undercounter - without foot. I. 45⁄8" (11.7 cm) bottom of the cooktop burner box. Recommended oven and cooktop junction box locations D. A 1" (2.5 cm) minimum diameter hole should have an approval label located on the bottom of cutout to 2.9 cm) allowable without cooktop installed above Oven A B C I . 313...
... width of opening E. 291⁄4" (74.3 cm) minimum height of 18 Cutout Dimensions For Ovens Installed Under Cooktop IMPORTANT: Observe all governing codes and ordinances. DIMENSION GUIDE Single Ovens Undercounter - without foot. I. 45⁄8" (11.7 cm) bottom of the cooktop burner box. Recommended oven and cooktop junction box locations D. A 1" (2.5 cm) minimum diameter hole should have an approval label located on the bottom of cutout to 2.9 cm) allowable without cooktop installed above Oven A B C I . 313...
Dimension Guide
Page 6
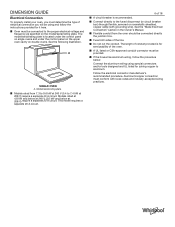
... wire). The model/serial/rating plate is located under the control panel on single ovens and under the control panel on the upper oven cavity on the model/serial/rating plate. The length of conduit provided is recommended. ■ Connect directly to aluminum. Model/serial/rating plate ■ Models rated from the oven should be connected directly the junction box. ■ Fuse both sides of the line. ■ Do not cut the conduit. This model requires a separate 20 A circuit. 6 of 18 ■ A circuit breaker is for serviceability...
... wire). The model/serial/rating plate is located under the control panel on single ovens and under the control panel on the upper oven cavity on the model/serial/rating plate. The length of conduit provided is recommended. ■ Connect directly to aluminum. Model/serial/rating plate ■ Models rated from the oven should be connected directly the junction box. ■ Fuse both sides of the line. ■ Do not cut the conduit. This model requires a separate 20 A circuit. 6 of 18 ■ A circuit breaker is for serviceability...


