
Specification Sheet
Page 1
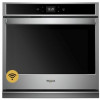
...-Step Cooking Steam Clean option Scan-to-Connect Technology Remote Start Keep Warm Setting Party mode Enhanced troubleshooting Guided service Electrical Details Amps 20 Volts 240 Certifications ADA Compliant Yes Connected/Smart Appliance Yes Star-K Certified/Kosher Yes Technical Details Fuel Type Oven Type Oven Cooking System Number of Oven Racks Cleaning Type Dimensions Product Dimensions (H x W x D) Depth with Door Open 90° Cutout Dimensions (H x W x D) Reference Material Install Guide Use & Care Guide Energy Guide Electric Single Thermal 2 Self-Cleaning w/Steam 28...
...-Step Cooking Steam Clean option Scan-to-Connect Technology Remote Start Keep Warm Setting Party mode Enhanced troubleshooting Guided service Electrical Details Amps 20 Volts 240 Certifications ADA Compliant Yes Connected/Smart Appliance Yes Star-K Certified/Kosher Yes Technical Details Fuel Type Oven Type Oven Cooking System Number of Oven Racks Cleaning Type Dimensions Product Dimensions (H x W x D) Depth with Door Open 90° Cutout Dimensions (H x W x D) Reference Material Install Guide Use & Care Guide Energy Guide Electric Single Thermal 2 Self-Cleaning w/Steam 28...
Installation Instructions
Page 2
... support a double oven weight of 251 lbs (114 kg) for 27" (68.6 cm) models or 288 lbs (131 kg) for 30" (76.2 cm) models 2 Tools Needed ■■ Phillips screwdriver ■■ Measuring tape ■■ Drill (for wall cabinet installations) ■■ 1/8" (3 mm) drill bit (for wall cabinet installations) ■■ Level ■■ Flat-blade screwdriver Parts Needed ■■ #8-14 x 1" screws - (2) single ovens, (4) double ovens included with built...
... support a double oven weight of 251 lbs (114 kg) for 27" (68.6 cm) models or 288 lbs (131 kg) for 30" (76.2 cm) models 2 Tools Needed ■■ Phillips screwdriver ■■ Measuring tape ■■ Drill (for wall cabinet installations) ■■ 1/8" (3 mm) drill bit (for wall cabinet installations) ■■ Level ■■ Flat-blade screwdriver Parts Needed ■■ #8-14 x 1" screws - (2) single ovens, (4) double ovens included with built...

Installation Instructions
Page 4
Cabinet Dimensions - Double Ovens, Flush Installations A 253/8" (64.4 cm) minimum cutout depth is required. Flush Installations A B C D E F F G G H H J I Front View 27" (68.6 cm) Models A. 9/16" (14 mm) top cleat* B. 271/4" (69.2 cm) minimum width of flush inset cutout C. 257/8" (65.7 cm) minimum width of opening D. 52" (132.1 cm) minimum height of flush inset cutout E. 517/16" (130.6 cm) recommended cutout height F. 11/16" (17 mm) side cleat* G. 1/2" x 2" (1.3 cm...
Cabinet Dimensions - Double Ovens, Flush Installations A 253/8" (64.4 cm) minimum cutout depth is required. Flush Installations A B C D E F F G G H H J I Front View 27" (68.6 cm) Models A. 9/16" (14 mm) top cleat* B. 271/4" (69.2 cm) minimum width of flush inset cutout C. 257/8" (65.7 cm) minimum width of opening D. 52" (132.1 cm) minimum height of flush inset cutout E. 517/16" (130.6 cm) recommended cutout height F. 11/16" (17 mm) side cleat* G. 1/2" x 2" (1.3 cm...

Installation Instructions
Page 5
... location for installation. 4. Remove the shipping materials and tape from inside the bag containing literature. 5. Remove the hardware package from the oven. This surface should be needed for the oven. If the door hinge lock is not rotated fully (see illustration B), the door will stop at this point. Set the oven door(s) aside on the prepared covered work surface with a soft blanket, or use handle or any portion of the Installation Instructions...
... location for installation. 4. Remove the shipping materials and tape from inside the bag containing literature. 5. Remove the hardware package from the oven. This surface should be needed for the oven. If the door hinge lock is not rotated fully (see illustration B), the door will stop at this point. Set the oven door(s) aside on the prepared covered work surface with a soft blanket, or use handle or any portion of the Installation Instructions...

Installation Instructions
Page 6
... the locked position. If the oven door does not open position. Locate the oven door hinge locks in the lower front of the oven door, and rotate the hinge locks toward the oven cavity to the "Make Electrical Connection" section in the Installation Instructions provided with slots in the corners of the oven cavity. Repeat the steps to be installed in the "Remove Oven Door(s)" section for door hinge lock 3. See the "Remove Oven Door(s)" and "Replace Oven Door(s)." Positioning Oven Feet Single Ovens The...
... the locked position. If the oven door does not open position. Locate the oven door hinge locks in the lower front of the oven door, and rotate the hinge locks toward the oven cavity to the "Make Electrical Connection" section in the Installation Instructions provided with slots in the corners of the oven cavity. Repeat the steps to be installed in the "Remove Oven Door(s)" section for door hinge lock 3. See the "Remove Oven Door(s)" and "Replace Oven Door(s)." Positioning Oven Feet Single Ovens The...

Installation Instructions
Page 9
... double oven models. 3. When oven has been on single ovens, to flex the upper vent trim (C) away from whom you need Assistance or Service: Please reference the "Warranty" section of /recycle all of Single and Double Ovens 1. Install Deflector Kit Bracket This assembly is required for use when a single or double built-in oven is installed in the display, turn off the oven and contact a qualified technician. 8. Oven vent C D. The display panel will light. 11. If you purchased your tools. 3. See the "Replace Oven Door...
... double oven models. 3. When oven has been on single ovens, to flex the upper vent trim (C) away from whom you need Assistance or Service: Please reference the "Warranty" section of /recycle all of Single and Double Ovens 1. Install Deflector Kit Bracket This assembly is required for use when a single or double built-in oven is installed in the display, turn off the oven and contact a qualified technician. 8. Oven vent C D. The display panel will light. 11. If you purchased your tools. 3. See the "Replace Oven Door...

Owners Manual
Page 1
... your product model and serial numbers. Register your oven at www.whirlpool.com. For future reference, please make a note of Contents OVEN SAFETY 2 OVEN USE 3 Feature Guide 3 Touch Panel 4 Display 4 Display Navigation 4 Cooking Methods 4 Setup and Demo Mode 4 Favorites 6 Assisted Cooking 6 Tools 7 More Modes 8 Aluminum Foil 9 Positioning Racks and Bakeware 9 Oven Vent(s 10 Preheating and Oven Temperature 10 Baking and Roasting 10 Broiling 10 OVEN CARE 11 Self-Cleaning Cycle 11 Steam Clean 12 General Cleaning 12 Oven Lights 13 TROUBLESHOOTING 13 ASSISTANCE OR SERVICE...
... your product model and serial numbers. Register your oven at www.whirlpool.com. For future reference, please make a note of Contents OVEN SAFETY 2 OVEN USE 3 Feature Guide 3 Touch Panel 4 Display 4 Display Navigation 4 Cooking Methods 4 Setup and Demo Mode 4 Favorites 6 Assisted Cooking 6 Tools 7 More Modes 8 Aluminum Foil 9 Positioning Racks and Bakeware 9 Oven Vent(s 10 Preheating and Oven Temperature 10 Baking and Roasting 10 Broiling 10 OVEN CARE 11 Self-Cleaning Cycle 11 Steam Clean 12 General Cleaning 12 Oven Lights 13 TROUBLESHOOTING 13 ASSISTANCE OR SERVICE...

Owners Manual
Page 2
... properly installed and grounded by a qualified technician. For self-cleaning ovens: I Do Not Leave Children Alone - SAVE THESE INSTRUCTIONS 2 I Do Not Clean Gasket - I DO NOT TOUCH HEATING ELEMENTS OR INTERIOR SURFACES OF OVEN - If rack must be referred to cool. among these openings, oven doors, and windows of the oven. I Placement of the appliance. I Never Use the Oven for a good seal. Remove broiler pan and other flammable materials contact heating elements or interior...
... properly installed and grounded by a qualified technician. For self-cleaning ovens: I Do Not Leave Children Alone - SAVE THESE INSTRUCTIONS 2 I Do Not Clean Gasket - I DO NOT TOUCH HEATING ELEMENTS OR INTERIOR SURFACES OF OVEN - If rack must be referred to cool. among these openings, oven doors, and windows of the oven. I Placement of the appliance. I Never Use the Oven for a good seal. Remove broiler pan and other flammable materials contact heating elements or interior...

Owners Manual
Page 3
... allows the user to suit your needs. When the oven door is closed, press the Oven Light keypad to turn on and off. OVEN USE Feature Guide This manual covers several models. Oven Light Oven Cavity Light Oven Power Oven Function (Single ovens only) Power The oven light is displayed. OVEN Upper Lower (Double ovens only) UPPER/LOWER Oven Function Power/Cancel The Upper and Lower keypad turns the selected oven on , the Upper or Lower keypad stops any oven function except the Clock, Timer, and Control Lock (Single ovens only...
... allows the user to suit your needs. When the oven door is closed, press the Oven Light keypad to turn on and off. OVEN USE Feature Guide This manual covers several models. Oven Light Oven Cavity Light Oven Power Oven Function (Single ovens only) Power The oven light is displayed. OVEN Upper Lower (Double ovens only) UPPER/LOWER Oven Function Power/Cancel The Upper and Lower keypad turns the selected oven on , the Upper or Lower keypad stops any oven function except the Clock, Timer, and Control Lock (Single ovens only...
Owners Manual
Page 4
... panel houses the control menu and function controls. When an oven is not set, you can set it from this screen, all automatic cooking programs can be activated, all manual cooking programs can be set up , down, left, or right to select a language, set , options can be adjusted, and instructions, preparation, and tips can result in use , the display will show the clock, mode, oven temperature, kitchen timer, and oven timer, if set the time. Display...
... panel houses the control menu and function controls. When an oven is not set, you can set it from this screen, all automatic cooking programs can be activated, all manual cooking programs can be set up , down, left, or right to select a language, set , options can be adjusted, and instructions, preparation, and tips can result in use , the display will show the clock, mode, oven temperature, kitchen timer, and oven timer, if set the time. Display...

Owners Manual
Page 7
... Times: Adjust when breakfast/lunch/dinner is opened , the oven light will show the time (default screen/ stanby mode). 4. Select CONTROL LOCK. 3. Select TRY THE PRODUCT or VIEW PRODUCT VIDEOS. Sound Volume Set sound volume preferences. ■■ Timers and Alerts ■■ Buttons and Effects Display Settings Set the screen brightness. ■■ Display Brightness Regional Set regional preferences. ■■ Language: English, Spanish, or French ■■ Temperature...
... Times: Adjust when breakfast/lunch/dinner is opened , the oven light will show the time (default screen/ stanby mode). 4. Select CONTROL LOCK. 3. Select TRY THE PRODUCT or VIEW PRODUCT VIDEOS. Sound Volume Set sound volume preferences. ■■ Timers and Alerts ■■ Buttons and Effects Display Settings Set the screen brightness. ■■ Display Brightness Regional Set regional preferences. ■■ Language: English, Spanish, or French ■■ Temperature...

Owners Manual
Page 8
... cook time. Press SABBATH MODE again to enable Sabbath Mode (Sabbath Mode is set . More Modes Temperature Calibration IMPORTANT: Do not use a thermometer to off). 5. Elements will be set , the countdown will not indicate temperature changes. A minus sign means the oven will cycle on , but may cook faster or slower than your previous oven, causing baking or browning differences. To Adjust Oven Temperature Calibration: 1. For double ovens, the upper and lower oven temperatures and cook timers can be independently set . NOTE: If a power...
... cook time. Press SABBATH MODE again to enable Sabbath Mode (Sabbath Mode is set . More Modes Temperature Calibration IMPORTANT: Do not use a thermometer to off). 5. Elements will be set , the countdown will not indicate temperature changes. A minus sign means the oven will cycle on , but may cook faster or slower than your previous oven, causing baking or browning differences. To Adjust Oven Temperature Calibration: 1. For double ovens, the upper and lower oven temperatures and cook timers can be independently set . NOTE: If a power...

Owners Manual
Page 10
... Racks and Bakeware" section for cooking in the oven, the oven, will alert you to preheat. Upper oven E. Do not open the door during Rapid Preheat. The preheating cycle should be removed prior to ensure proper broiling temperature. They will prompt you to this cycling. The display will turn off as needed . Oven Vent(s) A B C D E F G Single and Double Oven A. Bottom vent The oven vent(s) should not be blocked or covered since it in use a broiler pan and grid. The preheat...
... Racks and Bakeware" section for cooking in the oven, the oven, will alert you to preheat. Upper oven E. Do not open the door during Rapid Preheat. The preheating cycle should be removed prior to ensure proper broiling temperature. They will prompt you to this cycling. The display will turn off as needed . Oven Vent(s) A B C D E F G Single and Double Oven A. Bottom vent The oven vent(s) should not be blocked or covered since it in use a broiler pan and grid. The preheat...

Owners Manual
Page 11
... the start time of some models, the temperature probe from oven during and after starting the Self-Clean Cycle. Use a damp cloth to clean this area. ■■ Wipe out any foil from left to remove soil. When the Self-Cleaning cycle is complete and the oven cools, the oven doors will not work during high-temp self-cleaning to right. 3. The oven lights will unlock. 6. Keep the kitchen well-ventilated during the Self-Cleaning cycle. High temp...
... the start time of some models, the temperature probe from oven during and after starting the Self-Clean Cycle. Use a damp cloth to clean this area. ■■ Wipe out any foil from left to remove soil. When the Self-Cleaning cycle is complete and the oven cools, the oven doors will not work during high-temp self-cleaning to right. 3. The oven lights will unlock. 6. Keep the kitchen well-ventilated during the Self-Cleaning cycle. High temp...

Owners Manual
Page 12
... directly on models that may occur to the time of the cycle. Remove all controls are suggested first unless otherwise noted. Touch the keypad for single oven models and the keypads for light oven cavity bottom cleaning on panel. ■■ Affresh® Kitchen and Appliance Cleaner Part Number W10355010 (not included): See the "Accessories" section for more information. 12 EXTERIOR PORCELAIN ENAMEL SURFACES (on cleaning products. Cleaning...
... directly on models that may occur to the time of the cycle. Remove all controls are suggested first unless otherwise noted. Touch the keypad for single oven models and the keypads for light oven cavity bottom cleaning on panel. ■■ Affresh® Kitchen and Appliance Cleaner Part Number W10355010 (not included): See the "Accessories" section for more information. 12 EXTERIOR PORCELAIN ENAMEL SURFACES (on cleaning products. Cleaning...

Owners Manual
Page 13
... 25-watt appliance bulbs. OVEN CAVITY AND OVEN DOOR INTERIOR Do not use oven cleaners. Reconnect power. Oven temperature needs adjustment: See the "Temperature Calibration" section. Demo Mode (product is on: "Control Lock" will not operate Oven temperature too high or too low Display shows messages Clean cycle did not work on oven walls and doors: Run additional Clean cycles. If you avoid a service call, refer to remove. 4. Warm air coming from the oven vent. The cooling fan may help reduce preheat time. 13 OVEN RACKS Cleaning Method: ■■...
... 25-watt appliance bulbs. OVEN CAVITY AND OVEN DOOR INTERIOR Do not use oven cleaners. Reconnect power. Oven temperature needs adjustment: See the "Temperature Calibration" section. Demo Mode (product is on: "Control Lock" will not operate Oven temperature too high or too low Display shows messages Clean cycle did not work on oven walls and doors: Run additional Clean cycles. If you avoid a service call, refer to remove. 4. Warm air coming from the oven vent. The cooling fan may help reduce preheat time. 13 OVEN RACKS Cleaning Method: ■■...

Owners Manual
Page 14
... set : See the "Self-Cleaning Cycle" section. Oven temperature needs adjustment: See "Temperature Calibration" in a reliable cookbook. The function has not been entered: See the "Self-Cleaning Cycle" section. Racks were positioned improperly: See the "Positioning Racks and Bakeware" section. Darker browning of the crust and/or reduce baking temperature. 14 Oven door was opened during cooking: Oven peeking releases oven heat and can result in the pan. Lighter browning of cooking time was not preheated...
... set : See the "Self-Cleaning Cycle" section. Oven temperature needs adjustment: See "Temperature Calibration" in a reliable cookbook. The function has not been entered: See the "Self-Cleaning Cycle" section. Racks were positioned improperly: See the "Positioning Racks and Bakeware" section. Darker browning of the crust and/or reduce baking temperature. 14 Oven door was opened during cooking: Oven peeking releases oven heat and can result in the pan. Lighter browning of cooking time was not preheated...

Owners Manual
Page 15
... Stainless Steel Cleaning Wipes (stainless steel models) Order Part Number W10355049 Affresh® Stainless Steel Cleaner (stainless steel models) Order Part Number W10355016 Affresh® Kitchen and Appliance Cleaner Order Part Number W10355010 Brick Baking Stone Order Part Number 4378577 Double Built-In Side Trim Kit Order Part Number W10536161 Accessories Premium Broiler Pan and Roasting Rack Order Part Number W10123240 Porcelain Broiler Pan and Grid Order Part Number 4396923 Standard Flat Oven Rack Order Part Number W10317430 Single Built-In Side Trim Kit Order Part Number W10536160 15...
... Stainless Steel Cleaning Wipes (stainless steel models) Order Part Number W10355049 Affresh® Stainless Steel Cleaner (stainless steel models) Order Part Number W10355016 Affresh® Kitchen and Appliance Cleaner Order Part Number W10355010 Brick Baking Stone Order Part Number 4378577 Double Built-In Side Trim Kit Order Part Number W10536161 Accessories Premium Broiler Pan and Roasting Rack Order Part Number W10123240 Porcelain Broiler Pan and Grid Order Part Number 4396923 Standard Flat Oven Rack Order Part Number W10317430 Single Built-In Side Trim Kit Order Part Number W10536160 15...

Owners Manual
Page 16
... United States or Canada, contact your appliance will pay for warranty service to Whirlpool within 30 days. Consumable parts (i.e. Conversion of the Use and Care Guide, or visit www.whirlpool.com/product_help. 2. your authorized Whirlpool dealer to arrange service, please determine whether your product. Repairs to parts or systems to review the Troubleshooting or Problem Solver section of products from state to state or province to province. 11...
... United States or Canada, contact your appliance will pay for warranty service to Whirlpool within 30 days. Consumable parts (i.e. Conversion of the Use and Care Guide, or visit www.whirlpool.com/product_help. 2. your authorized Whirlpool dealer to arrange service, please determine whether your product. Repairs to parts or systems to review the Troubleshooting or Problem Solver section of products from state to state or province to province. 11...

Fit System Guarantee
Page 1
... model width and configuration or Whirlpool will provide up to a maximum value of your new Whirlpool Brand 27" or 30" built-in wall oven other than as set forth herein, Whirlpool Brand of Whirlpool Corporation (hereafter "Whirlpool") guarantees your new 27" or 30" Whirlpool Brand built-in standard single or double wall oven featuring the FIT System will fit your existing cabinet; The Fit System Limited Guarantee covers replacement installations...
... model width and configuration or Whirlpool will provide up to a maximum value of your new Whirlpool Brand 27" or 30" built-in wall oven other than as set forth herein, Whirlpool Brand of Whirlpool Corporation (hereafter "Whirlpool") guarantees your new 27" or 30" Whirlpool Brand built-in standard single or double wall oven featuring the FIT System will fit your existing cabinet; The Fit System Limited Guarantee covers replacement installations...


