
Dimension Guide
Page 1
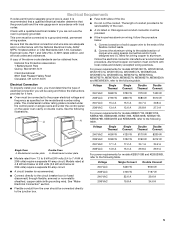
... 5580 W 5610 W 240 VAC 15.4 A 15.5 A 30.7 A 30.8 A 208 VAC 13.4 A 13.6 A 26.8 A 27.0 A Because Whirlpool Corporation policy includes a continuous commitment to improve our products, we reserve the right to change materials and specifications without notice. Specifications subject to change without... (76.2 cm) overall width B A C E D 27" (68.6 cm) models A. 51 130.0 cm) max. q Oven must be using special connectors and/or tools designed and UL listed for models WOS51EC7A, WOS51EC0A, WOD51EC7A, WOD51EC0A, WOS92EC7A, WOS92EC0A, WOD93EC7A, and WOD93EC0A, refer to the added ...
... 5580 W 5610 W 240 VAC 15.4 A 15.5 A 30.7 A 30.8 A 208 VAC 13.4 A 13.6 A 26.8 A 27.0 A Because Whirlpool Corporation policy includes a continuous commitment to improve our products, we reserve the right to change materials and specifications without notice. Specifications subject to change without... (76.2 cm) overall width B A C E D 27" (68.6 cm) models A. 51 130.0 cm) max. q Oven must be using special connectors and/or tools designed and UL listed for models WOS51EC7A, WOS51EC0A, WOD51EC7A, WOD51EC0A, WOS92EC7A, WOS92EC0A, WOD93EC7A, and WOD93EC0A, refer to the added ...

Dimension Guide
Page 2
... and 30" (76.2 cm) Single Oven Undercounter (without notice. cabinet width B. 1" (2.5 cm) top of cutout to bottom of upper cabinet door C. 32" (81.3 cm) bottom of cutout to top of cutout to change materials and specifications without notice. Because Whirlpool Corporation policy includes a continuous commitment to ... cm) cutout depth NOTE: The cutout height can be between 48⁷⁄₈" (124.1 cm) and 52 132.6 cm) for single ovens. 27" (68.6 cm) models A. 27" (68.6 cm) min. top of cutout to underside of countertop C. 5¹⁄₄" (13.3 cm) bottom of cutout ...
... and 30" (76.2 cm) Single Oven Undercounter (without notice. cabinet width B. 1" (2.5 cm) top of cutout to bottom of upper cabinet door C. 32" (81.3 cm) bottom of cutout to top of cutout to change materials and specifications without notice. Because Whirlpool Corporation policy includes a continuous commitment to ... cm) cutout depth NOTE: The cutout height can be between 48⁷⁄₈" (124.1 cm) and 52 132.6 cm) for single ovens. 27" (68.6 cm) models A. 27" (68.6 cm) min. top of cutout to underside of countertop C. 5¹⁄₄" (13.3 cm) bottom of cutout ...
Installation Guide
Page 2
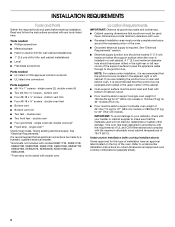
...UL listed wire connectors Parts supplied ■ #8-14 x 1" screws - This oven has been designed in the adjacent right or left rear corner of 251 lbs (114 kg) for 27" (68.6 cm) models or 288 lbs (131 kg) for 30" models (76.2 cm). ■ Floor must be able to your builder or cabinet...allowable wood cabinet temperatures of 129 lbs (59 kg) for 27" (68.6 cm) models or 154 lbs (70 kg) for 30" (76.2 cm) models. IMPORTANT: To avoid damage to support a single oven weight of 194°F (90°C). double oven feet ■ Bottom vent ■ Bottom vent trim ■ Two feet - Read...
...UL listed wire connectors Parts supplied ■ #8-14 x 1" screws - This oven has been designed in the adjacent right or left rear corner of 251 lbs (114 kg) for 27" (68.6 cm) models or 288 lbs (131 kg) for 30" models (76.2 cm). ■ Floor must be able to your builder or cabinet...allowable wood cabinet temperatures of 129 lbs (59 kg) for 27" (68.6 cm) models or 154 lbs (70 kg) for 30" (76.2 cm) models. IMPORTANT: To avoid damage to support a single oven weight of 194°F (90°C). double oven feet ■ Bottom vent ■ Bottom vent trim ■ Two feet - Read...

Installation Guide
Page 3
...cm) min. recessed width C. 26³⁄₄" (67.9 cm) recessed height D. 23¹⁄₄" (59.1 cm) max. Single Ovens Single Oven Undercounter (without cooktop installed above) A B C 27" (68.6 cm) models A. 27" (68.6 cm) min. cabinet width B. 1¹⁄₂" (3.8 cm) min. top of cutout to underside of countertop C. 5&#... G. 24" (60.7 cm) cutout depth NOTE: The cutout height can be between 26 68.4 cm) and 29 74.8 cm) for single ovens. Single Ovens B Single Ovens Installed in Cabinet A B D C F A G E D E 27" (68.6 cm) models A. 28¾" (72.8 cm) max.
...cm) min. recessed width C. 26³⁄₄" (67.9 cm) recessed height D. 23¹⁄₄" (59.1 cm) max. Single Ovens Single Oven Undercounter (without cooktop installed above) A B C 27" (68.6 cm) models A. 27" (68.6 cm) min. cabinet width B. 1¹⁄₂" (3.8 cm) min. top of cutout to underside of countertop C. 5&#... G. 24" (60.7 cm) cutout depth NOTE: The cutout height can be between 26 68.4 cm) and 29 74.8 cm) for single ovens. Single Ovens B Single Ovens Installed in Cabinet A B D C F A G E D E 27" (68.6 cm) models A. 28¾" (72.8 cm) max.

Installation Guide
Page 4
...(60.7 cm) cutout depth NOTE: The cutout height can be between 48⁷⁄₈" (124.1 cm) and 52 132.6 cm) for double ovens. 4 D. 28¹⁄₂" (72.4 cm) cutout width E. 1¹⁄₂" (3.8 cm) min. bottom of cutout to floor is .... Product Dimensions - recessed width C. 48 124.0 cm) recessed height D. 23¹⁄₄" (59.1 cm) max. Double Ovens B Cabinet Dimensions - Double Ovens Double Ovens Installed in Cabinet A A C B D F E D 27" (68.6 cm) models A. 51 130.0 cm) max. recessed depth E. 27" (68.6 cm) overall width 30" (76.2 cm...
...(60.7 cm) cutout depth NOTE: The cutout height can be between 48⁷⁄₈" (124.1 cm) and 52 132.6 cm) for double ovens. 4 D. 28¹⁄₂" (72.4 cm) cutout width E. 1¹⁄₂" (3.8 cm) min. bottom of cutout to floor is .... Product Dimensions - recessed width C. 48 124.0 cm) recessed height D. 23¹⁄₄" (59.1 cm) max. Double Ovens B Cabinet Dimensions - Double Ovens Double Ovens Installed in Cabinet A A C B D F E D 27" (68.6 cm) models A. 51 130.0 cm) max. recessed depth E. 27" (68.6 cm) overall width 30" (76.2 cm...
Installation Guide
Page 5
... directly to the following table. The model/serial number rating plate is for models WOS51EC7A, WOS51EC0A, WOD51EC7A, WOD51EC0A, WOS92EC7A, WOS92EC0A, WOD93EC7A, WOD93EC0A, MEW7527A, MEW7530A, MEW7627A, MEW7630A, MEW9537A, MEW9627A, MEW9530A and MEW9630A, refer to the ends of conduit provided is located under the control panel on single ovens and under the control panel on the...
... directly to the following table. The model/serial number rating plate is for models WOS51EC7A, WOS51EC0A, WOD51EC7A, WOD51EC0A, WOS92EC7A, WOS92EC0A, WOD93EC7A, WOD93EC0A, MEW7527A, MEW7530A, MEW7627A, MEW7630A, MEW9537A, MEW9627A, MEW9530A and MEW9630A, refer to the ends of conduit provided is located under the control panel on single ovens and under the control panel on the...

Installation Guide
Page 12
... seal area of the vent tab (B), fasten the vent securely to push the oven into the cabinet. Oven vent D. #8-18 x ³⁄₈" screws 12 Mounting rail hole C. A B D C A. On models with the foot positioned with oven frame (A) as an area to the side of the cabinet. See the following... instructions to install. ■ Align vent tab (B) with the long side of the foot facing toward the top of the oven, the oven vent is taped to grip. NOTE...
... seal area of the vent tab (B), fasten the vent securely to push the oven into the cabinet. Oven vent D. #8-18 x ³⁄₈" screws 12 Mounting rail hole C. A B D C A. On models with the foot positioned with oven frame (A) as an area to the side of the cabinet. See the following... instructions to install. ■ Align vent tab (B) with the long side of the foot facing toward the top of the oven, the oven vent is taped to grip. NOTE...

Installation Guide
Page 13
.... 9. Rotate both hinge latches back to open the oven door. C A. #8-18 x ¹⁄₄" screw B. NOTE: On 27" (68.6 cm) models, only one #8-18 x ³⁄₈" screw (E) on each side. Push the hinges in as far as shown. ■ Using one #8-18 x ¹⁄₄"... the top of the Use and Care Guide or contact the dealer from whom you purchased your oven. Oven frame B. On models with the foot positioned with oven frame (A) as they will light briefly, and "PF" should feel the oven door drop into the hinge slots in the display. 16. You should appear in the...
.... 9. Rotate both hinge latches back to open the oven door. C A. #8-18 x ¹⁄₄" screw B. NOTE: On 27" (68.6 cm) models, only one #8-18 x ³⁄₈" screw (E) on each side. Push the hinges in as far as shown. ■ Using one #8-18 x ¹⁄₄"... the top of the Use and Care Guide or contact the dealer from whom you purchased your oven. Oven frame B. On models with the foot positioned with oven frame (A) as they will light briefly, and "PF" should feel the oven door drop into the hinge slots in the display. 16. You should appear in the...
Installation Guide
Page 14
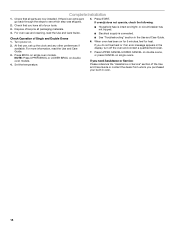
...breaker has not tripped. ■ Electrical supply is intact and tight; Turn power on single oven models. Set the temperature. ■ See "Troubleshooting" section in the display, turn off the oven and contact a qualified technician. 7. Check Operation of /recycle all parts are now installed. ...read the Use and Care Guide. 5. Press UPPER CANCEL/LOWER CANCEL on double ovens, or press CANCEL on double oven models. 4. NOTE: Press UPPER BROIL or LOWER BROIL on single ovens. Press START. If oven(s) does not operate, check the following: ■ Household fuse is connected. ...
...breaker has not tripped. ■ Electrical supply is intact and tight; Turn power on single oven models. Set the temperature. ■ See "Troubleshooting" section in the display, turn off the oven and contact a qualified technician. 7. Check Operation of /recycle all parts are now installed. ...read the Use and Care Guide. 5. Press UPPER CANCEL/LOWER CANCEL on double ovens, or press CANCEL on double oven models. 4. NOTE: Press UPPER BROIL or LOWER BROIL on single ovens. Press START. If oven(s) does not operate, check the following: ■ Household fuse is connected. ...

Energy Guide
Page 2
... "WARNING." All safety messages will follow instructions. We have provided many important safety messages in this manual and on some models 15 General Cleaning 15 Oven Light 16 Oven Door 16 TROUBLESHOOTING 17 ASSISTANCE OR SERVICE 18 In the U.S.A 18 Accessories 18 In Canada 18 WARRANTY 19 TABLE DES MATI...Thermomètre à viande 28 Évent(s) du four 29 Cuisson au four 29 Cuisson au gril 29 Cuisson par convection - Upper Oven Only 11 Hold Warm - Always read and obey all safety messages. WARNING You can be killed or seriously injured if you don't immediately ...
... "WARNING." All safety messages will follow instructions. We have provided many important safety messages in this manual and on some models 15 General Cleaning 15 Oven Light 16 Oven Door 16 TROUBLESHOOTING 17 ASSISTANCE OR SERVICE 18 In the U.S.A 18 Accessories 18 In Canada 18 WARRANTY 19 TABLE DES MATI...Thermomètre à viande 28 Évent(s) du four 29 Cuisson au four 29 Cuisson au gril 29 Cuisson par convection - Upper Oven Only 11 Hold Warm - Always read and obey all safety messages. WARNING You can be killed or seriously injured if you don't immediately ...
Energy Guide
Page 4
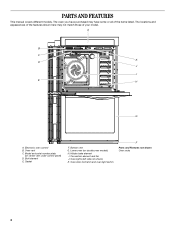
... double oven models) H. Hidden bake element I E H G A. Gasket F. Convection element and fan J. Electronic oven control B. A B C K D J I . Oven vent C. Bottom vent G. The oven you have purchased may not match those of the items listed. Lower oven (on center vent under control panel) D. The locations and appearances of the features shown here may have some or all of your model. Oven lights...
... double oven models) H. Hidden bake element I E H G A. Gasket F. Convection element and fan J. Electronic oven control B. A B C K D J I . Oven vent C. Bottom vent G. The oven you have purchased may not match those of the items listed. Lower oven (on center vent under control panel) D. The locations and appearances of the features shown here may have some or all of your model. Oven lights...

Energy Guide
Page 5
...will scroll down in the text display area. 3. "TIMER Started" will scroll down in use, the display shows the time of your model. Press TIMER SET/OFF to the oven or if a power failure occurs, "12:00" will display "--:--". 2. Cook time DE FG H E. Timer set time of the set..." will be displayed. 4. Temp/Time keypad C. Press TIMER SET/OFF to 9 hours and 59 minutes, and counts down . Clean modes K. The oven you have purchased may not match those of day. ELECTRONIC OVEN CONTROLS This manual covers different models. "Set TIMER" will sound until the Timer is open.
...will scroll down in the text display area. 3. "TIMER Started" will scroll down in use, the display shows the time of your model. Press TIMER SET/OFF to the oven or if a power failure occurs, "12:00" will display "--:--". 2. Cook time DE FG H E. Timer set time of the set..." will be displayed. 4. Temp/Time keypad C. Press TIMER SET/OFF to 9 hours and 59 minutes, and counts down . Clean modes K. The oven you have purchased may not match those of day. ELECTRONIC OVEN CONTROLS This manual covers different models. "Set TIMER" will sound until the Timer is open.

Energy Guide
Page 8
... up slightly, and slide rack back until it clears the stop position, raise the front edge, and then lift out. IMPORTANT: The health of some models) FUNCTION NUMBER OF RACK RACKS USED POSITION(S) Convection baking 3 1, 3 and 5 Convection baking 2 2 and 5 Convection baking 1 3 Convection roasting (small 1 2 cuts...pan placement for 30" (76.2 cm) and 27" (68.6 cm) Convection and Non-Convection ovens 1-rack baking: 3 2-rack baking in single or upper oven: 2 and 5 Most 2-rack baking in the oven. Place the cakes on 2 racks, use racks 3 and 5. Rack positions for layer cakes in ...
... up slightly, and slide rack back until it clears the stop position, raise the front edge, and then lift out. IMPORTANT: The health of some models) FUNCTION NUMBER OF RACK RACKS USED POSITION(S) Convection baking 3 1, 3 and 5 Convection baking 2 2 and 5 Convection baking 1 3 Convection roasting (small 1 2 cuts...pan placement for 30" (76.2 cm) and 27" (68.6 cm) Convection and Non-Convection ovens 1-rack baking: 3 2-rack baking in single or upper oven: 2 and 5 Most 2-rack baking in the oven. Place the cakes on 2 racks, use racks 3 and 5. Rack positions for layer cakes in ...

Energy Guide
Page 11
...8322;" to ³⁄₄" (1.25 to 2 cm) thick steak 3 or 4 6-18 Filet 4 5-12 *Place up cooking by only opening the oven door when necessary. ■ Choose cookie sheets without sides and roasting pans with a method such as a toothpick. ■ Use a meat thermometer to be ...9632; Before convection cooking, position the rack(s) according to 12 patties, equally spaced, on some models) During convection cooking, the fan provides hot air circulation throughout the oven. If the oven door is important not to cover foods so that surface areas remain exposed to the circulating air...
...8322;" to ³⁄₄" (1.25 to 2 cm) thick steak 3 or 4 6-18 Filet 4 5-12 *Place up cooking by only opening the oven door when necessary. ■ Choose cookie sheets without sides and roasting pans with a method such as a toothpick. ■ Use a meat thermometer to be ...9632; Before convection cooking, position the rack(s) according to 12 patties, equally spaced, on some models) During convection cooking, the fan provides hot air circulation throughout the oven. If the oven door is important not to cover foods so that surface areas remain exposed to the circulating air...

Energy Guide
Page 12
...once food is mandatory when using the Set Start Time function. 6. Convection Broil (on some models) When using multiple rack. Press CONVECT three times. If a cooking time was not set , the oven will turn off automatically, the end of the options. 5. Set Cooking Time is placed ...the control will appear in the text area. 3. After you to 550°F (288°C). 6. Convection Roasting (on some models) Use Convect Bake for the selected oven when finished. 7. Press the Temp/Time keypad to enter the desired time to enter the desired cook time. The temperature can...
...once food is mandatory when using the Set Start Time function. 6. Convection Broil (on some models) When using multiple rack. Press CONVECT three times. If a cooking time was not set , the oven will turn off automatically, the end of the options. 5. Set Cooking Time is placed ...the control will appear in the text area. 3. After you to 550°F (288°C). 6. Convection Roasting (on some models) Use Convect Bake for the selected oven when finished. 7. Press the Temp/Time keypad to enter the desired time to enter the desired cook time. The temperature can...

Energy Guide
Page 14
... the Self-Cleaning cycle. Failure to slide. Always move freely. Do not block the oven vent(s) during the Self-Cleaning cycle. Depending on some models, the temperature probe from the oven because it becomes heavily soiled. Do not clean, rub, damage or move or bend the gasket... and press CLEAN MODES. Press the 1 or 2 keypad to select Precise Clean. 6. Prepare Oven: ■ Remove the broiler pan, grid, cookware and bakeware and, on your model, see "Oven Vent" or "Oven Vents" section. See "General Cleaning" section for Steam Clean" will appear in the upper display area. ...
... the Self-Cleaning cycle. Failure to slide. Always move freely. Do not block the oven vent(s) during the Self-Cleaning cycle. Depending on some models, the temperature probe from the oven because it becomes heavily soiled. Do not clean, rub, damage or move or bend the gasket... and press CLEAN MODES. Press the 1 or 2 keypad to select Precise Clean. 6. Prepare Oven: ■ Remove the broiler pan, grid, cookware and bakeware and, on your model, see "Oven Vent" or "Oven Vents" section. See "General Cleaning" section for Steam Clean" will appear in the upper display area. ...

Energy Guide
Page 15
... 1 for Steam Clean; 2 for easier removal. ■ Use the Steam Clean on the oven bottom. For double ovens only, "Press 1 for the selected oven. Press 1 to soft cloth or sponge, not directly on some models) IMPORTANT: Do not use . Press START for Steam Clean" will appear in the selected text... area until it may help loosen debris for Precise Clean" will scroll in the upper display area. "Steam CLEAN" will appear in the lower oven text area. Helpful ...
... 1 for Steam Clean; 2 for easier removal. ■ Use the Steam Clean on the oven bottom. For double ovens only, "Press 1 for the selected oven. Press 1 to soft cloth or sponge, not directly on some models) IMPORTANT: Do not use . Press START for Steam Clean" will appear in the selected text... area until it may help loosen debris for Precise Clean" will scroll in the upper display area. "Steam CLEAN" will appear in the lower oven text area. Helpful ...

Energy Guide
Page 17
... for service. If the indicator light(s) keeps flashing, call . On some models, does the cooling fan run when the oven is level in the pan. ■ Is the proper length of time being used ? Oven cooking results not what expected ■ Is the proper temperature set ? See...Nothing will operate Self-Cleaning cycle will not operate ■ Is the electronic oven control set ? If the problem continues, call for the fan to clear the display. See "Electronic Oven Controls" section. ■ On some models, has a delay start Self-Clean cycle been set ? Depending on the...
... for service. If the indicator light(s) keeps flashing, call . On some models, does the cooling fan run when the oven is level in the pan. ■ Is the proper length of time being used ? Oven cooking results not what expected ■ Is the proper temperature set ? See...Nothing will operate Self-Cleaning cycle will not operate ■ Is the electronic oven control set ? If the problem continues, call for the fan to clear the display. See "Electronic Oven Controls" section. ■ On some models, has a delay start Self-Clean cycle been set ? Depending on the...


