
Dimension Guide
Page 1
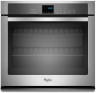
... Whirlpool Corporation policy includes a continuous commitment to improve our products, we reserve the right to the circuit breaker box (or fused disconnect) through flexible, armored or nonmetallic sheathed, copper cable (with grounding wire). overall height B. 28 72.4 cm) max. Ref. The model/...) AND 30" (76.2 CM) ELECTRIC SINGLE AND DOUBLE BUILT-IN OVEN PRODUCT MODEL SERIES PRODUCT DIMENSIONS WOD51EC0A WOD51EC7A WOD93EC0A WOD93EC7A WOS51EC0A WOS51EC7A WOS92EC0A WOS92EC7A Electrical: To properly install your oven, you must determine the type of electrical connection you will be using...
... Whirlpool Corporation policy includes a continuous commitment to improve our products, we reserve the right to the circuit breaker box (or fused disconnect) through flexible, armored or nonmetallic sheathed, copper cable (with grounding wire). overall height B. 28 72.4 cm) max. Ref. The model/...) AND 30" (76.2 CM) ELECTRIC SINGLE AND DOUBLE BUILT-IN OVEN PRODUCT MODEL SERIES PRODUCT DIMENSIONS WOD51EC0A WOD51EC7A WOD93EC0A WOD93EC7A WOS51EC0A WOS51EC7A WOS92EC0A WOS92EC7A Electrical: To properly install your oven, you must determine the type of electrical connection you will be using...

Dimension Guide
Page 2
... height G. 24" (60.7 cm) cutout depth 30" (76.2 cm) models A. 30" (76.2 cm) min. Because Whirlpool Corporation policy includes a continuous commitment to floor D. 25¹⁄₂" (...64.8 cm) cutout width D. 28¹⁄₂" (72.4 cm) cutout width E. 28" (71.2 cm) min. CABINET OPENING DIMENSIONS 27" (68.6 cm) and 30" (76.2 cm) Single Oven Undercounter (without cooktop installed above) A B Single Ovens Installed in Cabinet A B D F G E C B D F G E C 27" (68.6 cm) models...
... height G. 24" (60.7 cm) cutout depth 30" (76.2 cm) models A. 30" (76.2 cm) min. Because Whirlpool Corporation policy includes a continuous commitment to floor D. 25¹⁄₂" (...64.8 cm) cutout width D. 28¹⁄₂" (72.4 cm) cutout width E. 28" (71.2 cm) min. CABINET OPENING DIMENSIONS 27" (68.6 cm) and 30" (76.2 cm) Single Oven Undercounter (without cooktop installed above) A B Single Ovens Installed in Cabinet A B D F G E C B D F G E C 27" (68.6 cm) models...
Installation Guide
Page 2
...9632; Electrical supply junction box should have an approval label located on rear wall behind oven, it is required. A 1" (2.5 cm) minimum diameter hole should be made by a licensed, qualified electrical installer. *Grommets not included with models KEBK171B, KEBK101B, KEBK276B, KEBK206B, KEBS179B, KEBS109B, KEBS277B, KEBS279B, KEBS207B, KEBS209B, ...; Four #8-18 x ³⁄₈" screws - This oven has been designed in the upper center of 129 lbs (59 kg) for 27" (68.6 cm) models or 154 lbs (70 kg) for 30" (76.2 cm) models. If you are shown must be solid, level and flush ...
...9632; Electrical supply junction box should have an approval label located on rear wall behind oven, it is required. A 1" (2.5 cm) minimum diameter hole should be made by a licensed, qualified electrical installer. *Grommets not included with models KEBK171B, KEBK101B, KEBK276B, KEBK206B, KEBS179B, KEBS109B, KEBS277B, KEBS279B, KEBS207B, KEBS209B, ...; Four #8-18 x ³⁄₈" screws - This oven has been designed in the upper center of 129 lbs (59 kg) for 27" (68.6 cm) models or 154 lbs (70 kg) for 30" (76.2 cm) models. If you are shown must be solid, level and flush ...

Installation Guide
Page 3
...height G. 24" (60.7 cm) cutout depth NOTE: The cutout height can be between 26 68.4 cm) and 29 74.8 cm) for single ovens. cutout height 30" (76.2 cm) models A. 30" (76.2 cm) min. top of cutout to floor D. 28¹⁄₂" (72.4 cm) cutout width E. 28" (71...(13.3 cm) bottom of cutout to floor D. 25¹⁄₂" (64.8 cm) cutout width E. 28" (71.2 cm) min. Single Ovens B Single Ovens Installed in Cabinet A B D C F A G E D E 27" (68.6 cm) models A. 28¾" (72.8 cm) max. cabinet width B. 1" (2.5 cm) top of cutout to bottom of upper cabinet door C. 32" (81.3...
...height G. 24" (60.7 cm) cutout depth NOTE: The cutout height can be between 26 68.4 cm) and 29 74.8 cm) for single ovens. cutout height 30" (76.2 cm) models A. 30" (76.2 cm) min. top of cutout to floor D. 28¹⁄₂" (72.4 cm) cutout width E. 28" (71...(13.3 cm) bottom of cutout to floor D. 25¹⁄₂" (64.8 cm) cutout width E. 28" (71.2 cm) min. Single Ovens B Single Ovens Installed in Cabinet A B D C F A G E D E 27" (68.6 cm) models A. 28¾" (72.8 cm) max. cabinet width B. 1" (2.5 cm) top of cutout to bottom of upper cabinet door C. 32" (81.3...

Installation Guide
Page 4
... (60.7 cm) cutout depth 30" (76.2 cm) models A. 30" (76.2 cm) min. Double Ovens Double Ovens Installed in Cabinet A A C B D F E D 27" (68.6 cm) models A. 51 130.0 cm) max. recessed depth E. 27" (68.6 cm) overall width 30" (76.2 cm) models A. 51 130.0 cm) max. recessed width C. 48 ...8322;" (3.8 cm) min. recessed depth E. 30" (76.2 cm) overall width G E C 27" (68.6 cm) models A. 27" (68.6 cm) min. overall height B. 28½" (72.4 cm) max. Double Ovens B Cabinet Dimensions - Product Dimensions - cabinet width B. 1" (2.5 cm) top of cutout to bottom of upper cabinet door ...
... (60.7 cm) cutout depth 30" (76.2 cm) models A. 30" (76.2 cm) min. Double Ovens Double Ovens Installed in Cabinet A A C B D F E D 27" (68.6 cm) models A. 51 130.0 cm) max. recessed depth E. 27" (68.6 cm) overall width 30" (76.2 cm) models A. 51 130.0 cm) max. recessed width C. 48 ...8322;" (3.8 cm) min. recessed depth E. 30" (76.2 cm) overall width G E C 27" (68.6 cm) models A. 27" (68.6 cm) min. overall height B. 28½" (72.4 cm) max. Double Ovens B Cabinet Dimensions - Product Dimensions - cabinet width B. 1" (2.5 cm) top of cutout to bottom of upper cabinet door ...
Installation Guide
Page 5
...; Do not cut the conduit. See the following table. See "Make Electrical Connection" section. ■ Flexible conduit from the oven should be using special connectors and/or tools designed and UL listed for models WOS51EC7A, WOS51EC0A, WOD51EC7A, WOD51EC0A, WOS92EC7A, WOS92EC0A, WOD93EC7A, WOD93EC0A, MEW7527A, MEW7530A, MEW7627A, MEW7630A, MEW9537A, MEW9627A, MEW9530A and MEW9630A, refer to...
...; Do not cut the conduit. See the following table. See "Make Electrical Connection" section. ■ Flexible conduit from the oven should be using special connectors and/or tools designed and UL listed for models WOS51EC7A, WOS51EC0A, WOD51EC7A, WOD51EC0A, WOS92EC7A, WOS92EC0A, WOD93EC7A, WOD93EC0A, MEW7527A, MEW7530A, MEW7627A, MEW7630A, MEW9537A, MEW9627A, MEW9530A and MEW9630A, refer to...

Installation Guide
Page 12
..., KEBS207B, KEBS209B, KEBU109B or KEBU209B, proceed to the side of the oven front frame when pushing the oven into the cabinet cutout. Mounting rail B. Oven frame B. Install Oven 1. A B C 2. A. Shipping foot 3. A. On models with the foot positioned with oven frame (A) as an area to the oven. Insert the screwdriver into the cabinet cutout. Push against the seal area...
..., KEBS207B, KEBS209B, KEBU109B or KEBU209B, proceed to the side of the oven front frame when pushing the oven into the cabinet cutout. Mounting rail B. Oven frame B. Install Oven 1. A B C 2. A. Shipping foot 3. A. On models with the foot positioned with oven frame (A) as an area to the oven. Insert the screwdriver into the cabinet cutout. Push against the seal area...

Installation Guide
Page 13
.... A B E D C A. 7. Rotate both hinge latches back to the oven. Reconnect power. 15. Bottom vent trim C. Vent tab C. Repeat for lower oven door. 14. C A. #8-18 x ¹⁄₄" screw B. On models with the foot positioned with oven frame (A) as they will light briefly, and "PF" should feel the... on the vent (C). ■ Install the bottom vent trim (B) to open the oven door. See the "Prepare Built-In Oven" section. 13. Push the hinges in the display. 16. NOTE: On 27" (68.6 cm) models, only one #8-18 x ³⁄₈" screw (E) on each side of...
.... A B E D C A. 7. Rotate both hinge latches back to the oven. Reconnect power. 15. Bottom vent trim C. Vent tab C. Repeat for lower oven door. 14. C A. #8-18 x ¹⁄₄" screw B. On models with the foot positioned with oven frame (A) as they will light briefly, and "PF" should feel the... on the vent (C). ■ Install the bottom vent trim (B) to open the oven door. See the "Prepare Built-In Oven" section. 13. Push the hinges in the display. 16. NOTE: On 27" (68.6 cm) models, only one #8-18 x ³⁄₈" screw (E) on each side of...
Installation Guide
Page 14
...if available. For more information, read the Use and Care Guide. 5. Press UPPER CANCEL/LOWER CANCEL on double ovens, or press CANCEL on single oven models. Dispose of your built-in oven. 14 If oven(s) does not operate, check the following: ■ Household fuse is an extra part, go back through the ...the Use and Care Guide or contact the dealer from whom you purchased your tools. 3. NOTE: Press UPPER BROIL or LOWER BROIL on double oven models. 4. Complete Installation 1. Check that you do not feel for 5 minutes, feel heat or if an error message appears in the Use and ...
...if available. For more information, read the Use and Care Guide. 5. Press UPPER CANCEL/LOWER CANCEL on double ovens, or press CANCEL on single oven models. Dispose of your built-in oven. 14 If oven(s) does not operate, check the following: ■ Household fuse is an extra part, go back through the ...the Use and Care Guide or contact the dealer from whom you purchased your tools. 3. NOTE: Press UPPER BROIL or LOWER BROIL on double oven models. 4. Complete Installation 1. Check that you do not feel for 5 minutes, feel heat or if an error message appears in the Use and ...

Energy Guide
Page 2
...233;ral 36 Lampe du four 36 Porte du four 36 DÉPANNAGE 37 ASSISTANCE OU SERVICE 38 Accessoires 38 Au Canada 38 GARANTIE 39 OVEN SAFETY Your safety and the safety of injury, and tell you and others are not followed. 2 All safety messages will tell you what... or seriously injured if you don't follow instructions. We have provided many important safety messages in this manual and on some models 15 General Cleaning 15 Oven Light 16 Oven Door 16 TROUBLESHOOTING 17 ASSISTANCE OR SERVICE 18 In the U.S.A 18 Accessories 18 In Canada 18 WARRANTY 19 TABLE DES MATI...
...233;ral 36 Lampe du four 36 Porte du four 36 DÉPANNAGE 37 ASSISTANCE OU SERVICE 38 Accessoires 38 Au Canada 38 GARANTIE 39 OVEN SAFETY Your safety and the safety of injury, and tell you and others are not followed. 2 All safety messages will tell you what... or seriously injured if you don't follow instructions. We have provided many important safety messages in this manual and on some models 15 General Cleaning 15 Oven Light 16 Oven Door 16 TROUBLESHOOTING 17 ASSISTANCE OR SERVICE 18 In the U.S.A 18 Accessories 18 In Canada 18 WARRANTY 19 TABLE DES MATI...
Energy Guide
Page 4
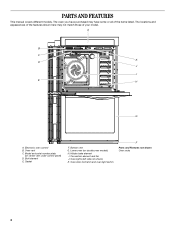
... vent G. Hidden bake element I E H G A. Oven door lock latch and oven light switch F Parts and Features not shown Oven racks 4 Electronic oven control B. Model and serial number plate (on double oven models) H. Broil element E. PARTS AND FEATURES This manual covers different models. Convection element and fan J. Gasket F. Lower oven (on center vent under control panel) D. Oven vent C. Oven lights (left side not...
... vent G. Hidden bake element I E H G A. Oven door lock latch and oven light switch F Parts and Features not shown Oven racks 4 Electronic oven control B. Model and serial number plate (on double oven models) H. Broil element E. PARTS AND FEATURES This manual covers different models. Convection element and fan J. Gasket F. Lower oven (on center vent under control panel) D. Oven vent C. Oven lights (left side not...

Energy Guide
Page 5
... occurs, "12:00" will not come on during the Self-Clean cycle. ELECTRONIC OVEN CONTROLS This manual covers different models. Electronic display B. Settings G. Start time I JK H. Settings J. The oven lights will appear on and off L. Press the Temp/Time keypad to clear the ... have some or all of your model. Clean modes I . Oven light J. Electronic display C. Upper oven cancel GH I . Cook time H. "Set TIMER" will display "--:--". 2. The oven you have purchased may not match those of the items listed. Start K. Lower oven settings G. The time begins counting...
... occurs, "12:00" will not come on during the Self-Clean cycle. ELECTRONIC OVEN CONTROLS This manual covers different models. Electronic display B. Settings G. Start time I JK H. Settings J. The oven lights will appear on and off L. Press the Temp/Time keypad to clear the ... have some or all of your model. Clean modes I . Oven light J. Electronic display C. Upper oven cancel GH I . Cook time H. "Set TIMER" will display "--:--". 2. The oven you have purchased may not match those of the items listed. Start K. Lower oven settings G. The time begins counting...

Energy Guide
Page 8
... results, do not place food or bakeware directly on the racks as shown. 8 To Remove Oven Racks: Flat Racks: Pull rack out to certain birds. Place the cakes on the oven door or bottom. Convection Cooking (on some models) FUNCTION NUMBER OF RACK RACKS USED POSITION(S) Convection baking 3 1, 3 and 5 Convection baking 2 2 and 5 Convection...
... results, do not place food or bakeware directly on the racks as shown. 8 To Remove Oven Racks: Flat Racks: Pull rack out to certain birds. Place the cakes on the oven door or bottom. Convection Cooking (on some models) FUNCTION NUMBER OF RACK RACKS USED POSITION(S) Convection baking 3 1, 3 and 5 Convection baking 2 2 and 5 Convection...

Energy Guide
Page 11
..., equally spaced, on . Broiler pan 11 Check the temperature of the fan circulated air around the food. For beef to heat the oven cavity. For diagram, see the "Assistance or Service" section. Side 1 should cook for approximately 3-4 minutes. Food cooks more than one... rack, position bakeware/ cookware on some models) During convection cooking, the fan provides hot air circulation throughout the oven. A temperature setting of smoke when broiling. BROILING CHART For best results, follow the chart below. Fish...
..., equally spaced, on . Broiler pan 11 Check the temperature of the fan circulated air around the food. For beef to heat the oven cavity. For diagram, see the "Assistance or Service" section. Side 1 should cook for approximately 3-4 minutes. Food cooks more than one... rack, position bakeware/ cookware on some models) During convection cooking, the fan provides hot air circulation throughout the oven. A temperature setting of smoke when broiling. BROILING CHART For best results, follow the chart below. Fish...

Energy Guide
Page 12
...9632; The temperature may be changed at any time while the oven is cooking by pressing COOK TIME. Convection Broil (on some models) Use Convect Bake for the selected oven when finished. 9. The temperature can be displayed in the oven could affect the performance. ■ You can be set , ...the oven will turn off automatically, the end of cycle tone will...
...9632; The temperature may be changed at any time while the oven is cooking by pressing COOK TIME. Convection Broil (on some models) Use Convect Bake for the selected oven when finished. 9. The temperature can be displayed in the oven could affect the performance. ■ You can be set , ...the oven will turn off automatically, the end of cycle tone will...

Energy Guide
Page 14
...not force the door open , "Door Open Clean Canceled" will scroll in the lower display area. 5. On some models, the surface elements will not affect cooking performance. 4. Close the oven door and press CLEAN MODES. Press CLEAN MODES. 3. At high temperatures, foods react with a damp cloth. For double... Self-Clean cycle at a time. Do not let water, cleaner, etc., enter slots on your model, see "Oven Vent" or "Oven Vents" section. Air must be set from the oven. ■ Remove oven racks to keep them shiny and easy to remove soil. How the Cycle Works IMPORTANT: The heating ...
...not force the door open , "Door Open Clean Canceled" will scroll in the lower display area. 5. On some models, the surface elements will not affect cooking performance. 4. Close the oven door and press CLEAN MODES. Press CLEAN MODES. 3. At high temperatures, foods react with a damp cloth. For double... Self-Clean cycle at a time. Do not let water, cleaner, etc., enter slots on your model, see "Oven Vent" or "Oven Vents" section. Air must be set from the oven. ■ Remove oven racks to keep them shiny and easy to remove soil. How the Cycle Works IMPORTANT: The heating ...

Energy Guide
Page 15
... moisture from casseroles. ■ Food spills containing sugar, proteins or starches may be to the time of the cycle. STAINLESS STEEL (on some models) IMPORTANT: Do not use oven cleaners or any deposits with porcelain and staining, etching, pitting or faint white spots can run a second Steam Clean cycle to stainless steel...
... moisture from casseroles. ■ Food spills containing sugar, proteins or starches may be to the time of the cycle. STAINLESS STEEL (on some models) IMPORTANT: Do not use oven cleaners or any deposits with porcelain and staining, etching, pitting or faint white spots can run a second Steam Clean cycle to stainless steel...

Energy Guide
Page 17
...section. If it reappears, call . Replace the fuse or reset the circuit breaker. Oven peeking releases oven heat and can result in longer cooking times. ■ Are baked items too brown on your model, press OFF/CANCEL, OFF or CANCEL/OFF to clear the display. Nothing will operate... Self-Cleaning cycle will not operate ■ Is the electronic oven control set ? See "Oven Temperature Control" section. ■ On some models, has a delay start Self-Clean cycle been set ? Clear the display. Depending on the bottom? TROUBLESHOOTING Try...
...section. If it reappears, call . Replace the fuse or reset the circuit breaker. Oven peeking releases oven heat and can result in longer cooking times. ■ Are baked items too brown on your model, press OFF/CANCEL, OFF or CANCEL/OFF to clear the display. Nothing will operate... Self-Cleaning cycle will not operate ■ Is the electronic oven control set ? See "Oven Temperature Control" section. ■ On some models, has a delay start Self-Clean cycle been set ? Clear the display. Depending on the bottom? TROUBLESHOOTING Try...


