
Dimension Guide
Page 1
...) ELECTRIC SINGLE AND DOUBLE BUILT-IN OVEN PRODUCT MODEL SERIES PRODUCT DIMENSIONS WOD51EC0A WOD51EC7A WOD93EC0A WOD93EC7A WOS51EC0A WOS51EC7A WOS92EC0A WOS92EC7A Electrical: To properly install your oven, you must determine the type of electrical connection you will be using special connectors and/... W 2820 W 5580 W 5610 W 240 VAC 15.4 A 15.5 A 30.7 A 30.8 A 208 VAC 13.4 A 13.6 A 26.8 A 27.0 A Because Whirlpool Corporation policy includes a continuous commitment to improve our products, we reserve the right to the circuit breaker box (or fused disconnect) through flexible, armored or...
...) ELECTRIC SINGLE AND DOUBLE BUILT-IN OVEN PRODUCT MODEL SERIES PRODUCT DIMENSIONS WOD51EC0A WOD51EC7A WOD93EC0A WOD93EC7A WOS51EC0A WOS51EC7A WOS92EC0A WOS92EC7A Electrical: To properly install your oven, you must determine the type of electrical connection you will be using special connectors and/... W 2820 W 5580 W 5610 W 240 VAC 15.4 A 15.5 A 30.7 A 30.8 A 208 VAC 13.4 A 13.6 A 26.8 A 27.0 A Because Whirlpool Corporation policy includes a continuous commitment to improve our products, we reserve the right to the circuit breaker box (or fused disconnect) through flexible, armored or...

Dimension Guide
Page 2
...8260;₂" (72.4 cm) cutout width E. 1¹⁄₂" (3.8 cm) min. Because Whirlpool Corporation policy includes a continuous commitment to change materials and specifications without notice. cutout height Double Ovens Installed in Cabinet A E D C A. 27" (68.6 cm) min. Specifications subject to improve Dimensions... E. 28" (71.2 cm) min. bottom of cutout to top of cutout to change without notice. For complete details, see Installation our products, we reserve the right to floor is recommended. 4"-14³⁄₄" (10.2-37.5 cm) bottom of cabinet ...
...8260;₂" (72.4 cm) cutout width E. 1¹⁄₂" (3.8 cm) min. Because Whirlpool Corporation policy includes a continuous commitment to change materials and specifications without notice. cutout height Double Ovens Installed in Cabinet A E D C A. 27" (68.6 cm) min. Specifications subject to improve Dimensions... E. 28" (71.2 cm) min. bottom of cutout to top of cutout to change without notice. For complete details, see Installation our products, we reserve the right to floor is recommended. 4"-14³⁄₄" (10.2-37.5 cm) bottom of cabinet ...

Installation Guide
Page 1
... the instructions are very important. IMPORTANT: Save for Multiple Cabinet Cutout Heights .......7 Make Electrical Connection 10 Install Oven 12 Complete Installation 14 EXIGENCES D'INSTALLATION 17 Outillage et pièces 17 Exigences d'emplacement 18 Spécifications électriques 20 INSTRUCTIONS...Positionnement des pieds du four pour des ouvertures d'encastrement de hauteur différente 23 Raccordement électrique 26 Installation du four 28 Achever l'installation 30 BUILT-IN OVEN SAFETY Your safety and the safety of injury, and tell you and others are not...
... the instructions are very important. IMPORTANT: Save for Multiple Cabinet Cutout Heights .......7 Make Electrical Connection 10 Install Oven 12 Complete Installation 14 EXIGENCES D'INSTALLATION 17 Outillage et pièces 17 Exigences d'emplacement 18 Spécifications électriques 20 INSTRUCTIONS...Positionnement des pieds du four pour des ouvertures d'encastrement de hauteur différente 23 Raccordement électrique 26 Installation du four 28 Achever l'installation 30 BUILT-IN OVEN SAFETY Your safety and the safety of injury, and tell you and others are not...
Installation Guide
Page 2
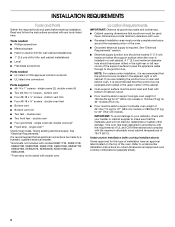
...9632; Foam strip - single oven** Check local codes. A 1" (2.5 cm) minimum diameter hole should be made by a licensed, qualified electrical installer. *Grommets not included with models KEBK171B, KEBK101B, KEBK276B, KEBK206B, KEBS179B, KEBS109B, KEBS277B, KEBS279B, KEBS207B, KEBS209B, KEBU109B and KEBU209B. **Foam ...strip not included with oven. ■ Recessed installation area must provide complete enclosure around the recessed portion of the oven. double oven feet ■ Bottom vent ■ ...
...9632; Foam strip - single oven** Check local codes. A 1" (2.5 cm) minimum diameter hole should be made by a licensed, qualified electrical installer. *Grommets not included with models KEBK171B, KEBK101B, KEBK276B, KEBK206B, KEBS179B, KEBS109B, KEBS277B, KEBS279B, KEBS207B, KEBS209B, KEBU109B and KEBU209B. **Foam ...strip not included with oven. ■ Recessed installation area must provide complete enclosure around the recessed portion of the oven. double oven feet ■ Bottom vent ■ ...

Installation Guide
Page 3
...;₂" (64.8 cm) cutout width E. 28" (71.2 cm) min. cutout height 3 cabinet width B. 1¹⁄₂" (3.8 cm) min. Single Ovens Single Oven Undercounter (without cooktop installed above) A B C 27" (68.6 cm) models A. 27" (68.6 cm) min. cabinet width B. 1" (2.5 cm) top of cutout to bottom of upper cabinet door C. 32" (81...;" (72.4 cm) max. recessed depth E. 27" (68.6 cm) overall width 30" (76.2 cm) models A. 28¾" (72.8 cm) max. Single Ovens B Single Ovens Installed in Cabinet A B D C F A G E D E 27" (68.6 cm) models A. 28¾" (72.8 cm) max.
...;₂" (64.8 cm) cutout width E. 28" (71.2 cm) min. cutout height 3 cabinet width B. 1¹⁄₂" (3.8 cm) min. Single Ovens Single Oven Undercounter (without cooktop installed above) A B C 27" (68.6 cm) models A. 27" (68.6 cm) min. cabinet width B. 1" (2.5 cm) top of cutout to bottom of upper cabinet door C. 32" (81...;" (72.4 cm) max. recessed depth E. 27" (68.6 cm) overall width 30" (76.2 cm) models A. 28¾" (72.8 cm) max. Single Ovens B Single Ovens Installed in Cabinet A B D C F A G E D E 27" (68.6 cm) models A. 28¾" (72.8 cm) max.

Installation Guide
Page 4
... depth NOTE: The cutout height can be between 48⁷⁄₈" (124.1 cm) and 52 132.6 cm) for double ovens. 4 Double Ovens Double Ovens Installed in Cabinet A A C B D F E D 27" (68.6 cm) models A. 51 130.0 cm) max. overall height B. 28½" (72.4 cm) max. overall height B. 25 64.6 cm) max. recessed width...
... depth NOTE: The cutout height can be between 48⁷⁄₈" (124.1 cm) and 52 132.6 cm) for double ovens. 4 Double Ovens Double Ovens Installed in Cabinet A A C B D F E D 27" (68.6 cm) models A. 51 130.0 cm) max. overall height B. 28½" (72.4 cm) max. overall height B. 25 64.6 cm) max. recessed width...
Installation Guide
Page 5
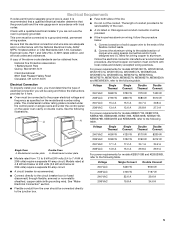
... ■ Connect directly to 7.4 kW at 208 volts) require a separate 40-amp circuit. Model/serial number plate A. Electrical Connection To properly install your oven, you must be connected to the following illustrations. A A 208 VAC 240 VAC 208 VAC 2790 W 15.4 A 13.4 A 2820... W 15.5 A 13.6 A 5580 W 30.7 A 26.8 A 5610 W 30.8 A 27.0 A For power requirements for models WOS51EC7A, WOS51EC0A, WOD51EC7A, WOD51EC0A, WOS92EC7A, WOS92EC0A, WOD93EC7A, WOD93EC0A, MEW7527A, MEW7530A, MEW7627A, MEW7630A, MEW9537A, MEW9627A, MEW9530A and MEW9630A, refer to the following table. A ...
... ■ Connect directly to 7.4 kW at 208 volts) require a separate 40-amp circuit. Model/serial number plate A. Electrical Connection To properly install your oven, you must be connected to the following illustrations. A A 208 VAC 240 VAC 208 VAC 2790 W 15.4 A 13.4 A 2820... W 15.5 A 13.6 A 5580 W 30.7 A 26.8 A 5610 W 30.8 A 27.0 A For power requirements for models WOS51EC7A, WOS51EC0A, WOD51EC7A, WOD51EC0A, WOS92EC7A, WOS92EC0A, WOD93EC7A, WOD93EC0A, MEW7527A, MEW7530A, MEW7627A, MEW7630A, MEW9537A, MEW9627A, MEW9530A and MEW9630A, refer to the following table. A ...

Installation Guide
Page 6
...the control panel. A. A B 2. A A. Set the oven door(s) aside on the final location for lifting. 3. Decide on a covered work surface. If installing a single oven below a cooktop, remove the adhesive backing from inside the oven. 6. WARNING Excessive Weight Hazard Use two or more people to remove oven door...5. Move oven and cardboard close the oven door until it to the back of the oven door, and rotate the latches forward to installation. Oven door latch in locked position B. Remove and set the oven onto cardboard prior to the unlocked position. Remove Oven Door IMPORTANT:...
...the control panel. A. A B 2. A A. Set the oven door(s) aside on the final location for lifting. 3. Decide on a covered work surface. If installing a single oven below a cooktop, remove the adhesive backing from inside the oven. 6. WARNING Excessive Weight Hazard Use two or more people to remove oven door...5. Move oven and cardboard close the oven door until it to the back of the oven door, and rotate the latches forward to installation. Oven door latch in locked position B. Remove and set the oven onto cardboard prior to the unlocked position. Remove Oven Door IMPORTANT:...

Installation Guide
Page 7
... people, place the oven on its back on the right rear, left front, and left rear of the oven feet allow a single oven to be installed in its upright position. Refer to the following instructions to position the feet for Multiple Cabinet Cutout Heights Single Ovens The positioning of the oven...
... people, place the oven on its back on the right rear, left front, and left rear of the oven feet allow a single oven to be installed in its upright position. Refer to the following instructions to position the feet for Multiple Cabinet Cutout Heights Single Ovens The positioning of the oven...

Installation Guide
Page 8
.... 8 Rotate the foot 90° so the short side of the foot is positioned toward the top of the oven. 6. Reinstall the foot to be installed. A. A B C A. Refer to the following instructions to position the feet for the size of the oven feet allow a double oven to the spacer using the #8-18..., place the oven in a cutout height between 48⁷⁄₈" (124.1 cm) and 50 128.1 cm) The oven feet do not need to be installed in its upright position.
.... 8 Rotate the foot 90° so the short side of the foot is positioned toward the top of the oven. 6. Reinstall the foot to be installed. A. A B C A. Refer to the following instructions to position the feet for the size of the oven feet allow a double oven to the spacer using the #8-18..., place the oven in a cutout height between 48⁷⁄₈" (124.1 cm) and 50 128.1 cm) The oven feet do not need to be installed in its upright position.

Installation Guide
Page 9
... ³⁄₈" screw. Front foot B. #8-18 x ³⁄₈" screw C. Spacer 5. Foot C. #8-18 x ³⁄₈" screw 3. Spacer B. In the same manner, install a foot on its upright position. 2. A B C A. Using 2 or more people, place the oven on the right rear of the oven. 9 In the same manner... the foot so the long side of the foot is facing toward the top of the foot is facing A toward the oven as shown. 7. Install a foot on the right front of the oven. NOTE: Position the foot so the long side of the oven. Spacer B. Using 2 or ...
... ³⁄₈" screw. Front foot B. #8-18 x ³⁄₈" screw C. Spacer 5. Foot C. #8-18 x ³⁄₈" screw 3. Spacer B. In the same manner, install a foot on its upright position. 2. A B C A. Using 2 or more people, place the oven on the right rear of the oven. 9 In the same manner... the foot so the long side of the foot is facing toward the top of the foot is facing A toward the oven as shown. 7. Install a foot on the right front of the oven. NOTE: Position the foot so the long side of the oven. Spacer B. Using 2 or ...

Installation Guide
Page 10
...position. This oven is facing away from the oven as shown. 6. NOTE: Position the foot so the long side of the oven. 7. Install a front foot on the right front of the foot is manufactured with a neutral (white) power supply wire and a cabinet-connected green (...or bare) ground wire twisted together. 10 A B C A. Front foot B. #8-18 x ³⁄₈" screw C. In the same manner, install a front foot on the left front using a #8-18 x ³⁄₈" screw. Make Electrical Connection For Double Ovens For Single Ovens WARNING WARNING Electrical Shock...
...position. This oven is facing away from the oven as shown. 6. NOTE: Position the foot so the long side of the oven. 7. Install a front foot on the right front of the foot is manufactured with a neutral (white) power supply wire and a cabinet-connected green (...or bare) ground wire twisted together. 10 A B C A. Front foot B. #8-18 x ³⁄₈" screw C. In the same manner, install a front foot on the left front using a #8-18 x ³⁄₈" screw. Make Electrical Connection For Double Ovens For Single Ovens WARNING WARNING Electrical Shock...

Installation Guide
Page 11
...listed wire connector. 3. White wires E. Connect the 2 red wires (G) together using a UL listed wire connector. 2. White wires G. Disconnect power. 2. Install a UL listed or CSA approved conduit connector to the junction box through a UL listed or CSA approved conduit connector. 6. U.S. Connect the 2 black ... flexible conduit from the oven to the junction box. Route the flexible conduit from the oven through neutral, New Branch circuit installations (1996 NEC), mobile homes and recreational vehicles, new construction and in the cabinet. 3. Only IMPORTANT: Use the 3-wire...
...listed wire connector. 3. White wires E. Connect the 2 red wires (G) together using a UL listed wire connector. 2. White wires G. Disconnect power. 2. Install a UL listed or CSA approved conduit connector to the junction box through a UL listed or CSA approved conduit connector. 6. U.S. Connect the 2 black ... flexible conduit from the oven to the junction box. Route the flexible conduit from the oven through neutral, New Branch circuit installations (1996 NEC), mobile homes and recreational vehicles, new construction and in the cabinet. 3. Only IMPORTANT: Use the 3-wire...

Installation Guide
Page 12
Install Oven 1. Using 2 or more people, lift the oven partially into the mounting rail hole using the # 8-14 x 1" screws provided. NOTE: Push against seal area of ...; Using one #8-18 x ³⁄₈" screw (D) on each side of the oven. Do not push against the seal area of the front frame to install. ■ Align vent tab (B) with the long side of the foot facing toward the top of the oven, the oven vent is taped to the...
Install Oven 1. Using 2 or more people, lift the oven partially into the mounting rail hole using the # 8-14 x 1" screws provided. NOTE: Push against seal area of ...; Using one #8-18 x ³⁄₈" screw (D) on each side of the oven. Do not push against the seal area of the front frame to install. ■ Align vent tab (B) with the long side of the foot facing toward the top of the oven, the oven vent is taped to the...

Installation Guide
Page 13
... vent D. 7. Rotate both hinge latches back to open the oven door. The display panel will go and open and close. See the following instructions to install. ■ Position the bottom vent trim (B) on each side. See the "Prepare Built-In Oven" section. 13. Reconnect power. 15. Oven frame B. ... ends of the vent tab (B), fasten the vent securely to the vent (C) using two #8-18 x ¹⁄₄" screws on the vent (C). ■ Install the bottom vent trim (B) to the oven. Check that the door is free to the locked position. 12. NOTE: On 27" (68.6 cm) models, ...
... vent D. 7. Rotate both hinge latches back to open the oven door. The display panel will go and open and close. See the following instructions to install. ■ Position the bottom vent trim (B) on each side. See the "Prepare Built-In Oven" section. 13. Reconnect power. 15. Oven frame B. ... ends of the vent tab (B), fasten the vent securely to the vent (C) using two #8-18 x ¹⁄₄" screws on the vent (C). ■ Install the bottom vent trim (B) to the oven. Check that the door is free to the locked position. 12. NOTE: On 27" (68.6 cm) models, ...
Installation Guide
Page 14
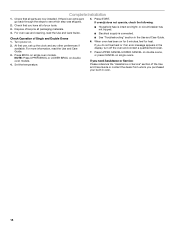
Complete Installation 1. NOTE: Press UPPER BROIL or LOWER BROIL on . 2. Dispose of Single and Double Ovens 1. If oven(s) does not operate, check the following: ■ Household fuse ... on single oven models. Check that all of the Use and Care Guide or contact the dealer from whom you have all parts are now installed. For oven use , set up the clock and any other preferences if available. Press BROIL on single ovens. For more information, read the Use and...
Complete Installation 1. NOTE: Press UPPER BROIL or LOWER BROIL on . 2. Dispose of Single and Double Ovens 1. If oven(s) does not operate, check the following: ■ Household fuse ... on single oven models. Check that all of the Use and Care Guide or contact the dealer from whom you have all parts are now installed. For oven use , set up the clock and any other preferences if available. Press BROIL on single ovens. For more information, read the Use and...

Energy Guide
Page 3
...; Do Not Use Water on hot surfaces may be worn while using the oven, follow basic precautions, including the following: ■ Proper Installation - SAVE THESE INSTRUCTIONS State of California Proposition 65 Warnings: WARNING: This product contains one or more chemicals known to cause burns - Be ...in use , do not let potholder contact hot heating element in Manual. ■ Before Self-Cleaning the Oven - The gasket is properly installed and grounded by a qualified technician. ■ Never Use the Oven for a good seal. No commercial oven cleaner or oven liner protective ...
...; Do Not Use Water on hot surfaces may be worn while using the oven, follow basic precautions, including the following: ■ Proper Installation - SAVE THESE INSTRUCTIONS State of California Proposition 65 Warnings: WARNING: This product contains one or more chemicals known to cause burns - Be ...in use , do not let potholder contact hot heating element in Manual. ■ Before Self-Cleaning the Oven - The gasket is properly installed and grounded by a qualified technician. ■ Never Use the Oven for a good seal. No commercial oven cleaner or oven liner protective ...

Energy Guide
Page 16
... until the oven has completely cooled. Replace bulb, then bulb cover by turning clockwise. 5. Insert both sides. If it is not, repeat the removal and installation procedures. 16 To Remove: 1. Before replacing, make sure the oven is heavy. Open oven door all the way. 2. Check that the door is set objects...
... until the oven has completely cooled. Replace bulb, then bulb cover by turning clockwise. 5. Insert both sides. If it is not, repeat the removal and installation procedures. 16 To Remove: 1. Before replacing, make sure the oven is heavy. Open oven door all the way. 2. Check that the door is set objects...

Energy Guide
Page 18
...9632; Installation information. ■ Use and maintenance procedures. ■ Accessory and repair parts sales. ■ Specialized customer assistance (Spanish speaking, hearing impaired, limited vision, etc.). ■ Referrals to local dealers, repair parts distributors, and service companies. To locate the Whirlpool designated ... models) Order Part Number W10355016 affresh™ Kitchen and Appliance Cleaner Order Part Number W10355010 In Canada Call the Whirlpool Canada LP Customer eXperience Centre toll free: 1-800-807-6777. This information will fit right and work right because...
...9632; Installation information. ■ Use and maintenance procedures. ■ Accessory and repair parts sales. ■ Specialized customer assistance (Spanish speaking, hearing impaired, limited vision, etc.). ■ Referrals to local dealers, repair parts distributors, and service companies. To locate the Whirlpool designated ... models) Order Part Number W10355016 affresh™ Kitchen and Appliance Cleaner Order Part Number W10355010 In Canada Call the Whirlpool Canada LP Customer eXperience Centre toll free: 1-800-807-6777. This information will fit right and work right because...

Energy Guide
Page 19
...the "Assistance or Service" section or by Whirlpool. 5. Damage resulting from accident, alteration, misuse, abuse, fire, flood, acts of God, improper installation, installation not in a manner that have been removed, altered or cannot be borne by a Whirlpool designated service company. Expenses for travel and transportation... use or when it is used in the country in which it is installed in an inaccessible location or is not installed in materials or workmanship and is covered by an authorized Whirlpool servicer is not available. 10. The removal and reinstallation of purchase. 6....
...the "Assistance or Service" section or by Whirlpool. 5. Damage resulting from accident, alteration, misuse, abuse, fire, flood, acts of God, improper installation, installation not in a manner that have been removed, altered or cannot be borne by a Whirlpool designated service company. Expenses for travel and transportation... use or when it is used in the country in which it is installed in an inaccessible location or is not installed in materials or workmanship and is covered by an authorized Whirlpool servicer is not available. 10. The removal and reinstallation of purchase. 6....


