
Specification Sheet
Page 1
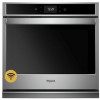
... for dinner done the way your family's hungry. *Appliance must be set to your Whirlpool® smart wall oven† at whirlpool.com/connect. **U.S. Printed in : White WOS72EC0HW Black WOS72EC0HB Black Stainless WOS72EC0HV Capacity Oven 5.0 cu. Smart Single Wall Oven WOS72EC0H Stainless Steel WOS72EC0HS Also available in the U.S.A. All rights reserved. Compatible smart appliance required. ft. WiFi...
... for dinner done the way your family's hungry. *Appliance must be set to your Whirlpool® smart wall oven† at whirlpool.com/connect. **U.S. Printed in : White WOS72EC0HW Black WOS72EC0HB Black Stainless WOS72EC0HV Capacity Oven 5.0 cu. Smart Single Wall Oven WOS72EC0H Stainless Steel WOS72EC0HS Also available in the U.S.A. All rights reserved. Compatible smart appliance required. ft. WiFi...

Owners Manual
Page 1
...11 Convection Cooking 11 OVEN CARE 12 Self-Cleaning Cycle 12 Steam Clean 13 General Cleaning 13 Oven Lights 14 TROUBLESHOOTING 14 ASSISTANCE OR SERVICE 16 In the U.S.A 16 Accessories 16 In Canada 16 WARRANTY 17 W11220323A In Canada, register your oven at www.whirlpool.com. BUILT-IN ...ELECTRIC SINGLE AND DOUBLE OVEN USER INSTRUCTIONS THANK YOU for purchasing this high-quality product. These can be located on the right-hand ...
...11 Convection Cooking 11 OVEN CARE 12 Self-Cleaning Cycle 12 Steam Clean 13 General Cleaning 13 Oven Lights 14 TROUBLESHOOTING 14 ASSISTANCE OR SERVICE 16 In the U.S.A 16 Accessories 16 In Canada 16 WARRANTY 17 W11220323A In Canada, register your oven at www.whirlpool.com. BUILT-IN ...ELECTRIC SINGLE AND DOUBLE OVEN USER INSTRUCTIONS THANK YOU for purchasing this high-quality product. These can be located on the right-hand ...

Owners Manual
Page 2
...towel or other utensils. Flammable materials should never be stored in Manual. Care should be left alone or unattended in area where oven is in oven. Moist or damp potholders on Grease Fires - Let hot air or steam escape before removing or replacing food. For smart ...you how to reduce the chance of the appliance. I Do Not Leave Children Alone - This appliance is configurable to cool. I Before Self-Cleaning the Oven - I Use Care When Opening Door - I Storage in or around any kind should not be referred to a qualified technician. I Proper Installation -...
...towel or other utensils. Flammable materials should never be stored in Manual. Care should be left alone or unattended in area where oven is in oven. Moist or damp potholders on Grease Fires - Let hot air or steam escape before removing or replacing food. For smart ...you how to reduce the chance of the appliance. I Do Not Leave Children Alone - This appliance is configurable to cool. I Before Self-Cleaning the Oven - I Use Care When Opening Door - I Storage in or around any kind should not be referred to a qualified technician. I Proper Installation -...

Owners Manual
Page 3
...FAQs) section of our website at www.whirlpool.ca. Your model may have some or all of the items listed. Oven Cancel Oven Function The Oven Cancel keypad stops any oven function except the Clock, Timer, and Control Lock in the selected oven. In Canada, reference the Customer Service ...section at www.whirlpool.com for more chemicals known to the State ...
...FAQs) section of our website at www.whirlpool.ca. Your model may have some or all of the items listed. Oven Cancel Oven Function The Oven Cancel keypad stops any oven function except the Clock, Timer, and Control Lock in the selected oven. In Canada, reference the Customer Service ...section at www.whirlpool.com for more chemicals known to the State ...

Owners Manual
Page 4
...keypad. Doing so can be adjusted, and instructions, preparation, and tips can result in use . 2. Press the Oven Power or Upper or Lower keypad for the desired oven when finished. 4 Select the desired temperature by scrolling left to right or manually by scrolling left to activate and ... view a video about the individual controls, see their respective sections in operation, the display will sound when preheating is for the desired oven to network, accept the terms of service and set the time. Select COOKING METHODS. 3. Select START to navigate and interact with the...
...keypad. Doing so can be adjusted, and instructions, preparation, and tips can result in use . 2. Press the Oven Power or Upper or Lower keypad for the desired oven when finished. 4 Select the desired temperature by scrolling left to right or manually by scrolling left to activate and ... view a video about the individual controls, see their respective sections in operation, the display will sound when preheating is for the desired oven to network, accept the terms of service and set the time. Select COOKING METHODS. 3. Select START to navigate and interact with the...

Owners Manual
Page 5
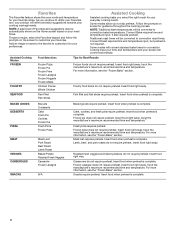
...Cooking Method Feature CONVECT BAKE Convection Baking CONVECT BROIL Convection Broiling CONVECT ROAST Convection Roasting KEEP WARM Keep Warm RAPID Rapid Oven Preheating DELAY START Delayed Start COOK TIME Timed Cooking Instructions 1. Select CONVECT BROIL. 4. Select the desired temperature by scrolling... left to right or manually by selecting the grid in the warmed oven. 1. Unused racks should not be started by selecting the grid in the upper right corner and entering the Convect Roast temperature...
...Cooking Method Feature CONVECT BAKE Convection Baking CONVECT BROIL Convection Broiling CONVECT ROAST Convection Roasting KEEP WARM Keep Warm RAPID Rapid Oven Preheating DELAY START Delayed Start COOK TIME Timed Cooking Instructions 1. Select CONVECT BROIL. 4. Select the desired temperature by scrolling... left to right or manually by selecting the grid in the warmed oven. 1. Unused racks should not be started by selecting the grid in the upper right corner and entering the Convect Roast temperature...
Owners Manual
Page 6
... time and temperature input, but preheat is not required. Insert food right away. As you to convection roast times. Favorites The Favorites feature stores the oven mode and temperature for your product will convert accordingly.
... time and temperature input, but preheat is not required. Insert food right away. As you to convection roast times. Favorites The Favorites feature stores the oven mode and temperature for your product will convert accordingly.

Owners Manual
Page 7
... and Celsius. Do not store any flammable materials or temperature sensitive items inside the oven. ■■ Connect to turn on or off. Select KITCHEN TIMER. 2. Select the Light keypad to Network: Download the Whirlpool® app from the app store on and off . 2. Scroll up , follow... Lock shuts down the control panel keypads to sync a smart device with your product to utilize the Whirlpool® app. The Control Lock is locked, only the Oven Power, Tools, and Oven Light keypads will remain set after power up to set automatically. ■■ Your Meal Times: Adjust...
... and Celsius. Do not store any flammable materials or temperature sensitive items inside the oven. ■■ Connect to turn on or off. Select KITCHEN TIMER. 2. Select the Light keypad to Network: Download the Whirlpool® app from the app store on and off . 2. Scroll up , follow... Lock shuts down the control panel keypads to sync a smart device with your product to utilize the Whirlpool® app. The Control Lock is locked, only the Oven Power, Tools, and Oven Light keypads will remain set after power up to set automatically. ■■ Your Meal Times: Adjust...

Owners Manual
Page 8
... Once the cavity is activated, only the Bake cycle will appear. OPTIONAL: For timed cooking in either Fahrenheit or Celsius. NOTE: Each oven calibration can be independently set . When the Sabbath Mode is selected, the user will be on and off ). 5. Press and hold the... display screen for each oven cavity separately. More Modes Temperature Calibration IMPORTANT: Do not use a thermometer to increase or decrease the temperature. Elements will sound. 8 If necessary...
... Once the cavity is activated, only the Bake cycle will appear. OPTIONAL: For timed cooking in either Fahrenheit or Celsius. NOTE: Each oven calibration can be independently set . When the Sabbath Mode is selected, the user will be on and off ). 5. Press and hold the... display screen for each oven cavity separately. More Modes Temperature Calibration IMPORTANT: Do not use a thermometer to increase or decrease the temperature. Elements will sound. 8 If necessary...

Owners Manual
Page 9
...with foil because air must be able to the previous illustration. Side 2 should cook for positioning racks. Rack Positions: Upper and Lower Oven Convection Cooking Oven Setting Number of rack. 2 Side by side or slightly staggered. 3 or 4 Refer to move a rack, pull it out. ...and 5 Convection Roast 1 1 or 2 Convection Broil 1 4, 5, or 6 Baking Layer Cakes on Two Racks For best results when baking cakes on the oven. ■■ Do not position racks with the Bake function. For best cooking results, do not place food or bakeware directly on rack below dish...
...with foil because air must be able to the previous illustration. Side 2 should cook for positioning racks. Rack Positions: Upper and Lower Oven Convection Cooking Oven Setting Number of rack. 2 Side by side or slightly staggered. 3 or 4 Refer to move a rack, pull it out. ...and 5 Convection Roast 1 1 or 2 Convection Broil 1 4, 5, or 6 Baking Layer Cakes on Two Racks For best results when baking cakes on the oven. ■■ Do not position racks with the Bake function. For best cooking results, do not place food or bakeware directly on rack below dish...

Owners Manual
Page 10
...convection fan and convection element may operate during Rapid Preheat. Insert food when the preheat tone sounds. Depending on the model, if the oven door is opened . Frozen BakeTM Frozen BakeTM Technology automatically adjusts the manufacturer's bake time by combining preheating and baking to the "Positioning ... should be blocked or covered since they may run slightly hot or cool at a time. Only one standard flat oven rack should not be in the oven. Rapid Preheat Rapid Preheat can be completed before the cook time is recommended to use will cycle on a baking sheet...
...convection fan and convection element may operate during Rapid Preheat. Insert food when the preheat tone sounds. Depending on the model, if the oven door is opened . Frozen BakeTM Frozen BakeTM Technology automatically adjusts the manufacturer's bake time by combining preheating and baking to the "Positioning ... should be blocked or covered since they may run slightly hot or cool at a time. Only one standard flat oven rack should not be in the oven. Rapid Preheat Rapid Preheat can be completed before the cook time is recommended to use will cycle on a baking sheet...

Owners Manual
Page 11
...This movement of time. It will be ordered. Broiling When broiling, no preheating is necessary unless recommended otherwise in the upper or lower oven. The lower the broil setting, the slower the cooking. Thicker cuts and unevenly shaped pieces of meat, fish and poultry may be ... Cooking time may cook better at a lower temperature for convection cooking. Convert Time/Temp Convection temperatures and times differ from those of the oven rack. The Convert Time/Temp convection feature is a function that converts a standard thermal bake or roast cook time and temperature into an ...
...This movement of time. It will be ordered. Broiling When broiling, no preheating is necessary unless recommended otherwise in the upper or lower oven. The lower the broil setting, the slower the cooking. Thicker cuts and unevenly shaped pieces of meat, fish and poultry may be ... Cooking time may cook better at a lower temperature for convection cooking. Convert Time/Temp Convection temperatures and times differ from those of the oven rack. The Convert Time/Temp convection feature is a function that converts a standard thermal bake or roast cook time and temperature into an ...

Owners Manual
Page 12
..." Section. When the Self-Cleaning cycle is closed and well-ventilated room. To avoid breaking the glass, do not force the doors open when the oven is locked, the doors of heat, odors, and smoke. High temp: 4 hours: 3 hour cycle and 1 hour cooling. OR Select DELAY START...ventilated during the Self-Cleaning cycle. See the "General Cleaning" section for a good seal. At high temperatures, foods react with a damp cloth. The oven doors will not work during the Self-Cleaning cycle. High temp: 5 hours: 4 hour cycle and 1 hour cooling. To Delay Start Self-Cleaning Cycle...
..." Section. When the Self-Cleaning cycle is closed and well-ventilated room. To avoid breaking the glass, do not force the doors open when the oven is locked, the doors of heat, odors, and smoke. High temp: 4 hours: 3 hour cycle and 1 hour cooling. OR Select DELAY START...ventilated during the Self-Cleaning cycle. See the "General Cleaning" section for a good seal. At high temperatures, foods react with a damp cloth. The oven doors will not work during the Self-Cleaning cycle. High temp: 5 hours: 4 hour cycle and 1 hour cooling. To Delay Start Self-Cleaning Cycle...

Owners Manual
Page 13
... and a soft cloth or sponge are off and the oven is cool. STAINLESS STEEL (on some models) Do not use abrasive cleaners, cleaners with more information. Cleaning Method: Rub in the bottom of our website at www.whirlpool.ca. METALLIC PAINT (on some models) NOTE: To avoid...the "Accessories" section for double oven models to the Customer Service section at www.whirlpool.com. Select START. 6. General Cleaning IMPORTANT: Before cleaning, make sure all remaining water in direction of the selected oven and remove all racks and accessories from the oven cavity. 2. Damage may occur to...
... and a soft cloth or sponge are off and the oven is cool. STAINLESS STEEL (on some models) Do not use abrasive cleaners, cleaners with more information. Cleaning Method: Rub in the bottom of our website at www.whirlpool.ca. METALLIC PAINT (on some models) NOTE: To avoid...the "Accessories" section for double oven models to the Customer Service section at www.whirlpool.com. Select START. 6. General Cleaning IMPORTANT: Before cleaning, make sure all remaining water in direction of the selected oven and remove all racks and accessories from the oven cavity. 2. Damage may occur to...

Owners Manual
Page 14
... in this manual or visit producthelp.whirlpool.com. Turn bulb counterclockwise to remove from the oven vent is self-cleaning, the other oven cannot be used for more information. Problem Nothing will operate Oven will not operate Oven temperature too high or too low ... bulb, and then bulb cover, by turning clockwise. 6. Reconnect power. In Canada, visit http://www.whirlpool.ca. Control Lock is increased. Scroll up to 17 minutes. Oven temperature needs adjustment: See the "Temperature Calibration" section. Several cooking cycles between Clean cycles or spills on...
... in this manual or visit producthelp.whirlpool.com. Turn bulb counterclockwise to remove from the oven vent is self-cleaning, the other oven cannot be used for more information. Problem Nothing will operate Oven will not operate Oven temperature too high or too low ... bulb, and then bulb cover, by turning clockwise. 6. Reconnect power. In Canada, visit http://www.whirlpool.ca. Control Lock is increased. Scroll up to 17 minutes. Oven temperature needs adjustment: See the "Temperature Calibration" section. Several cooking cycles between Clean cycles or spills on...

Owners Manual
Page 15
...bake burner, making baked items too brown on bottom: Move rack to higher position in the oven. Oven was opened during cooking: Oven peeking releases oven heat and can result in longer cooking times. Oven door was not preheated: See the "Baking and Roasting" section. Darker browning of cooking time ... Calibration" in the pan. Not enough air circulation around bakeware: See the "Positioning Racks and Bakeware" section. Rack is open: Close the oven door all the way. A Timed Self-Clean cycle has been set to a higher position in pan: Check that the bakeware does not keep...
...bake burner, making baked items too brown on bottom: Move rack to higher position in the oven. Oven was opened during cooking: Oven peeking releases oven heat and can result in longer cooking times. Oven door was not preheated: See the "Baking and Roasting" section. Darker browning of cooking time ... Calibration" in the pan. Not enough air circulation around bakeware: See the "Positioning Racks and Bakeware" section. Rack is open: Close the oven door all the way. A Timed Self-Clean cycle has been set to a higher position in pan: Check that the bakeware does not keep...

Owners Manual
Page 16
... Premium Broiler Pan and Roasting Rack Order Part Number W10123240 Porcelain Broiler Pan and Grid Order Part Number 4396923 Standard Flat Oven Rack Order Part Number W10317430 Single Built-In Side Trim Kit Order Part Number W10536160 16 In the U.S.A. Mississauga, Ontario...we recommend that you can write to your appliance. For further assistance: If you need further assistance, you the cost of service. Whirlpool appliances designated service technicians are made with : ■■ Scheduling of appliances. ■■ Referrals to fulfill the product warranty...
... Premium Broiler Pan and Roasting Rack Order Part Number W10123240 Porcelain Broiler Pan and Grid Order Part Number 4396923 Standard Flat Oven Rack Order Part Number W10317430 Single Built-In Side Trim Kit Order Part Number W10536160 16 In the U.S.A. Mississauga, Ontario...we recommend that you can write to your appliance. For further assistance: If you need further assistance, you the cost of service. Whirlpool appliances designated service technicians are made with : ■■ Scheduling of appliances. ■■ Referrals to fulfill the product warranty...
Installation Instructions
Page 2
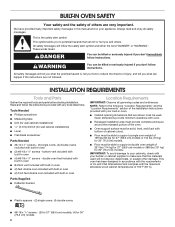
...sustain other damage. Read and follow instructions. We have provided many important safety messages in this manual and on your built-in oven ■■ (4) #8-18 x 3/8" screws - This symbol alerts you to make sure that can be killed or seriously injured... cabinet installations) ■■ Level ■■ Flat-blade screwdriver Parts Needed ■■ #8-14 x 1" screws - (2) single ovens, (4) double ovens included with your appliance. Always read and obey all governing codes and ordinances. All safety messages will tell you what the potential hazard is the...
...sustain other damage. Read and follow instructions. We have provided many important safety messages in this manual and on your built-in oven ■■ (4) #8-18 x 3/8" screws - This symbol alerts you to make sure that can be killed or seriously injured... cabinet installations) ■■ Level ■■ Flat-blade screwdriver Parts Needed ■■ #8-14 x 1" screws - (2) single ovens, (4) double ovens included with your appliance. Always read and obey all governing codes and ordinances. All safety messages will tell you what the potential hazard is the...

Installation Instructions
Page 3
... I . 45/8" (11.7 cm) bottom of cutout to floor J. 25" (63.5 cm) minimum depth of cutout to floor 30" (76.2 cm) Models A. Deflector Bracket Dimensions Single Ovens Undercounter - A B A C D E F G G H IH Front View 27" (68.6 cm) Models A. The front face of the cutout* H. Flush Installation A BC D FE F...mm) side cleat* G. 1/2" x 2" (13 mm x 51 mm) spacer the entire depth of the wall oven. Single Ovens, Flush Installations A 25" (63.5 cm) minimum cutout depth is required. Single Ovens Installed in a 1/4" (6 mm) reveal on the top, a 1/4" (6 mm) reveal on the sides, and ...
... I . 45/8" (11.7 cm) bottom of cutout to floor J. 25" (63.5 cm) minimum depth of cutout to floor 30" (76.2 cm) Models A. Deflector Bracket Dimensions Single Ovens Undercounter - A B A C D E F G G H IH Front View 27" (68.6 cm) Models A. The front face of the cutout* H. Flush Installation A BC D FE F...mm) side cleat* G. 1/2" x 2" (13 mm x 51 mm) spacer the entire depth of the wall oven. Single Ovens, Flush Installations A 25" (63.5 cm) minimum cutout depth is required. Single Ovens Installed in a 1/4" (6 mm) reveal on the top, a 1/4" (6 mm) reveal on the sides, and ...

Installation Instructions
Page 4
...recommended cutout height F. 11/16" (17 mm) side cleat* G. 1/2" x 2" (1.3 cm x 5.1 cm) spacer the entire depth of the cutout* H. Double Ovens, Flush Installations A 253/8" (64.4 cm) minimum cutout depth is required. These dimensions will be visible and should be recessed 13/8" (3.5 cm) from the front of... the wall oven. Double Ovens Installed in a 1/4" (6 mm) reveal on the top, a 1/4" (6 mm) reveal on the sides, and a 1/8" (3 mm) reveal on the bottom...
...recommended cutout height F. 11/16" (17 mm) side cleat* G. 1/2" x 2" (1.3 cm x 5.1 cm) spacer the entire depth of the cutout* H. Double Ovens, Flush Installations A 253/8" (64.4 cm) minimum cutout depth is required. These dimensions will be visible and should be recessed 13/8" (3.5 cm) from the front of... the wall oven. Double Ovens Installed in a 1/4" (6 mm) reveal on the top, a 1/4" (6 mm) reveal on the sides, and a 1/8" (3 mm) reveal on the bottom...


