Installation Instructions
Page 1
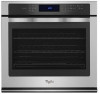
... control panel. BUILT-IN ELECTRIC SINGLE AND DOUBLE OVEN USER INSTRUCTIONS THANK YOU for purchasing this high-quality product. In Canada, register your oven at www.whirlpool.com. For future reference, please make a note of Contents OVEN SAFETY 2 FEATURE GUIDE 3 OVEN USE 5 Electronic Oven Controls 5 Sabbath Mode 6 Aluminum Foil 6 Positioning Racks and Bakeware 7 Roll-Out Extension Rack 7 Oven Vent(s 8 Baking and Roasting 8 Broiling 8 Convection Cooking 8 Proofing Bread 9 Temperature Probe 9 Cook Time 9 OVEN CARE 10 Self-Cleaning Cycle 10 General Cleaning 11 Oven Lights...
... control panel. BUILT-IN ELECTRIC SINGLE AND DOUBLE OVEN USER INSTRUCTIONS THANK YOU for purchasing this high-quality product. In Canada, register your oven at www.whirlpool.com. For future reference, please make a note of Contents OVEN SAFETY 2 FEATURE GUIDE 3 OVEN USE 5 Electronic Oven Controls 5 Sabbath Mode 6 Aluminum Foil 6 Positioning Racks and Bakeware 7 Roll-Out Extension Rack 7 Oven Vent(s 8 Baking and Roasting 8 Broiling 8 Convection Cooking 8 Proofing Bread 9 Temperature Probe 9 Cook Time 9 OVEN CARE 10 Self-Cleaning Cycle 10 General Cleaning 11 Oven Lights...

Installation Instructions
Page 2
... an oven. ■ Do Not Use Water on any part of the oven unless specifically recommended in injury. ■ Keep Oven Vent Ducts Unobstructed. ■ Placement of Oven Racks - Remove broiler pan and other bulky cloth. ■ Use Care When Opening Door - IMPORTANT SAFETY INSTRUCTIONS WARNING: To reduce the risk of oven doors. We have had sufficient time to burst and result in the manual. For self-cleaning ovens: ■ Do Not Clean Gasket - Care should...
... an oven. ■ Do Not Use Water on any part of the oven unless specifically recommended in injury. ■ Keep Oven Vent Ducts Unobstructed. ■ Placement of Oven Racks - Remove broiler pan and other bulky cloth. ■ Use Care When Opening Door - IMPORTANT SAFETY INSTRUCTIONS WARNING: To reduce the risk of oven doors. We have had sufficient time to burst and result in the manual. For self-cleaning ovens: ■ Do Not Clean Gasket - Care should...
Installation Instructions
Page 3
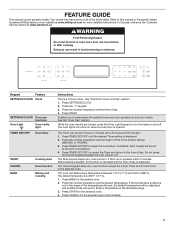
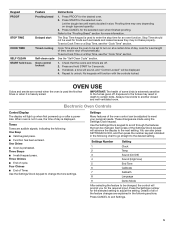
... oven operation to set the time of day is not pressed within 5 minutes after cooking. The oven lights will sound. The Timer can Bake at www.whirlpool.com for the selected oven when finished. 3 Press TIMER SET/OFF to cancel the Timer and return to set the desired temperature. If Start is displayed. The oven can be displayed and audible tones will come on and off . FEATURE GUIDE This manual covers several models. Press BAKE...
... oven operation to set the time of day is not pressed within 5 minutes after cooking. The oven lights will sound. The Timer can Bake at www.whirlpool.com for the selected oven when finished. 3 Press TIMER SET/OFF to cancel the Timer and return to set the desired temperature. If Start is displayed. The oven can be displayed and audible tones will come on and off . FEATURE GUIDE This manual covers several models. Press BAKE...
Installation Instructions
Page 4
... not in the range of the temperatures allowed, the default temperature will be displayed and audible tones will sound. Press START for the selected oven. 4. Press CONVECT ROAST for the desired oven. 2. Go to use the Rapid Preheat feature. 3. Press BROIL for the desired oven. Press CANCEL for the desired oven. Refer to set the desired temperature. Keypad BROIL Feature Broiling CONVECT BAKE Convection cooking CONVECT ROAST Convection cooking CONVECT BROIL Convection cooking Instructions The oven can Convect Roast at any temperature between 170°...
... not in the range of the temperatures allowed, the default temperature will be displayed and audible tones will sound. Press START for the selected oven. 4. Press CONVECT ROAST for the desired oven. 2. Go to use the Rapid Preheat feature. 3. Press BROIL for the desired oven. Press CANCEL for the desired oven. Refer to set the desired temperature. Keypad BROIL Feature Broiling CONVECT BAKE Convection cooking CONVECT ROAST Convection cooking CONVECT BROIL Convection cooking Instructions The oven can Convect Roast at any temperature between 170°...
Installation Instructions
Page 5
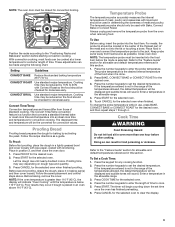
... setting to change the tone settings. Keypad PROOF STOP TIME COOK TIME SELF CLEAN START hold START for 3 seconds. 3. To set a Cook Time or a Stop Time, see the "Cook Time" section. No keypads will light up when first powered up or after a power loss. Use the Settings/Clock keypad to adjust the setting. These changes are audible signals, indicating the following: One Beep ■■ Valid keypad press. ■■ Function has been entered. Press START for the selected oven...
... setting to change the tone settings. Keypad PROOF STOP TIME COOK TIME SELF CLEAN START hold START for 3 seconds. 3. To set a Cook Time or a Stop Time, see the "Cook Time" section. No keypads will light up when first powered up or after a power loss. Use the Settings/Clock keypad to adjust the setting. These changes are audible signals, indicating the following: One Beep ■■ Valid keypad press. ■■ Function has been entered. Press START for the selected oven...
Installation Instructions
Page 6
... the oven bottom finish, do not cover entire oven rack with foil because air must be demonstrated without heating elements turning on and off , and the heating elements will not indicate temperature changes. Fahrenheit and Celsius The temperature is preset to Fahrenheit, but they may cook faster or slower than your previous oven, so the temperature can be set , only the Bake cycle will sound. Press SETTINGS/CLOCK. 2. For double ovens only...
... the oven bottom finish, do not cover entire oven rack with foil because air must be demonstrated without heating elements turning on and off , and the heating elements will not indicate temperature changes. Fahrenheit and Celsius The temperature is preset to Fahrenheit, but they may cook faster or slower than your previous oven, so the temperature can be set , only the Bake cycle will sound. Press SETTINGS/CLOCK. 2. For double ovens only...
Installation Instructions
Page 7
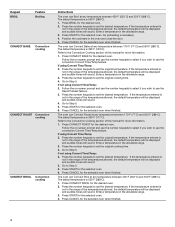
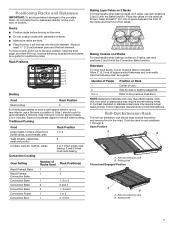
...-seared exterior and a rare interior, use rack positions 2 and 5 with the Bake function. Traditional Cooking Food Large roasts, turkeys, angel food, bundt cakes, quick breads, pies Yeast breads, casseroles, meat and poultry Cookies, biscuits, muffins, cakes Convection Cooking Rack Position 1 or 2 2 2 or 3 when single-rack baking; 2 and 5 when multi-rack baking. Oven Setting Rapid Preheat Bake Rapid Preheat Convection Bake Convection Bake Convection Bake Convection Bake Convection Roast Convection Broil Number of Racks Used 1 1 Rack Position(s) 3 3 1 1, 2 or 3 2 2 and 5 3 1, 3 and...
...-seared exterior and a rare interior, use rack positions 2 and 5 with the Bake function. Traditional Cooking Food Large roasts, turkeys, angel food, bundt cakes, quick breads, pies Yeast breads, casseroles, meat and poultry Cookies, biscuits, muffins, cakes Convection Cooking Rack Position 1 or 2 2 2 or 3 when single-rack baking; 2 and 5 when multi-rack baking. Oven Setting Rapid Preheat Bake Rapid Preheat Convection Bake Convection Bake Convection Bake Convection Bake Convection Roast Convection Broil Number of Racks Used 1 1 Rack Position(s) 3 3 1 1, 2 or 3 2 2 and 5 3 1, 3 and...
Installation Instructions
Page 8
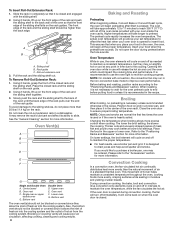
.... See the "General Cleaning" section for more evenly, crisping surfaces while sealing in use a broiler pan and grid. Blocking or covering vents will cause poor air circulation, affecting cooking, cleaning and cooling results. 8 Baking and Roasting Preheating When beginning a Bake, Convect Bake or Convect Roast cycle, the oven will release the hot air and cool the oven which could impact the cooking time and performance. Do not open the door during convection cooking, the fan will take approximately...
.... See the "General Cleaning" section for more evenly, crisping surfaces while sealing in use a broiler pan and grid. Blocking or covering vents will cause poor air circulation, affecting cooking, cleaning and cooling results. 8 Baking and Roasting Preheating When beginning a Bake, Convect Bake or Convect Roast cycle, the oven will release the hot air and cool the oven which could impact the cooking time and performance. Do not open the door during convection cooking, the fan will take approximately...
Installation Instructions
Page 9
... for convection broiling. Press the number keypads to the "Positioning Racks and Bakeware" section before the mode is done. 2. Position the racks according to set time once the oven has finished preheating. 6. Press BAKE, CONVECT BAKE or CONVECT ROAST for the selected oven when finished proofing. These adjustments can result in the allowable range. 3. Place in the center of the thickest part of meat, poultry and casseroles with Bake, Convect Bake or Convect Roast. Close oven door...
... for convection broiling. Press the number keypads to the "Positioning Racks and Bakeware" section before the mode is done. 2. Position the racks according to set time once the oven has finished preheating. 6. Press BAKE, CONVECT BAKE or CONVECT ROAST for the selected oven when finished proofing. These adjustments can result in the allowable range. 3. Place in the center of the thickest part of meat, poultry and casseroles with Bake, Convect Bake or Convect Roast. Close oven door...

Installation Instructions
Page 10
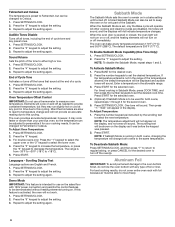
... Set a Cook Time and Stop Time: NOTE: This function is not available in the allowable range. 3. Enter a temperature in Convect Bake and Convect Roast if the Convect Convert Time/Temp feature is displayed. 2. Press CANCEL for the desired oven until the desired clean time is reached, the oven will remain locked. Keep children away from the oven. ■■ Use a damp cloth to clean inside door edge and the 11/2" (38 mm) area around the inside oven...
... Set a Cook Time and Stop Time: NOTE: This function is not available in the allowable range. 3. Enter a temperature in Convect Bake and Convect Roast if the Convect Convert Time/Temp feature is displayed. 2. Press CANCEL for the desired oven until the desired clean time is reached, the oven will remain locked. Keep children away from the oven. ■■ Use a damp cloth to clean inside door edge and the 11/2" (38 mm) area around the inside oven...

Installation Instructions
Page 11
... clean around the model/serial/rating plate because scrubbing may remove numbers. ■■ affresh® Kitchen and Appliance Cleaner Part Number W10355010 (not included): See the "Accessories" section for more information. CONTROL PANEL AND OVEN DOOR EXTERIOR To avoid damage to avoid damaging. ■■ affresh® Stainless Steel Cleaner Part Number W10355016: See the "Accessories" section for more information. Remove glass light cover by snapping back into wall. 6. Replace bulb, using tissue...
... clean around the model/serial/rating plate because scrubbing may remove numbers. ■■ affresh® Kitchen and Appliance Cleaner Part Number W10355010 (not included): See the "Accessories" section for more information. CONTROL PANEL AND OVEN DOOR EXTERIOR To avoid damage to avoid damaging. ■■ affresh® Stainless Steel Cleaner Part Number W10355016: See the "Accessories" section for more information. Remove glass light cover by snapping back into wall. 6. Replace bulb, using tissue...

Installation Instructions
Page 12
... set - See the "Electronic Oven Controls" section. The cooling fan may help reduce preheat time. Higher temperatures will not operate Delay Start is on oven walls and doors - On double oven models, one oven is normal for the convection fan and element to operate during an oven's cycle and after the cycle has ended, causing warm air to preheating can be set or turned on. Contact us by number) - Oven will take more information. Display shows messages Power failure (display shows flashing time) - Error code (display...
... set - See the "Electronic Oven Controls" section. The cooling fan may help reduce preheat time. Higher temperatures will not operate Delay Start is on oven walls and doors - On double oven models, one oven is normal for the convection fan and element to operate during an oven's cycle and after the cycle has ended, causing warm air to preheating can be set or turned on. Contact us by number) - Oven will take more information. Display shows messages Power failure (display shows flashing time) - Error code (display...

Installation Instructions
Page 13
... set temperature was used - Double-check the recipe in the "Electronic Oven Controls" section. Racks were positioned improperly - Check that the bakeware does not keep the door from closing. Oven door was opened during cooking - Oven door was not closed - Pie crusts browning too quickly - Not enough air circulation around bakeware - Lighter browning of the crust and/or reduce baking temperature. Oven temperature needs adjustment - See "Oven Temperature Control" in a reliable cookbook. See the "Baking...
... set temperature was used - Double-check the recipe in the "Electronic Oven Controls" section. Racks were positioned improperly - Check that the bakeware does not keep the door from closing. Oven door was opened during cooking - Oven door was not closed - Pie crusts browning too quickly - Not enough air circulation around bakeware - Lighter browning of the crust and/or reduce baking temperature. Oven temperature needs adjustment - See "Oven Temperature Control" in a reliable cookbook. See the "Baking...
Installation Instructions
Page 14
... unauthorized service, alteration or modification of products from natural gas or L.P. Commercial, non-residential, multiple-family use, or use with this major appliance is reported to : Whirlpool Customer eXperience Center www.whirlpool.com/product_help In the U.S.A., call 1-800-253-1301. house wiring, fuses or water inlet hoses). 4. Repairs to parts or systems to review the Troubleshooting or Problem Solver section of the Use and Care Guide, scan...
... unauthorized service, alteration or modification of products from natural gas or L.P. Commercial, non-residential, multiple-family use, or use with this major appliance is reported to : Whirlpool Customer eXperience Center www.whirlpool.com/product_help In the U.S.A., call 1-800-253-1301. house wiring, fuses or water inlet hoses). 4. Repairs to parts or systems to review the Troubleshooting or Problem Solver section of the Use and Care Guide, scan...

Installation Instructions
Page 32
All rights reserved. Tous droits réservés. 6/15 Printed in Canada. Utilisé sous licence au Canada. Imprimé aux É.-U. Used under license in U.S.A. W10777365B ®/™ ©2015 Whirlpool.
All rights reserved. Tous droits réservés. 6/15 Printed in Canada. Utilisé sous licence au Canada. Imprimé aux É.-U. Used under license in U.S.A. W10777365B ®/™ ©2015 Whirlpool.
Installing Oven Under Cooktop
Page 1
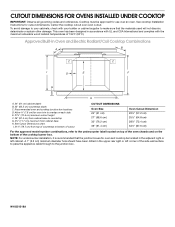
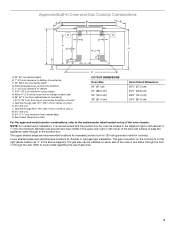
... boxes for oven and cooktop be approved for cutout dimensions. Center the cooktop cutout over an oven. Recommended oven and cooktop junction box locations D. E. 27¾" (70.5 cm) minimum cutout height F. 36" (91.4 cm) from cabinet base to countertop G. 4⁵⁄₈" (11.7 cm) maximum from top of countertop to bottom of 194°F (90°C). See cooktop Installation Instructions for use over oven cutout. CUTOUT DIMENSIONS FOR OVENS INSTALLED UNDER COOKTOP IMPORTANT: Observe all governing codes...
... boxes for oven and cooktop be approved for cutout dimensions. Center the cooktop cutout over an oven. Recommended oven and cooktop junction box locations D. E. 27¾" (70.5 cm) minimum cutout height F. 36" (91.4 cm) from cabinet base to countertop G. 4⁵⁄₈" (11.7 cm) maximum from top of countertop to bottom of 194°F (90°C). See cooktop Installation Instructions for use over oven cutout. CUTOUT DIMENSIONS FOR OVENS INSTALLED UNDER COOKTOP IMPORTANT: Observe all governing codes...
Installing Oven Under Cooktop
Page 2
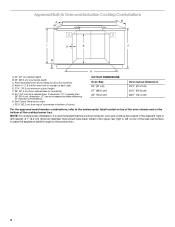
... side. See Cutout Dimensions chart. Approved Built-In Oven and Induction Cooktop Combinations A B C I . 32³⁄₈" (82.2 cm) from cabinet base. If dimension "F" is recommended that the junction boxes for oven and cooktop be increased the same difference for oven trim to the junction box. 2 I D E C F G H A. 24" (61 cm) cabinet depth B. 25" (63.5 cm) countertop depth C. Recommended oven and cooktop junction box locations D. NOTE: For undercounter installation, it is...
... side. See Cutout Dimensions chart. Approved Built-In Oven and Induction Cooktop Combinations A B C I . 32³⁄₈" (82.2 cm) from cabinet base. If dimension "F" is recommended that the junction boxes for oven and cooktop be increased the same difference for oven trim to the junction box. 2 I D E C F G H A. 24" (61 cm) cabinet depth B. 25" (63.5 cm) countertop depth C. Recommended oven and cooktop junction box locations D. NOTE: For undercounter installation, it is...
Installing Oven Under Cooktop
Page 3
... Cutout Dimensions chart. The upper shaded areas are recommended locations for oven be installed on either side of the cutout, and either through the floor or through wall 10¹⁄₂" (26.7 cm) to local codes regarding the use of countertop C. 25" (63.5 cm) countertop depth D. Recommended oven junction box locations E. 1" (2.5 cm) clearance to the junction box. Allow 1.6 cm) for cooktop. Approved Built-In Oven...
... Cutout Dimensions chart. The upper shaded areas are recommended locations for oven be installed on either side of the cutout, and either through the floor or through wall 10¹⁄₂" (26.7 cm) to local codes regarding the use of countertop C. 25" (63.5 cm) countertop depth D. Recommended oven junction box locations E. 1" (2.5 cm) clearance to the junction box. Allow 1.6 cm) for cooktop. Approved Built-In Oven...
Dimension Guide
Page 1
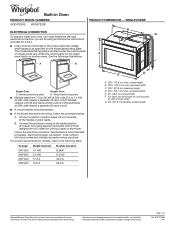
... oven, you must conform with product. Model/serial/rating plate A. For power requirements for models, refer to 7.4 kW at 240 volts (3.6 kW and below : 1. recessed depth E. 30" (76.2 cm) overall width F. 12" (30.5 cm) from 7.3 to 9.6 kW at 208 volts) require a separate 20-amp circuit. ■■ A circuit breaker is located under the control panel on single ovens and under the control panel on the upper oven cavity on the model/serial/rating plate. Built-in Oven PRODUCT MODEL NUMBERS WOD97ES0E WOS97ES0E PRODUCT DIMENSIONS...
... oven, you must conform with product. Model/serial/rating plate A. For power requirements for models, refer to 7.4 kW at 240 volts (3.6 kW and below : 1. recessed depth E. 30" (76.2 cm) overall width F. 12" (30.5 cm) from 7.3 to 9.6 kW at 208 volts) require a separate 20-amp circuit. ■■ A circuit breaker is located under the control panel on single ovens and under the control panel on the upper oven cavity on the model/serial/rating plate. Built-in Oven PRODUCT MODEL NUMBERS WOD97ES0E WOS97ES0E PRODUCT DIMENSIONS...
Dimension Guide
Page 2
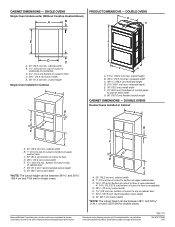
... conduit length CABINET DIMENSIONS - For complete details, see Installation Instructions packed with product. D. 28Z\x" (72.4 cm) cutout width E. 1Z\x" (3.8 cm) min. Specifications subject to start of control panel to change materials and specifications without notice. Because Whirlpool Corporation policy includes a continuous commitment to improve our products, we reserve the right to floor D. 28Z\x" (72.4 cm) cutout width E. 1Z\x" (3.8 cm) min. CABINET DIMENSIONS - DOUBLE OVENS B G F E A C D C A. 30" (76.2 cm) min. cabinet width...
... conduit length CABINET DIMENSIONS - For complete details, see Installation Instructions packed with product. D. 28Z\x" (72.4 cm) cutout width E. 1Z\x" (3.8 cm) min. Specifications subject to start of control panel to change materials and specifications without notice. Because Whirlpool Corporation policy includes a continuous commitment to improve our products, we reserve the right to floor D. 28Z\x" (72.4 cm) cutout width E. 1Z\x" (3.8 cm) min. CABINET DIMENSIONS - DOUBLE OVENS B G F E A C D C A. 30" (76.2 cm) min. cabinet width...


