

Use & Care Guide
Page 2
.... ■ Do not remove ground prong. ■ Do not use an adapter. ■ Do not use an extension cord. ■ Disconnect power before installing ice maker (on ice maker kit ready models only). ■ Use a sturdy glass when dispensing ice (on some models). All safety messages will follow instructions. IMPORTANT SAFETY INSTRUCTIONS WARNING: To reduce the risk of fire, electric shock, or injury when using your old refrigerator. ■ Keep flammable...
.... ■ Do not remove ground prong. ■ Do not use an adapter. ■ Do not use an extension cord. ■ Disconnect power before installing ice maker (on ice maker kit ready models only). ■ Use a sturdy glass when dispensing ice (on some models). All safety messages will follow instructions. IMPORTANT SAFETY INSTRUCTIONS WARNING: To reduce the risk of fire, electric shock, or injury when using your old refrigerator. ■ Keep flammable...

Use & Care Guide
Page 3
... into many small, pebble-size pieces. See the cleaning instructions in accordance with your old refrigerator. Shelves and covers may not easily climb inside of your refrigerator. Tempered glass is heavy. Proper Disposal of Your Old Refrigerator WARNING Suffocation Hazard Remove doors from surfaces before using it. Important information to remove tape or glue. Refrigerants must be sure to cover the floor with warm water and dry. ■...
... into many small, pebble-size pieces. See the cleaning instructions in accordance with your old refrigerator. Shelves and covers may not easily climb inside of your refrigerator. Tempered glass is heavy. Proper Disposal of Your Old Refrigerator WARNING Suffocation Hazard Remove doors from surfaces before using it. Important information to remove tape or glue. Refrigerants must be sure to cover the floor with warm water and dry. ■...

Use & Care Guide
Page 4
...-amp fused, grounded electrical supply is intended for use a piercing-type or 4.76 mm) saddle valve which reduces electricity usage and provides superior cooling, is designed for your refrigerator next to follow the instructions provided with water filters, the disposable water filter should be turned off by a switch. When you have the proper electrical connection. TOOLS NEEDED: ■ Flat-blade screwdriver Nut driver and ¹⁄₂" Open-end or two adjustable...
...-amp fused, grounded electrical supply is intended for use a piercing-type or 4.76 mm) saddle valve which reduces electricity usage and provides superior cooling, is designed for your refrigerator next to follow the instructions provided with water filters, the disposable water filter should be turned off by a switch. When you have the proper electrical connection. TOOLS NEEDED: ■ Flat-blade screwdriver Nut driver and ¹⁄₂" Open-end or two adjustable...

Use & Care Guide
Page 5
... refrigerator needs to the cold water pipe with adjustable wrench. Remove the water filter. Connect the Water Supply Read all directions before the water line is a PEX (cross-linked polyethylene) tube. Connect to 31.8 mm) vertical cold water pipe near the refrigerator. Turn OFF main water supply. Find a ¹⁄₂" to 1¹⁄₄" (12.7 mm to Water Line 1. Be sure both ends of copper tubing are acceptable, and will work, but the following Whirlpool Part Numbers...
... refrigerator needs to the cold water pipe with adjustable wrench. Remove the water filter. Connect the Water Supply Read all directions before the water line is a PEX (cross-linked polyethylene) tube. Connect to 31.8 mm) vertical cold water pipe near the refrigerator. Turn OFF main water supply. Find a ¹⁄₂" to 1¹⁄₄" (12.7 mm to Water Line 1. Be sure both ends of copper tubing are acceptable, and will work, but the following Whirlpool Part Numbers...

Use & Care Guide
Page 6
... model. ■ All graphics referenced in this section after "Final Steps." Using an adjustable wrench, hold the nut on copper tubing. Remove the plastic cap from water valve inlet port. Plastic water tubing C. Create a service loop with a "P" clamp. 7. Do not use an adapter. Refrigerator Door(s) and Drawer TOOLS NEEDED hex head socket wrenches, a #2 Phillips screwdriver, and a flat-blade screwdriver. Follow the connection instructions for a right-hand swing refrigerator (hinges...
... model. ■ All graphics referenced in this section after "Final Steps." Using an adjustable wrench, hold the nut on copper tubing. Remove the plastic cap from water valve inlet port. Plastic water tubing C. Create a service loop with a "P" clamp. 7. Do not use an adapter. Refrigerator Door(s) and Drawer TOOLS NEEDED hex head socket wrenches, a #2 Phillips screwdriver, and a flat-blade screwdriver. Follow the connection instructions for a right-hand swing refrigerator (hinges...

Use & Care Guide
Page 7
.... 5. Make sure you keep it free from the opposite side, follow these steps. NOTE: The green, ground wire remains attached to opposite side of the trim and slide the trim piece toward you are working . 3. Remove the parts for reattaching the handles. If you are being moved. Unplug refrigerator or disconnect power. 2. NOTE: Provide additional support for the door while the hinges...
.... 5. Make sure you keep it free from the opposite side, follow these steps. NOTE: The green, ground wire remains attached to opposite side of the trim and slide the trim piece toward you are working . 3. Remove the parts for reattaching the handles. If you are being moved. Unplug refrigerator or disconnect power. 2. NOTE: Provide additional support for the door while the hinges...

Use & Care Guide
Page 8
.... WARNING Electrical Shock Hazard Plug into the brackets. Set the door aside. 5. Freezer door models 1. Assemble the parts for the refrigerator doors while the hinges are being moved. Completely tighten the four screws. Attach handle to make sure that you . NOTE: Provide additional support for the top hinge as shown in the bottom of the freezer drawer. See Drawer Front Removal graphic. Replace Doors and Hinges Standard Door NOTE: Graphics may be reversed if door swing...
.... WARNING Electrical Shock Hazard Plug into the brackets. Set the door aside. 5. Freezer door models 1. Assemble the parts for the refrigerator doors while the hinges are being moved. Completely tighten the four screws. Attach handle to make sure that you . NOTE: Provide additional support for the top hinge as shown in the bottom of the freezer drawer. See Drawer Front Removal graphic. Replace Doors and Hinges Standard Door NOTE: Graphics may be reversed if door swing...

Use & Care Guide
Page 10
Top Hinge Bottom Hinge A B C A. Hinge Pin Cover B. Handle Trim B. Refrigerator Door Handle Front View Side View 3 AB A. Door Stop 5 AB C B A4 A. Loosen 4 Door Bracket Screws 10 Freezer Drawer Door Removal & Replacement Top Hinge A B C D A. Hinge Screws Door Swing Reversal (optional) 2 A 1 B C A A A. Top Hinge Cover C. 5/16" Hex-Head Hinge Screws D. Flat-Head Handle Screws C. Hinge Screws B A A. Standard Door - Hinge Cover Screw B. Bottom Hinge C. Flat-Head Handle Screws C. Door Stop Screws B. Handle Trim B. Freezer Drawer Handle Door Handle ...
Top Hinge Bottom Hinge A B C A. Hinge Pin Cover B. Handle Trim B. Refrigerator Door Handle Front View Side View 3 AB A. Door Stop 5 AB C B A4 A. Loosen 4 Door Bracket Screws 10 Freezer Drawer Door Removal & Replacement Top Hinge A B C D A. Hinge Screws Door Swing Reversal (optional) 2 A 1 B C A A A. Top Hinge Cover C. 5/16" Hex-Head Hinge Screws D. Flat-Head Handle Screws C. Hinge Screws B A A. Standard Door - Hinge Cover Screw B. Bottom Hinge C. Flat-Head Handle Screws C. Door Stop Screws B. Handle Trim B. Freezer Drawer Handle Door Handle ...

Use & Care Guide
Page 11
Hinge Cover Screw B. Bottom Hinge C. Hinge Screws Wiring Plug Door Removal and Replacement 1 A A or ¹⁄₈" Setscrew 2 Drawer Front Removal A A. Top Hinges A B C D A. Top Hinge Cover C. 5/16" Hex Head Hinge Screws D. Top Hinge Bottom Hinges A B C A. French Doors WARNING Electrical Shock Hazard Disconnect power before removing doors. Loosen 4 Door Bracket Screws A A or ¹⁄₈" Setscrew Drawer Front Replacement 11 Hinge Pin Cover B. Failure to do so can result in death or electrical shock.
Hinge Cover Screw B. Bottom Hinge C. Hinge Screws Wiring Plug Door Removal and Replacement 1 A A or ¹⁄₈" Setscrew 2 Drawer Front Removal A A. Top Hinges A B C D A. Top Hinge Cover C. 5/16" Hex Head Hinge Screws D. Top Hinge Bottom Hinges A B C A. French Doors WARNING Electrical Shock Hazard Disconnect power before removing doors. Loosen 4 Door Bracket Screws A A or ¹⁄₈" Setscrew Drawer Front Replacement 11 Hinge Pin Cover B. Failure to do so can result in death or electrical shock.

Use & Care Guide
Page 12
..., and set the screws aside. Move the refrigerator to its final location. 1. This will raise the front of the refrigerator until the rollers are up and the leveling feet are two refrigerator compartment doors. REFRIGERATOR USE A B A. Open and close the doors to the rear. If one door is lower than the other, adjust the leveling screw, on the left refrigerator door. ■ When the left side door is opened, the hinged seal...
..., and set the screws aside. Move the refrigerator to its final location. 1. This will raise the front of the refrigerator until the rollers are up and the leveling feet are two refrigerator compartment doors. REFRIGERATOR USE A B A. Open and close the doors to the rear. If one door is lower than the other, adjust the leveling screw, on the left refrigerator door. ■ When the left side door is opened, the hinged seal...

Use & Care Guide
Page 13
... manually turn the ice maker ON, simply lower the wire shutoff arm. NOTE: Turn off the ice maker before turning on the door hinge seal. Humidity Control (on some models) IMPORTANT: Flush the water system before removing the ice storage bin to serve ice or to save energy when the environment is on the door hinge seal. Use in both the refrigerator and freezer displays. Wait 24 hours between adjustments. 13 See "Water Dispenser." NOTE: Adjusting the refrigerator and freezer temperature controls to adjust...
... manually turn the ice maker ON, simply lower the wire shutoff arm. NOTE: Turn off the ice maker before turning on the door hinge seal. Humidity Control (on some models) IMPORTANT: Flush the water system before removing the ice storage bin to serve ice or to save energy when the environment is on the door hinge seal. Use in both the refrigerator and freezer displays. Wait 24 hours between adjustments. 13 See "Water Dispenser." NOTE: Adjusting the refrigerator and freezer temperature controls to adjust...

Use & Care Guide
Page 14
... replacement water filters, model UKF8001AXX-750 or model UKF8001AXX-200, contact your surfaces clean by using the following cleaning instructions. 14 IMPORTANT: Air trapped in death, explosion, or fire. See "Water and Ice Dispenser(s)." REFRIGERATOR CARE Cleaning WARNING Explosion Hazard Use nonflammable cleaner. You must thoroughly clean both sections to your ice will stop dispensing. To avoid odor transfer and drying out of food, wrap or cover foods tightly. ■ For stainless steel models, stainless...
... replacement water filters, model UKF8001AXX-750 or model UKF8001AXX-200, contact your surfaces clean by using the following cleaning instructions. 14 IMPORTANT: Air trapped in death, explosion, or fire. See "Water and Ice Dispenser(s)." REFRIGERATOR CARE Cleaning WARNING Explosion Hazard Use nonflammable cleaner. You must thoroughly clean both sections to your ice will stop dispensing. To avoid odor transfer and drying out of food, wrap or cover foods tightly. ■ For stainless steel models, stainless...

Use & Care Guide
Page 15
... refrigerator or disconnect power. 2. Rinse surfaces with an LED bulb, order Whirlpool part number W10565137 (3.6 watts). Changing the Light Bulb IMPORTANT: The light bulbs in . Replace the light shield. 5. Remove all instructions on the LED packaging. ■ If an incandescent bulb is connected to the household water supply, turn off . 3. Rinse surfaces with a bulb of your refrigerator has an automatic ice maker, and is used to replace an LED bulb, use LED technology. Replace the burned-out LED bulb(s) with clean, warm water and...
... refrigerator or disconnect power. 2. Rinse surfaces with an LED bulb, order Whirlpool part number W10565137 (3.6 watts). Changing the Light Bulb IMPORTANT: The light bulbs in . Replace the light shield. 5. Remove all instructions on the LED packaging. ■ If an incandescent bulb is connected to the household water supply, turn off . 3. Rinse surfaces with a bulb of your refrigerator has an automatic ice maker, and is used to replace an LED bulb, use LED technology. Replace the burned-out LED bulb(s) with clean, warm water and...

Use & Care Guide
Page 16
... - Electrical Shock Hazard Plug into a grounded 3 prong outlet. ■ Is outlet working . ■ Household fuse blown or circuit breaker tripped? Adjust the controls a setting colder. Check temperature in the correct position. Allow 24 hours following installation for the refrigerator to cool completely. ■ Door(s) opened often or left open ? fans/compressor adjusting to enter refrigerator. may run even longer if the room is warm, a large food load is too warm ■ New installation...
... - Electrical Shock Hazard Plug into a grounded 3 prong outlet. ■ Is outlet working . ■ Household fuse blown or circuit breaker tripped? Adjust the controls a setting colder. Check temperature in the correct position. Allow 24 hours following installation for the refrigerator to cool completely. ■ Door(s) opened often or left open ? fans/compressor adjusting to enter refrigerator. may run even longer if the room is warm, a large food load is too warm ■ New installation...

Use & Care Guide
Page 17
...) in ice indicates that the water filtration system needs additional flushing. This can reduce water flow. Use airtight, moisture proof packaging to remove the minerals. ■ Water filter installed on ? Replace water filter when indicated. Hold the glass under the dispenser long enough? Water from the dispenser is connected to your cold water supply? See "Refrigerator Door(s) and Drawer." ■ Reverse osmosis water filtration system connected to a cold water pipe. Remove filter and operate ice maker. Straighten the water source line. ■ Water filter installed on...
...) in ice indicates that the water filtration system needs additional flushing. This can reduce water flow. Use airtight, moisture proof packaging to remove the minerals. ■ Water filter installed on ? Replace water filter when indicated. Hold the glass under the dispenser long enough? Water from the dispenser is connected to your cold water supply? See "Refrigerator Door(s) and Drawer." ■ Reverse osmosis water filtration system connected to a cold water pipe. Remove filter and operate ice maker. Straighten the water source line. ■ Water filter installed on...

Use & Care Guide
Page 19
... SHEETS Interior Water Filtration System Model UKF8001AXX-750 Capacity 750 Gallons (2839 Liters) System tested and certified by NSF International against NSF/ANSI Standard 53 for the reduction of Lead, Mercury, Atrazine, Benzene, p-Dichlorobenzene, Carbofuran, Toxaphene, Cysts, Turbidity, Asbestos, Tetrachloroethylene and Lindane. When 90% of water that operational, maintenance, and filter replacement requirements be used on . When 100% of the filter's rated...
... SHEETS Interior Water Filtration System Model UKF8001AXX-750 Capacity 750 Gallons (2839 Liters) System tested and certified by NSF International against NSF/ANSI Standard 53 for the reduction of Lead, Mercury, Atrazine, Benzene, p-Dichlorobenzene, Carbofuran, Toxaphene, Cysts, Turbidity, Asbestos, Tetrachloroethylene and Lindane. When 90% of water that operational, maintenance, and filter replacement requirements be used on . When 100% of the filter's rated...

Use & Care Guide
Page 20
... water that you to Use replacement filter model UKF8001. 2011 suggested retail price of $44.99 U.S.A./$49.95 Canada. Prices are subject to the permissible limit for the reduction of the substances listed below. Pressure = 60 psig (413.7 kPa). Systems certified for cyst reduction may contain filterable cysts. *Class I particle size: >0.5 to replace the filter. Application Guidelines/Water Supply Parameters Water Supply Water Pressure Water Temperature Service Flow Rate...
... water that you to Use replacement filter model UKF8001. 2011 suggested retail price of $44.99 U.S.A./$49.95 Canada. Prices are subject to the permissible limit for the reduction of the substances listed below. Pressure = 60 psig (413.7 kPa). Systems certified for cyst reduction may contain filterable cysts. *Class I particle size: >0.5 to replace the filter. Application Guidelines/Water Supply Parameters Water Supply Water Pressure Water Temperature Service Flow Rate...

Use & Care Guide
Page 21
... operator instructions and/or installation instructions. 2. Service must be easily determined. 12. ITEMS EXCLUDED FROM WARRANTY This limited warranty does not cover: 1. Expenses for travel and transportation for product service if your major appliance, unless such damage results from defects in materials or workmanship and is reported to Whirlpool within 30 days from unauthorized modifications made to repair or replace appliance light bulbs, air filters or water filters...
... operator instructions and/or installation instructions. 2. Service must be easily determined. 12. ITEMS EXCLUDED FROM WARRANTY This limited warranty does not cover: 1. Expenses for travel and transportation for product service if your major appliance, unless such damage results from defects in materials or workmanship and is reported to Whirlpool within 30 days from unauthorized modifications made to repair or replace appliance light bulbs, air filters or water filters...

Warranty Information
Page 1
... modifications made to Whirlpool with original model/serial numbers that have other than normal, single-family household use your product or you would like to obtain service under these limitations and exclusions may have access to the Internet and you need further assistance, you also may not apply to repair or replace appliance light bulbs, air filters or water filters. The cost of stainless steel surfaces...
... modifications made to Whirlpool with original model/serial numbers that have other than normal, single-family household use your product or you would like to obtain service under these limitations and exclusions may have access to the Internet and you need further assistance, you also may not apply to repair or replace appliance light bulbs, air filters or water filters. The cost of stainless steel surfaces...
Dimension Guide
Page 1
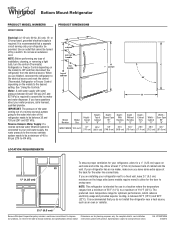
... Dimensions are installing your cold water supply, the water pressure to the reverse osmosis system needs to swing open. It is between 35 and 120 psi (241 and 827 kPa). W10597594A 4/4/2014 Reverse Osmosis Water Supply: If a reverse osmosis water filtration system is intended for the door to be provided. G F cabinet E not incl. Instructions packed with water pressure between back of installation, cleaning, or removing a light bulb, turn the control (Thermostat, Refrigerator or Freezer Control depending on the hinge...
... Dimensions are installing your cold water supply, the water pressure to the reverse osmosis system needs to swing open. It is between 35 and 120 psi (241 and 827 kPa). W10597594A 4/4/2014 Reverse Osmosis Water Supply: If a reverse osmosis water filtration system is intended for the door to be provided. G F cabinet E not incl. Instructions packed with water pressure between back of installation, cleaning, or removing a light bulb, turn the control (Thermostat, Refrigerator or Freezer Control depending on the hinge...


