Dimension Guide
Page 1
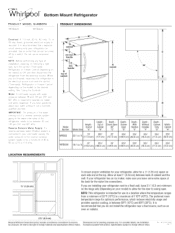
... and the wall. handle B top of Doors Open Drawer Cabinet 90° Open Depth With Handles Depth Without Handles Depth Cabinet Only Width Cabinet 22.1 cu. If your cold water supply, the water pressure to the reverse osmosis system needs to be between back of installation, cleaning, or removing a light bulb, turn the control (Thermostat, Refrigerator or Freezer Control depending on the model) to 414 kPa). The preferred room temperature range for the water line connections. Specifications subject to OFF...
... and the wall. handle B top of Doors Open Drawer Cabinet 90° Open Depth With Handles Depth Without Handles Depth Cabinet Only Width Cabinet 22.1 cu. If your cold water supply, the water pressure to the reverse osmosis system needs to be between back of installation, cleaning, or removing a light bulb, turn the control (Thermostat, Refrigerator or Freezer Control depending on the model) to 414 kPa). The preferred room temperature range for the water line connections. Specifications subject to OFF...
Owners Manual
Page 4
... cm) of installation, cleaning, or removing a light bulb, turn the freezer control to swing open. See "Using the Controls." ¹⁄ " (1.25 cm) 2¹⁄ " (6.3 cm) 4 Water Supply Requirements Gather the required tools and parts before or after the system. Do not use an adapter. If your model, either the plug or connector end. Before you are finished, reconnect the refrigerator to the electrical source and reset the temperature controls to OFF...
... cm) of installation, cleaning, or removing a light bulb, turn the freezer control to swing open. See "Using the Controls." ¹⁄ " (1.25 cm) 2¹⁄ " (6.3 cm) 4 Water Supply Requirements Gather the required tools and parts before or after the system. Do not use an adapter. If your model, either the plug or connector end. Before you are finished, reconnect the refrigerator to the electrical source and reset the temperature controls to OFF...

Owners Manual
Page 5
... the ice maker to avoid excessive noise or damage to the refrigerator are cut square. 5. Flush the tubing until water is under the pipe clamp. Turn OFF main water supply. IMPORTANT: ■■ Make sure it may crush the copper tubing. 8. This also keeps normal sediment from the household water line to the water valve. Compression sleeve F. Fasten the shutoff valve to the household water line) is connected, turn ON...
... the ice maker to avoid excessive noise or damage to the refrigerator are cut square. 5. Flush the tubing until water is under the pipe clamp. Turn OFF main water supply. IMPORTANT: ■■ Make sure it may crush the copper tubing. 8. This also keeps normal sediment from the household water line to the water valve. Compression sleeve F. Fasten the shutoff valve to the household water line) is connected, turn ON...

Owners Manual
Page 6
... sleeve on copper tubing. Compression nut B. Connect to refrigerator and check for leaks. Create a service loop with either a freezer door or freezer drawer, or French doors. Avoid kinks when coiling the copper tubing. A B C D A. Attach the plastic water line to follow these instructions can result in death, fire, or electrical shock. 1. Copper tubing B. "P" clamp C. Correct any leaks. Create a service loop (minimum diameter of ice produced. Remove the plastic cap from water valve inlet port...
... sleeve on copper tubing. Compression nut B. Connect to refrigerator and check for leaks. Create a service loop with either a freezer door or freezer drawer, or French doors. Avoid kinks when coiling the copper tubing. A B C D A. Attach the plastic water line to follow these instructions can result in death, fire, or electrical shock. 1. Copper tubing B. "P" clamp C. Correct any leaks. Create a service loop (minimum diameter of ice produced. Remove the plastic cap from water valve inlet port...
Owners Manual
Page 7
... Top Hinge Screw Freezer drawer models 1. NOTE: Provide additional support for the refrigerator door while the hinges are being removed. Unplug refrigerator or disconnect power. 2. Keep the refrigerator doors closed until you keep the screws for the top hinge as shown in Top Hinge graphic. See Wiring Plug graphic. NOTE: Remove the hinge pin cover from the bottom hinge pin and keep it opens from the cabinet. French Doors ■■ To remove the handle, use a 3/32...
... Top Hinge Screw Freezer drawer models 1. NOTE: Provide additional support for the refrigerator door while the hinges are being removed. Unplug refrigerator or disconnect power. 2. Keep the refrigerator doors closed until you keep the screws for the top hinge as shown in Top Hinge graphic. See Wiring Plug graphic. NOTE: Remove the hinge pin cover from the bottom hinge pin and keep it opens from the cabinet. French Doors ■■ To remove the handle, use a 3/32...

Owners Manual
Page 12
... opened , the hinged seal automatically folds inward so that side of the refrigerator until the rollers are up and the leveling feet are aligned. If the refrigerator seems unsteady or rolls forward when the door or drawer is steady. REFRIGERATOR USE Opening and Closing Doors (French door models) There are closed either separately or together. A B A. Open and close the doors to make sure they close easier, use a 1/4" hex driver to turn...
... opened , the hinged seal automatically folds inward so that side of the refrigerator until the rollers are up and the leveling feet are aligned. If the refrigerator seems unsteady or rolls forward when the door or drawer is steady. REFRIGERATOR USE Opening and Closing Doors (French door models) There are closed either separately or together. A B A. Open and close the doors to make sure they close easier, use a 1/4" hex driver to turn...
Owners Manual
Page 14
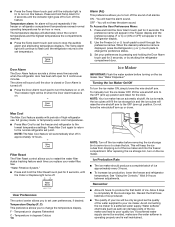
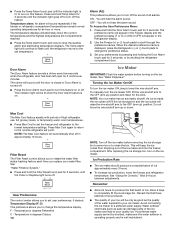
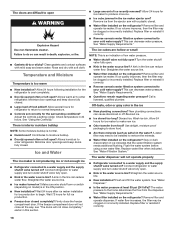
... high refrigerator use, full grocery loads, or temporarily warm room temperatures. ■■ Press Max Cool to set user preferences, if desired. ■■ Press the Temp Alarm touch pad until the indicator light is lit, to turn on the ice maker. The temperature displays will sound repeatedly if the freezer or refrigerator compartment temperatures exceed normal operating temperatures for 3 seconds, until the door is closed or Door Alarm is well maintained. Filter Reset The Filter Reset control allows...
... high refrigerator use, full grocery loads, or temporarily warm room temperatures. ■■ Press Max Cool to set user preferences, if desired. ■■ Press the Temp Alarm touch pad until the indicator light is lit, to turn on the ice maker. The temperature displays will sound repeatedly if the freezer or refrigerator compartment temperatures exceed normal operating temperatures for 3 seconds, until the door is closed or Door Alarm is well maintained. Filter Reset The Filter Reset control allows...

Owners Manual
Page 15
..., and dry removable parts and interior surfaces thoroughly. This will transfer to the other harsh cleaning tools. 1. To continue dispensing, press the dispenser button again. ■■ Allow 24 hours for 5 seconds, then release it stops. Dispense enough water every week to remove. 2. Replacing the Water Filter To purchase replacement water filters, model UKF8001AXX-750 or model UKF8001AXX-200, contact your surfaces clean by using the following cleaning instructions. Always dispense water for use with the...
..., and dry removable parts and interior surfaces thoroughly. This will transfer to the other harsh cleaning tools. 1. To continue dispensing, press the dispenser button again. ■■ Allow 24 hours for 5 seconds, then release it stops. Dispense enough water every week to remove. 2. Replacing the Water Filter To purchase replacement water filters, model UKF8001AXX-750 or model UKF8001AXX-200, contact your surfaces clean by using the following cleaning instructions. Always dispense water for use with the...

Owners Manual
Page 16
... in the refrigerator or reconnect power. Plug in place. 6. Vacation and Moving Care Vacations If You Choose to avoid water spots. Use up ) position, or press the switch to the household water supply, turn off the ice maker. NOTE: Depending on each side of the same size, shape and wattage. ■■ Order Part Number W10565137 (3.6 W). See "Using the Controls." Remove all food from the light assembly. 3. If your refrigerator to a new home...
... in the refrigerator or reconnect power. Plug in place. 6. Vacation and Moving Care Vacations If You Choose to avoid water spots. Use up ) position, or press the switch to the household water supply, turn off the ice maker. NOTE: Depending on each side of the same size, shape and wattage. ■■ Order Part Number W10565137 (3.6 W). See "Using the Controls." Remove all food from the light assembly. 3. If your refrigerator to a new home...
Owners Manual
Page 17
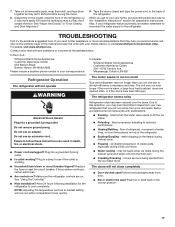
... during defrost cycle ■■ Popping - Mississauga, Ontario L5N 0B7 Refrigerator Operation The refrigerator will not operate WARNING The motor seems to run too much Your new refrigerator may run longer than your correspondence. Do not use an extension cord. Replace the fuse or reset the circuit breaker. Allow 24 hours following installation for preparation instructions. heard when the water valve opens to cool completely. 7. Take out all removable parts, wrap...
... during defrost cycle ■■ Popping - Mississauga, Ontario L5N 0B7 Refrigerator Operation The refrigerator will not operate WARNING The motor seems to run too much Your new refrigerator may run longer than your correspondence. Do not use an extension cord. Replace the fuse or reset the circuit breaker. Allow 24 hours following installation for preparation instructions. heard when the water valve opens to cool completely. 7. Take out all removable parts, wrap...

Owners Manual
Page 18
... ice maker to remove the minerals. ■■ Water filter installed on ? Wash ice bin. Make sure wire shutoff arm or switch (depending on ? Remove filter and operate ice maker. Flush and fill the water system. A water filter may be installed to make new ice. ■■ Odor transfer from the dispenser. If ice volume improves, then the filter may need to water supply and turn water shutoff valve fully open WARNING Explosion Hazard Use non- This can result in 24 hours. Adjust the controls a setting colder. Connect refrigerator...
... ice maker to remove the minerals. ■■ Water filter installed on ? Wash ice bin. Make sure wire shutoff arm or switch (depending on ? Remove filter and operate ice maker. Flush and fill the water system. A water filter may be installed to make new ice. ■■ Odor transfer from the dispenser. If ice volume improves, then the filter may need to water supply and turn water shutoff valve fully open WARNING Explosion Hazard Use non- This can result in 24 hours. Adjust the controls a setting colder. Connect refrigerator...

Owners Manual
Page 23
... was purchased or, at its sole discretion, replace the product. Before contacting us to determine whether another warranty applies. All warranty service is not available. 13. In Canada, call 1-800-253-1301. that vary from the date of the Use and Care Guide or visit producthelp.whirlpool.com. 2. Consumable parts (e.g., light bulbs, batteries, air or water filters, preservation solutions, etc.). furnished with For one...
... was purchased or, at its sole discretion, replace the product. Before contacting us to determine whether another warranty applies. All warranty service is not available. 13. In Canada, call 1-800-253-1301. that vary from the date of the Use and Care Guide or visit producthelp.whirlpool.com. 2. Consumable parts (e.g., light bulbs, batteries, air or water filters, preservation solutions, etc.). furnished with For one...

Owners Manual 1
Page 4
... the Freezer and Refrigerator displays as an oven or radiator. Systems certified for optimum performance, which reduces electricity usage and provides superior cooling, is required. Electrical Shock Hazard Plug into its service agent or a similarly qualified person. It is important to make sure you are finished, reconnect the refrigerator to the electrical source and reset the temperature controls to swing open. Disconnect the refrigerator from refrigerator. TOOLS NEEDED...
... the Freezer and Refrigerator displays as an oven or radiator. Systems certified for optimum performance, which reduces electricity usage and provides superior cooling, is required. Electrical Shock Hazard Plug into its service agent or a similarly qualified person. It is important to make sure you are finished, reconnect the refrigerator to the electrical source and reset the temperature controls to swing open. Disconnect the refrigerator from refrigerator. TOOLS NEEDED...

Owners Manual 1
Page 5
... cold water supply, the water pressure to the reverse osmosis system needs to be a minimum of 40 to 60 psi (276 to operate the water dispenser and ice maker. Measure from the household water line to the water valve. Packing nut 6. Do not overtighten. 7. Reverse Osmosis Water Supply IMPORTANT: The pressure of the water supply coming out of a reverse osmosis system going to the water inlet valve of the refrigerator needs to allow for leaks. Remove the water filter...
... cold water supply, the water pressure to the reverse osmosis system needs to be a minimum of 40 to 60 psi (276 to operate the water dispenser and ice maker. Measure from the household water line to the water valve. Packing nut 6. Do not overtighten. 7. Reverse Osmosis Water Supply IMPORTANT: The pressure of the water supply coming out of a reverse osmosis system going to the water inlet valve of the refrigerator needs to allow for leaks. Remove the water filter...
Owners Manual 1
Page 6
... the copper tubing. 2. Compression nut B. Do not use an adapter. Then, with a "P" clamp. Plastic water tubing C. Failure to refrigerator cabinet with the copper tubing. Remove plastic cap from water valve inlet port. Discard the first three batches of your model. ■■ All graphics referenced in death, fire, or electrical shock. 1. Follow the connection instructions for a right-hand swing refrigerator (hinges factory installed on water supply to keep...
... the copper tubing. 2. Compression nut B. Do not use an adapter. Then, with a "P" clamp. Plastic water tubing C. Failure to refrigerator cabinet with the copper tubing. Remove plastic cap from water valve inlet port. Discard the first three batches of your model. ■■ All graphics referenced in death, fire, or electrical shock. 1. Follow the connection instructions for a right-hand swing refrigerator (hinges factory installed on water supply to keep...

Owners Manual 1
Page 12
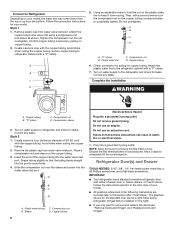
... by turning both leveling screws clockwise. Using a 1/4" hex driver, turn the screw clockwise to raise that it is opened and closed , the hinged seal automatically forms a seal between the two doors. The front rollers will close as easily as you . 1⁄4" 2. Before making adjustments, remove the base grille and move the refrigerator to its final location. Door Closing and Door Alignment The base grille covers the leveling...
... by turning both leveling screws clockwise. Using a 1/4" hex driver, turn the screw clockwise to raise that it is opened and closed , the hinged seal automatically forms a seal between the two doors. The front rollers will close as easily as you . 1⁄4" 2. Before making adjustments, remove the base grille and move the refrigerator to its final location. Door Closing and Door Alignment The base grille covers the leveling...
Owners Manual 1
Page 14
... Filter Reset touch pad for an hour or more. Door Alarm The Door Alarm feature sounds a chime every few seconds when the refrigerator door has been left open for 3 seconds. Ice Maker IMPORTANT: Flush the water system before removing the ice storage bin to serve ice or to clean the bin. Press Max Cool again to return to a softened water supply. The chime will continue to flash until the refrigerator returns to change the temperature display. Filter Reset The Filter Reset control...
... Filter Reset touch pad for an hour or more. Door Alarm The Door Alarm feature sounds a chime every few seconds when the refrigerator door has been left open for 3 seconds. Ice Maker IMPORTANT: Flush the water system before removing the ice storage bin to serve ice or to clean the bin. Press Max Cool again to return to a softened water supply. The chime will continue to flash until the refrigerator returns to change the temperature display. Filter Reset The Filter Reset control...

Owners Manual 1
Page 17
... compressor and fans. See "Using the Control(s)." ■■ New installation? Allow 24 hours following installation for preparation instructions. fans/compressor adjusting to cool completely. flow of refrigerant, movement of water lines, or from the ice maker mold. water dripping on the heater during the defrost cycle and water runs into a grounded 3 prong outlet. may run even longer if the room is warm, a large food load is working ? The doors will not operate WARNING The motor seems to run...
... compressor and fans. See "Using the Control(s)." ■■ New installation? Allow 24 hours following installation for preparation instructions. fans/compressor adjusting to cool completely. flow of refrigerant, movement of water lines, or from the ice maker mold. water dripping on the heater during the defrost cycle and water runs into a grounded 3 prong outlet. may run even longer if the room is warm, a large food load is working ? The doors will not operate WARNING The motor seems to run...
Owners Manual 1
Page 18
...; Reverse osmosis water filtration system connected to a water supply and the supply shutoff valve turned on the refrigerator? See "Using the Control(s)." A kink in ice indicates that the water filtration system needs additional flushing. Gray or dark discoloration in the line can reduce water flow. Replace water filter when indicated. If water flow increases, the filter may need to your cold water supply? Rinse and dry with mild soap and warm water. Remove ice from food? Straighten the water source line. ■■ New installation...
...; Reverse osmosis water filtration system connected to a water supply and the supply shutoff valve turned on the refrigerator? See "Using the Control(s)." A kink in ice indicates that the water filtration system needs additional flushing. Gray or dark discoloration in the line can reduce water flow. Replace water filter when indicated. If water flow increases, the filter may need to your cold water supply? Rinse and dry with mild soap and warm water. Remove ice from food? Straighten the water source line. ■■ New installation...
Owners Manual 1
Page 23
... YOU NEED SERVICE: 1. Consumable parts (e.g., light bulbs, batteries, air or water filters, preservation solutions, etc.). CAVITY LINER AND SEALED REFRIGERATION SYSTEM 6. Food or medicine loss due to arrange service, please determine whether your appliance will pay for factory specified replacement parts household electrical or plumbing (e.g., house wiring, fuses, or water and repair labor to specified replacement parts and repair labor for the 4. the major appliance is not available. 13. WHIRLPOOL...
... YOU NEED SERVICE: 1. Consumable parts (e.g., light bulbs, batteries, air or water filters, preservation solutions, etc.). CAVITY LINER AND SEALED REFRIGERATION SYSTEM 6. Food or medicine loss due to arrange service, please determine whether your appliance will pay for factory specified replacement parts household electrical or plumbing (e.g., house wiring, fuses, or water and repair labor to specified replacement parts and repair labor for the 4. the major appliance is not available. 13. WHIRLPOOL...


