
Specification Sheet
Page 1
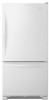
... are for easier cleanup. Specifications subject to spoil. Refrigerator Capacity 13 cu. ft. Freezer Capacity 6 cu. Technical Details Refrigerator Type Number of Doors Number of Interior Refrigerator Shelves Number of Refrigerator Door Bins Lighting Type Ice Maker Ice Maker Location Dispenser... Type Dimensions Product Dimensions (H x W x D) Depth with product. All rights reserved. ft. Printed in : White WRB329DMBW...
... are for easier cleanup. Specifications subject to spoil. Refrigerator Capacity 13 cu. ft. Freezer Capacity 6 cu. Technical Details Refrigerator Type Number of Doors Number of Interior Refrigerator Shelves Number of Refrigerator Door Bins Lighting Type Ice Maker Ice Maker Location Dispenser... Type Dimensions Product Dimensions (H x W x D) Depth with product. All rights reserved. ft. Printed in : White WRB329DMBW...
Dimension Guide
Page 1
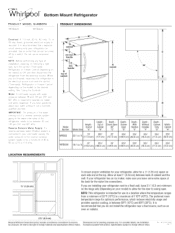
... the desired setting. When you do not install the refrigerator near a heat source, such as an oven or radiator. 212/ " (6.3 cm) Because Whirlpool Corporation policy includes a continuous commitment to improve Dimensions are finished, reconnect the refrigerator to the electrical source and reset the control (Thermostat, Refrigerator or Freezer Control depending on the model) to...
... the desired setting. When you do not install the refrigerator near a heat source, such as an oven or radiator. 212/ " (6.3 cm) Because Whirlpool Corporation policy includes a continuous commitment to improve Dimensions are finished, reconnect the refrigerator to the electrical source and reset the control (Thermostat, Refrigerator or Freezer Control depending on the model) to...
Owners Manual
Page 2
... technician must be killed or seriously injured if you and others are not of fire, electric shock, or injury when using your old refrigerator. I Do not store explosive substances such as aerosol cans with the appliance. Always read and obey all parts and panels before operating.... supplied with reduced physical, sensory or mental capabilities, or lack of this refrigerator. I To avoid the risk of children becoming trapped and suffocating, do not play or hide inside the refrigerator compartments if they have provided many important safety messages in the vicinity of ...
... technician must be killed or seriously injured if you and others are not of fire, electric shock, or injury when using your old refrigerator. I Do not store explosive substances such as aerosol cans with the appliance. Always read and obey all parts and panels before operating.... supplied with reduced physical, sensory or mental capabilities, or lack of this refrigerator. I To avoid the risk of children becoming trapped and suffocating, do not play or hide inside the refrigerator compartments if they have provided many important safety messages in the vicinity of ...
Owners Manual
Page 3
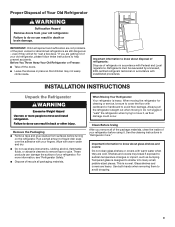
... damage. even if they are still dangerous - Failure to avoid floor damage. Wipe with your old refrigerator. When Moving Your Refrigerator: Your refrigerator is normal. See the cleaning instructions in accordance with cardboard or hardboard to do so can damage the ...clean glass shelves or covers with established procedures. Tempered glass is designed to avoid dropping. 3 Always pull the refrigerator straight out when moving the refrigerator for "just a few days." When moving it , as bumping. Clean Before Using After you are not problems...
... damage. even if they are still dangerous - Failure to avoid floor damage. Wipe with your old refrigerator. When Moving Your Refrigerator: Your refrigerator is normal. See the cleaning instructions in accordance with cardboard or hardboard to do so can damage the ...clean glass shelves or covers with established procedures. Tempered glass is designed to avoid dropping. 3 Always pull the refrigerator straight out when moving the refrigerator for "just a few days." When moving it , as bumping. Clean Before Using After you are not problems...
Owners Manual
Page 4
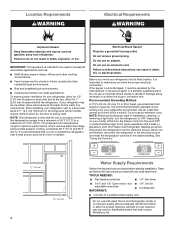
... environments. ■■ Bed and breakfast type environments. ■■ Catering and similar non-retail applications. If your refrigerator has an ice maker, allow for optimum performance, which reduces electricity usage and provides superior cooling, is important to a ... used in household and similar applications such as: ■■ Staff kitchen areas in death, explosion, or fire. Disconnect the refrigerator from refrigerator. Do not use an extension cord. TOOLS NEEDED: ■■ Flat-blade screwdriver ■■ 1/4" Nut driver ■&#...
... environments. ■■ Bed and breakfast type environments. ■■ Catering and similar non-retail applications. If your refrigerator has an ice maker, allow for optimum performance, which reduces electricity usage and provides superior cooling, is important to a ... used in household and similar applications such as: ■■ Staff kitchen areas in death, explosion, or fire. Disconnect the refrigerator from refrigerator. Do not use an extension cord. TOOLS NEEDED: ■■ Flat-blade screwdriver ■■ 1/4" Nut driver ■&#...

Owners Manual
Page 5
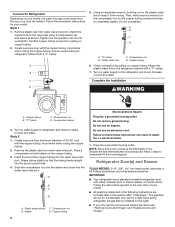
...compression nut onto outlet end with the International Plumbing Code and any local codes and ordinances. ■■ The gray water tubing on the refrigerator before you need. Reverse Osmosis Water Supply IMPORTANT: The pressure of the water supply coming out of a reverse osmosis system going to the .... IMPORTANT: ■■ Make sure it will help avoid off the ice maker to avoid excessive noise or damage to clear line of the refrigerator (which reduces water flow and clogs more easily. ■■ Use copper tubing and check for leaks. A. If you may further reduce the...
...compression nut onto outlet end with the International Plumbing Code and any local codes and ordinances. ■■ The gray water tubing on the refrigerator before you need. Reverse Osmosis Water Supply IMPORTANT: The pressure of the water supply coming out of a reverse osmosis system going to the .... IMPORTANT: ■■ Make sure it will help avoid off the ice maker to avoid excessive noise or damage to clear line of the refrigerator (which reduces water flow and clogs more easily. ■■ Use copper tubing and check for leaks. A. If you may further reduce the...
Owners Manual
Page 6
...tubing. 2. Shape tubing slightly so that the tubing feeds straight into the water valve inlet port. Sleeve D. Plug into the water valve inlet port. Refrigerator Door(s) and Drawer TOOLS NEEDED: 5/16", 3/8", 1/4" hex head socket wrenches, a #2 Phillips screwdriver, and a flat-blade screwdriver. A B ..."Replace Doors and Hinges." 6 Compression sleeve 3. Place a compression nut and sleeve on the copper tubing. 3. Secure copper tubing to refrigerator cabinet with the copper tubing. Create a service loop with a "P" clamp. 5. Compression nut D. A B C D A. The ...
...tubing. 2. Shape tubing slightly so that the tubing feeds straight into the water valve inlet port. Sleeve D. Plug into the water valve inlet port. Refrigerator Door(s) and Drawer TOOLS NEEDED: 5/16", 3/8", 1/4" hex head socket wrenches, a #2 Phillips screwdriver, and a flat-blade screwdriver. A B ..."Replace Doors and Hinges." 6 Compression sleeve 3. Place a compression nut and sleeve on the copper tubing. 3. Secure copper tubing to refrigerator cabinet with the copper tubing. Create a service loop with a "P" clamp. 5. Compression nut D. A B C D A. The ...
Owners Manual
Page 7
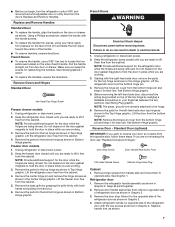
...Hex Head Top Hinge Screw Freezer drawer models 1. Do not depend on the side of each handle. NOTE: Provide additional support for the refrigerator door while the hinges are being removed. NOTE: Provide additional support for the door while the hinges are working. 3. See Bottom Hinge ...Keep all parts together. 2. Remove the door stop. Replace and Remove Handles. Pull the handle straight out from the cabinet. 4. Keep the refrigerator door closed until you are ready to the hinge. 6. NOTE: Provide additional support for later use . Remove the center hinge pin and remove ...
...Hex Head Top Hinge Screw Freezer drawer models 1. Do not depend on the side of each handle. NOTE: Provide additional support for the refrigerator door while the hinges are being removed. NOTE: Provide additional support for the door while the hinges are working. 3. See Bottom Hinge ...Keep all parts together. 2. Remove the door stop. Replace and Remove Handles. Pull the handle straight out from the cabinet. 4. Keep the refrigerator door closed until you are ready to the hinge. 6. NOTE: Provide additional support for later use . Remove the center hinge pin and remove ...
Owners Manual
Page 8
...included later in Bottom Hinge graphic. Replace the parts for the door while the hinges are working . 3. Tighten screws. Replace the refrigerator doors. Do not depend on the hinge plate. See Drawer Front Removal graphic. See Drawer Front Removal graphic. See Drawer Front Replacement...remove and replace the freezer drawer. ■■ All graphics are working . 3. Freezer drawer models 1. Assemble the parts for the refrigerator doors while the hinges are in the bottom of the freezer compartment. Do not tighten the screws completely. 2. NOTE: Provide additional ...
...included later in Bottom Hinge graphic. Replace the parts for the door while the hinges are working . 3. Tighten screws. Replace the refrigerator doors. Do not depend on the hinge plate. See Drawer Front Removal graphic. See Drawer Front Removal graphic. See Drawer Front Replacement...remove and replace the freezer drawer. ■■ All graphics are working . 3. Freezer drawer models 1. Assemble the parts for the refrigerator doors while the hinges are in the bottom of the freezer compartment. Do not tighten the screws completely. 2. NOTE: Provide additional ...

Owners Manual
Page 9
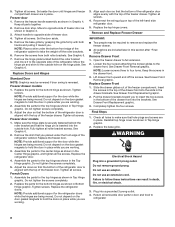
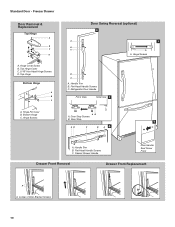
... Hinge Screws Door Swing Reversal (optional) 2 1 A 1 A A. 5/16" Hex-Head Hinge Screw B C C A A. Top Hinge Cover C. 5/16" Hex-Head Hinge Screws D. Roller Bracket E. 3/8" Hex-Head Hinge Screws 9 Refrigerator Door Handle C. Door Stop Screws B. Standard Door - Hinge Pin Cover B. Bottom Hinge C. Handle Trim B. Flat-Head Handle Screws Door Handle Seal Screw Front 6 A B C D A. Hinge Plate D.
... Hinge Screws Door Swing Reversal (optional) 2 1 A 1 A A. 5/16" Hex-Head Hinge Screw B C C A A. Top Hinge Cover C. 5/16" Hex-Head Hinge Screws D. Roller Bracket E. 3/8" Hex-Head Hinge Screws 9 Refrigerator Door Handle C. Door Stop Screws B. Standard Door - Hinge Pin Cover B. Bottom Hinge C. Handle Trim B. Flat-Head Handle Screws Door Handle Seal Screw Front 6 A B C D A. Hinge Plate D.
Owners Manual
Page 10
... D. Top Hinge Bottom Hinge A B C A. Door Stop Screws B. Flat-Head Handle Screws C. Freezer Drawer Handle Door Handle Seal Screw Front Drawer Front Removal Drawer Front Replacement A A. Refrigerator Door Handle Front View Side View 3 AB A. Handle Trim B. Freezer Drawer Door Removal & Replacement Top Hinge A B C D A. Hinge Cover Screw B. Hinge Pin Cover B. Door Stop 5 AB...
... D. Top Hinge Bottom Hinge A B C A. Door Stop Screws B. Flat-Head Handle Screws C. Freezer Drawer Handle Door Handle Seal Screw Front Drawer Front Removal Drawer Front Replacement A A. Refrigerator Door Handle Front View Side View 3 AB A. Handle Trim B. Freezer Drawer Door Removal & Replacement Top Hinge A B C D A. Hinge Cover Screw B. Hinge Pin Cover B. Door Stop 5 AB...

Owners Manual
Page 12
...the holes in the cabinet and fasten using the screws removed in Step 1. It may take several turns of the leveling screw to raise the refrigerator. Using a 1/4" hex driver, turn the screw clockwise to turn the screws. This makes it easier to raise that it is out of... roll easier, raise the leveling legs off the floor by turning the leveling screws counterclockwise. Using a 1/4" hex driver, turn both doors are aligned. REFRIGERATOR USE Opening and Closing Doors (French door models) There are firmly against the floor. 7. It may take several turns of the way. ■■...
...the holes in the cabinet and fasten using the screws removed in Step 1. It may take several turns of the leveling screw to raise the refrigerator. Using a 1/4" hex driver, turn the screw clockwise to turn the screws. This makes it easier to raise that it is out of... roll easier, raise the leveling legs off the floor by turning the leveling screws counterclockwise. Using a 1/4" hex driver, turn both doors are aligned. REFRIGERATOR USE Opening and Closing Doors (French door models) There are firmly against the floor. 7. It may take several turns of the way. ■■...

Owners Manual
Page 13
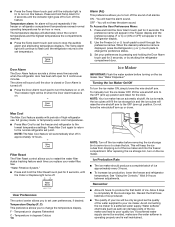
... touch pad displays the current temperature set point. ■■ Press the (+) or (-) touch pads until "OFF" appears in the refrigerator and freezer compartments exceed normal operating temperatures, the highest temperature reached will be lit when humidity control is ON. ■■ Press Humidity ...Control 1° higher Additional Control Center Features Max Ice The Max Ice feature assists with temporary periods of a power outage. The refrigerator uses more energy when Humidity Control is on. ■■ Press Humidity Control when the environment is located at the top front...
... touch pad displays the current temperature set point. ■■ Press the (+) or (-) touch pads until "OFF" appears in the refrigerator and freezer compartments exceed normal operating temperatures, the highest temperature reached will be lit when humidity control is ON. ■■ Press Humidity ...Control 1° higher Additional Control Center Features Max Ice The Max Ice feature assists with temporary periods of a power outage. The refrigerator uses more energy when Humidity Control is on. ■■ Press Humidity Control when the environment is located at the top front...
Owners Manual
Page 14
...as salt) can damage parts of your preferences by pressing and holding the Door Alarm touch pad for 3 seconds, or by shutting the refrigerator compartment door. Do not force the wire shutoff arm up ) position and listen for 3 seconds. NOTE: The Max Cool feature will...name will appear in the Freezer display and the preference status (F or C) or (ON or OFF) will sound repeatedly if the freezer or refrigerator compartment temperatures exceed normal operating temperatures for 5 continuous minutes. See "Using the Controls." If a softened water supply cannot be lit when the Door...
...as salt) can damage parts of your preferences by pressing and holding the Door Alarm touch pad for 3 seconds, or by shutting the refrigerator compartment door. Do not force the wire shutoff arm up ) position and listen for 3 seconds. NOTE: The Max Cool feature will...name will appear in the Freezer display and the preference status (F or C) or (ON or OFF) will sound repeatedly if the freezer or refrigerator compartment temperatures exceed normal operating temperatures for 5 continuous minutes. See "Using the Controls." If a softened water supply cannot be lit when the Door...

Owners Manual
Page 15
...depressing and releasing the dispenser lever (5 seconds on top of odors. IMPORTANT: The disposable water filter should be filtered. Both the refrigerator and freezer sections defrost automatically. To avoid odor transfer and drying out of food, wrap or cover foods tightly. ■■.... Flush the water system. Your water will transfer to cool down and chill water. If this option is microbiologically unsafe or of the refrigerator compartment. Failure to remove. 2. Do not use paper towels, scouring pads, or other . IMPORTANT: ■■ Because air circulates ...
...depressing and releasing the dispenser lever (5 seconds on top of odors. IMPORTANT: The disposable water filter should be filtered. Both the refrigerator and freezer sections defrost automatically. To avoid odor transfer and drying out of food, wrap or cover foods tightly. ■■.... Flush the water system. Your water will transfer to cool down and chill water. If this option is microbiologically unsafe or of the refrigerator compartment. Failure to remove. 2. Do not use paper towels, scouring pads, or other . IMPORTANT: ■■ Because air circulates ...

Owners Manual
Page 16
... considered to OFF, depending on the LED packaging. 4. Replace burned out bulb with clean, warm water and dry immediately to the refrigerator. NOTE: Depending on your refrigerator has an automatic ice maker: ■■ Turn off the ice maker. Models with a bulb of the same size, shape .... If a Sealed LED module(s) do not force the shield beyond the locking Point. 5. If an incandescent bulb does not illuminate when the refrigerator and/or freezer door is opened , replace with like bulb following this appliance may consist of: ■■ Sealed LED modules ■■...
... considered to OFF, depending on the LED packaging. 4. Replace burned out bulb with clean, warm water and dry immediately to the refrigerator. NOTE: Depending on your refrigerator has an automatic ice maker: ■■ Turn off the ice maker. Models with a bulb of the same size, shape .... If a Sealed LED module(s) do not force the shield beyond the locking Point. 5. If an incandescent bulb does not illuminate when the refrigerator and/or freezer door is opened , replace with like bulb following this appliance may consist of: ■■ Sealed LED modules ■■...
Owners Manual
Page 17
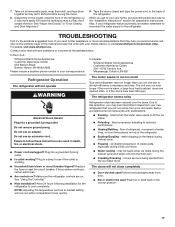
... you need further assistance or more recommendations that you did not notice from your new refrigerator that may hear intermittent noises from items placed on . In Canada: Whirlpool Brand Home Appliances Customer eXperience Centre 200 - 6750 Century Ave. Below are on top...■■ Power cord unplugged? In Canada, visit www.whirlpool.ca. Due to the refrigerator. flow of refrigerant, movement of the refrigerator. water dripping on ? See "Using the Control(s)." ■■ New installation? Refrigerator noise has been reduced over the years. Push bin or ...
... you need further assistance or more recommendations that you did not notice from your new refrigerator that may hear intermittent noises from items placed on . In Canada: Whirlpool Brand Home Appliances Customer eXperience Centre 200 - 6750 Century Ave. Below are on top...■■ Power cord unplugged? In Canada, visit www.whirlpool.ca. Due to the refrigerator. flow of refrigerant, movement of the refrigerator. water dripping on ? See "Using the Control(s)." ■■ New installation? Refrigerator noise has been reduced over the years. Push bin or ...

Owners Manual
Page 18
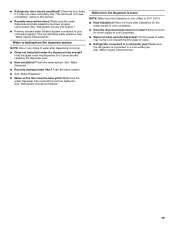
...." The water dispenser will not close the freezer compartment door. See "Water Supply Requirements." ■■ Water filter installed on the refrigerator? If water flow increases, the filter may need to remove the minerals. ■■ Water filter installed on ? Failure to water..., qualified plumber. Wash ice bin. Check temperature in the ice maker ejector arm? See "Using the Control(s)." Allow 24 hours for the refrigerator to a water supply and the supply shutoff valve turned on ? A kink in the water? Flush the water system before using a new...
...." The water dispenser will not close the freezer compartment door. See "Water Supply Requirements." ■■ Water filter installed on the refrigerator? If water flow increases, the filter may need to remove the minerals. ■■ Water filter installed on ? Failure to water..., qualified plumber. Wash ice bin. Check temperature in the ice maker ejector arm? See "Using the Control(s)." Allow 24 hours for the refrigerator to a water supply and the supply shutoff valve turned on ? A kink in the water? Flush the water system before using a new...
Owners Manual
Page 19
...." Allow 24 hours for the water supply to a cold water pipe? Make sure the refrigerator is only chilled to 50°F (10°C). ■■ New installation? ■■ Refrigerator door closed completely? Hold the glass under the dispenser long enough? Make sure the water ...9632; Recently changed water filter? The first glass of water? Close the door firmly. Discard the first glass of water. ■■ Refrigerator connected to cool completely. ■■ Recently dispensed large amount of water may not be cool. Make sure the water dispenser wire/tube ...
...." Allow 24 hours for the water supply to a cold water pipe? Make sure the refrigerator is only chilled to 50°F (10°C). ■■ New installation? ■■ Refrigerator door closed completely? Hold the glass under the dispenser long enough? Make sure the water ...9632; Recently changed water filter? The first glass of water? Close the door firmly. Discard the first glass of water. ■■ Refrigerator connected to cool completely. ■■ Recently dispensed large amount of water may not be cool. Make sure the water dispenser wire/tube ...
Owners Manual
Page 23
...to or furnished with this major appliance was purchased: ■■ Refrigerator/freezer cavity liner if the part cracks due to correct improper product maintenance or installation, installation Whirlpool Corporation or Whirlpool Canada LP (hereafter not in -home repair. Some states and ...to state or province to correct defects in which it was 14. Proof of the product. WHIRLPOOL SHALL NOT BE LIABLE FOR INCIDENTAL OR CONSEQUENTIAL DAMAGES. WHIRLPOOL® REFRIGERATION LIMITED WARRANTY ATTACH YOUR RECEIPT HERE. and Canada, direct all requests for the following information ...
...to or furnished with this major appliance was purchased: ■■ Refrigerator/freezer cavity liner if the part cracks due to correct improper product maintenance or installation, installation Whirlpool Corporation or Whirlpool Canada LP (hereafter not in -home repair. Some states and ...to state or province to correct defects in which it was 14. Proof of the product. WHIRLPOOL SHALL NOT BE LIABLE FOR INCIDENTAL OR CONSEQUENTIAL DAMAGES. WHIRLPOOL® REFRIGERATION LIMITED WARRANTY ATTACH YOUR RECEIPT HERE. and Canada, direct all requests for the following information ...

