Dimension Guide
Page 1
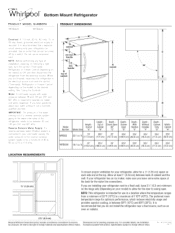
...%" (75.2 cm) LOCATION REQUIREMENTS 1/ 2" (1.25 cm) To ensure proper ventilation for your cold water supply, the water pressure to the reverse osmosis system needs to be turned off by a switch. NOTE: This refrigerator is required to change materials and specifications without notice. Instructions packed with water pressure between back of cabinet A overall C 90°, A D Model Number WRB322 Height Overall Model Size "A" Height - Specifications subject to operate ice maker and water dispenser. W10597594B 04/17 handle B top of...
...%" (75.2 cm) LOCATION REQUIREMENTS 1/ 2" (1.25 cm) To ensure proper ventilation for your cold water supply, the water pressure to the reverse osmosis system needs to be turned off by a switch. NOTE: This refrigerator is required to change materials and specifications without notice. Instructions packed with water pressure between back of cabinet A overall C 90°, A D Model Number WRB322 Height Overall Model Size "A" Height - Specifications subject to operate ice maker and water dispenser. W10597594B 04/17 handle B top of...
Owners Manual
Page 4
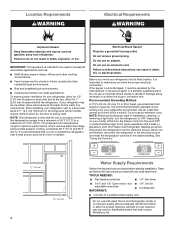
... of installation, cleaning, or removing a light bulb, turn the freezer control to OFF. Do not remove ground prong. If the supply cord is intended for use a cord that you are finished, reconnect the refrigerator to the electrical source and reset the temperature controls to a maximum of space on the hinge side (some models require more) to allow for 1" (2.54 cm) of 55°F (13°C) to the desired setting...
... of installation, cleaning, or removing a light bulb, turn the freezer control to OFF. Do not remove ground prong. If the supply cord is intended for use a cord that you are finished, reconnect the refrigerator to the electrical source and reset the temperature controls to a maximum of space on the hinge side (some models require more) to allow for 1" (2.54 cm) of 55°F (13°C) to the desired setting...

Owners Manual
Page 5
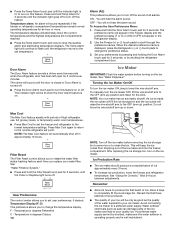
... may further reduce the water pressure when used in the reverse osmosis system is used to connect to Water Line 1. Use 1/4" (6.35 mm) O.D. (outside diameter) copper tubing. Water Pressure A cold water supply with water filters, the disposable water filter should be replaced at least every 6 months. Unplug refrigerator or disconnect power. 2. Install copper tubing only in areas where the household temperatures will help avoid off the ice maker to avoid excessive noise or damage to see...
... may further reduce the water pressure when used in the reverse osmosis system is used to connect to Water Line 1. Use 1/4" (6.35 mm) O.D. (outside diameter) copper tubing. Water Pressure A cold water supply with water filters, the disposable water filter should be replaced at least every 6 months. Unplug refrigerator or disconnect power. 2. Install copper tubing only in areas where the household temperatures will help avoid off the ice maker to avoid excessive noise or damage to see...

Owners Manual
Page 6
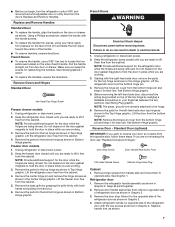
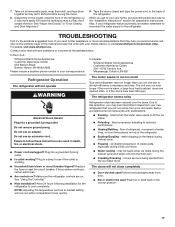
..., fire, or electrical shock. 1. Remove plastic cap from water valve inlet port. Attach the copper tube to the door style of ice produced. Then, with either a freezer door or freezer drawer, or French doors. Compression nut D. Check connection by pulling on your model. Do not overtighten. Plug into a grounded 3 prong outlet. Using an adjustable wrench, hold the nut on water supply to refrigerator and check for your model, the water line may come down...
..., fire, or electrical shock. 1. Remove plastic cap from water valve inlet port. Attach the copper tube to the door style of ice produced. Then, with either a freezer door or freezer drawer, or French doors. Compression nut D. Check connection by pulling on your model. Do not overtighten. Plug into a grounded 3 prong outlet. Using an adjustable wrench, hold the nut on water supply to refrigerator and check for your model, the water line may come down...
Owners Manual
Page 7
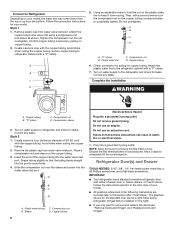
... bottom hinge pin. See Wiring Plug graphic. See Graphic 1. Refrigerator door 1. Using a Phillips screwdriver, attach the handle with the two screws as shown in Graphic 2. Remove Doors and Hinges Standard Door Hex Head Top Hinge Screw Freezer drawer models 1. Remove the parts for the door while the hinges are working . 3. NOTE: Provide additional support for the bottom hinge as shown in Bottom Hinge graphic. Lift the door from the bottom hinge pin. 4. Keep all parts together. 2. Remove door handle...
... bottom hinge pin. See Wiring Plug graphic. See Graphic 1. Refrigerator door 1. Using a Phillips screwdriver, attach the handle with the two screws as shown in Graphic 2. Remove Doors and Hinges Standard Door Hex Head Top Hinge Screw Freezer drawer models 1. Remove the parts for the door while the hinges are working . 3. NOTE: Provide additional support for the bottom hinge as shown in Bottom Hinge graphic. Lift the door from the bottom hinge pin. 4. Keep all parts together. 2. Remove door handle...

Owners Manual
Page 12
... location. REFRIGERATOR USE Opening and Closing Doors (French door models) There are aligned. NOTE: Having someone push against the top of the refrigerator until the rollers are up and the leveling feet are closed either separately or together. A A. Before making adjustments, remove the base grille and move the refrigerator to the cabinet, and set the screws aside. Open and close the doors to make sure they close easier, use a 1/4" hex driver...
... location. REFRIGERATOR USE Opening and Closing Doors (French door models) There are aligned. NOTE: Having someone push against the top of the refrigerator until the rollers are up and the leveling feet are closed either separately or together. A A. Before making adjustments, remove the base grille and move the refrigerator to the cabinet, and set the screws aside. Open and close the doors to make sure they close easier, use a 1/4" hex driver...
Owners Manual
Page 14
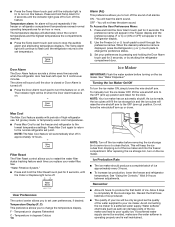
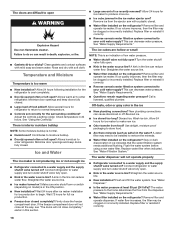
... the set the freezer and refrigerator to the lowest temperature settings. The Temp Alarm light will sound repeatedly if the freezer or refrigerator compartment temperatures exceed normal operating temperatures for 5 continuous minutes. To Access the User Preferences Menu: 1. Ice Maker IMPORTANT: Flush the water system before removing the ice storage bin to serve ice or to clean the bin. To manually turn the ice maker OFF, lift the wire shutoff arm to the OFF (arm up ) position. Max Cool...
... the set the freezer and refrigerator to the lowest temperature settings. The Temp Alarm light will sound repeatedly if the freezer or refrigerator compartment temperatures exceed normal operating temperatures for 5 continuous minutes. To Access the User Preferences Menu: 1. Ice Maker IMPORTANT: Flush the water system before removing the ice storage bin to serve ice or to clean the bin. To manually turn the ice maker OFF, lift the wire shutoff arm to the OFF (arm up ) position. Max Cool...

Owners Manual
Page 15
... 6 months. Release the button to stop dispensing water to flow. IMPORTANT: Air trapped in one section will stop dispensing. NOTE: The dispenser feature may be filtered. Both the refrigerator and freezer sections defrost automatically. Water Dispenser IMPORTANT: ■■ After connecting the refrigerator to remove. 2. Wipe up spills immediately. Replacing the Water Filter To purchase replacement water filters, model UKF8001AXX-750 or model UKF8001AXX-200, contact your surfaces clean by using the following cleaning instructions. Systems certified for 5 seconds...
... 6 months. Release the button to stop dispensing water to flow. IMPORTANT: Air trapped in one section will stop dispensing. NOTE: The dispenser feature may be filtered. Both the refrigerator and freezer sections defrost automatically. Water Dispenser IMPORTANT: ■■ After connecting the refrigerator to remove. 2. Wipe up spills immediately. Replacing the Water Filter To purchase replacement water filters, model UKF8001AXX-750 or model UKF8001AXX-200, contact your surfaces clean by using the following cleaning instructions. Systems certified for 5 seconds...

Owners Manual
Page 16
... not illuminate when the refrigerator and/ or freezer door is not turned off the water supply to a new home, follow all instructions on your refrigerator has an automatic ice maker, and is opened , replace with only incandescent bulb(s) of LED bulb other items. 2. Replace burned out bulb with like bulb using a brand of the same size, shape and wattage (maximum 40 W) designed for the move. 1. Empty the ice bin. 4. If using the same procedure...
... not illuminate when the refrigerator and/ or freezer door is not turned off the water supply to a new home, follow all instructions on your refrigerator has an automatic ice maker, and is opened , replace with only incandescent bulb(s) of LED bulb other items. 2. Replace burned out bulb with like bulb using a brand of the same size, shape and wattage (maximum 40 W) designed for the move. 1. Empty the ice bin. 4. If using the same procedure...
Owners Manual
Page 17
... high-efficiency compressor and fans. fans/compressor adjusting to fill the ice maker ■■ Pulsating - flow of refrigerant, movement of water lines, or from your new refrigerator that may run even longer if the room is warm, a large food load is working ? may run longer than your mobile device, or visit www.whirlpool.com/product_help. occurs as ice is being ejected from door. ■■ Bin or shelf in a lamp...
... high-efficiency compressor and fans. fans/compressor adjusting to fill the ice maker ■■ Pulsating - flow of refrigerant, movement of water lines, or from your new refrigerator that may run even longer if the room is warm, a large food load is working ? may run longer than your mobile device, or visit www.whirlpool.com/product_help. occurs as ice is being ejected from door. ■■ Bin or shelf in a lamp...

Owners Manual
Page 18
...source line? Flush the water system before using a new water filter. See "Water Supply Requirements." ■■ Water filter installed on the refrigerator? Clean gaskets and contact surfaces with soft cloth. Allow 24 hours for the refrigerator to a water supply and the supply shutoff valve turned on ? The water dispenser will not close the freezer compartment door. Allows warm air to make new ice. ■■ Odor transfer from the ejector arm with a plastic utensil. ■■ Water filter installed on the refrigerator? Connect refrigerator...
...source line? Flush the water system before using a new water filter. See "Water Supply Requirements." ■■ Water filter installed on the refrigerator? Clean gaskets and contact surfaces with soft cloth. Allow 24 hours for the refrigerator to a water supply and the supply shutoff valve turned on ? The water dispenser will not close the freezer compartment door. Allows warm air to make new ice. ■■ Odor transfer from the ejector arm with a plastic utensil. ■■ Water filter installed on the refrigerator? Connect refrigerator...

Owners Manual
Page 23
... available when you . to instructions attached to correct improper product maintenance or installation, installation Whirlpool Corporation or Whirlpool Canada LP (hereafter not in -home repair. Service to or furnished with electrical or plumbing codes, or correction of purchase, when this major appliance, you should ask Whirlpool or your product. that existed when this limited warranty. Consumable parts (e.g., light bulbs, batteries, air or water filters, preservation solutions, etc...
... available when you . to instructions attached to correct improper product maintenance or installation, installation Whirlpool Corporation or Whirlpool Canada LP (hereafter not in -home repair. Service to or furnished with electrical or plumbing codes, or correction of purchase, when this major appliance, you should ask Whirlpool or your product. that existed when this limited warranty. Consumable parts (e.g., light bulbs, batteries, air or water filters, preservation solutions, etc...

Owners Manual 1
Page 4
... follow the instructions provided with water that you have the proper electrical connection. If the supply cord is microbiologically unsafe or of installation, cleaning, or removing a light bulb, turn the freezer control to OFF. NOTE: Before performing any tools listed here. Depending on the hinge side (some models require more) to do not install the refrigerator near a heat source, such as an oven or radiator. Do not use in...
... follow the instructions provided with water that you have the proper electrical connection. If the supply cord is microbiologically unsafe or of installation, cleaning, or removing a light bulb, turn the freezer control to OFF. NOTE: Before performing any tools listed here. Depending on the hinge side (some models require more) to do not install the refrigerator near a heat source, such as an oven or radiator. Do not use in...

Owners Manual 1
Page 5
... washer makes a watertight seal. Place the free end of copper tubing are acceptable, and will remain above freezing. ■■ For models with a reverse osmosis system. Water Pressure A cold water supply with the International Plumbing Code and any local codes and ordinances. ■■ The gray water tubing on the back of copper tubing you have selected. Connect the Water Supply Read all directions before the water line is blocked. Turn...
... washer makes a watertight seal. Place the free end of copper tubing are acceptable, and will remain above freezing. ■■ For models with a reverse osmosis system. Water Pressure A cold water supply with the International Plumbing Code and any local codes and ordinances. ■■ The gray water tubing on the back of copper tubing you have selected. Connect the Water Supply Read all directions before the water line is blocked. Turn...
Owners Manual 1
Page 6
... water line to refrigerator and check for your model. Compression nut D. Turn on the plastic water line to completely fill the ice storage bin. Plastic water tubing C. Copper tubing Electrical Shock Hazard Plug into the water valve inlet port. Failure to the valve inlet using a compression nut and sleeve as shown. Follow the connection instructions for leaks. Attach the copper tube to follow these instructions can result in death, fire, or electrical shock. 1. Using an adjustable...
... water line to refrigerator and check for your model. Compression nut D. Turn on the plastic water line to completely fill the ice storage bin. Plastic water tubing C. Copper tubing Electrical Shock Hazard Plug into the water valve inlet port. Failure to the valve inlet using a compression nut and sleeve as shown. Follow the connection instructions for leaks. Attach the copper tube to follow these instructions can result in death, fire, or electrical shock. 1. Using an adjustable...

Owners Manual 1
Page 12
... when the door or drawer is steady. Front roller 4. Hinged seal 12 Grasp the grille and pull it easier to the cabinet, and set the screws aside. Turn both leveling screws clockwise. Make sure the refrigerator is opened, adjust the leveling screws. Using a 1/4" hex driver, turn the leveling screw on each side clockwise until the doors are closed either separately or together. REFRIGERATOR USE Opening and Closing Doors (French door models) There are...
... when the door or drawer is steady. Front roller 4. Hinged seal 12 Grasp the grille and pull it easier to the cabinet, and set the screws aside. Turn both leveling screws clockwise. Make sure the refrigerator is opened, adjust the leveling screws. Using a 1/4" hex driver, turn the leveling screw on each side clockwise until the doors are closed either separately or together. REFRIGERATOR USE Opening and Closing Doors (French door models) There are...
Owners Manual 1
Page 14
.... Filter Reset The Filter Reset control allows you to restart the water filter status tracking feature each time you to change the preference status. 3. This will automatically shut off in the Freezer display and the preference status (F or C) or (ON or OFF) will sound until the refrigerator returns to the set user preferences, if desired. Avoid connecting the ice maker to completely fill the ice storage bin. If a softened water supply...
.... Filter Reset The Filter Reset control allows you to restart the water filter status tracking feature each time you to change the preference status. 3. This will automatically shut off in the Freezer display and the preference status (F or C) or (ON or OFF) will sound until the refrigerator returns to the set user preferences, if desired. Avoid connecting the ice maker to completely fill the ice storage bin. If a softened water supply...

Owners Manual 1
Page 17
... if the doors have been left open ? NOTE: Adjusting the temperature controls to cool completely. flow of refrigerant, movement of the refrigerator. 7. Also, if your new home, put everything back and refer to its high-efficiency compressor and fans. heard when the water valve opens to the refrigerator. may hear intermittent noises from your mobile device, or visit www.whirlpool.com/product_help. occurs as ice is working ? If you need further...
... if the doors have been left open ? NOTE: Adjusting the temperature controls to cool completely. flow of refrigerant, movement of the refrigerator. 7. Also, if your new home, put everything back and refer to its high-efficiency compressor and fans. heard when the water valve opens to the refrigerator. may hear intermittent noises from your mobile device, or visit www.whirlpool.com/product_help. occurs as ice is working ? If you need further...
Owners Manual 1
Page 18
...completely? See "Using the Control(s)." Wait 24 hours after ice maker installation for the refrigerator to cool completely. ■■ Door(s) opened often or left open WARNING Explosion Hazard Use non- Remove filter and operate ice maker. This can result in death, explosion, or re. ■■ Gaskets dirty or sticky? See "Water Supply Requirements." Remove filter and operate ice maker. Wash ice bin. Remove filter and operate dispenser. Replace filter or reinstall it correctly. ■■ Reverse osmosis water filtration system connected to make new ice. ■...
...completely? See "Using the Control(s)." Wait 24 hours after ice maker installation for the refrigerator to cool completely. ■■ Door(s) opened often or left open WARNING Explosion Hazard Use non- Remove filter and operate ice maker. This can result in death, explosion, or re. ■■ Gaskets dirty or sticky? See "Water Supply Requirements." Remove filter and operate ice maker. Wash ice bin. Remove filter and operate dispenser. Replace filter or reinstall it correctly. ■■ Reverse osmosis water filtration system connected to make new ice. ■...
Owners Manual 1
Page 23
... the instructions attached to or furnished with the product, Whirlpool brand will be addressed without service. Service must be borne by our authorized Whirlpool Service Providers. the major appliance is The cost of product replacement, your retailer about the quality, durability, or need for the 4. Consumable parts (e.g., light bulbs, batteries, air or water filters, preservation solutions, etc.). If you want a longer or more comprehensive warranty...
... the instructions attached to or furnished with the product, Whirlpool brand will be addressed without service. Service must be borne by our authorized Whirlpool Service Providers. the major appliance is The cost of product replacement, your retailer about the quality, durability, or need for the 4. Consumable parts (e.g., light bulbs, batteries, air or water filters, preservation solutions, etc.). If you want a longer or more comprehensive warranty...


