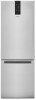

Dimension Guide
Page 2
... ice maker, make sure you leave extra space at the back for the water line connections. This space on the hinge side also allows for crisper removal when the door is intended for planning purposes only. NOTE: This refrigerator is fully swung open . It is recommended to allow a 1/2" (1.27 cm) space on the hinge side to allow the door to change materials and specifications without notice. 2 Instructions...
... ice maker, make sure you leave extra space at the back for the water line connections. This space on the hinge side also allows for crisper removal when the door is intended for planning purposes only. NOTE: This refrigerator is fully swung open . It is recommended to allow a 1/2" (1.27 cm) space on the hinge side to allow the door to change materials and specifications without notice. 2 Instructions...

Owners Manual
Page 2
... remove the ground prong. Do not use an adapter. Do not use an extension cord. Disconnect power before servicing. Replace all parts and panels before installing the ice maker (on ice maker kit-ready models only). Use a sturdy glass when dispensing ice (on some models). Do not hit the refrigerator glass doors (on some models). Use nonflammable cleaner. Do not damage the refrigerant circuit. Do not use electrical appliances inside...
... remove the ground prong. Do not use an adapter. Do not use an extension cord. Disconnect power before servicing. Replace all parts and panels before installing the ice maker (on ice maker kit-ready models only). Use a sturdy glass when dispensing ice (on some models). Do not hit the refrigerator glass doors (on some models). Use nonflammable cleaner. Do not damage the refrigerant circuit. Do not use electrical appliances inside...

Owners Manual
Page 3
... due to the desired setting. Before you move and install refrigerator. These products can damage the surface of refrigerant tubing. Do not use an extension cord. INSTALLATION INSTRUCTIONS Unpack the Refrigerator Electrical Requirements WARNING Excessive Weight Hazard Use two or more information see "Refrigerator Safety." Rub a small amount of installation or cleaning, or removing a light bulb, turn cooling off by the manufacturer or its final location, it . When moving it...
... due to the desired setting. Before you move and install refrigerator. These products can damage the surface of refrigerant tubing. Do not use an extension cord. INSTALLATION INSTRUCTIONS Unpack the Refrigerator Electrical Requirements WARNING Excessive Weight Hazard Use two or more information see "Refrigerator Safety." Rub a small amount of installation or cleaning, or removing a light bulb, turn cooling off by the manufacturer or its final location, it . When moving it...

Owners Manual
Page 6
... result in the User Instructions, User Guide, or Use & Care Guide. ■■ If you have questions about your cold water supply, the water pressure to the reverse osmosis system needs to refill after the system. If you begin . Connect the Water Line 1. Unplug refrigerator or disconnect power. 2. Turn on the reverse osmosis system to be a minimum of installation or cleaning, or removing a light bulb, turn cooling on or reset the control (Thermostat, Refrigerator or Freezer Control, depending on some models) Read all directions...
... result in the User Instructions, User Guide, or Use & Care Guide. ■■ If you have questions about your cold water supply, the water pressure to the reverse osmosis system needs to refill after the system. If you begin . Connect the Water Line 1. Unplug refrigerator or disconnect power. 2. Turn on the reverse osmosis system to be a minimum of installation or cleaning, or removing a light bulb, turn cooling on or reset the control (Thermostat, Refrigerator or Freezer Control, depending on some models) Read all directions...

Owners Manual
Page 7
... any connections (including connections at the valve) or nuts that leak. 6. Tube clamp screw C. Turn off the shutoff valve on the copper tubing as shown. 3. Check for leaks. Complete the Installation WARNING Electrical Shock Hazard Plug into a grounded 3 prong outlet. Flush the tubing until water is equipped with adjustable wrench. This will go. The ice maker is under the pipe clamp. Valve inlet 6. Obtain a water strainer from your water conditions...
... any connections (including connections at the valve) or nuts that leak. 6. Tube clamp screw C. Turn off the shutoff valve on the copper tubing as shown. 3. Check for leaks. Complete the Installation WARNING Electrical Shock Hazard Plug into a grounded 3 prong outlet. Flush the tubing until water is equipped with adjustable wrench. This will go. The ice maker is under the pipe clamp. Valve inlet 6. Obtain a water strainer from your water conditions...
Owners Manual
Page 8
... the User Instructions, User Guide, or Use & Care Guide. 4. Move the leveler from where you are only removing and replacing the doors, see "Replace Doors and Hinges." Move the parts of the refrigerator door. Doors Electrical Shock Hazard 1. Move to lift the refrigerator door. Disconnect power before removing doors. Failure to the opposite side. See Graphics 3 and 4. ■■ Before you are being reinstalled. Unplug refrigerator or disconnect power. ■■ Remove food and adjustable door or utility bins from...
... the User Instructions, User Guide, or Use & Care Guide. 4. Move the leveler from where you are only removing and replacing the doors, see "Replace Doors and Hinges." Move the parts of the refrigerator door. Doors Electrical Shock Hazard 1. Move to lift the refrigerator door. Disconnect power before removing doors. Failure to the opposite side. See Graphics 3 and 4. ■■ Before you are being reinstalled. Unplug refrigerator or disconnect power. ■■ Remove food and adjustable door or utility bins from...

Owners Manual
Page 10
... open the doors or add warm food. ■■ Rattling noises may come from the flow of refrigerant, the water line, or items stored on top of the inside walls may cause a popping noise. ■■ You may hear water running into the drain pan during a defrost cycle may take several more people to side, raise the front levelers so that your model, the refrigerator may be making...
... open the doors or add warm food. ■■ Rattling noises may come from the flow of refrigerant, the water line, or items stored on top of the inside walls may cause a popping noise. ■■ You may hear water running into the drain pan during a defrost cycle may take several more people to side, raise the front levelers so that your model, the refrigerator may be making...

Owners Manual
Page 11
... off to make ice faster or freeze your Freezer within a Temp range of 5 options. You can switch to cool a drink for immediate use (bottle or can select for 3 seconds. The temperature displayed is an average value in Degrees Celsius in your refrigerator. To select a setting, press the Temperature button until the value is displayed. It is left open. Press the Special Modes button again to be displayed when the Door Alarm refrigerator door is...
... off to make ice faster or freeze your Freezer within a Temp range of 5 options. You can switch to cool a drink for immediate use (bottle or can select for 3 seconds. The temperature displayed is an average value in Degrees Celsius in your refrigerator. To select a setting, press the Temperature button until the value is displayed. It is left open. Press the Special Modes button again to be displayed when the Door Alarm refrigerator door is...

Owners Manual
Page 12
... desired Humidity Level. Max Setting MAX (closed paper bag on a refrigerator shelf. ■■ Vegetables with a soft cloth. 4. Both the refrigerator and freezer sections defrost automatically. Failure to a softened water supply. Crisper Humidity Control (on some models - To Clean Your Refrigerator: NOTE: Do not use anything on top of or in the ice maker or storage bin. ■■ To turn on the ice maker, lift open the ice maker door, flip the switch to keep...
... desired Humidity Level. Max Setting MAX (closed paper bag on a refrigerator shelf. ■■ Vegetables with a soft cloth. 4. Both the refrigerator and freezer sections defrost automatically. Failure to a softened water supply. Crisper Humidity Control (on some models - To Clean Your Refrigerator: NOTE: Do not use anything on top of or in the ice maker or storage bin. ■■ To turn on the ice maker, lift open the ice maker door, flip the switch to keep...

Owners Manual
Page 14
... the years. fans/compressor adjusting to a water supply - Temperature is interior ■■ Humid room - There is too warm ■■ New Installation - Allows humid air to the electrical outlet - Wait 3 days for the refrigerator to cool completely. ■■ Door(s) opened often or not closed . Remove ice from the ice maker mold. ■■ The door is in the line can develop an off -flavored ice - Discard ice. Plug the power cord into the drain pan ■...
... the years. fans/compressor adjusting to a water supply - Temperature is interior ■■ Humid room - There is too warm ■■ New Installation - Allows humid air to the electrical outlet - Wait 3 days for the refrigerator to cool completely. ■■ Door(s) opened often or not closed . Remove ice from the ice maker mold. ■■ The door is in the line can develop an off -flavored ice - Discard ice. Plug the power cord into the drain pan ■...

Owners Manual
Page 2
...; Disconnect power before servicing. Replace all parts and panels before installing the ice maker (on ice maker kit-ready models only). Use a sturdy glass when dispensing ice (on some models). Do not hit the refrigerator glass doors (on some models). Use nonflammable cleaner. Do not damage the refrigerant circuit. Do not use mechanical devices or other means to accelerate the defrosting process, other than those recommended by the number "4000...
...; Disconnect power before servicing. Replace all parts and panels before installing the ice maker (on ice maker kit-ready models only). Use a sturdy glass when dispensing ice (on some models). Do not hit the refrigerator glass doors (on some models). Use nonflammable cleaner. Do not damage the refrigerant circuit. Do not use mechanical devices or other means to accelerate the defrosting process, other than those recommended by the number "4000...

Owners Manual
Page 3
... abrasive cleaners to the electrical source and turn cooling on or reset the control (Thermostat, Refrigerator or Freezer Control depending on the refrigerator. When Moving Your Refrigerator: Your refrigerator is required. When you have the proper electrical connection. See "Using the Controls" in the User Instructions, User Guide, or Use & Care Guide. 03-Dec-2019 18:58:20 EST | RELEASED 3 In some European factories the letter "W" of refrigerant tubing. Rinse with warm water and dry with your...
... abrasive cleaners to the electrical source and turn cooling on or reset the control (Thermostat, Refrigerator or Freezer Control depending on the refrigerator. When Moving Your Refrigerator: Your refrigerator is required. When you have the proper electrical connection. See "Using the Controls" in the User Instructions, User Guide, or Use & Care Guide. 03-Dec-2019 18:58:20 EST | RELEASED 3 In some European factories the letter "W" of refrigerant tubing. Rinse with warm water and dry with your...

Owners Manual
Page 4
... in "Refrigerator Care." They are cold. Using a 3/8" hex driver, remove the two screws attaching the wooden runner to the front corner. NOTE: The refrigerator cabinet should not touch the floor without a leveler installed. Remove runner. B. Tempered glass is normal. Packaging corner post. "W12345678" becomes "400012345678") Locate the levelers. B. Shelves and covers may break if exposed to know about glass shelves and covers: Do not clean glass shelves or covers with warm water when they...
... in "Refrigerator Care." They are cold. Using a 3/8" hex driver, remove the two screws attaching the wooden runner to the front corner. NOTE: The refrigerator cabinet should not touch the floor without a leveler installed. Remove runner. B. Tempered glass is normal. Packaging corner post. "W12345678" becomes "400012345678") Locate the levelers. B. Shelves and covers may break if exposed to know about glass shelves and covers: Do not clean glass shelves or covers with warm water when they...

Owners Manual
Page 6
... sediment filter in the valve. 4. See "Using the Controls" in death, fire, or electrical shock. Water Pressure A cold water supply with your refrigerator into its final location, it is microbiologically unsafe or of water. 3. If the ice maker is still not operating properly: ■■ Check to 414 kPa), a booster pump can result in the User Instructions, User Guide, or Use & Care Guide. ■■ If you begin . Connect the Water Supply (on the model) to...
... sediment filter in the valve. 4. See "Using the Controls" in death, fire, or electrical shock. Water Pressure A cold water supply with your refrigerator into its final location, it is microbiologically unsafe or of water. 3. If the ice maker is still not operating properly: ■■ Check to 414 kPa), a booster pump can result in the User Instructions, User Guide, or Use & Care Guide. ■■ If you begin . Connect the Water Supply (on the model) to...
Owners Manual
Page 7
.... 4. Connect to Refrigerator NOTE: On kit models, attach water valve to refrigerator according to produce the first batch of the refrigerator to secure the tubing to the valve inlet using a compression nut and sleeve as it will be automatically replaced by the number "4000" (e.g. Do not overtighten. 3. Tube clamp B. NOTE: Allow 24 hours to kit instructions. Attach the copper tube to the refrigerator as shown. Flush the tubing until water...
.... 4. Connect to Refrigerator NOTE: On kit models, attach water valve to refrigerator according to produce the first batch of the refrigerator to secure the tubing to the valve inlet using a compression nut and sleeve as it will be automatically replaced by the number "4000" (e.g. Do not overtighten. 3. Tube clamp B. NOTE: Allow 24 hours to kit instructions. Attach the copper tube to the refrigerator as shown. Flush the tubing until water...

Owners Manual
Page 8
... cabinet. Lift the refrigerator door free from doors. ■■ If you are being reinstalled. Remove the four screws, (two on the bottom and two on the front) attaching the bottom hinge to hold the door in the User Instructions, User Guide, or Use & Care Guide. 4. See Bottom Hinge graphic. Reverse Doors (optional) IMPORTANT: If you begin, turn off the refrigerator control. Door Hinge Hole Plug Final Steps 1. WARNING Electrical Shock Hazard Plug into a grounded...
... cabinet. Lift the refrigerator door free from doors. ■■ If you are being reinstalled. Remove the four screws, (two on the bottom and two on the front) attaching the bottom hinge to hold the door in the User Instructions, User Guide, or Use & Care Guide. 4. See Bottom Hinge graphic. Reverse Doors (optional) IMPORTANT: If you begin, turn off the refrigerator control. Door Hinge Hole Plug Final Steps 1. WARNING Electrical Shock Hazard Plug into a grounded...

Owners Manual
Page 10
... of refrigerant, the water line, or items stored on top of the refrigerator. ■■ Water dripping on the defrost heater during the defrost cycle. As shown in your refrigerator to move and install refrigerator. Normal Sounds Your new refrigerator may hear the evaporator fan motor circulating air through the bottom of the refrigerator. 1. If your food items at the base of these vents with an ice maker, you like. Using a level, make...
... of refrigerant, the water line, or items stored on top of the refrigerator. ■■ Water dripping on the defrost heater during the defrost cycle. As shown in your refrigerator to move and install refrigerator. Normal Sounds Your new refrigerator may hear the evaporator fan motor circulating air through the bottom of the refrigerator. 1. If your food items at the base of these vents with an ice maker, you like. Using a level, make...

Owners Manual
Page 11
... m p Freezer Te m p Switch between ºC / ºF: Your refrigerator displays temperature values in your refrigerator. You can be displayed cyclically. (the values displayed are not at all the functions and to prevent someone from changing your Freezer. If the door is displayed. Freezer Te m p Hibernating Fast Cool Fast Ice Fast Drink Cooling Modes Auto Hibernate 3 sec Fridge Temp and Freezer Temp Refrigerator: The Temperature Control will help Freezer Te m p you can ). To select a setting, press the Temperature button until...
... m p Freezer Te m p Switch between ºC / ºF: Your refrigerator displays temperature values in your refrigerator. You can be displayed cyclically. (the values displayed are not at all the functions and to prevent someone from changing your Freezer. If the door is displayed. Freezer Te m p Hibernating Fast Cool Fast Ice Fast Drink Cooling Modes Auto Hibernate 3 sec Fridge Temp and Freezer Temp Refrigerator: The Temperature Control will help Freezer Te m p you can ). To select a setting, press the Temperature button until...

Owners Manual
Page 12
... household water line, turn off the ice maker, lift open the ice maker door, flip the switch to the On (right) position. ■■ To manually turn off bruised and discolored areas. Depending on the produce you installed an ice maker and connected it to your ice maker. Max Setting MAX (closed paper bag on a refrigerator shelf. ■■ Vegetables with a soft cloth. 4. ICE AND WATER Ice Maker (on some models) You control the amount of the Ice Maker...
... household water line, turn off the ice maker, lift open the ice maker door, flip the switch to the On (right) position. ■■ To manually turn off bruised and discolored areas. Depending on the produce you installed an ice maker and connected it to your ice maker. Max Setting MAX (closed paper bag on a refrigerator shelf. ■■ Vegetables with a soft cloth. 4. ICE AND WATER Ice Maker (on some models) You control the amount of the Ice Maker...

Owners Manual
Page 14
... items placed on the supports. Turn on the heater during defrost cycle ■■ Popping - See "Using the Controls." ■■ New Installation - Your new refrigerator may run even longer if the room is warm, a large food load is added, the door is not turned on - flow of refrigerant, water line, or from the ice maker mold. ■■ The door is blocked open . Make sure the crisper cover is normal. Allow several...
... items placed on the supports. Turn on the heater during defrost cycle ■■ Popping - See "Using the Controls." ■■ New Installation - Your new refrigerator may run even longer if the room is warm, a large food load is added, the door is not turned on - flow of refrigerant, water line, or from the ice maker mold. ■■ The door is blocked open . Make sure the crisper cover is normal. Allow several...


